tersmuse
-
Posts
120 -
Joined
-
Last visited
Everything posted by tersmuse
-
 wonderful! Thanks a lot!
 -
The text styles preview mode makes text styles unwieldy. If styles are labeled sensibly, it's easy to get along without preview. Is there a way to disable preview?
-
I have only the CS6 version, there it's like I wrote, each page has the zero point at the top left. It is certainly possible that there are individual settings by country?
-
The same in QuarkXPress. The origin of a spread is the top left corner of a page, not the spread. This is the standard setting. This setting makes more sense. The fact that you can change it in other apps just shows how well thought out the competitors apps are. How to set the values depends on your layout. I prefer the coordinates page by page, because the pages in a book, for example 1 + 16, are designed individually, not as one page. For me it was "unusual" because I know it from InDesign, QuarkXPress, PageDesign, Ventura Publisher ... differently. Maybe Serif will give us a selection one day. Many thanks for your attention, the question is answered. Everyone likes it different.
-
When I work with multiple canvases in Designer, each canvas has its zero point … funny
-
@walt.farrell then I have negative values on the left page in each case. It can never be seriously thought that way. Madness, completely new ways.
-
No, why would I do that if I have a book?
-
@Old Bruce this is how it looks under macOS 12.7 for me, also the right page: why is it different for me? Is it because of any settings?

-
the approach is unusual for old hands, here is a comparison: ID QXP APUB I think you get what I mean why it is difficult to get used to this approach. As a graduate graphic designer, I work exclusively via XY coordinates, for all elements. Now with calculator ;)
-
I know, but in the beginning it was the problem. To help others, text / color management is a constant problem, I added it here.
-
There is a simple way to avoid "colorful" text. 1. create the document (!!!) as it will be printed (CMYK, Color profile: ISO Coated v2 (ECI)) 2. take for text (black) the existing black swatch, it's already 0/0/0/100. The important thing is this: A CMYK document can be exported as RGB without any problems. The other direction (RGB to 4c) is a huge problem. Also to change an existing RGB documents settings afterwards does not work. It must be set up / created accordingly from beginning.
-
When I select a frame, an object on the right page, the dimensions are displayed including the left page. Which setting is needed, that the right page also starts with X = 0 (ZERO). Example: If I create a frame on the left page X = 15, Y = 20. If I create the same frame on the right page, X is plus the page width (perhaps 210): X = 225, Y = 20 That's exhausting with a book (facing pages). How do you change this?
-
I don't understand why a bug that is serious for professionals is placed in a beta? Do you think about what you are doing? The apps are completely unusable, with no working color management. I expect an upgrade right away. Sorry, but that just had to come out.
-
Sad news. For professionals, in this situation the apps are now hardly usable. I hope that this will be fixed soon. As already written, ICC should be included as standard in the apps.
-
In Affinity Apps the default CMYK is "U.S. Web Uncoated v2". In Europe, ISO Coated v2 or older FOGRA profiles are predominantly used. In recent years, I've manually added the ISO profiles after each update upgrade and saved them in the settings, without having opened any file. In version 2.2 of all apps, the profile is not saved. Not in the settings of the apps, and not in the settings of a file. I've tried by saving the ICC profiles in /Library/ColorSync/Profiles/ and /Applications/Affinity Designer.app/Contents/Resources After closing / reopening a file, the profile is no longer available. Is there perhaps a new way of dealing with profiles? Serif Team: For Europe, for European companies, please add the ICC profiles. A must for pros.
-
The answer to my question is: No, it's not possible to have percentage scaling in the Transform panel. Thanks for your replies
-
When I place a graphic in a picture frame, e.g. an .afdesign file. I have in the Transform panel width and height, and the the X/Y coordinates. That's great. In the context bar I see the percentage enlargement, it took me ages to even notice this. I wish that scaling is also displayed in the transform panel. Is there a way to replace scaling? By the way: why is dpi displayed on a pure vector graphic? There are no dots
-
Sorry but I can't do it without comparison. In Photoshop I change the colours of a photo with one click. Image > Mode > Greyscale, that's it! I get a photo that is completely in greyscale (0-100 % K, 0 % C, 0 % M, 0 % Y). In Photo there is another way Convert / Format ICC Profiles ? Generic Gray Gamma 2.2 Profile ? Generic Gray Profile ? Greyscale D50 Rendering Input ? Perceptual ? Relative Colourimetric ? Saturation ? Absolute Colourimetric ? Black Point Compensation No matter which selection I do, I don't get what I need: 0 - 100 % K. Example: I have a shade of green (20, 0, 100, 19) in a graphic. My client receives the graphic in different formats, CMYK, RGB, greyscale and black/white. Black and white are not supported by the Affinity Apps, sad, but another topic. After converting (colour format: grey/8) the CMYK file, I get in Photo the following "greyscales": 29, 22, 22, 6 (Hue). The right value should be around 40 % K, without cyan, yellow and magenta. What am I doing wrong? Why do I not get a true greyscale result for offset printing when converting to grey/8?
-
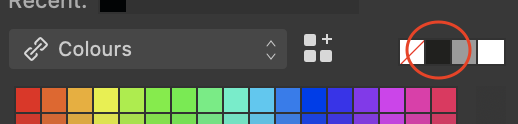
Set CMYK Standard Profile
tersmuse replied to tersmuse's topic in Affinity on Desktop Questions (macOS and Windows)
@NathanC You are right. I took another profile (FOGRA ...) and that was saved. I also had to add ECI manually in version 1 /Applications/Affinity ….app/Contents/Resources I completely deleted version 1 with AppCleaner before installing version 2. After reinstalling version 2, the ECI colour profile was included (see screenshot) in the list, so I didn't add it manually. That was a mistake. I now added the icc files manually in all three apps, selected them – and it is saved. Thanks for the hint!
-
macOS v2 Universal License macOS 10.15.7 I have a question about how to set the colour space in the preferences, not the setting in a single file. The desktop apps Designer, Photo and Publisher do not save the settings I set (without having opened a file). > Preferences > Colour CMYK Colour Profile: U.S. Web Coated (SWOP) v2 I would like to have as standard: ISO Coated v2 (ECI) If I close the app after setting the colours, the app / apps (they behave the same) has again the CMYK colour profile: U.S. Web Coated (SWOP) v2. What can I do to ensure that my in Preferences selected colour profile is saved as default? In version 1 it has worked. Am I doing something wrong?
-
When I open a document and then click on "Save as" after an edit, is there a way to always have the path where the document is located?
-
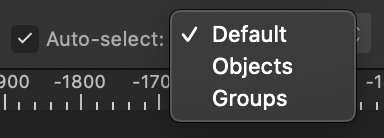
Is there a way to set the new function "Auto-select > Objects" as default? Where can I find the "Default" setting, I can't find it in the Preferences?
-
Mmhhh, I wonder what the developers were thinking. This makes no sense at all. A contour is not a contour when the element which surrounds the contour is missing. Then I do it as in ver. 1 with "Expand Stroke", which works without deleting the source element. # # # I know it's not deleted, I can change the distance. But for the eye it is deleted.
-
Many thanks for your replies. I removed v1 apps via AccCleaner before installing. It works fine, version 2 runs clean.
-
When I do an outline (contour tool), the original disappears. A simple example: I draw a circle with a diameter of 50 mm. I choose the Contour Tool with + 5 mm. I now see two circles in the preview. But when I switch to the Move tool, the origin 50 mm circle disappears. This was already the case in version 1. That's why I never used the contour tool. Surely I'm doing something wrong? How do I get an outline contour without losing the original?