Steven Casey
-
Posts
20 -
Joined
-
Last visited
Everything posted by Steven Casey
-
I'm using Windows 10, and I'm using Affinity Designer 1.8.5.703. About two days ago keyboard shortcuts stopped working. I use the following shortcuts regularly: CRTL+ ", CTRL + X, CTRL+C, CTRL+V, CTRL+Z, all these have stopped working. I can still achieve the same functions via menu's, but it feels very unnatural and slow. I have tried rebooting the computer, and on a few occasions things returned to normal, and then after a time the shortcuts stopped working again. My PC has 16GB of memory and a speed of 2.90 GHz. I don't know what triggers this problem, Is this a known issue? Does anyone know what triggers the bug? Will we have to wait for an update?
-
Create Style - broken in 1.8.0.585
Steven Casey replied to Steven Casey's topic in V1 Bugs found on Windows
Update: In the stroke menu there is an "Order property" with the option to "draw stroke in front" or "draw stroke behind". If you select 'draw stroke behind' it allows you to add a style, even if it has a black outline and no fill. the following information is from Affinity Designer help. "Draw stroke behind hides the inner half of the object's outline behind a closed shape—useful with very small objects or when shrinking outlined text. Draw stroke in front always reveals the whole line." this insight was provided by a friend - NIcolas Terry a fellow origami enthusiast. Previously there was no need to select that option, and it only seems to affect black outlines with no fill. -
Create Style - broken in 1.8.0.585
Steven Casey replied to Steven Casey's topic in V1 Bugs found on Windows
Hi Rondem, I tested your theory, and it proved to be correct. So more accurately if the line is black 100%, without fill ( normal ) , you cannot add the style to the style menu. If you add a fill you can add the style.. And if you open the appearance menu and duplicate the line only, not the empty fill, you can add the style. And if you uncheck the empty fill in the appearance menu, you can add the style. So it's the black line with * no fill / normal * enabled that is the issue. Thank you for the insight. Still it shouldn't work that way. Thanks, Steve Casey -
Create Style - broken in 1.8.0.585
Steven Casey replied to Steven Casey's topic in V1 Bugs found on Windows
Hi Sean, Try this exercise , create a line style, say in a blue, and add it. Change the colour to green, and then add it. Now change the colour to black 100% and try adding it. This is what I observed, the styles created in colour will be added to the style panel. The black coloured line style will not be added. Also if you create a line style in any colour 'other than black 100%' you can add it more than once. In earlier version of Designer there was no issue adding custom line styles created with black 100%. I have only just discovered the issue was with black 100% outlines. I haven't tested fills. Can you see if you can duplicate my findings. Thanks! -
In the latest release of Affinity Designer (1.8.0.585 ), Create Styles is not working. When you right click and select 'create style' nothing happens. When you select 'Add style from selection' from the style panel, again nothing happens. Update: I tried some things as a work around. Currently a new style category can be created. I was able to add 'one' style to the new category, but only one! So currently it seems you can add a single style to a newly created 'style category', and you can create many style categories. This is only a work around, not the way it's supposed to work.
-
In the layers panel select the 'Screen' blend mode or try other blend modes as a temporary work around. The default blend mode is 'Normal', but seems to distort shapes and lines as in my example. Setting blend mode to screen worked for my printing issue. Hope it works for you. Although it's not a permanent solution.
-
Hi Sean, please see attached images of printouts. Printer HL-2142 DPI 300 In Print Dialog: Profile = Custom ( default setting ) Range - Artboards Pages = ( default setting none ) Fit Type = Scale Include = All Sheets Orientation = Automatic Blend Mode = Normal ************************ In Layers Panel Blend mode = Normal Resulting in printouts as below. Setting the print model to Tiled or N-up removed the red preview screen ( there's more than one Artboard). Setting the blend mode to Multiply or Colour Burn ( or possibly anything other than normal) removes the black printouts and distorted lines. Steve

-
Styles not labeled when shown as grid
Steven Casey replied to Steven Casey's topic in V1 Bugs found on Windows
Hi Walt, See images below of ver 1.6.5.123 showing labels - not in list mode
- 8 replies
-
- 2
-

-

-
- labels
- style panel
- (and 1 more)
-
Hi Sean P, I did some tests and determined the following. In the print dialog to print my file, I had to do the following. In the model property box select Tiled or N-up. This avoids the red screen. In the layers panel, I did the following. for the Blend mode: select Screen or Multiply or Colour Burn (possibly other modes). This prints everything correctly without distortions. I'm not sure this is how it was intended, but it works. Steve Casey
-
Could the printing issue I'm experiencing be due to running Windows 7 rather than Windows 10?
-
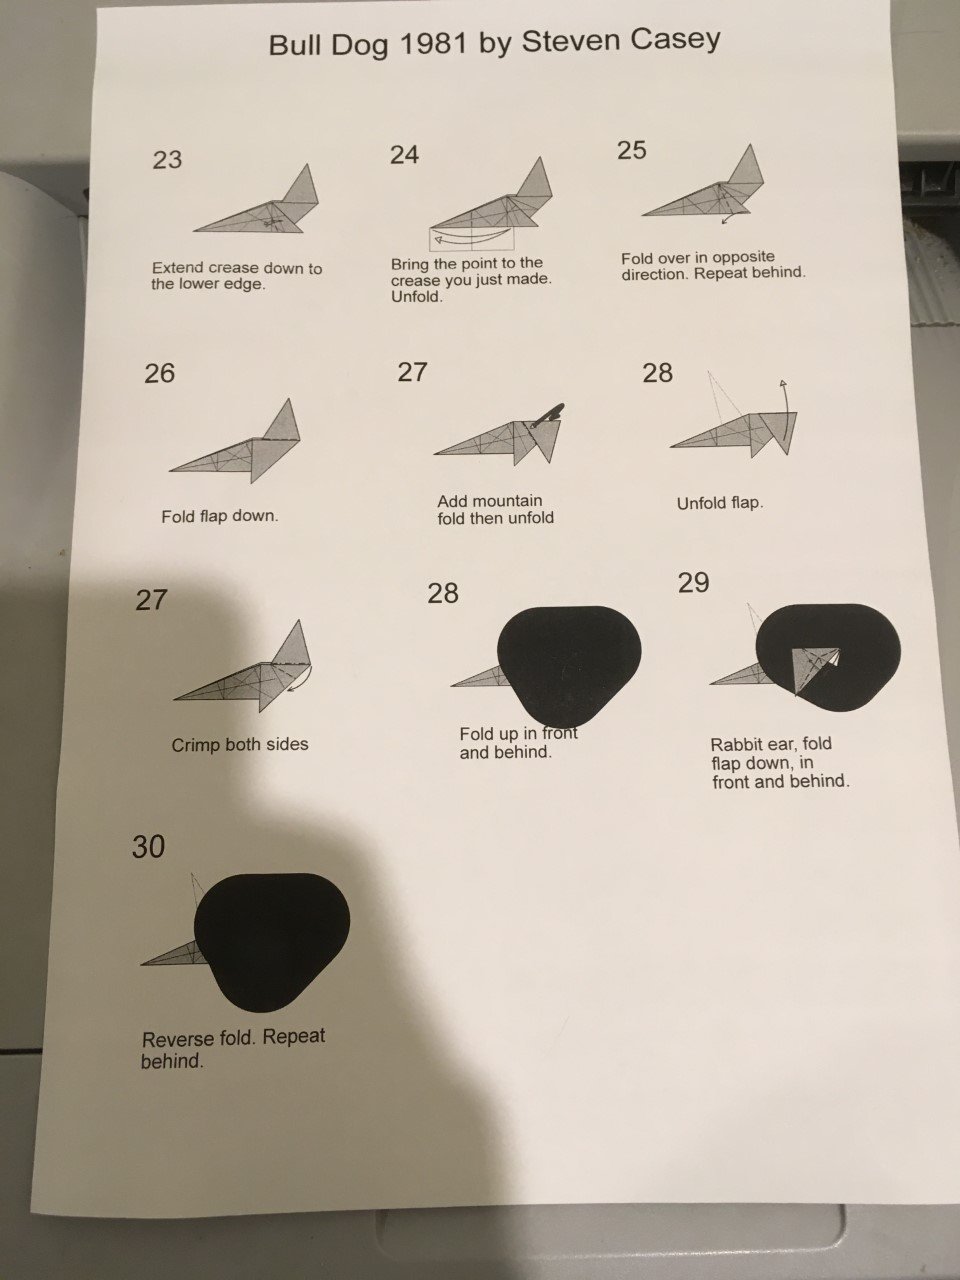
Hi Sean, Thanks for your reply, I have attached the file as requested. Bull Dog 1981 WIP - Reworked Steps.afdesign
-
Styles not labeled when shown as grid
Steven Casey replied to Steven Casey's topic in V1 Bugs found on Windows
Just to clarify, it was the style panel I was referring to. But I was referring to the cogs that represent the style. I slipped up in calling them a symbol. I really hope a label can be enabled in the non list mode.- 8 replies
-
- 1
-
-
- labels
- style panel
- (and 1 more)
-
Styles not labeled when shown as grid
Steven Casey replied to Steven Casey's topic in V1 Bugs found on Windows
Sorry my bad.i was talking about styles. What I said applies to styles not symbols. Everything I mentioned actually applies to the styles panel. I must have been half asleep. I still believe labels should apply when you toggle the list option. That’s how it worked in previous versions, with out the list option. And if not, why even have the option to rename when list mode is disabled. My apologies for the typo. -
Styles not labeled when shown as grid
Steven Casey replied to Steven Casey's topic in V1 Bugs found on Windows
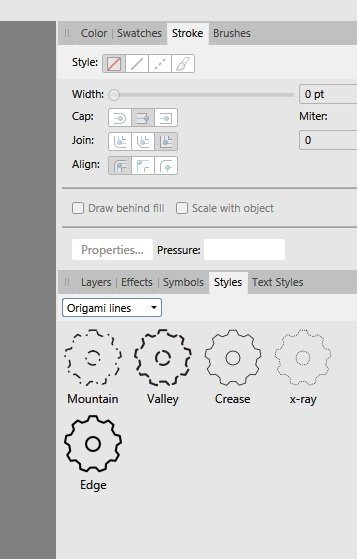
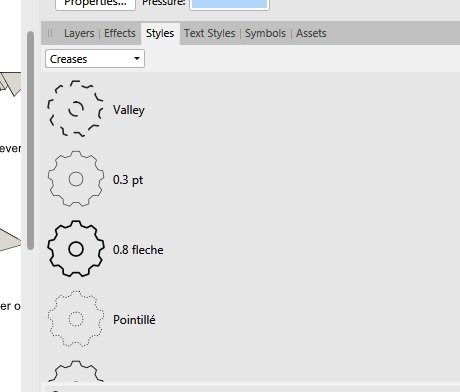
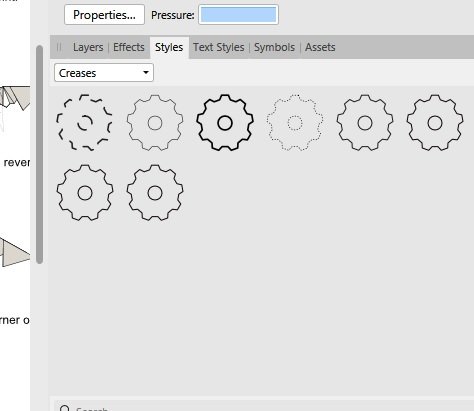
In 1.6 for custom symbols there was no list mode. The symbols were simply created line by line. The was an option to rename the symbol. In the latest version the option still remains. But only shows in list mode. It requires the user to scroll. When not listed at least 3 to 6 symbols are views at once. Having labels is useful to assign line weights and avoid mis selection of line styles. Particularly for my purpose, which is drawing origami diagrams. For consistency and intuitiveness the label are good idea, when you toggle the list option. -
Styles not labeled when shown as grid
Steven Casey replied to Steven Casey's topic in V1 Bugs found on Windows
In 1.6 for custom symbols there was no list mode. The symbols were simply created line by line. The was an option to rename the symbol. In the latest version the option still remains. But only shows in list mode. It requires the user to scroll. When not listed at least 3 to 6 symbols are views at once. Having labels is useful to assign line weights and avoid mis selection of line styles. Particularly for my purpose, which is drawing origami diagrams. For consistency and intuitiveness the label are good idea, when you toggle the list option. -
I loaded a file created in Affinity Designer Version 1.6.5.123 into the latest version 1.7.0.367. When I printed the 6 page document, whole pages where printing dark grey (almost black), some pages OK, and some graphic elements totally distorted. By distorted I mean the line weight was altered, from a .5pt line to a much thicker line when printed. Another thing that stood out, was, in the Print dialog the preview was displayed in a red shade. Is this a feature or a bug? I would prefer to see the preview in the colours as created in the document. Has the current version changed so much that previously created document may not print correctly?
-
In the latest update of Affinity Design ver 1.7.0.367, when you create a new style in the Style Panel, and you choose to *not* show the styles as a list, (As in version 1.6.5.123 ) currently no label is displayed to identify the style.
-
Thank you for the prompt response, RC-R and Alfred. So essentially it's just a bit of fun the programmers put in, and all users will experience the altered icons?. It really obscures some the Origami styles I use, and I was unaware of the feature. I wonder if I could have that feature removed! I deleted some of the imported styles my friend sent me, and re-installed the program, and lost a fair bit of time trying to work out why the panel changed. I guess that could be an issue in a commercial situation. A bit of warning or a message would have been great. So now hopefully there won't be any more surprises. Thanks once again.
-
Recently I received some vector art files from a friend, including his Assets, and Styles FILES. After viewing them in Affinity Designer, I noticed that the standard icons in the Styles panel had been customised into a cat shape, rather than the COG shape that is standard in my version of Affinity, version 1.6.4. I have tried holding down CRTL while loading, and then selecting the reset options in the dialog, and that did not work. Has anyone had a similar issue and resolved it. If so, can you run me through the steps to fix it.