
graphxlord
-
Posts
24 -
Joined
-
Last visited
Posts posted by graphxlord
-
-
23 minutes ago, MikeTO said:
Sorry, if turning off hardware acceleration (Metal) and setting Display to OpenGL didn't fix it for you then I'm out of ideas and Serif will have to assist you.
Good luck.
Would you mind verifying that the screenshot that you were referring to was becca's and not mine so we can at least eliminate that out of the equation. Thanks Mike, greatly appreciate it 🙏
-
On 10/30/2023 at 9:06 AM, MikeTO said:
Deselect the checkbox between Hardware Acceleration and Enable Metal. It's a bit confusing because it has two labels but just turn this off. Then change Display to OpenGL. It should look like the screenshot Becca posted above.
Cheers,
Mike
I made my settings exactly as the screenshot that Becca did. It's now worse than before. The spinning wheel of death spins even longer now. This is for a newly opened file and just simply dragging an asset onto the new document. Can you verify that you are looking at the correct screenshot? Mine has the "About this Mac" included so that it's clear what OS version I am running as well as the make year and model of my newly purchased Apple Macbook Pro. Thank you sir for any help 🙏
-
5 hours ago, MikeTO said:
Hi @BeccaB and welcome to the forums.
Which MBP model do you have, Intel or M1/M2?
I recommend going to Settings > Performance and turning off hardware acceleration > enable metal and changing display to OpenGL.
Does the document have any linked resources? If so, what type? Try renaming them or the folder containing them and then opening the document - don't relink the images when prompted. if that works, try replacing the images with the original files and then saving it and opening it again.
Also please upload a crash report - Serif will want to review that and could then provide better advice.
Good luck.
I'm Having similar issues but your instructions aren't clear to me, How do I turn off Hardware Acceleration and enable Metal? Looks like those 2 things are within the same setting. My issue is that I use Affinity Designer exclusively and I just purchased this macbook, using Sonama 14.1 but unlike my 6 year old macbook that went bye bye recently it shows the spinning wheel of death after each adjustment in any AD project I am working on. What would normally take five minutes is taking 15-20 to complete the task. Could you treat me like I'm from Mars and look at my attached screenshot and let me know what I can adjust to eliminate the issue. Just FYI I spent 3 hours with Apple Care with no success on this issue, I was passed off to 2 different "Higher Ups" and still same issue persist, the spinning wheel of death. I do have a bluetooth mouse and I was using an SD card to save my work on but changed that with a tiny bit of change in performance for a few clicks before returning to the spinning wheel of death at every adjustment, whether major or minor, even changing the spelling of text would cause the Spinning wheel. I also included the 'About this Mac' pop up window so you can see what I am working with make model and screen size. As of this moment everything is up to date with my OS and Affinity Designer is version 2.2
Thank You In Advance Mike for any help you can provide, even what I can do to optimize performance with the slider adjustments in the performance tab. I don't use this Macbook for anything else but Affinity Designer other than occasionally browsing google images for reference material or fonts. I use my ipad for everything else.
🙏🙏🙏

-
Got it working! Thanks Mate!!!
-
I recently started vectoring an object on my desktop (PC) and needed to export it to my ipad. I used google drive to drop the file on and then opened the file up on designer for ipad with Zero problems but when I completed the vector object and tried to export it back to the desktop it keeps exporting the objects as pixels even though I chose "editable" for all aspects of the file it still opens up on the desktop as pixels. Please Help! Thank you in Advance for any help!
-
12 hours ago, IsabelAracama said:
Ok, so here the promised video. I see now reading some of the posts that Alfred thought of the same solution as me, which I find the best so far, so now I hope it's a bit clearer for you to get what we mean with the video itself. Enjoy and like or something! Thanks!
Thank You!! Thank You!!! Thank You!!!! I see others have offered an alternate solution, but since I am not very clear about what it is just by reading it (That's always my problem, I need a visual/video) I will use your method Isabel :-) I am super happy and thankful to you Isabel for doing this :-) I think I could listen to you read the ingredients off of a cereal box LOL, you have a voice that is very easy on the Ears, Affinity should pay you to do all of their Tutorials :-)
Thanks TO ALL of you who have offered contributions, tips, and solutions on this thread!!!! Greatly appreciative of this wonderful Illustration Affinity Community !!!!!!
Happy Creating Guys!!!
-
On 3/27/2018 at 10:01 AM, IsabelAracama said:
Hi graphxlord
Been looking into this as I promised you a few days ago. Please check this attachment and let me know if this is the effect you're looking for. I couldn't read all the thread due to lack of time and not sure if anyone suggested my method before but it took me little time and was quite easy to achieve. If so, I'll do the video as I said the moment I have a sec. As you can see in the image there's no raster for the stroke. I used a workaround to do this as I could not see a way to do this "automatically". Wait for your answer.
Looking forward to the tutorial Isabel :-) Thank You!
-
On 3/27/2018 at 5:04 PM, owenr said:
Another method is to set the text's stroke to centre-aligned and behind fill.
Once you convert the Text to Vector it will revert to the same problem of an overlapping stroke. It's fine if you leave it as text but once you hit (Ctrl Enter) to convert it to (Curves) you get ....
-
3 minutes ago, R C-R said:
I don't make tutorial videos for several reasons. The most significant one is that sadly, I have never mastered the necessary skills needed to produce ones that are clear, concise, & to the point. In less than an hour I can create & edit illustrations like the ones in this discussion that (hopefully) are easy to understand, but it would take me days to make a video that accomplished that half as well.
Not to worry my friend I actually have forwarded this thread to a person on youtube that does a lot of Affinity tutorials, her name is Isabel, I am waiting on a reply from her as we speak and hopefully she'll be up for the task. As soon as I hear from her I'll let all within this thread know with a post. Thank you again for your input and contributions to this topic. Much Appreciated!
-
20 hours ago, R C-R said:
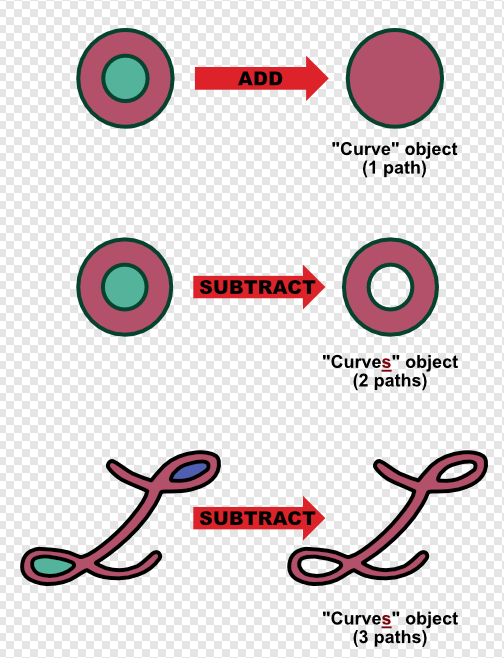
Hi @graphxlord! Regarding operations that make holes or loops in shapes, this illustration may help:
As it shows, the Add operation just deletes a shape that is fully enclosed by another shape, so that is obviously not what you want. But subtracting a shape from one that encloses it creates a "Curves" layer with the path of the smaller object defining the shape of the hole. This also works if you subtract several shapes from one that incloses all of them, as with the "L" shape. For this to work properly, note that the stacking order in the Layers panel is important: the enclosing shape must be below the enclosed ones.
You also must perform the subtraction operation on each set of enclosed shapes & the one that encloses them separately (like the 2 loop shapes & the enclosing 'loopless' one of the "L" shape). So for example, from your first screenshot the W & L outline shape is an enclosing one & the two loops of the L are its enclosed ones that should be subtracted from it. It is hard to tell exactly how your layers are organized, but most likely those three shapes are all part of one "Curves" layer. If so, use the Divide operation on that layer, make sure the 2 loop shapes are above the outline shape, select all 3 & subtract to get that part of the logo into its own "Curves" layer that preserves the loops.
It is hard to tell from the screenshot how many shapes are in the "ar" part but the basic procedure is the same: divide any "Curves" it includes as needed to break it down into individual enclosed & enclosing "Curve" layers, place all the enclosed ones above the enclosing one, select them all, & subtract to get a "Curves" layer that preserves the loops. Do the same separately for the "ords" part, & if you want you can group the 3 resulting "Curves" layers (WL, ar, & ords) together to make it easier to edit them as if they were a single object.
My apologies if I am covering anything you already know about, but I hope this will help with anything you don't.
No apologies necessary RC, I do a ton of lettering in both printing and embroidering, so I know that this thread will come in handy again and again. I am a huge fan of a going over material even if I think I may know it already, the possibility that I may have missed something is very high. I thank you for being thorough. You are clearly great at being very detailed in your explanation and I urge you to do a video because based upon the responses within this thread there is a real need for it. The problem for me as an artist I am a visual and an auditory learner. Once you go beyond 3 steps in the written form I start to get a bit overwhelmed and can lose track of where I was and where I need to go. So 85% of the time I am going to get the full understanding from a youtube clip coupled with the written. It's just how I have always learned. So please do consider a youtube video RC :-) Thank You!
-
3 minutes ago, MikeW said:
https://forum.affinity.serif.com/index.php?/topic/56065-script-font-overlap-transparency-issue/
This is as regards just the letter overlap on a connecting script.
Exactly, I def see this guys issue, unfortunately the issues for me begin when you add a stroke. The Stroke will be visible on the neighboring letter instead of the stroke finding the outer most line of the scripted text. I hopefully have found the solution as I have described above with the using "erase" in Blend mode.
-
5 minutes ago, owenr said:
Did you not get the required result by following my instructions which you gave a "like"?
No Owen, It just stroked the individual letters and they overlapped each other, that wasn't the look I was going for. I liked your instructions for how they sounded, simple. Unfortunately, the didn't get the desired effect in the end.
-
7 minutes ago, Alfred said:
I’m confused, @graphxlord. You previously said that you got lost halfway through my method, so in what sense did it work for you?
Sorry Bud, here is what I used from you, "Alternatively, ungroup the group and 'Divide', which will give you separate shapes for the "holes"."
At that point I just found the holes or loops and selected them, then I went to the blend mode and chose "Erase" and it Worked
-
1 hour ago, MikeW said:
Type a new text string. Group the text. Seems dumb, but do it. Now add your outline.
Tried it, loved the simplicity of it but just did not work for me, if you actually can get this shortcut to work please make a video. So far using the technique described by Alfred plus using the blend mode and selecting "Erase" has been the only method that has personally worked for me.
-
26 minutes ago, Alfred said:
Alternatively, ungroup the group and 'Divide', which will give you separate shapes for the "holes". Now 'Add' the "holes" and cut them to the clipboard, and then 'Add' the remaining shapes, paste the "holes" back in again and 'Subtract' them.
I got lost about half way through this one Alfred but I remembered that I can use the Blend Mode and Select "Erase" where the holes are and that did the trick!!!
YAY! Thank You Gentlemen for your assistance! -
37 minutes ago, owenr said:
After converting the text to curves, which creates a group, select all of the objects inside the group except for the "holes" and do Add.
Drag the newly created object to the bottom inside the group, so all of the "holes" are above it, then select everything inside the group and do Subtract.
Now the "holes" will have been cut out.
I have attempted this but when I convert to curves there are no "holes" separate from the letters, there are only letters.
-
Is there not a way to just "tear" a hole into the "D A L" and just create new loops?
For example, in PS I can just hold down the ALT key to drag an elliptical object to create a negative space in the existing vector object.
Do we not possess a similar short cut in AD? Thanks Guys!
-
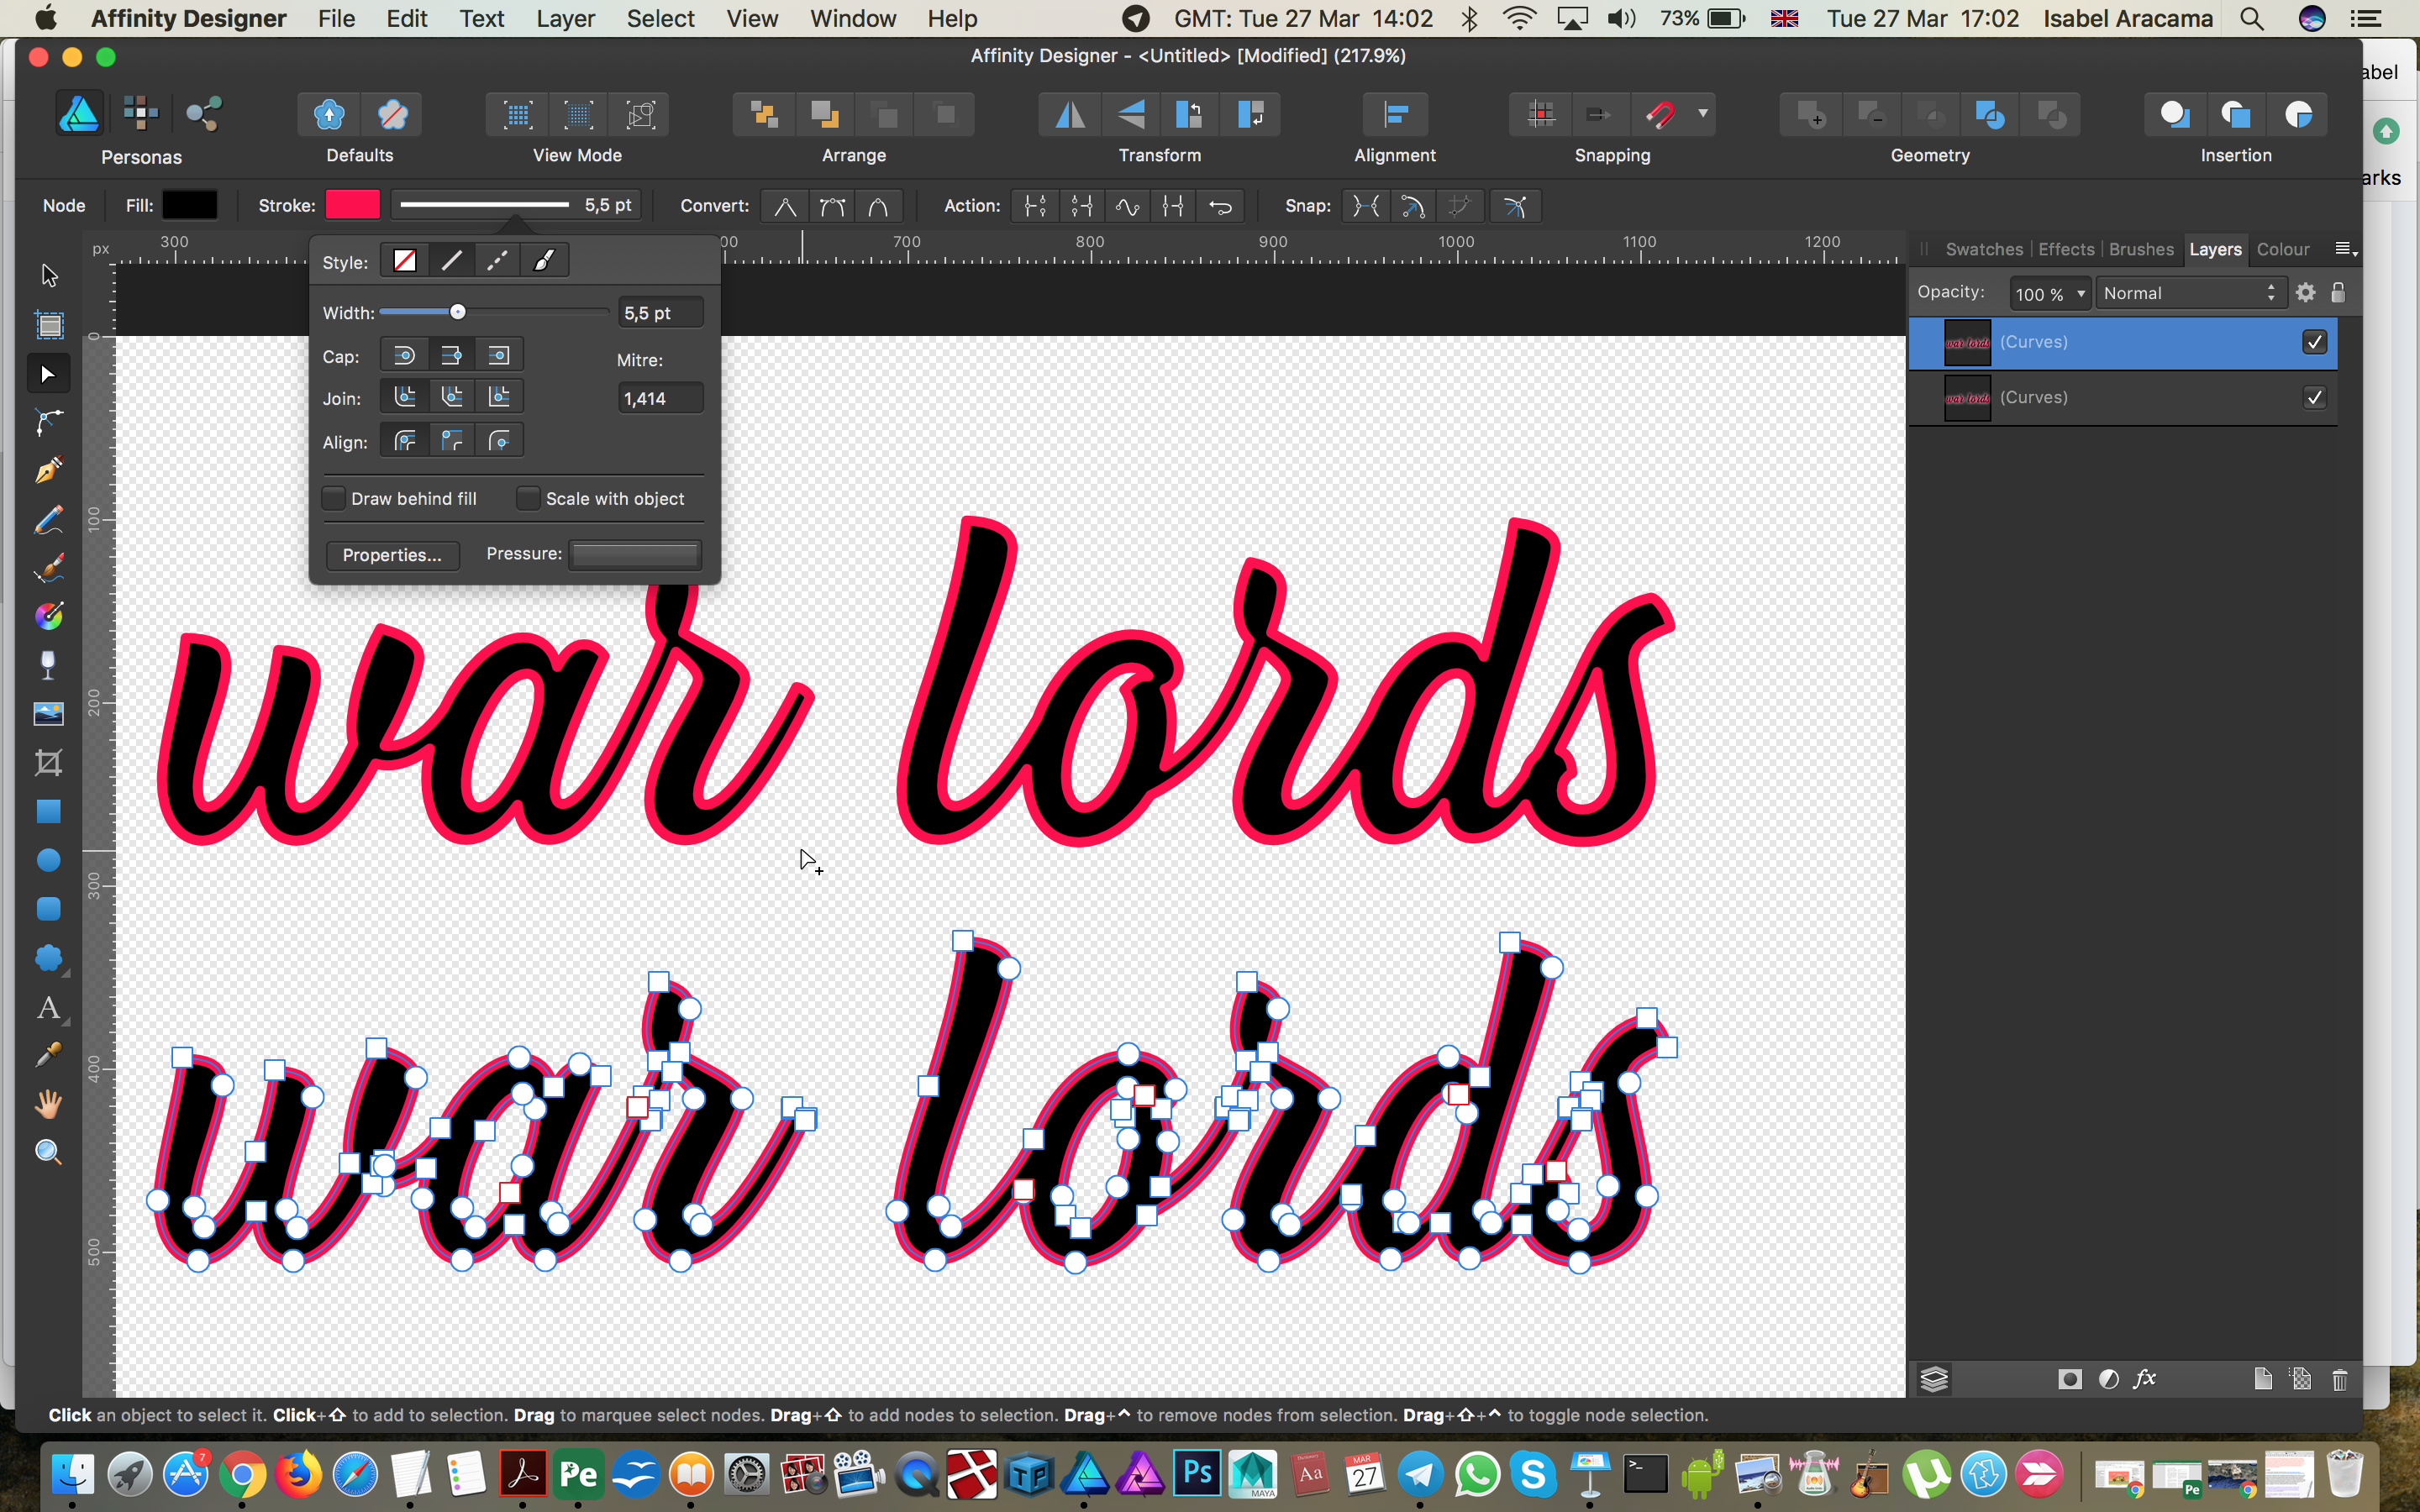
I have a script with several letters that I need to combine and then stroke, I must combine them or else the stroke is overlapping other letters and does not achieve the desired effect. The problem I am having when Combining or Adding from the OPERATIONS tools the center of the Loops in the letters aren't being knocked out, except for the "o" in the word "Lord". I am stuck and I can not figure out what I am doing wrong. Please Help :-) Thank You!
Please take a look at the screenshots below...
-
8 hours ago, Alfred said:
It’s on the Affinity Designer Feature Roadmap.
Excellent! Looking Forward To it's inclusion!
-
On 3/14/2018 at 11:08 AM, Alfred said:
No, it's not the same at all! A tracing tool would find all the shape boundaries in a bitmap image and create closed curves to mark those boundaries. The 'Convert Pixel selection to Vector shape' feature will simply take a "marching ants" selection and create a vector shape to match.
That's interesting, Can you point me to where I can find the 'Convert Pixel selection to Vector shape' feature in AD, thank you :-)
-
WOW!!!!!!!!!!!!!!!!!!!!!!!!!!!!!!
I just feel like I got a whole Brand New Program just now, BRO! If you could have seen the look on my face when I discovered the icon / assets list LOL, like I was 10 yrs old on xmas and I just got a daisy rider BB-Gun LMAO
Best $50 I ever spent LOL Ok so the boolean operation sounds very technical but I'd like to give it a shot. Because if I am designing a bird that has like 200 feathers I'd much prefer they be on the same object layer especially if I am adding to my brand newly discovered vector library Could you point me to a tutorial? Thank you again! Loving this program so far :-)
-
Hey Love all the communication between users and developers, certainly a winning business model in my book, unlike Adobe. I read in a much older forum about a vector tracing tool that was in development back in 2014. I was unable to see anything more about it, what ever happened to that I do I actually have it and just don't know it, LOL. I just bought AD yesterday so forgive me if I am a bit behind but reading in the forums is certainly inspirational :-) Thank You!
-
Hey Guys, long time PS user, 18+ years to be exact. I put off learning Ai for ever and when I finally decided to learn Adobe's business model pretty much put the brakes on that ever happening. To say I am disgusted with Adobe would be an understatement. I have some high hopes for Affinity Designer. I am glad to see aggressive and constant improvements to AD. After spending most of the day getting to know AD I was pleased that I could typically find answers either here or on Youtube. So being that I am here in the Suggestions thread I do have one MAJOR request and one Minor request.
1) A vector library that I can add to, preferably one that will recognize .csh files that I have accumulated over the years. Some from other users and some I've made myself. We already have the basic basic circle, triangle, square etc etc in AD but we need the ability to save new vector shapes for future use that is easily accessible. It would be great for the vector library to have an open source community data base so we can contribute and share with others. When I design a complex vector shape I appreciate the ability to save it and even improve upon it at will the way that I can in PS.
2) The ability to put two different / even multiple vector shapes on one layer. Making a new layer every time you create a vector shape can be hell when you have to comb back through a list trying to discover even a minor flaw.
To me those two improvements would put AD in an advanced stage of development. I'd be willing to pay another $50 or even $100 just to have a vector library as an add'on feature. It is that important to me. Thank you and I look forward to growing with this community! CHEERS!
GraphXlord


.png.38af93ff2f6120f6acdcc5f770dbff99.png)
.png.d39686ffc6539b7ff6c1a3ddddb0790f.png)
.png.1c22b99f4b1be08527c34961845d9439.png)
Affinity Publisher Crashing
in V2 Bugs found on macOS
Posted
I have reduced it and it was super slow, but when I adjust it to a ram speed I know I don't have it runs smoother and quicker but the spinning wheel is still happening just not at the rate when I use the lower settings as you suggested. Would love input from the Dev team on how that is possible and perhaps maybe even find the source of what plagues most of us with similar issues. I do appreciate all of your input.