
.jpg.9274236b630350889981c47c0c25851a.jpg)
Ricardo Sandoval
-
Posts
43 -
Joined
-
Last visited
Posts posted by Ricardo Sandoval
-
-
Hi everyone;I have problem with last version 1.9.1 of Affinity Photo on iMac i cant export my files whole time crash the aplication....Anyone have same problems and anyone know how solve it??.Any know if we can downgrade if is not possible solve this problem, because i prefer continue with 1.8 at least is stable version.
-
1 hour ago, David in Яuislip said:
Not yet but you are half way there. Do not edit the xml file. The information you are trying to include is actually a report by Exiftool of a corrected 85mm file
Yes.
On Windows I have the Exiftool program in a folder, there is no installation prrocedure. I then set a path to that folder in the environmental variables. Then I would open the folder containing the images, open a Powershell window and do
exiftool -lenstype2#=32823 -lenstype3#=32823 *.ARW
which will process every file in that folder. I am sorry but I have no idea how to do that on a Mac but this
https://www.exiftool.org/install.html
may help. Good luck
Thx ill read this last link of exiftool install
thx so much for your help
-
3 hours ago, David in Яuislip said:
You can persuade Photo to apply an existing, similar lens correction instead
Download the relevant fie from https://github.com/lensfun/lensfun/blob/master/data/db/mil-samyang.xml
Modify the model descriptions
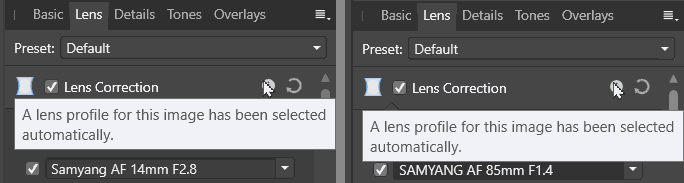
<model>Samyang AF 14mm F2.8</model> - was Samyang 14mm f/2.8 AE ED AS IF UMC
<model>SAMYANG AF 85mm F1.4</model> - was Samyang 85mm f/1.4 IF UMC AsphericalThe attached xml file contains these changes so load it into Photo's Lens Profiles Folder. Preferences\General\click button
Restart PhotoThat's enough for the 14mm lens but the 85 needs a bit more help as the exif data is so mangled. Exiftool to the rescue available here https://exiftool.org/
exiftool -lens* 85.ARW
displays:
Lens Type : E-Mount, T-Mount, Other Lens or no lens
Lens Spec : E 85mm F1.4
Lens Zoom Position : 0%
Lens Mount 2 : E-mount
Lens Type 3 : Samyang AF 35mm F1.4
Lens E-mount Version : 1.70
Lens Firmware Version : Ver.03.002
Lens Mount : E-mount
Lens Format : Full-frame
Lens Type 2 : Samyang AF 35mm F1.4
Lens Spec Features : E
Lens Info : 85mm f/1.4
Lens Model : SAMYANG AF 85mm F1.4
Lens ID : Samyang AF 35mm F1.4To fix this do
exiftool -lenstype2#=32823 -lenstype3#=32823 85.ARW
and you'll see:
Lens Type : E-Mount, T-Mount, Other Lens or no lens
Lens Spec : E 85mm F1.4
Lens Zoom Position : 0%
Lens Mount 2 : E-mount
Lens Type 3 : Sony FE 85mm F1.4 GM or Samyang AF 85mm F1.4
Lens E-mount Version : 1.70
Lens Firmware Version : Ver.03.002
Lens Mount : E-mount
Lens Format : Full-frame
Lens Type 2 : Sony FE 85mm F1.4 GM or Samyang AF 85mm F1.4
Lens Spec Features : E
Lens Info : 85mm f/1.4
Lens Model : SAMYANG AF 85mm F1.4
Lens ID : Samyang AF 85mm F1.432823 is the lens number from https://exiftool.org/TagNames/Sony.html

First at all thanks for your help....
I don't found how download this file https://github.com/lensfun/lensfun/blob/master/data/db/mil-samyang.xml
I download the file that you let me at the end of the post Samyang1485.xml and i place it in "Lens Profiles Folder" as you indicate me.
This works pefect for Samyang 14mm F2.8 files now the program change the wrong 35mm for correct 14mm profile.
But with 85mm i don't understand so much what i have to do. I have to apply this command " exiftool -lenstype2#=32823 -lenstype3#=32823 *******.ARW) for each file who i want to edit??? , because i tried to edit the file Samyang1485.xml to include this :
-
Lens Type : E-Mount, T-Mount, Other Lens or no lens
Lens Spec : E 85mm F1.4
Lens Zoom Position : 0%
Lens Mount 2 : E-mount
Lens Type 3 : Sony FE 85mm F1.4 GM or Samyang AF 85mm F1.4
Lens E-mount Version : 1.70
Lens Firmware Version : Ver.03.002
Lens Mount : E-mount
Lens Format : Full-frame
Lens Type 2 : Sony FE 85mm F1.4 GM or Samyang AF 85mm F1.4
Lens Spec Features : E
Lens Info : 85mm f/1.4
Lens Model : SAMYANG AF 85mm F1.4
Lens ID : Samyang AF 85mm F1.4
but i can't i really donkt know how doit.
Sorry for inconvenience but im noob with all these issues.
THX SO MUCH AGAIN
-
Lens Type : E-Mount, T-Mount, Other Lens or no lens
-
23 minutes ago, walt.farrell said:
The 1.9 beta includes a function to save the arrangement of the Studio panels. It does not (yet?) cover other functions like location of the Tools panel; only the panels that are part of the Studio menu.
Hi @walt.farrell,
I hope they improve this function on next update in stable version.
Thx for your information.
-
Hi;
Anyone now if is possible save the work space in develope persona same like in Photoshop. I would like to save the arrangement of all the windows and tools. I think its possible because if we can restore the studio i suppose that its possible save.
Thanks.
Ricardo
-
3 hours ago, walt.farrell said:
For Samyang 14mm f2_8.ARW the file EXIF data that seems relevant is
  Lens Type                       : E-Mount, T-Mount, Other Lens or no lens
  Lens Spec                       : E 14mm F2.
  Lens Mount                      : E-mount
  Lens Type 3                     : Samyang AF 14mm F2.8 or Samyang AF 35mm F2.8
  Lens Type 2                     : Samyang AF 14mm F2.8 or Samyang AF 35mm F2.8
  Lens ID                         : Samyang AF 35mm F2.8
  Make                            : SONY
  Camera Model Name               : ILCE-7M3
Photo identifies it by the Lens ID as SAMYANG AF 35MM F2.8.
The Lensfun database has two entries that are similar, but that do not match:
<model>Samyang 14mm f/2.8 AE ED AS IF UMC</model>
One entry is for a cropfactor of 1, the other for 1.523. But note that that AF is missing.
--------
For Samyang 85mm f1_4.ARW:
  Lens Type                       : E-Mount, T-Mount, Other Lens or no lens
  Lens Spec                       : E 85mm F1.4
  Lens Mount                      : E-mount
  Lens Type 3                     : Samyang AF 35mm F1.4
  Lens Type 2                     : Samyang AF 35mm F1.4
  Lens ID                         : Samyang AF 35mm F1.4
  Make                            : SONY
  Camera Model Name               : ILCE-7M3
The strange thing about this one is that you have said it's an 85mm lens, and the Lens Spec field says 85mm, but the camera/lens is reporting the lens type and ID as a 35mm lens. The only entry in the lensfun database for a similar lens is this one:
        <model>Samyang 35mm f/1.4 AS UMC</model>
        <!-- This model is really only available for Nikon.  For the other
             brands, the 35/1.4 may have different characteristics. -->
Note that the model name does not match (which means that Photo won't find it) but also that this lens is only for a Nikon camera.
Result: Basically, both lenses are unknown to Lensfun, and you need to either wait for them to calibrate them and add them to their database, or you need to calibrate them yourself and provide the information to Lensfun for inclusion in their database. The Lensfun website has information about how to ask them to do the calibration, or how to calibrate them yourself.
Hi @walt.farrell thx so much for your help ill try contact with LENSFUN to try include this lenses in the database..
-
Hi @walt.farrell an all who can help me..
As i promised yesterday I attach the link to dropbox of two photos one with Samyang 85mm f1.4 FE and the second with Samyang 14mm f2.8 FE, both of them got it with Sony a7 III.
https://www.dropbox.com/sh/rergbibpwimwuzh/AAC70ZN8rqWGJiWI7CkU0sufa?dl=0
Thx in advanced your your help.
-
On 1/14/2019 at 6:34 PM, smadell said:
I have been reading Dave Straker’s post about Saturation Masks, and the variety of methods he and others have used to construct them. In looking into this further, I stumbled across a web page written by Tony Kuyper, and he describes a really simple way of creating a Saturation Mask using a Selective Color adjustment layer. A link to his web page is included below:
http://goodlight.us/writing/saturationmasks/satmask-1.html
I have attached a Macros Category (import this from the “hamburger” menu on the Library panel) that includes 6 different macros.
Important Note - Because of a bug in the Selective Color adjustment layer, these macros will not work in version 1.6 of Affinity Photo. However, the apparent bug has been squashed in version 1.7, and the macros give the proper results. At this point, use the macros ONLY in the version 1.7 beta and, presumably, in any version which follows it.
Saturation Mask - Greyscale
This macro creates a greyscale version of a saturation mask, based on a “merge visible” pixel layer that takes all of the visible layers into account.
Vibrance Mask - Greyscale
This macro creates a greyscale version of a Vibrance Mask. A vibrance mask is the inverse of a saturation mask, and favors areas of relatively low saturation. Vibrance Masks can be used to apply adjustments, etc. to poorly saturated pixels, while masking that adjustment from highly saturated pixels.
Saturation Mask - Create Mask
This macro creates a Mask layer out of the greyscale version of the mask. The mask is placed at the top of the layer stack, and can be used as needed.
Vibrance Mask - Create Mask
Similar to the above, this macro creates a Mask layer out of the Vibrance Mask greyscale layer.
Fix OVER-Saturated Image
This macro puts a 50% grey fill layer at the top of the layer stack, and sets the Blend Mode to Saturation. Without anything further, this would have the effect of desaturating all of the colors in an image. However, the macro attaches a Saturation Mask to the fill layer, which desaturates the colors relative to their existing saturation level. (More highly saturated pixels are affected more strongly.) Finally, the macro asks the user “How much desaturation?” should be applied. This sets the opacity of the fill layer, and can change the amount of DE-saturation applied.
Fix UNDER-Saturated Image
This macro puts an HSL adjustment layer at the top of the layer stack, and attaches a Vibrance Mask to the adjustment. The macro asks the user “How much saturation?” and this affects the Saturation slider inside the HSL adjustment. The vibrance mask causes the HSL adjustment to be applied more strongly to pixels with low saturation, and minimizes its effect on highly saturated pixels.
Thank you for this work I really miss so much the Tony Kuyper panel in Affinity Photo
-
On 6/19/2020 at 6:31 PM, Tony77 said:
In some videos on the net I have seen "plug-ins" that allow you to select areas of brightness (luminosity masks) through special macros .... then they manage to change the tones of the mask to include or eliminate some unnecessary areas .... like a sky or a foreground.
as I downloaded a mascro that creates the luminosity mask in Aphoto I wanted to know if you can then modify it to increase / decrease the areas you are interested in modifyingHi @Tony77
I'm a new user of Affinity Photo and I miss so much in this program the Tony Kuyper panel who is the action that you mentioned in this post...
Please can you link the videos or the action for the luminosity mask that you said.
Thx
-
Hi Walt thanks for all this information...
Tomorrow I uploaded a photo and you can check this info please I don't understand so much all about exit I tried as other mate in the post said but I don't know if I did well.
Other things who could help is that Adobe Camera Raw recognize the lenses as "Rokinon 14mm 2.8 FE” who is the other name for Samyang lenses....
Thx
-
Any knows other solution to get an auto-select the profile lenses...
I have the assistant correct set up as OLD BRUCE said and my affinity not get any profile for any lenses.
I just try with other Samyang 14mm F2.8 AF and didn't work too... but in Adobe Camera Raw its get correct.
Please any help will be welcomed
Thx
-
29 minutes ago, Ricardo Sandoval said:
Hi;
Can anyone said me the route who i set in the next window to made NIK COLLECTION 3.0.7 work in Affinity Photo.... Its works fine in Photoshop but im not able to made work in Affinity.
I use Affinity in Mac
Thanks so much
Ricardo
I just solved
thx
-
Hi;
Can anyone said me the route who i set in the next window to made NIK COLLECTION 3.0.7 work in Affinity Photo.... Its works fine in Photoshop but im not able to made work in Affinity.
I use Affinity in Mac
Thanks so much
Ricardo
-
Thank you so much for this Pack
-
31 minutes ago, Alfred said:
I’m afraid I don’t understand what you mean by this.
Hi Alfred
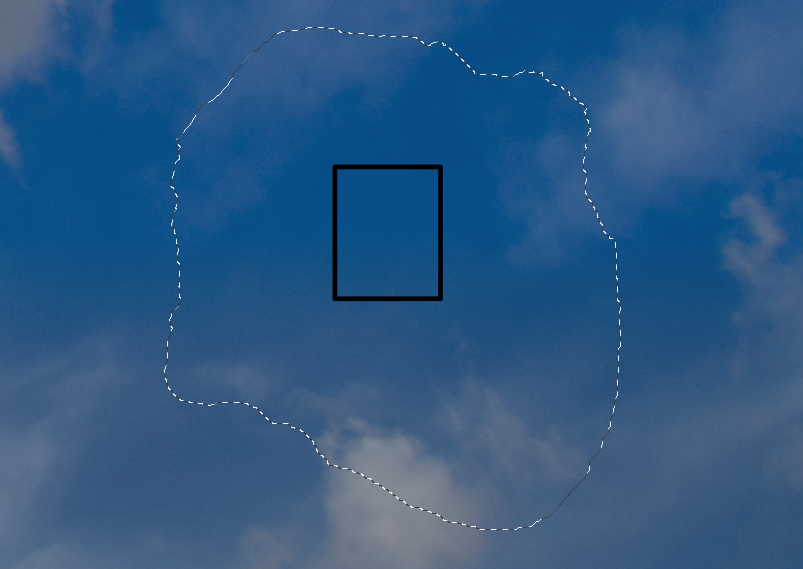
imagine you have an image like a SKY and you did a selection with different blues (deep blue and clear blue) like a degradee and other colors like withe... you need to select just the deep blue in the selection that you're did first. I don't know how did that
I attach you and screenshot.
i just want select the blue who are in the black box who is in the selection for made a mask
Thx
-
10 minutes ago, Alfred said:
You can create pixel masks in Affinity Photo, but a simple way to achieve the result you describe is to duplicate the selected pixels onto their own layer (via Cmd+J or Ctrl+J, depending on whether you’re on Mac or Windows) and then select colours from the new layer.
I dont understand your answer i have same problem tham @London and did exactly the same i need pass through Photoshop.
My problem is that: once i have a selection area and later i want to refine this selection for an specific color, to do a mask i really cant.
thxs
-
this seems is a problem with the list of the lenses who have no profile for that lense.
In other sofware works well.
thx
-
2 hours ago, thomaso said:
You can try to identify the path to an applications folder in the macos finder with right-click on the title bar. This would show its related disk (partition/volume/container)
i have double installation of all software because i upgraded the HDD to an SDD and in the service did a backup
thx for your constant help
-
Hi i
12 hours ago, Kaffeepause said:I share markw's assumption that the second installation is on an external drive or another partition, because in one of the screenshots showing the sidebar there is the drive "Macintosh SSD - Datos".
But I would like to mention one more thought, which probably does not apply to your problem, but is still worth checking.
In macOS there is the possibility to install apps for all users of the Mac or only for a certain user.
So there can be two Applications folders in the system where apps are installed:- in the root directory of the system in "Macintosh HD/Applications"
- in the user's home folder in "Macintosh HD/Users/YourUserName/Applications"
Therefore my suggestion: Check your home folder to see if there is an Applications folder and if there is an installation of Affinity Photo inside.
Based on the screenshots I have come to the assumption that there is an installation of Affinity Photo in the Applications folder in the root directory and ianother installation of Affinity Photo in the Applications folder inside the Home folder. With CMD + I you can find out the version and then delete the old version.
As written, this is just a thought and does not have to apply to your problem, but I didn't want to leave it unmentioned and I think markw's hint ist more accurate.
Hi reading your answer i realice that last year I upgrade my HDD to an SDD drive and the apple support made me a backup partition .... today i uninstalled that partition because i have allready backup in an external disk .... and all the problems with the old version dissapear.
Thx all for your great help.
Regards
-
12 hours ago, anon2 said:
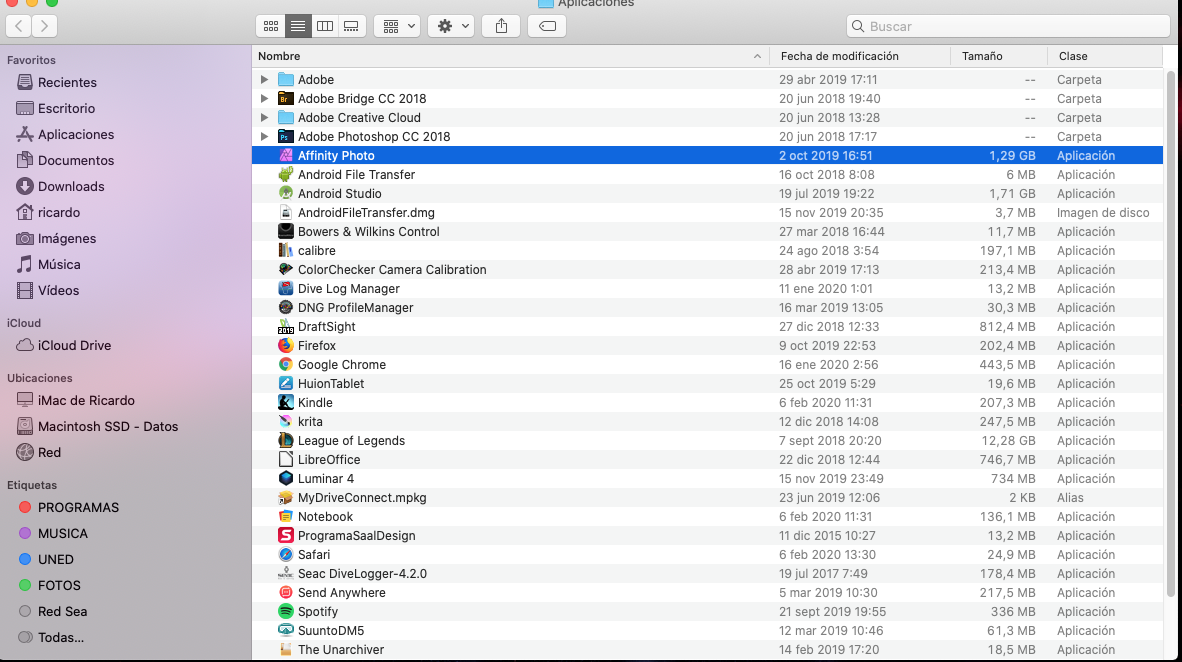
Your screenshots show two folders named Applications. One contains the apps which come with macOS, Affinity Photo (1.8.4 ?), Photoshop 2020 and other apps you have installed. The other contains no macOS apps, Affinity Photo (1.7.3 ?), Photoshop 2018 and other apps you have installed.
Uninstalling AP 1.7.3 is a simple matter of moving it to Trash.
thx for your help Ill try this afternoon
-
8 hours ago, thomaso said:
In macOS another option to detect the file path of a running app is the macOS "Activity Monitor.app":
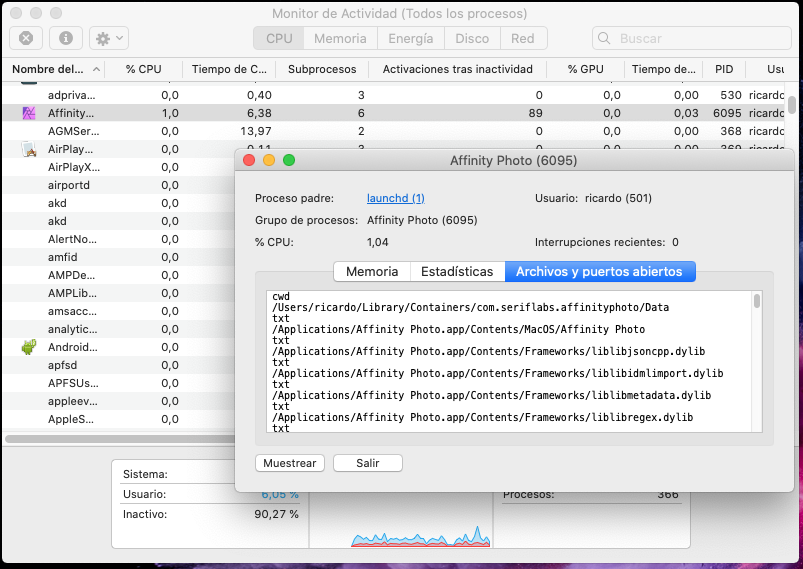
Selected a list entry > "Info" button > "Open files" (...):
Hi;
I did your test and they have differents path as you can see in the 2 screenshots
Version 1.7.3
Version 1.8.4
thx for your help and your patience with my problem.
-
9 hours ago, thomaso said:
(The Right-click > "Show in Finder" menu command appears to cause the same as a CMD-click on the dock icon)
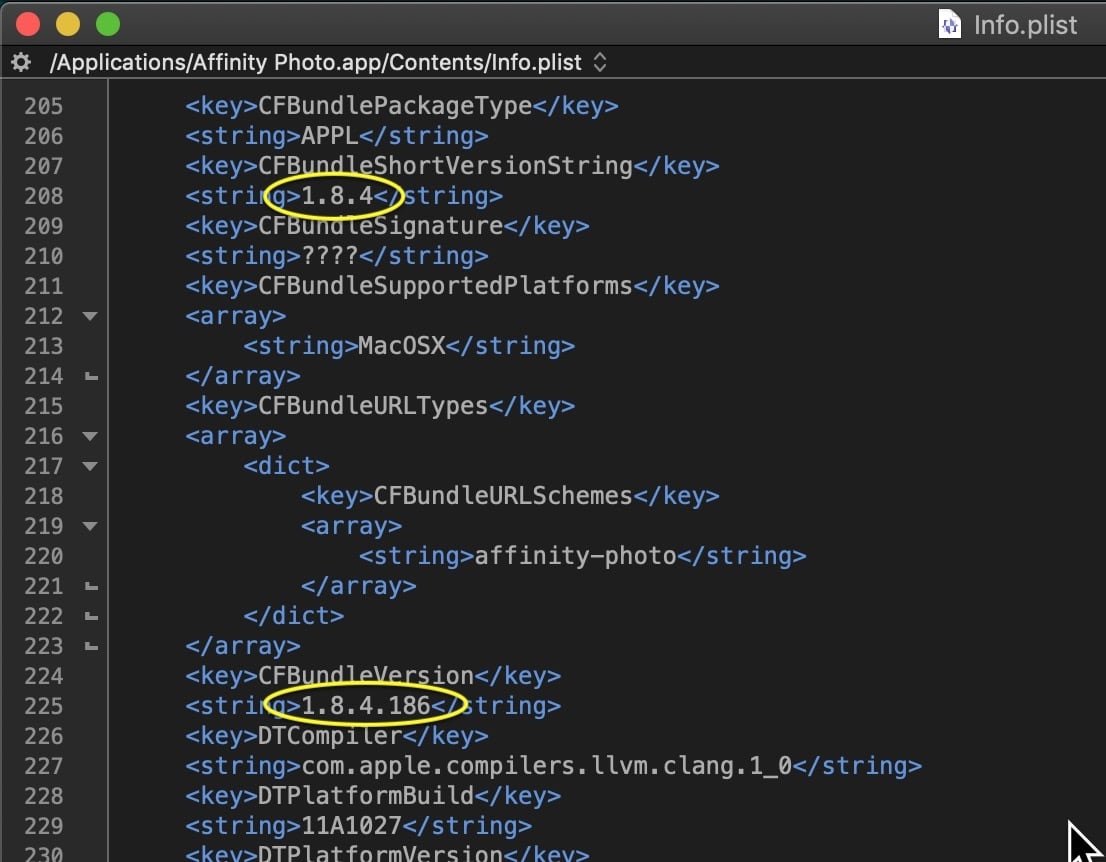
If you open the info.plist in a text editor app:
What app version number / details do you see in the info.plist for "CFBundle(...)"? For instance to me it shows "1.8.4" and "1.8.4.186":
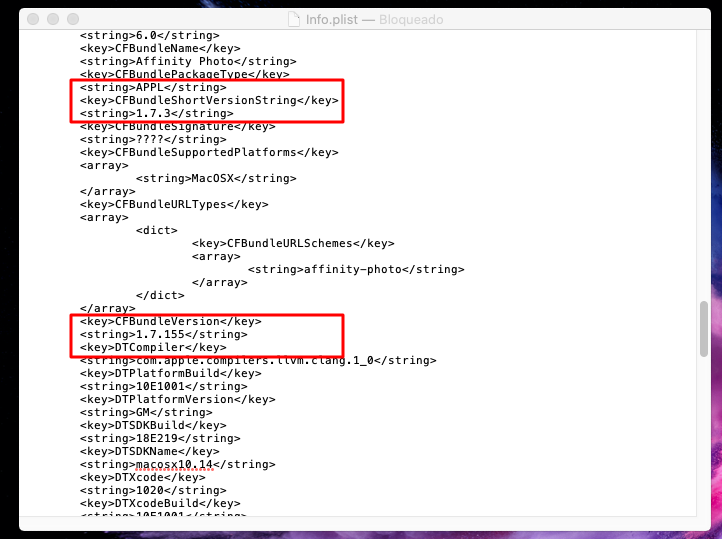
EDIT: If you have the version 1.7.3 opened and 1.8.4 closed: Are there two AP icons? Does one or both show a white dot below the icon? Can you show a screenshot of your dock icons together with the app's "About" info screen?I follow your steps and with version 1.7.3 open the versions as you can see at the screenshot attached were different the first one is 1.7.3 but the second one is 1.7.155
thx for your great effort to help me
-
10 hours ago, Pšenda said:
Thx for your support; and any other option i read that exist a routine to did this action???
Regards
-
4 hours ago, R C-R said:
As @thomaso suggested, open a document with version 1.7.3.
On the Dock there should be an AP icon. Right-click on that icon to pop up a menu & look for a menu item named "Options" with a submenu item named "Show In Finder." Select that. What happens?
Hi R C-R
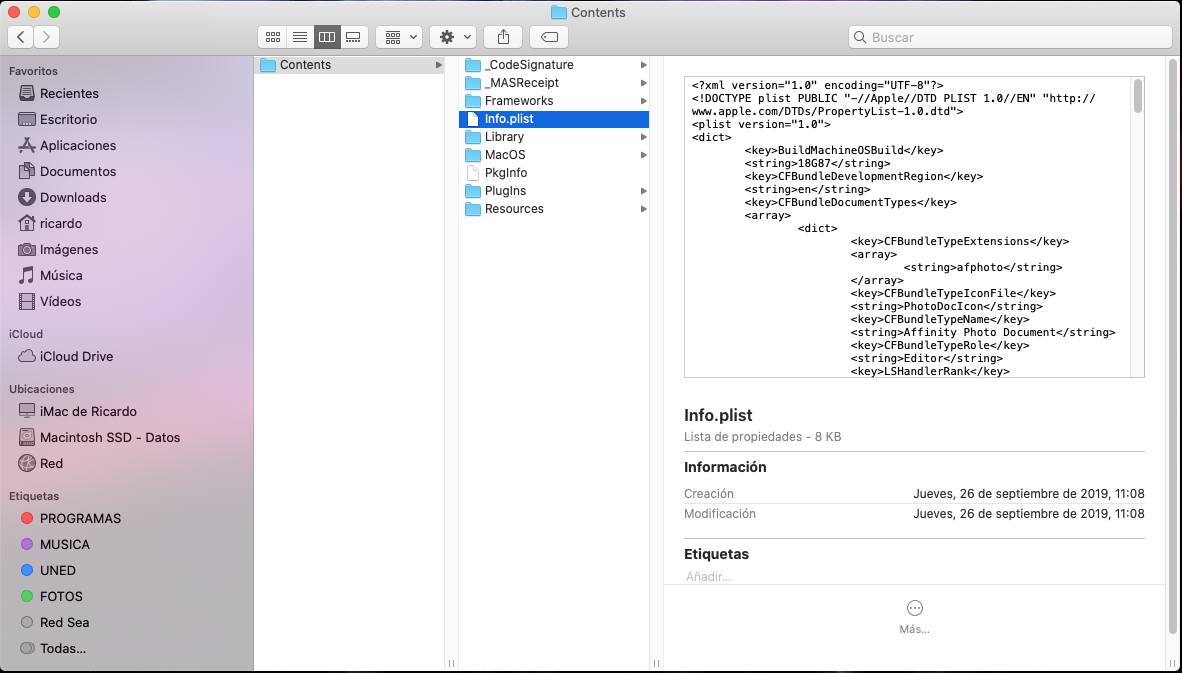
I tested. your suggestion and appear the same in the v 1.7.3 as you can see in the next two screenshots appear this version you can chech in the second one the file is dated on 09/26/2019
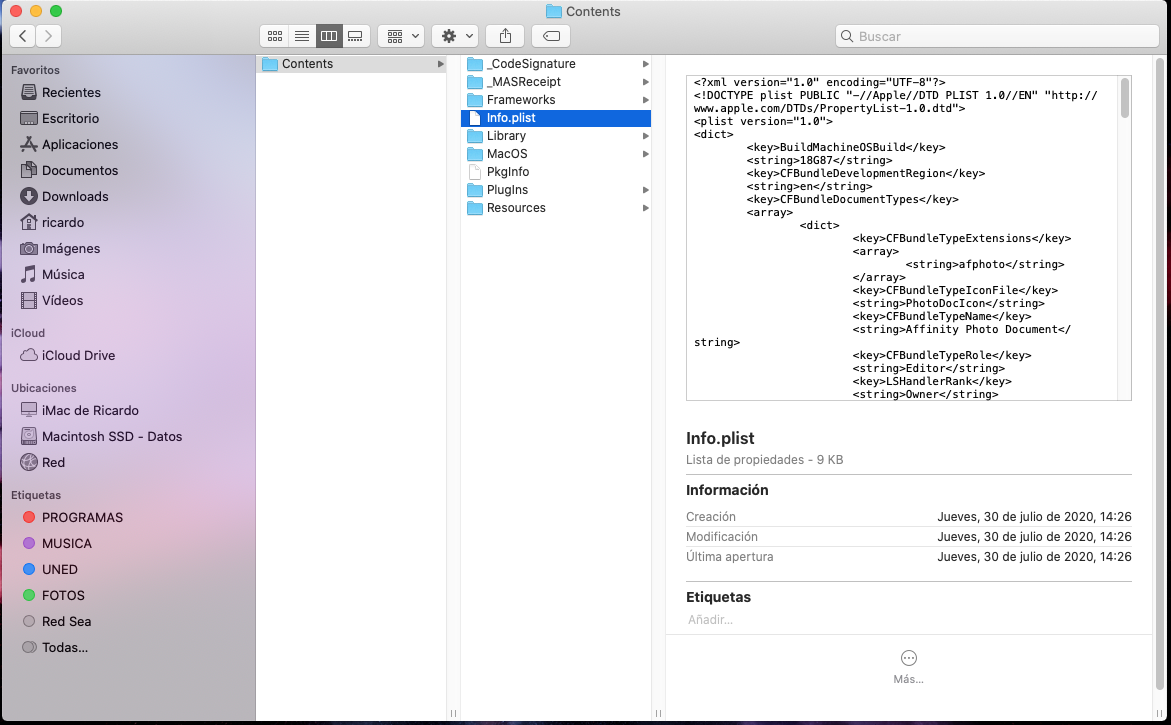
while in the last version 1.8.4 the same file was dated on 07/30/2020
this dates was when i installed this versions so i suppose that two version were installed on my Imac
thx


I can't sing in my account on Affinity
in Pre-V2 Archive of Affinity on Desktop Questions (macOS and Windows)
Posted
I have to reinstall my whole OS on my iMac and now I use the version 1.10.4 of Affinity Photo.
But after reinstall the Affinity its impossible to log in on my account. Allways i get same error "long time to connect"...
Anyone can help me with this error please. Thx in advance.
Ricardo