simonlayfield
-
Posts
80 -
Joined
-
Last visited
Everything posted by simonlayfield
-
 Noticed this has also been posted here, in case it's addressed there any sooner.
 -
Also posted here in case one is addressed sooner than the other
-
Yep I've noticed this a few times when nudging objects in to position. +1 for this.
-
I'd be keen to know if there's any plan for this experience to be enhanced. I can't quite work out from this thread if it's a bug or if this is expected, but if you need to retroactively find the name of a brush used on a path it's basically...well, it's a serious challenge. Here's that experience in a video: https://www.loom.com/share/febf4dfd5e0d478e8309cdb4351b5cba Am I missing something? Is there a way of knowing which brush was used on a path either by name, or by seeing it selected in the panel (which isn't ideal if you have to rummage through a large number of brushes to find the one that's selected but hey ho - better than nothing).
-
Export an artboard don't export bleed
simonlayfield replied to Erider's topic in V1 Bugs found on Windows
I'm struggling with this issue as well and it's probably the biggest speed bump I've hit with Affinity Designer since day one, given that I can't export commissioned print work to the required spec. I could write a longer post airing my frustration, but I don't want to clog up the forum with extraneous ranting. @Sean P Is there any way of knowing when a fix is likely to be implemented and released? -
@Lee D Are you able to confirm whether this bug is affecting bleed when exporting a PDF? I can't for the life of me get the bleed area to show to when exporting from Affinity Designer, and I'm sure it was working before. Include bleed + crop marks selected on export, but PDF shows artwork clipped to Artboard and crop marks aligned to the edge of the artwork, Affinity Designer 1.7.1, MacOS (App Store) Thanks.
-
I'm getting this behaviour too. This can't be as expected, right? What if the bleed area is made up of multiple layers/objects? Do they all need dragging out of their natural placement in the layer/artboard stack? I'm able to see the bleed 'guideline', but View > Clip to Canvas is checked and greyed out so can't toggle that to see the actual bleed content. Exporting whole document as PDF with Include bleed and Crop marks selected results in a PDF with Artboard artwork (bleed not included), and crop marks aligned to the outside of the artwork
-
Thanks a million for uploading this - extremely useful, and saved me digging around on each platform for the specs.
-
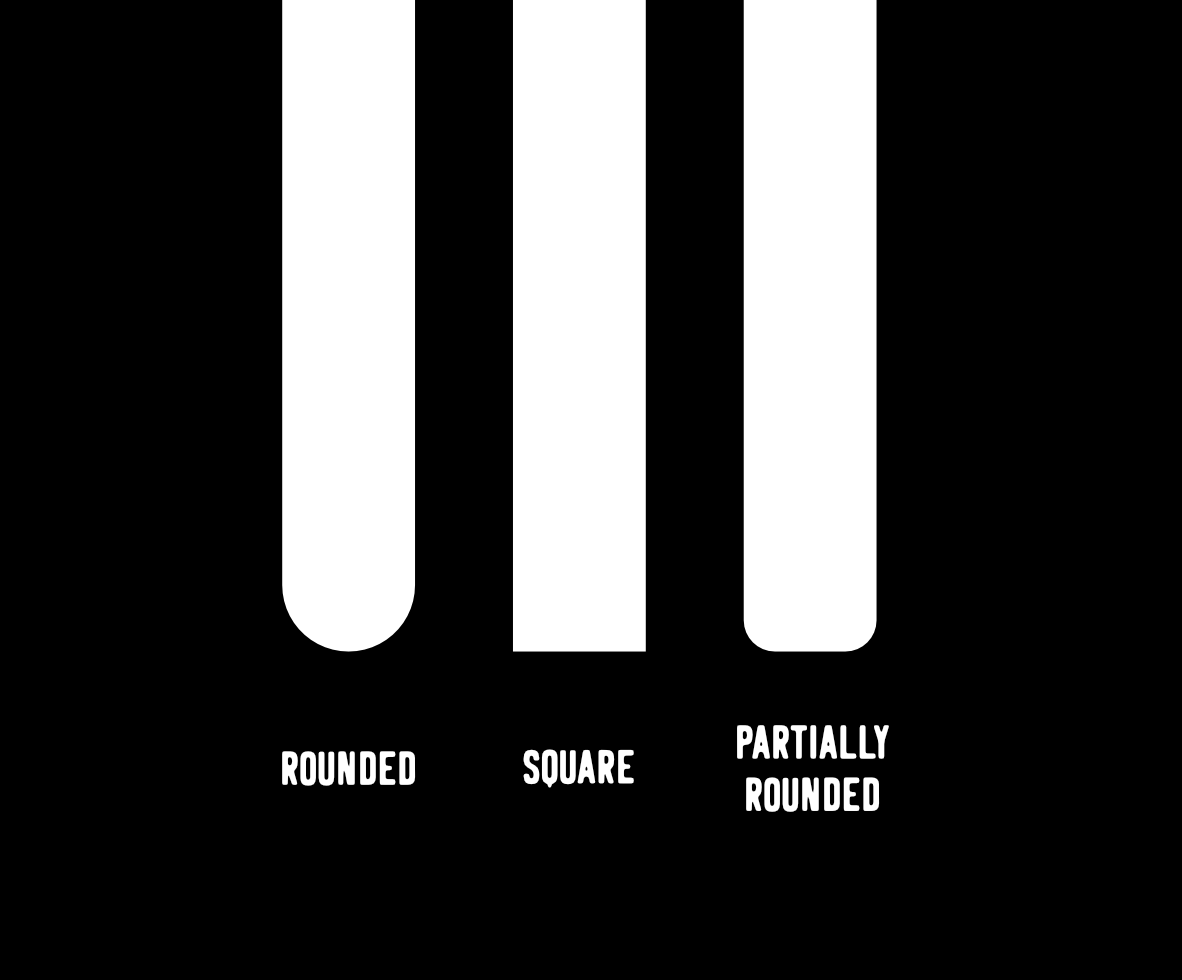
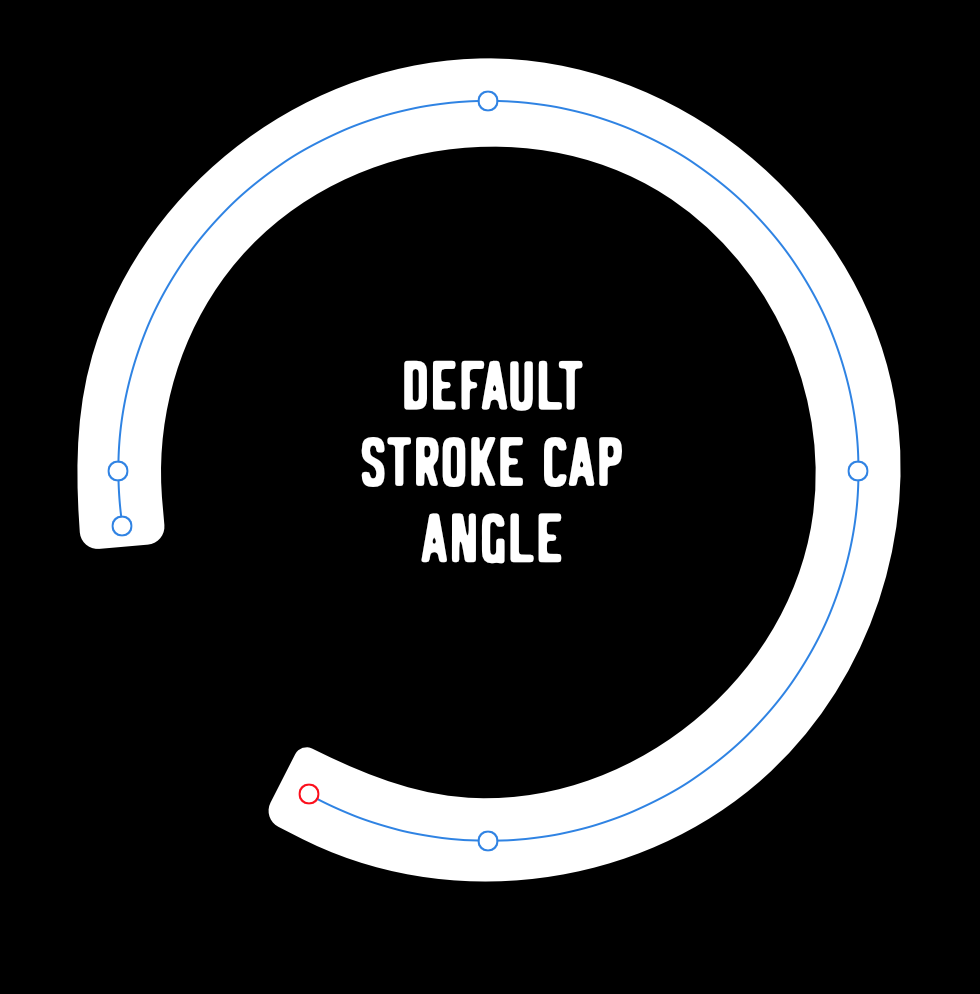
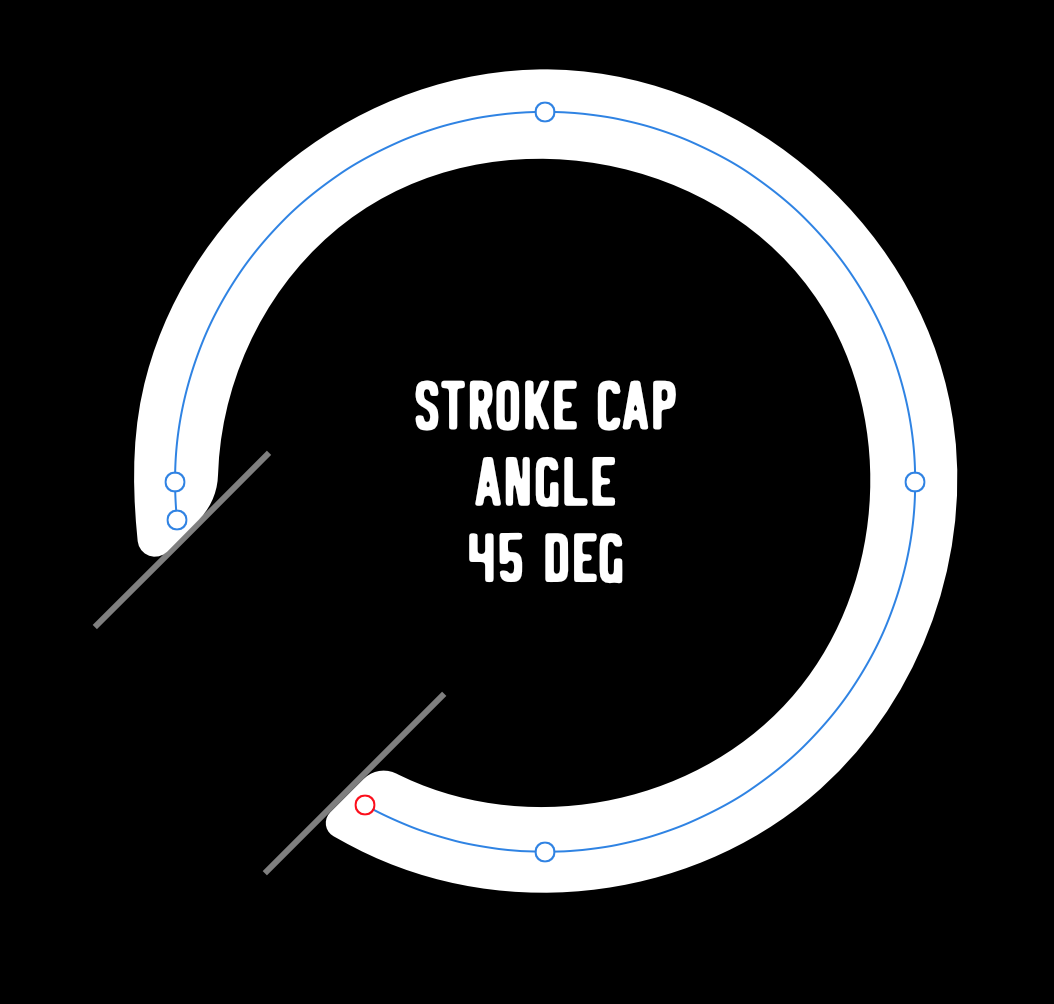
Hi team, I decided to check whether this feature has been requested but I couldn't find anything similar on the forums so apologies if I'm doubling up here. I was creating some artwork today that could have really used partially rounded stroke caps. Currently there's the option to have fully rounded or fully square caps (and butt cap, which is also a square cap) but no option for a variant of the two. I've attached a screenshot illustrating the difference if that's not clear (affinity-stroke-cap-variant.png). Also, an added feature could be the angle of the stroke cap - this would make it a powerful addition to shapes or paths whose angles or ends need to be something other than a flat, squared off (or rounded) end. Let's call this 'Stroke Cap Angle'? I've kind of mocked it up in the attachments to illustrate the resulting effect. I haven't thought this through thoroughly but it was a feature I felt would be very useful, avoiding the need to expand strokes which allows you to round the corners of an expanded path but you lose the benefit of it being a stroke.

-
Replace Symbol functionality
simonlayfield replied to simonlayfield's topic in Feedback for Affinity Designer V1 on Desktop
Yeah sorry this is what I meant when I said it's possible to replace all by replacing symbol contents. But, say, if you only want to replace some (not all) of them, then it's fiddly work. In my case, I want to try different colourways for designs, with multiple artboards containing multiple instances of that design. Once I have a full set of boards in one colourway then I want to duplicate those artboards and change the colours of the design (Symbol). But I can't do this without detaching the Symbols, recreating a new Symbol and repositioning it in each place on the new Artboards. If I was able to replace a Symbol with another, then I could keep the new Artboard symbols positioned as is, duplicate the original Symbol as a new one and then (drag and replace?) the new Symbol to replace them individually (or even better select in Layers panel, right click, Replace Symbol). Does that make sense? -
Hi team, I was just wondering if there's a way to replace multiple Symbol instances with a different Symbol? I can't find a way to do this, to basically swap out a selection of Symbol instances. Obviously I know that you can detach and recreate a Symbol, thus effectively duplicating it and then replacing the content of that Symbol - but this doesn't quite provide the same control as being able to swap multiple existing symbol instances with a different Symbol. An example of this would be swapping a number of icons (existing symbols) in a UI with a different icon, maintaining proportion and position on the Artboard - rather than dragging, resizing and repositioning a different icon from the Symbols panel. I'm not sure if this feature has already been requested, or if it's been, or being, considered. Thanks
- 39 replies
-
- 11
-

-
Hi team, I've seen this happen a few times over the last few months and since doing more with Symbols and Global Colours it's happened more frequently. Video below. Basically I need to use global colours across a document to conrtol a colour scheme. Having set up all of the objects with their global colours, I can then change the global colour and it can update wherever used accordingly - so far so good. Now, this does work (although you have to be very wary of colour sync breaking for symbol instances!) but it seems as though when changing the global colour it doesn't always update in the panels. The Layers panel still shows the previous colour of the object, and the Symbols panel shows previous colours too. In the video below you can clearly see the objects I'm selecting have a different colour in the Layer panel (bright green) to what they actually do on the Artboard (cream). The Symbol panel is showing a yellow colour for objects in the Symbol that have since been changed. It doesn't totally disrupt my workflow but it's a little distracting and occasionally confusing. Collapsing Groups or Layers and re-expanding appears to kickstart the colour replacement but this isn't ideal as you can imagine. affinity-colour-update-issue.mov
-
Ah sorry - so when you select 'Missing Fonts' in the Character panel, the font dropdown on the right (showing Arial in the gif) should display a list of missing fonts. In this case, it isn't - the dropdown doesn't display them, or work at all. I'm actually clicking on the dropdown arrow but nothing happens, presumably because there's no list to display.
-
Can anyone confirm whether this is working for them on Mac v1.7?
-
Hey team, I'm sure this was working before, but if I open a Designer file the missing fonts are shown in a notification (all good with that) but if I use the Character panel to list missing fonts then that appears not to work (screen rec attached). Apologies if I'm missing the correct way to manage missing fonts here. Is there a better way to view and manage missing fonts? Thanks in advance.
-
As a on/off freelancer who picks up all kinds of odd jobs - this is the ideal, but a rare occasion for me. A lot of the time, I'm the guy they call who'll do the jobs no-one else wants, and I've been supplied all kinds of nightmarish files. Are those legitimate use cases for Affinity Designer? It's tough to say in every case, but all I know is that this feature would be invaluable in making broad attribute changes to existing creative, or reverse engineering complex vector files for lack of more suitable means. So I guess Affinity can aim to be robust enough to deal with those curveballs, or deny them as legitimate/worthwhile use cases and those users will just have to find another way to get the job done. @robinp I realise we both support this feature being added, I just quoted to add context to my own experience. I get this - but it doesn't really hold up as a reason not to add a feature for those that would use it. For those that don't use it there's no change, no degradation of experience. For those that do use it, it's a huge time saver.
-
@Jowday Is this the 'clone' feature in Inkscape? Are there any other solutions out there (mac) that anyone knows of? @sorax you mentioned creating a standalone util. By canvas do you mean HTML5 canvas, or are you using alternative software?
-
Was this ever considered as a feature request officially? Was looking for whether something like this might make it on to the roadmap and curious to know if it was considered but dropped.
-
I was looking for a solution to this today as I need to do something similar, the difference being that each Artboard is one side of a double sided print (these are clothing hangtags). Unfortunately when exporting each Artboard to it's own page of a pdf it becomes a real task to align the front/back artwork for each hangtag when aiming to print multiple hagtags per page (more efficient use of paper than printing one hangtag per A4 page). Has anyone had any success with anything like this? The only thing I can think to do is to create an A4 Artboard and add each hangtag artwork to the page (positioned for double sided printing) and manually add bleed/crop marks.
-
@MEB Yep, got it working thanks!
-
Oh man....me again. So, black and white actually doesn't work in the way that you'd expect. Basically adding any fill colour should activate the mask, and then using the opacity will give you varying degrees of visibility.
-
Ugh. As soon as I posted this I figured it out. The trick is to use a black and white fill on the vector shape - as you would a pixel mask. Apologies for making noise.
-
This seems like the right place to ask this question having searched the forums. Is there a way of clipping OR masking an Adjustment layer with a vector shape? I realise that Adjustment layers have their own built in pixel masks, but basically I'm aiming to see the effects of an Adjustment layer only within the bounds of a vector shape. I've been playing around with it and it doesn't seem to work in the same way that clipping and masking layers, groups or shapes does. Thanks in advance.
-
affinity designer Add Pantone colors in Affinity Designer
simonlayfield replied to M-Rick's topic in Resources
I needed the Pantone Fashion and Interiors colour book available in Affinity Designer for designing tech packs for the clothing industry. I started out by selecting from the whole spectrum of colours (colour wheel) and then had to go through the document at various stages, copying hex codes and using the Pantone Colour Finder to provide me with the closest Pantone colour, copying the hex code and pasting it back in to the hex field in AD. So...a bit tedious, not to mention a little unreliable because when converting any old hex colours to Pantones the results aren't as close as I'd like. However, I did find a list of Fashion and Interior Pantones hex codes online here and reformatted the pantone-numbers.json to csv. That way I can drop them in to Affinity Designer > Contents > Resources > pantones and they show up as an additional palette in AD. Much easier. It's attached here if anyone needs it. Hopefully there isn't a downside to this, other than the colours themselves needing to be manually updated when Pantone update their range. pantone-fashion-interiors.csv -
Node Tool Curve Selection Accuracy
simonlayfield replied to simonlayfield's topic in [ARCHIVE] Designer beta on macOS threads
@MEB Ah I see, thanks. Yeah this does help. Also dotted line problem solved - thanks!