Imaginary
-
Posts
93 -
Joined
-
Last visited
Everything posted by Imaginary
-

[AP] Bug in 2.0.4: Artifacts when using "Merge visible"
Imaginary replied to Imaginary's topic in V2 Bugs found on Windows
Disabling OpenCl seems to work, but this also slows down Photo e.g. when zooming into large projects. Hardware acceleration makes zooming much faster but shows temporary artifacts similar to those when merging the visible layers. I have uploaded the file from my initial post to the dropbox. -
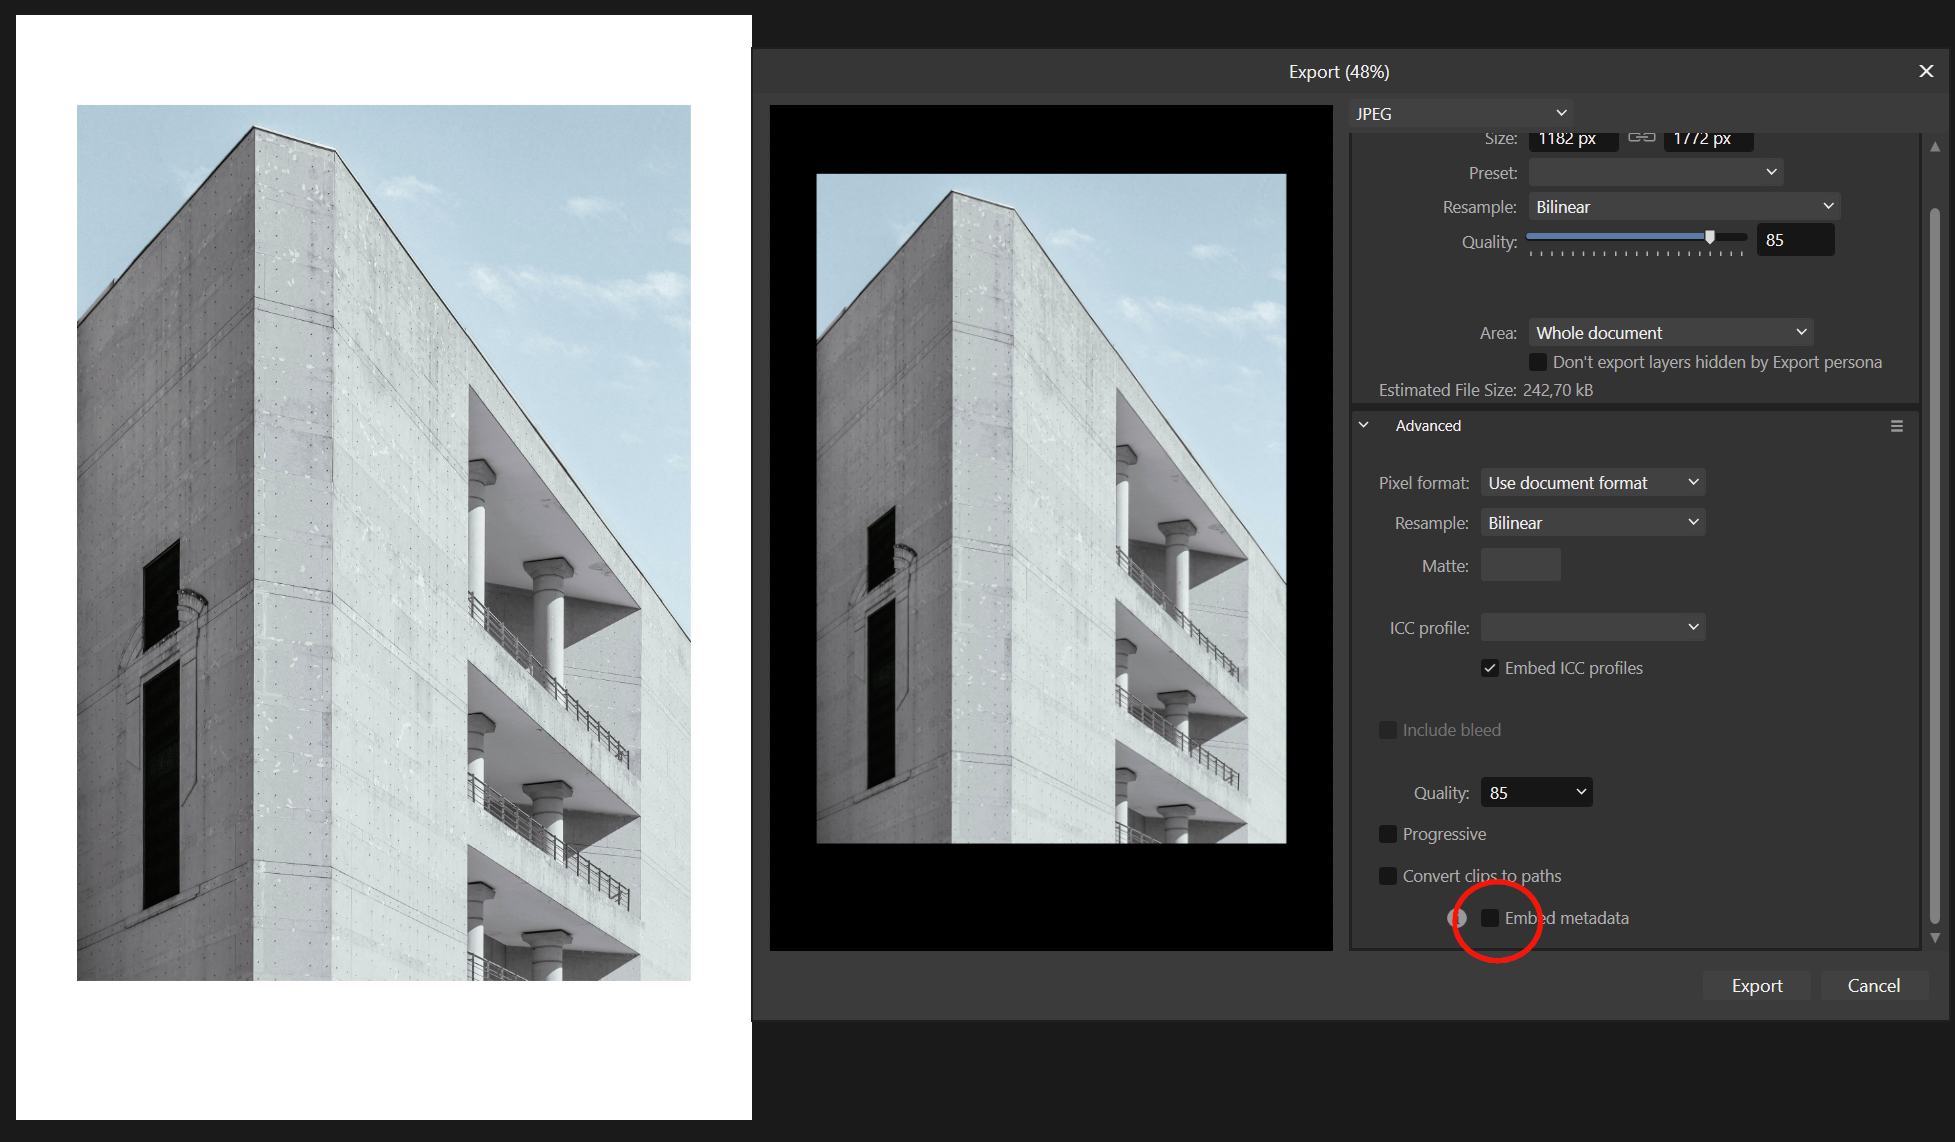
When I enter the export dialog the preview looks as expected but when I deselect "Embed metadata" the background color of the preview image changes to black and doesn't revert to white after selecting it again. It is not only a display issue, the exported image looks exactly like in the preview. Btw: I think the color of the Matte button should represent the currently selected Matte color, but it stays grey, no matter which color is selected. 2.0.4 on Windows 11

-
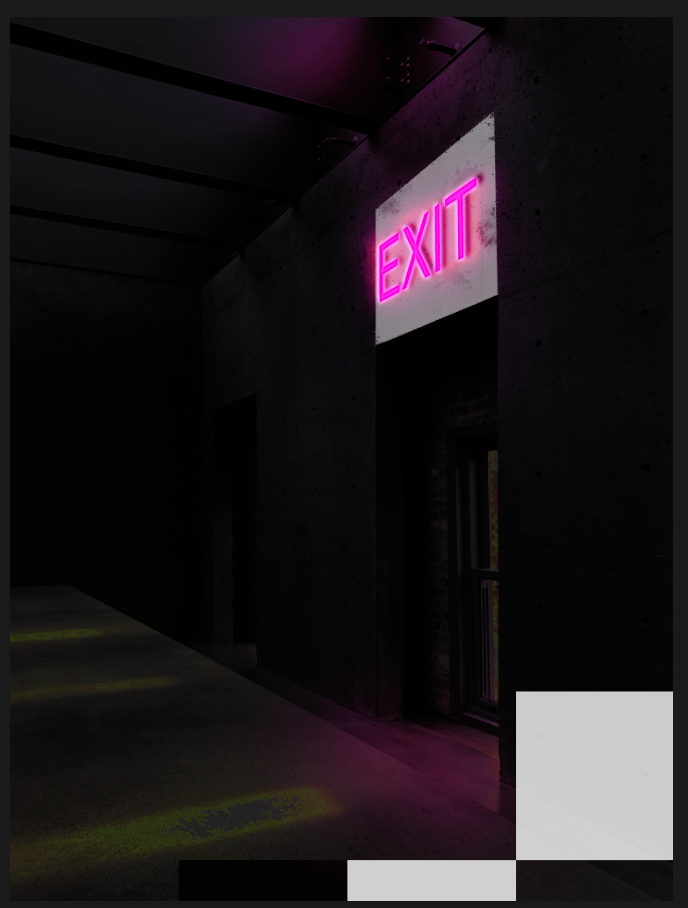
When merging the visible layers Affinity Photo produces random rectangle artifacts (see image below bottom right), it takes a few repetitions until it works as expected. AP 2.0.4, Windows 11, NVIDIA GeForce RTX 3060 Laptop, Hardware acceleration enabled
-
Export to .BMP
Imaginary replied to Fizmarble's topic in Feedback for the Affinity V2 Suite of Products
Kind of annoying, still not to have such an elementary file format in an application that claims to be for the pros... -
The bug is still there in 1.9.0.864.
-
Benchmark process hangs
Imaginary replied to walt.farrell's topic in [ARCHIVE] Photo beta on Windows threads
Same here, process hangs, at Raster (Multi CPU) and has to be killed via task manager. My laptop specs: Windows 10 1903 64 16 GB Intel i7 5500U AMD Radeon R7 M265 Series -> Default Renderer Before I switched on OpenCL in the preferences the benchmark finished but the result was N/A at both single and multi GPU -
+1
-
Eraser tool for vector curves
Imaginary replied to RPC's topic in Feedback for Affinity Designer V1 on Desktop
+1 -
Enhance Select Sampled Color
Imaginary replied to Lem3's topic in Feedback for Affinity Photo V1 on Desktop
+1 -
AP 1.8.3.641 selection and refine mask slow/hang
Imaginary replied to NotMyFault's topic in V1 Bugs found on Windows
Even with "All layers" unchecked in the OPs document, Photo selects more slowly than in a newly created document with only the background layer in it. But with "All alyers" checked in the original documents it takes ages to select... -
Well, I think the "Refine selection" process needs a complete makeover:
-
If you add presets for your LUTs you will find a preview thumbnail for each of them in the adjustment panel under LUT. Very small but at least somekind of preview. I would rather like to see the possibility to choose a LUT from a drop down list similar to the blend modes list with live preview when hovering over the items.
-
To come back to Windows: In software developing I sometimes have to use so called ImageLists which in my developing environment can only deal with .bmp or .ico-files So at the moment I have to export the graphics as .tiff, open them in Windows Paint and save them back as .bmp.
-
Crash when I try to turn a selection into a layer
Imaginary replied to fochardo's topic in V1 Bugs found on Windows
Same here with 1.8.3.641 on Windows 10. Photo closes as soon as you try to move the selection, no matter whether there is no actual layer (like in your screenshot) ot there is one.I know that this bug wasn't in previous versions. EDIT: Seems like ths was fixed in the current beta 1.8.3.647 -
Could you add HSV/HSB to color picker?
Imaginary replied to jcburns's topic in Feedback for Affinity Photo V1 on Desktop
+1 -
Fill layers - Strange behaviour when rasterised
Imaginary posted a topic in V1 Bugs found on Windows
Fill layers do not respond to live filters. I have tried "Add noise", "Vignette", "Halftone", "Voronoi" and "Procedural textures". Well, as far as I know, fill layers internally are vector objects and thus might be treated different from pixel layers, but on the other hand the forementioned live filters are applicable to vector shapes such as rectangles or ellipses. So, why not use a flood-filled pixel layer? Well, the main reason for using a fill layer is the possibility to change the colour on the fly right from the colour picker dialogue. The flood fill tool is cumbersome to use here. I just made a strange discovery: When you rasterise a fill layer, its label changes to Pixel. So far, so good. From now on all the live filters work as expected. Ok. But when you now go to the colour picker and change the colour, the "pixel" layer is updated as if it was still a fill layer. So why doesn't a fill layer respond to live filters in the first place? Windows 10, AP 1.8.3 -
Thank you, Simon! Stay healthy!
-
Still the same in 1.8.0.585 and Beta 1.8.1.611:
-
Feature Request - Alpha Channels (AGAIN!)
Imaginary replied to rui_mac's topic in Feedback for Affinity Photo V1 on Desktop
+1 -
My suggestions for improving the "Refine Selection" tool: 1. When entering the refine dialog, at first the selection does not change at all. No feathering, no matte edges. 2. The user decides where they want to to feather the selection or reanalyse the transition from foreground to background with the feather or the matte brush. 3. The sliders have a global effect on all the edges, whether the brushes were used or not. 4. Foreground and background brushes work just like white and black, without any reanalysis of the edge and spill-over. 5. Colour decontamination is switchable. 6. The preview shows what is, depending on decontamination state.
-
This is my attempt. I chose output to selection, made a mask and set the layer to difference. Except for some single pixels in the feathered area it is completely black, so no difference, no shadow. Refining was difficult as usual, because the Matte brush made to much of the foreground transparent (that's ok, the image is quite a hard one due to lack of contrast and sharpness) and foreground and background brush spilled over into the opposite areas.
-
I have never seen such a shadow-like margin so far, so I don't have a sample document. What bothers me most is the unpredictable behaviour of the refine tool when it comes to brushing background or foreground areas. Theres is always some bleeding into the opposite area: The amount of bleeding seems to be dependent on the brush size, but a 2px brush is useless IMO. The second issue relates to the automatic colour decontamination which results in a difference between preview and avctual selection if you do not set output to mask. In Photoshop colour decontamination can be switched off (it is by default). Summing up this means that "refine selection" is not usable in a serious way which really is a pity because Affinity has taken some steps into the right direction...
-
Make blend options switchable
Imaginary replied to Imaginary's topic in Feedback for Affinity Photo V1 on Desktop
Bump -
I think the OP's issue is not about masking the blur but about blurring the mask in order to feather the transition from masked to unmasked areas. This can be achieved by clipping the mask layer to the actual image by dragging it on the layer label until the blue horizontal bar appears. Unfortunately it has to be moved out of the image layer before. Once it is clipped the mask will accept a live filter that won't be hidden and can be modified.