Radu F
-
Posts
11 -
Joined
-
Last visited
Everything posted by Radu F
-
 @stokerg Thanks for your reply! The Numpad comma doesn't work well for me and I saw this problem on a lot of other users. For example, If I want to modify the size of an element and set it to 40,5 mm, if I use the numpad comma it will transform the value in 405 mm instead of 40,5 mm. I need to use the comma from the "qwerty" area of the keyboard in order to use numbers with decimals. I need to modify something in the Affinity settings in order to work correctly? It is very annoying and time consuming to use the comma from the qwerty section instead of the comma from the numpad section. Thanks!
 -
Hi, I found a few issues on Affinity Designer: - the reverse curve doesn't work for multiple selected curves. If you want to reverse the direction of multiple selected curves it will change direction only to the last selected curve; - bleed doesn't work properly for JPG. If you use JPG export + include bleed, it will export the document + bleed, but the bleed area is white. Also, it would be nice to have the "include bleed" option for TIFF export. - It would be really really helpful to be able to use the NumPad comma for numbers with decimals (for dimensions, position etc). I am not sure, but I think this worked before on the earlier versions of Affinity Designer. Affinity Designer version - 1.10.5.1342 Windows 10
-
You are welcome!
-
Same issue here. I found also a solution for this issue until will be fixed: - Create a new document - Select all the content from the problematic document with a selection box - Copy and paste the content to the new document Now, you should be able to switch to Export Persona without any problem in the new document.
-
Stroke thickness on PNG export (1.7.1.404)
Radu F replied to Radu F's topic in V1 Bugs found on Windows
Hi Sean, Sorry, it looks like it's a Windows issue. I imported the PNG file in Affinity and it looks well. I opened it also with Paint and it looks well. It seems that is a problem regarding how Windows photo viewer display the PNG images. Thank you for taking the time to investigate this! -
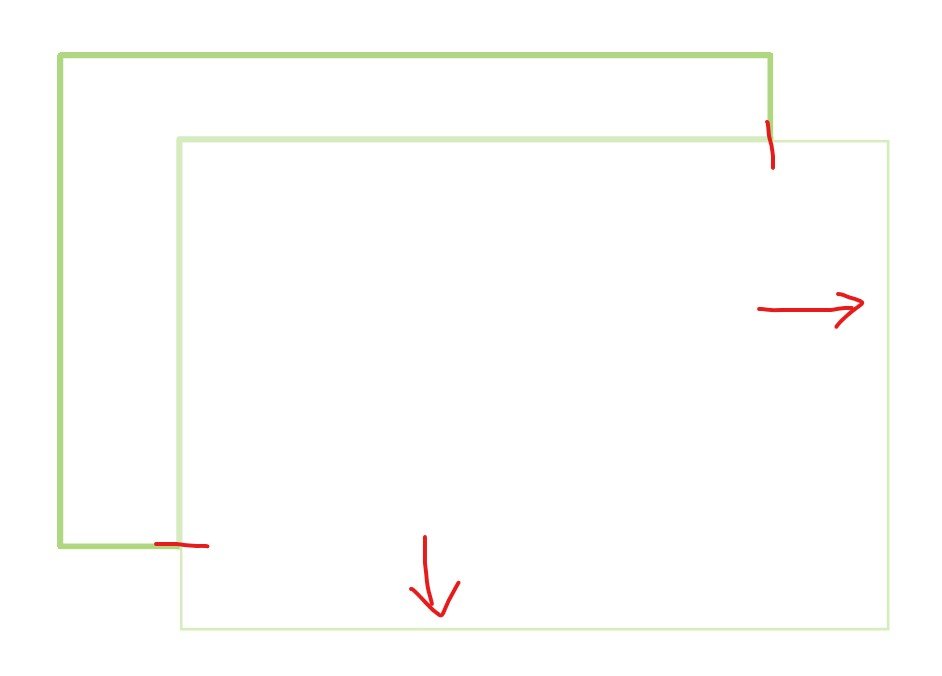
Hello, I found an issue when exporting a PNG file. If you set transparency to a stroke, that specific stroke will be thinner when exported to PNG. To reproduce this, try the following: - create two rectangles with "rectangle" tool - set the interior of the rectangles to white - set the stroke of the rectangles to green for example - put the rectangles one above the other as in attached image (one of them will serve as a "control" rectangle) - for the top rectangle set the stroke opacity to 50% (only for the stroke) - select both rectangles, go to - File - Export - PNG - Selection without background - the result should be as in the attached image From what I experienced, this issue appear only if you export "Selection without background" and only if that specific stroke is on the exterior of the artwork. I use Affinity Designer 1.7.1.404 on Windows 10.

-
Hi Jim, Regarding the color palette, you already have this option in AD. In the contextual menu of swatches panel choose "Add Document Palette". This option will add a new color palette which will be saved with your document. Also you can add more than one palette for each document. In the same contextual menu, you have the option to import a saved palette to your document, by choosing "Import Palette/As Document Palette".
-
problem with expand stroke....
Radu F replied to grapher's topic in [ARCHIVE] Designer beta on Windows threads
You are welcome Laureen. -
problem with expand stroke....
Radu F replied to grapher's topic in [ARCHIVE] Designer beta on Windows threads
Hi Laureen, From what I know there is a method that can work for you: 1 - Select the strokes you want to expand and in the Stroke panel check "Scale with object" 2 - Increase the size of the icons (for example from 50px x 50px to 1000px x 1000px) 3 - Expand strokes 4 - Scale back the icons to their original size. I hope it will help you.