jmwellborn
-
Posts
2,155 -
Joined
-
Last visited
Everything posted by jmwellborn
-
 If I understand your issue correctly, here is a way to create your own palette with the colours you want, rather than the automatic ones created when using Create Palette from Image. It is definitely fiddly, but it works. 1. From the Swatches panel, hamburger menu, choose Create Palette from Image. Then import your image document that has the colours you want. 2. When the image appears on your canvas, move the slider to choose 3 colours only. Choose Application palette, because you must be able to find it in the Swatches panel to use for the next document when you reach step 5. 3. Give the new palette a name. Then in the Swatches panel, right click on any two of the colors that have been automatically inserted, and select Delete, leaving just one colour which you can later delete. 4. Now you close the document. 5. Create a blank new document. Choose FILE>PLACE and import the same image document you used in step 1. Duplicate it, and lock the background layer. Now, with the duplicate layer selected, use the eyedropper from the Swatches Panel, select a colour in the image that you wish to keep, click on the well in the swatches panel, and it will load. Then click to add it to the swatches. (Video attached.) 6. I did not do this in the video, but once you have one or two of your own swatches placed in your category, you can click on the initial swatch that was automatically selected and delete it. 7. Note that each time you add a swatch to your category, the duplicate layer will remain that colour. That is why you must keep deleting the duplicate layer and then creating a new duplicate. Said it was fiddly! Screen Recording 2023-12-31 at 11.51.24.mov
 -
Original black and white image is "Stonethwaite Bridge, Borrowdale, Cumberland, from a soft ground etching by William Green, 1809," now in the public domain, courtesy of the British Library. The bluebird and cardinal, who is actually bright red in my original jpg, are regulars from my garden. They join me in wishing everybody a much happier 2024!!

-
@Patty Keeney welcome to the Forums! And a Happy New Year with Publisher!!
-
@Old Bruce Am I being picky? My keyboards have the tilde on the upper left, next to the 1 key. Also here on my iPad. Anyway, best wishes for a Happy New Year!
- 9 replies
-
- 1
-

-
- hyphen
- hypenation
- (and 1 more)
-
“The image is based from an image that I designed in 1977 as best I remember it” doesn’t exactly shout “Using Affinity software in depth.” This entire series of escalating posts from Mr. Overington appears to me rather more as a feeble attempt to justify what was originally a dubious premise. In the Resources section of the Forums, several very professional templates have been provided by generous Forum members. They are easily adjustable, and elegant to use.
-
bug ou mauvaise manip
jmwellborn replied to jacques teillet's topic in Affinity on Desktop Questions (macOS and Windows)
@jacques teillet welcome to the forums! May I suggest that you remove your email address from your post? It is unfortunately possible that some scammer might see it and cause you problems. You can make the deletion by clicking on the - - - at the top right of your post, then choose EDIT. Regarding the cloning and correction tools, could you explain the problem you are having in more detail so we can help? -
affinity designer Limited edition Leica M-P Grip by Rolf Sachs
jmwellborn replied to VectorVonDoom's topic in Share your work
@VectorVonDoom and that table tennis bat rubber must have taken hours to create. Spectacular! -
@j3rry Very elegant!
-
On my MAC, I was having the same issue with Photo V2. The bracket shortcuts are present and identical in V2 to those in Photo V1. I have discovered that if you will go up to the Context Toolbar and uncheck Snap to Edges the "[" and "]" bracket shortcuts seem to work perfectly. Interestingly, if I then recheck Snap to Edges and try to resize the selection brush tool using the bracket keys, the shortcuts work! Not sure about this, but it could be a bug.
-
@StuartRc EEEEEK!! Merry Christmas to you and yours!!
-
Old Parkinson’s Law: people at a board meeting argue the longest over the size of the wastepaper baskets.
-
@v_kyr Lovely!
-
With a major assist from a black and white drawing of Ancient Windsor Castle in the British Library's collection of images in the public domain (watercolour brushes), plus a Jixipix plugin, plus some Pixabay images of snow, a bow, and some spruce (selection brush tool), I wish each and every person at Serif — who has/have been so indefatigable at giving us our lovely V.3 this year — a blessed and happy Christmas! A more elegant group of professionals could not be found! My thanks and best wishes also go to the many Forum members who have so kindly devoted so much of their time and intellect over the past years to answering thousands of "how do I ..." questions from other Forum members. Not to mention my own. I have learned from those answers more than I ever imagined when first I found Affinity Photo, and later Designer and Publisher a few years ago. A special thanks goes to @MikeTO for his extraordinary gift to us all of his Publisher manual. It is a Herculean effort and so very appreciated, I am sure, by many of us. So thank you, everybody, and may we all pray for peace on Earth in 2024! P.S. The bow in my jpg is actually a clear red. Not sure why the uploaded version is this rather off-putting burnt sienna. The spruce looks rather sick and tired too. Oh, well. Not Photo's fault.
- 3 replies
-
- 12
-
-

-
@VectorVonDoom Stunning!
-
@TrentL Thank you for this. Another winner!! I really appreciate your tutorials, because they are so thorough.
-
@loukash as I was reading your comment, I thought “MikeTO’s manual!” and then reached your well-meant advice to @cirkē. Good for you!! Hopefully this person will take advantage of Mike’s superb gift to us all, rather than posting any more all-encompassing criticisms of Affinity’s sophisticated software before learning to use it.
-
Scrolling Stock Panel with Pixabay Crashes Publisher 2.2.1
jmwellborn replied to Seneca's topic in V2 Bugs found on macOS
Using Designer 2.3, have had a complete crash while scrolling Pixabay. When asked whether I wanted to recover the file, found a completely empty screen. Just an update. -
Unofficial PDF Manual - Expert Guide to Affinity Publisher
jmwellborn replied to MikeTO's topic in Resources
@MikeTO This is what I have been hoping for! Your manual has been absolutely terrific, but the text styles stuff has been my bugaboo since Publisher first arrived. Not that the Text Styles panel isn’t useful. Just “how in the world does it work?” As is the case with everything about Affinity, there is such a plethora of wonderful options that one can get lost in the forest when searching for a tree. Being one of those fossils who learn most quickly from reading vs watching, the Help sections have been consistently underwhelming. I am so thankful for your elegant PDF manual. In one instance, I found the solution for a problem in a matter of seconds on one of your pages for which I had searched again and again, in vain, in Publisher Help and on the forums. Can’t wait to delve into this newest iteration! Thank you so much for the massive amount of work and effort you have expended to help us all. And Merry Christmas! -
@loukash even better news - maybe this new hire can do something about the depressing design of the tools in V2.
-
Welcome to the Forums @TD HANSON! There are also many excellent tutorials in the LEARN AND SHARE section of these forums. Some recent ones posted by @TrentL are, I think, especially helpful, because they explain each issue in detail, with plenty of examples. If you will fire up your MAC and watch them, I think you will find that your creative juices will start to flow again. The official Affinity tutorials are also superb. With those, I have found that hitting the pause button and writing some notes, before resuming the tutorial, sometimes helps, because some of them are pretty speedy. Finally, just post away here in the Forums when you would like help learning all of the wonderful things Affinity can do. There are many exceptionally talented and knowledgeable people who are available to help. I couldn’t have made it to first base without them! (Not sure which base I am on at this point, I might add, but I am having a lot of fun every single day.) Most of all, I hope that as you and your MAC learn the software, you will find that the hours and days once again fly by in a new and special way! Best wishes!
-
Tutorials to restore old photos
jmwellborn replied to vpkumar's topic in Affinity on Desktop Questions (macOS and Windows)
@GarryP what do you mean, made up? I use a greeble wrachet every single day to get started!😬 -
@Fnwolf Welcome to the Forums! That is one scary fellow, and very much alive!
-
Adding snow effect in Photo
jmwellborn replied to Angela M's topic in Affinity on Desktop Questions (macOS and Windows)
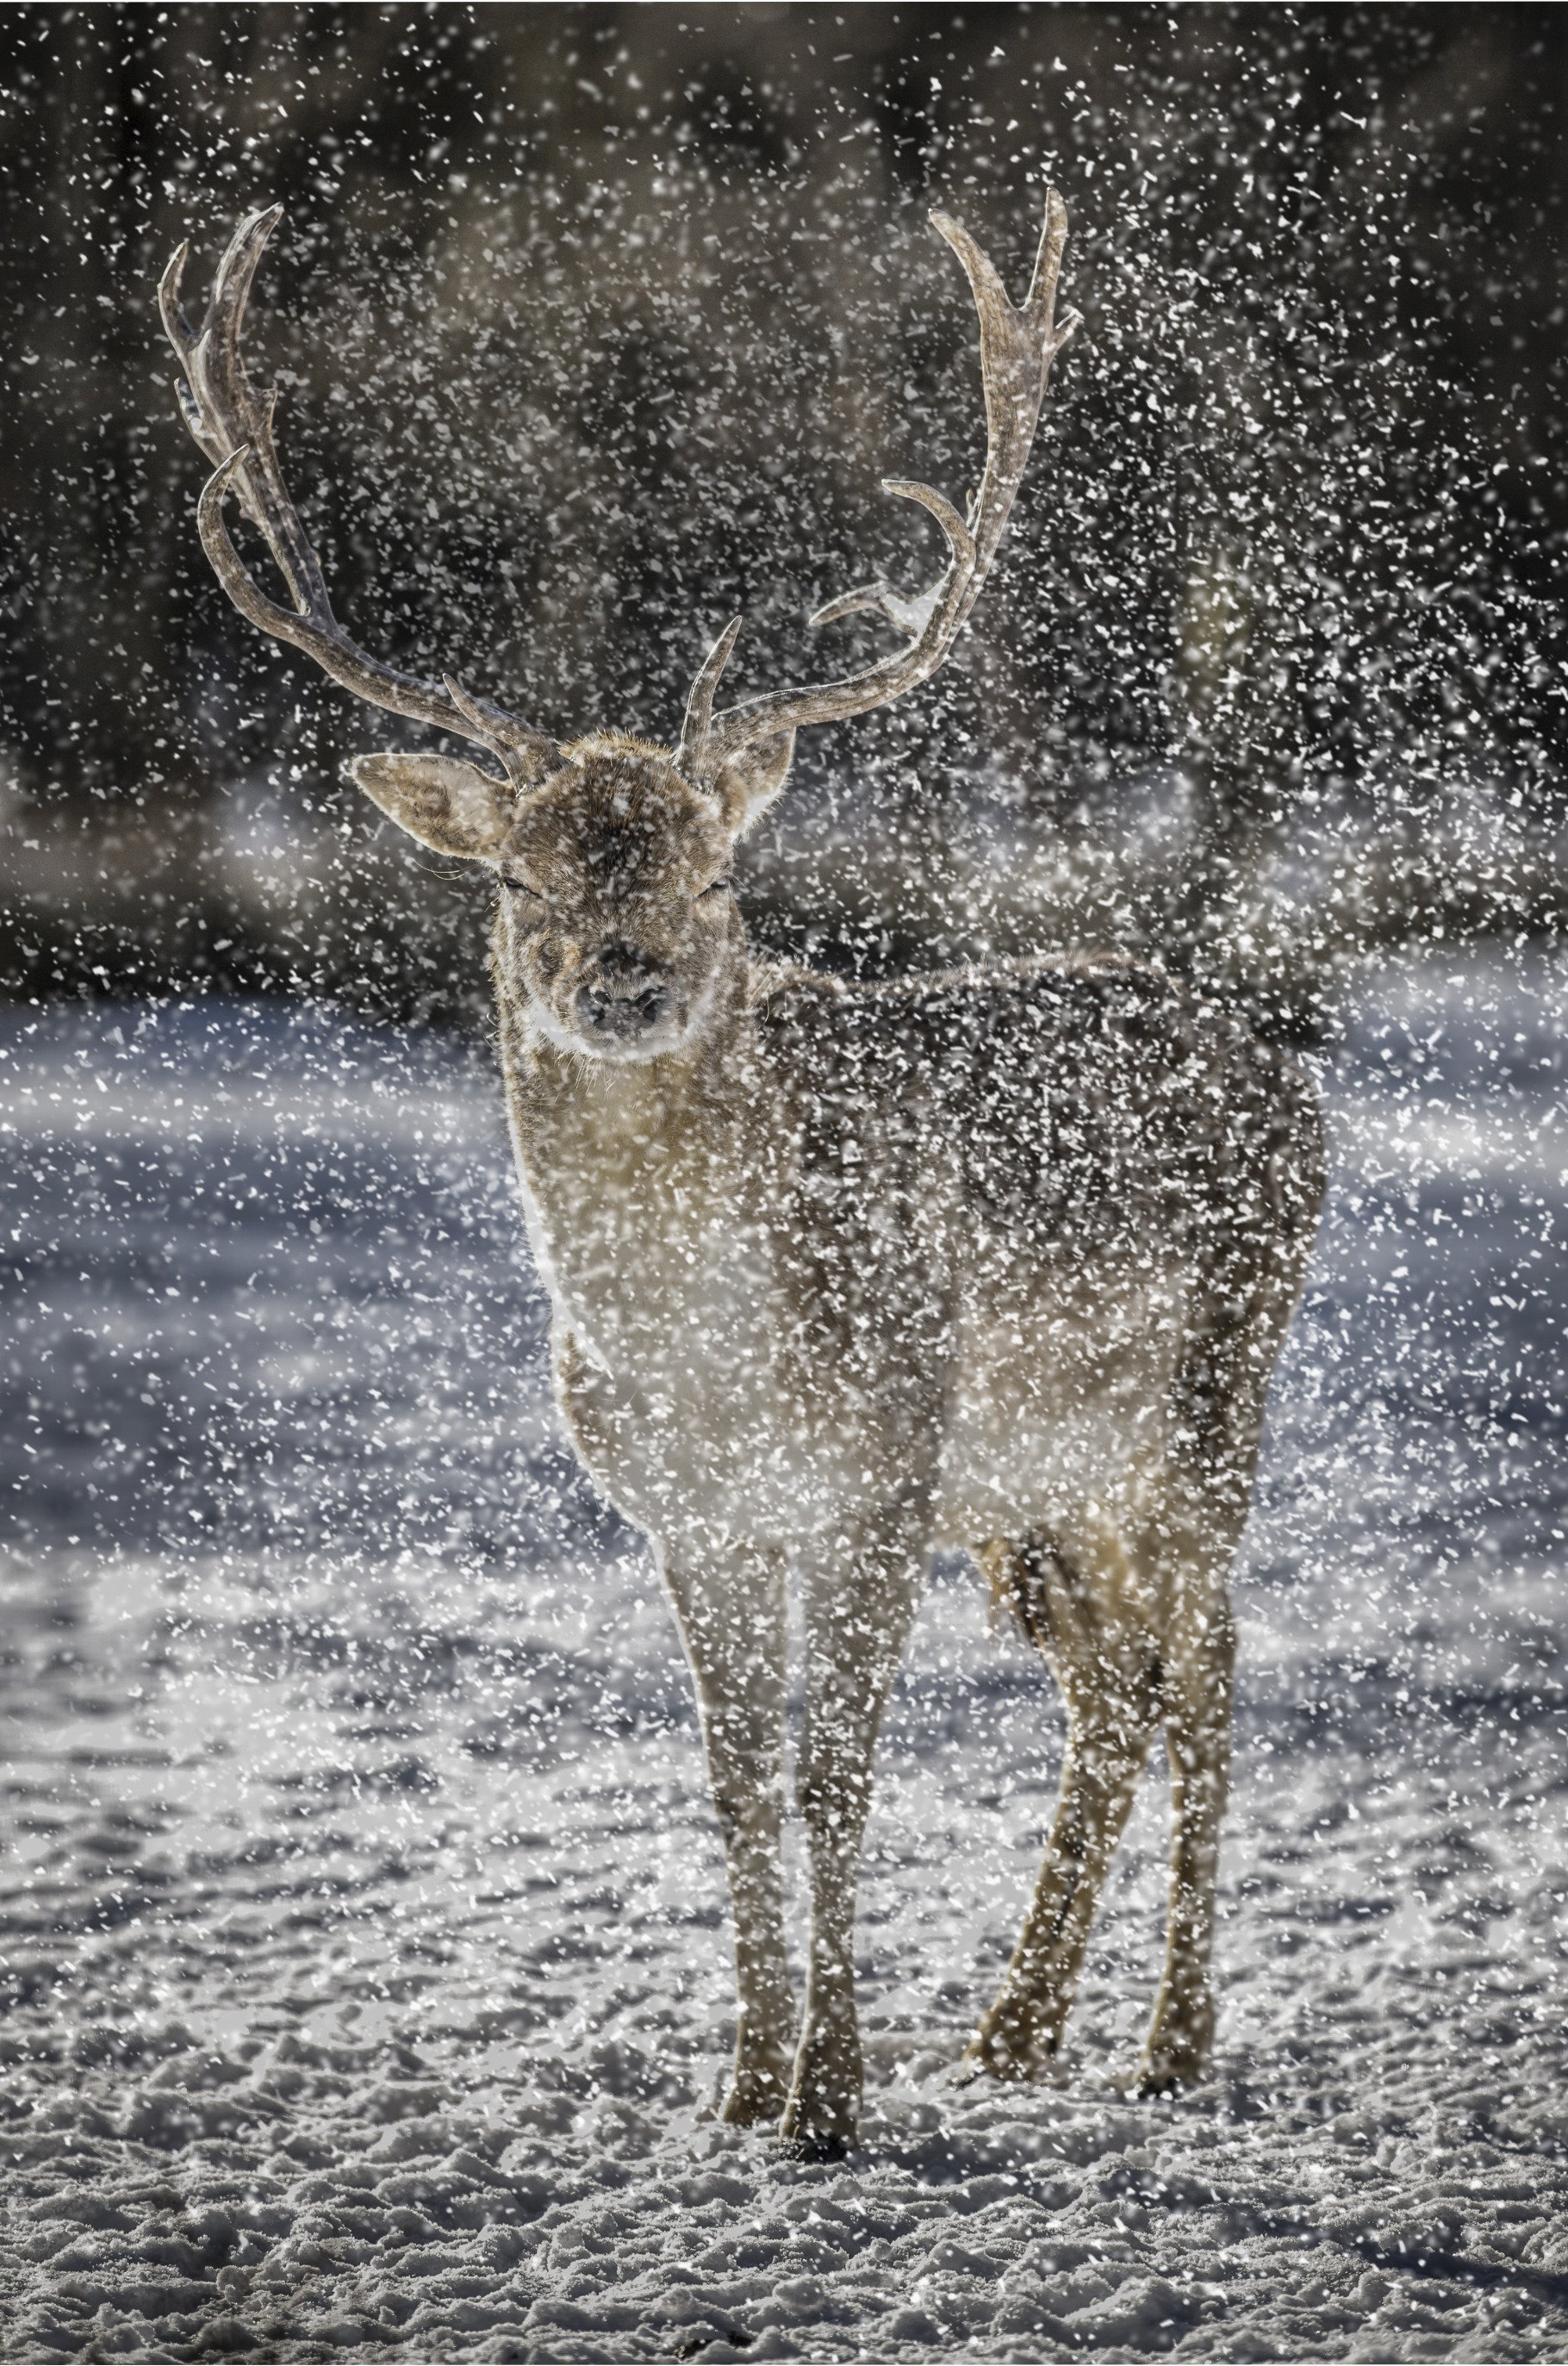
@Angela M It is not as sophisticated as some methods, but in case you would like to try this, I made an Asset several years ago that provides options for creating snow at different intensities. You just need to import it into your Assets Panel, then open an image, go to Assets, and double click on the Asset. This will allow you to drag the Snow Group across your image with the image placement icon, rather than having a huge representation covering your entire screen. In the Layers Panel you will see that the asset is a new pixel layer "Snow Group." It can be opened to make adjustments on any of 5 layers in the group. For slightly stronger snowflakes, finish by running the Subtle Sharpening Macro (I believe that should be in your Default category in your Library panel). You can add more snow anywhere you want by copying and pasting any of the five snow layers from the Snow Group on the top of the image. If you want to remove snow from part of the image you can click on each pixel layer and use the Eraser Brush. Here is a very quick sample, using a Pixabay stock image. generic snow.afassets
-
"From goulies and ghosties and long-leggedy beasties And things that go bump in the night Good Lord, deliver us!"
-
@j3rry Eeeeeeek! love it!!!!!!