

Dmitry
-
Posts
21 -
Joined
-
Last visited
Posts posted by Dmitry
-
-
Great stuff! Thanks again. I'll have to become more savvy with the Terminal and find ways around the issue.
You're probably right about Wacom (at least based on the responses thus far) - but it is curious... this kind of feedback is exactly the kind of thing that can improve the desirability and functionality of products/services, instead of leaving them 'half functional'. Often, the smaller the software/hardware developer, the more likely they are to listen to customers, it seems.
Anways, I'll follow your instructions as I return to this issue and will make it all work!
-
Hi there,
I appreciate your help - unfortunately, though, I am stuck and don't seem to be getting anywhere...
I can't currently install Xcode (space and OS), but I did install what I believe are the alternative parts, gcc etc. And as I have Homebrew installed, I didn't try installing autotrace using Macports - but I still can't get the Homebrew version of autotrace to work. I should have all the libs and autotrace in their right places, but all this is getting a bit complicated for me…
I should really get some more feedback from Wacom (very quiet lately) or develop more Terminal skills - however it shouldn't really require bash skills to work the Bamboo Slate, should it?!
")
Anyway, I'll get back to Wacom in the hopes of some information - really, I should be doing more writing work than sketching right now, so that's ok! Thanks again for trying!
-
I'm afraid I still cannot get it to work. Will have to investigate further...
-
No dice, I'm afraid! I tried, to best of my (lack of) abilities in Terminal and the Finder to create the directory structure above, even the hidden tmp/opt, copy the files from autotrace-0.31.1_10.darwin_13.x86_64.tbz2 (the first file on the page of tbz2 files), and use the Centreline extension on an image, but nothing seems to have happened. Inkscape still gives me a message: 'You need to install autotrace for this extension to work!'
Perhaps I should put the Wacom Slate to the side for a while and study the Terminal
Anyways, thanks and happy new year's!
-
Hmm. I think there may be some clash in installing Macports together with my current Homebrew installation. I managed to install all the dependencies on the Autotrace page via Homebrew but not Autotrace itself. (I just selected one of the tar.bz2 files).
-
Thanks!
Definitely interesting, although I'm afraid it's probably not useable for my purposes in its current state. Overall - this is promising in proving the tracing technique (in lack of Wacom attention to their export process + options for pressure preferences + centre line strokes), but the output details tend to simplify the lines quite a lot. (and at times, are a bit random, e.g. in the 'crosshatching' parts in Tracing.svg.
I tried the RapidResizer site and Inkcape's default tracing tool (installed via X11 on my quite old Mac OS X 10.7.5 set up), but got into trouble with installing the mac version of autotrace, for which the Mac Terminal gave me:
Error: No available formula with the name "autotrace"
(even in previously deleted formulae)
and
Error: No formulae found in taps.
I have homebrew installed along with python (in the hopes of learning python at some time, soonish), so that should be ok. Possible that I've messed something along the line, though.
But - absolutely - I could trace an image with RapidResizer, import it into AD and apply a stroke etc., so the centre line tracing technique itself works!
-
Thanks! The third, dog video looks the most interesting in this case (stroke/path mode switchingf?), hmm...
-
Actually, that's a good point in there - for animators, who could sketch something quick and export the vector artwork into a vector animation package. Moving, animating and modifying the vector artwork would be easier (I can imagine) with simpler strokes.
I tried to install some of the Github simplify tools in the Mac OS X Terminal but ran into some kind of installation/dependency problem, might have a look later... Or, could try a trial version of Illustrator to see what that article means regarding the simplify etc. tools. If Illustrator had an opposite tool to what is used in this video, and AD had something similar, that could do the trick (i.e. in the 'outline to stroke' direction): https://www.youtube.com/watch?v=F2oSR0Oh25c
-
Yes, exactly! It would be quite frustrating to manually work on each shape/stroke over the course of multiple sketches.
What I was hoping for in AD would have been something like a 'Select All + reduce all strokes by x percent' kind of a thing, since I have not had any concrete feedback from Wacom re: choosing shapes/outlines vs strokes and pressure sensitivity preferences. I think Adobe Illustrator has some tool/brush to 'squeeze/pinch' the strokes (or outlines) to make them thinner (maybe the 'pucker' tool?)
Still, other pen products with pressure sensitivity have similar issues - the pen detects many levels of pressure, but the software only shows very similar + limited level of strokes (as at 5:50 in this video: https://www.youtube.com/watch?v=8Ewv3T4En9A&app=desktop)
Anyway, here's hoping that things will improve!
-
Oh, I must have been a bit unclear at the beginning!
The Wacom Bamboo Slate product is indeed a pressure-sensitive ballpoint pen and standalone tablet combination, hence my photos comparing paper and SVG files etc. Sorry for the confusion! The pen uses Wacom's electromagnetic technology to work. You then sync the Bamboo Slate to your phone/tablet and export your work via the Wacom Inkspace app. It also supports optical character recognition, which works pretty well (at least in English).
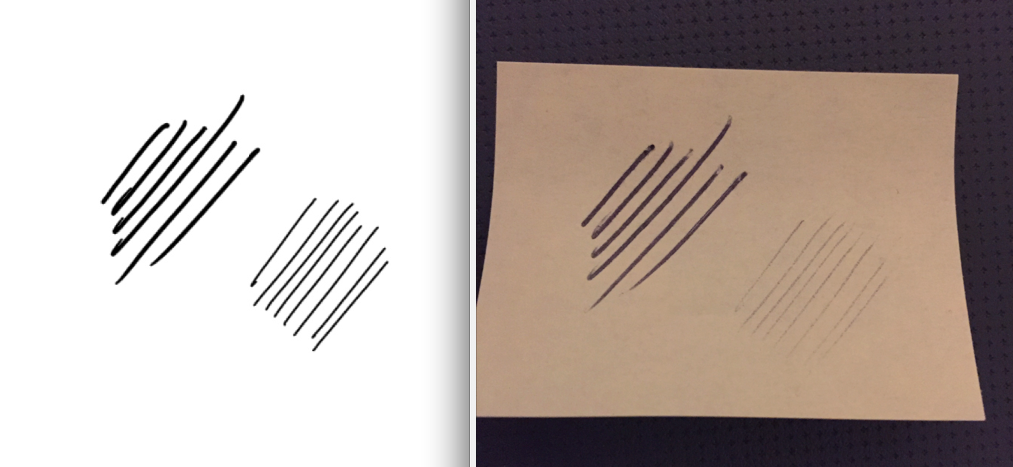
Teoh Yi Chie's Bamboo Slate review compares the 'on paper' pressure vs 'on screen' pressure differences well at about 12:26. And the on screen output doesn't look too bad! But: have a look at when I try normal pressure vs very light pressure on paper (image attachment). In the digital on screen version, the difference between normal and very light pressure creates lines that are really quite similar.
So, there's the SVG 'shapes vs strokes' problem (can't really adjust size in Affinity Designer) and there's this line thickness problem of the hardware working but software letting it down, causing very dark and thick output. This is where I think it might be a question of software interpreting pressure data in a certain way, and that this could be improved upon to create more subtle digital linew ork.
In fact, an other reviewer, Brad Colbow, commented (see at about 3:00 of his review) that "I was really impressed by how much (the Slate) captures" ... "but (I) couldn't shake my initial impression that I just didn't enjoy using this thing…" For him, the reason was the software. Not much work seems to be put into the Inkspace app.
https://www.youtube.com/watch?v=sMmnN1QnpXU
By the way, I just got an email from Wacom email support (below), but unfortunately I am none the wiser, so I sent a new reply + citing this forum discussion. Note that the message says "you could adjust stroke width in Illustrator". I don't have Illustrator, but as we are still talking about the same SVG files, I wonder if there's a difference?
Wacom's email:
"There is a difference between the ink left on paper by the physical pentip and the pressure seen by the digitizer in the smartpad. The smartpad can only measure the applied pressure, but the width on paper depends on the ink cartridge and paper material. The Slate tries to record as much detail as possible, but does not necessarily reproduce the look on paper hundred percent. The main purpose of the device is to record notes and sketches for further processing - conversion of handwriting to text or working with the SVG vector data in programs like Illustrator. - Currently there is no option to adjust pressure sensitivity and pressure curve, but you could adjust stroke width in Illustrator.
I could not check the forum as the link is restricted. "
-
Yes, exactly - perhaps Wacom records data in this way (outlines) to save details in the lines. I'm thinking about the 'beauty' of exported raster files etc. But choosing closed vector shapes over plain strokes also means that I can't make these lines any thinner, like I can with strokes created in AD (with a 'spine' of nodes in the middle).
The digital lines (both in Wacom's app - the native WILL file - and the exported SVG) are:
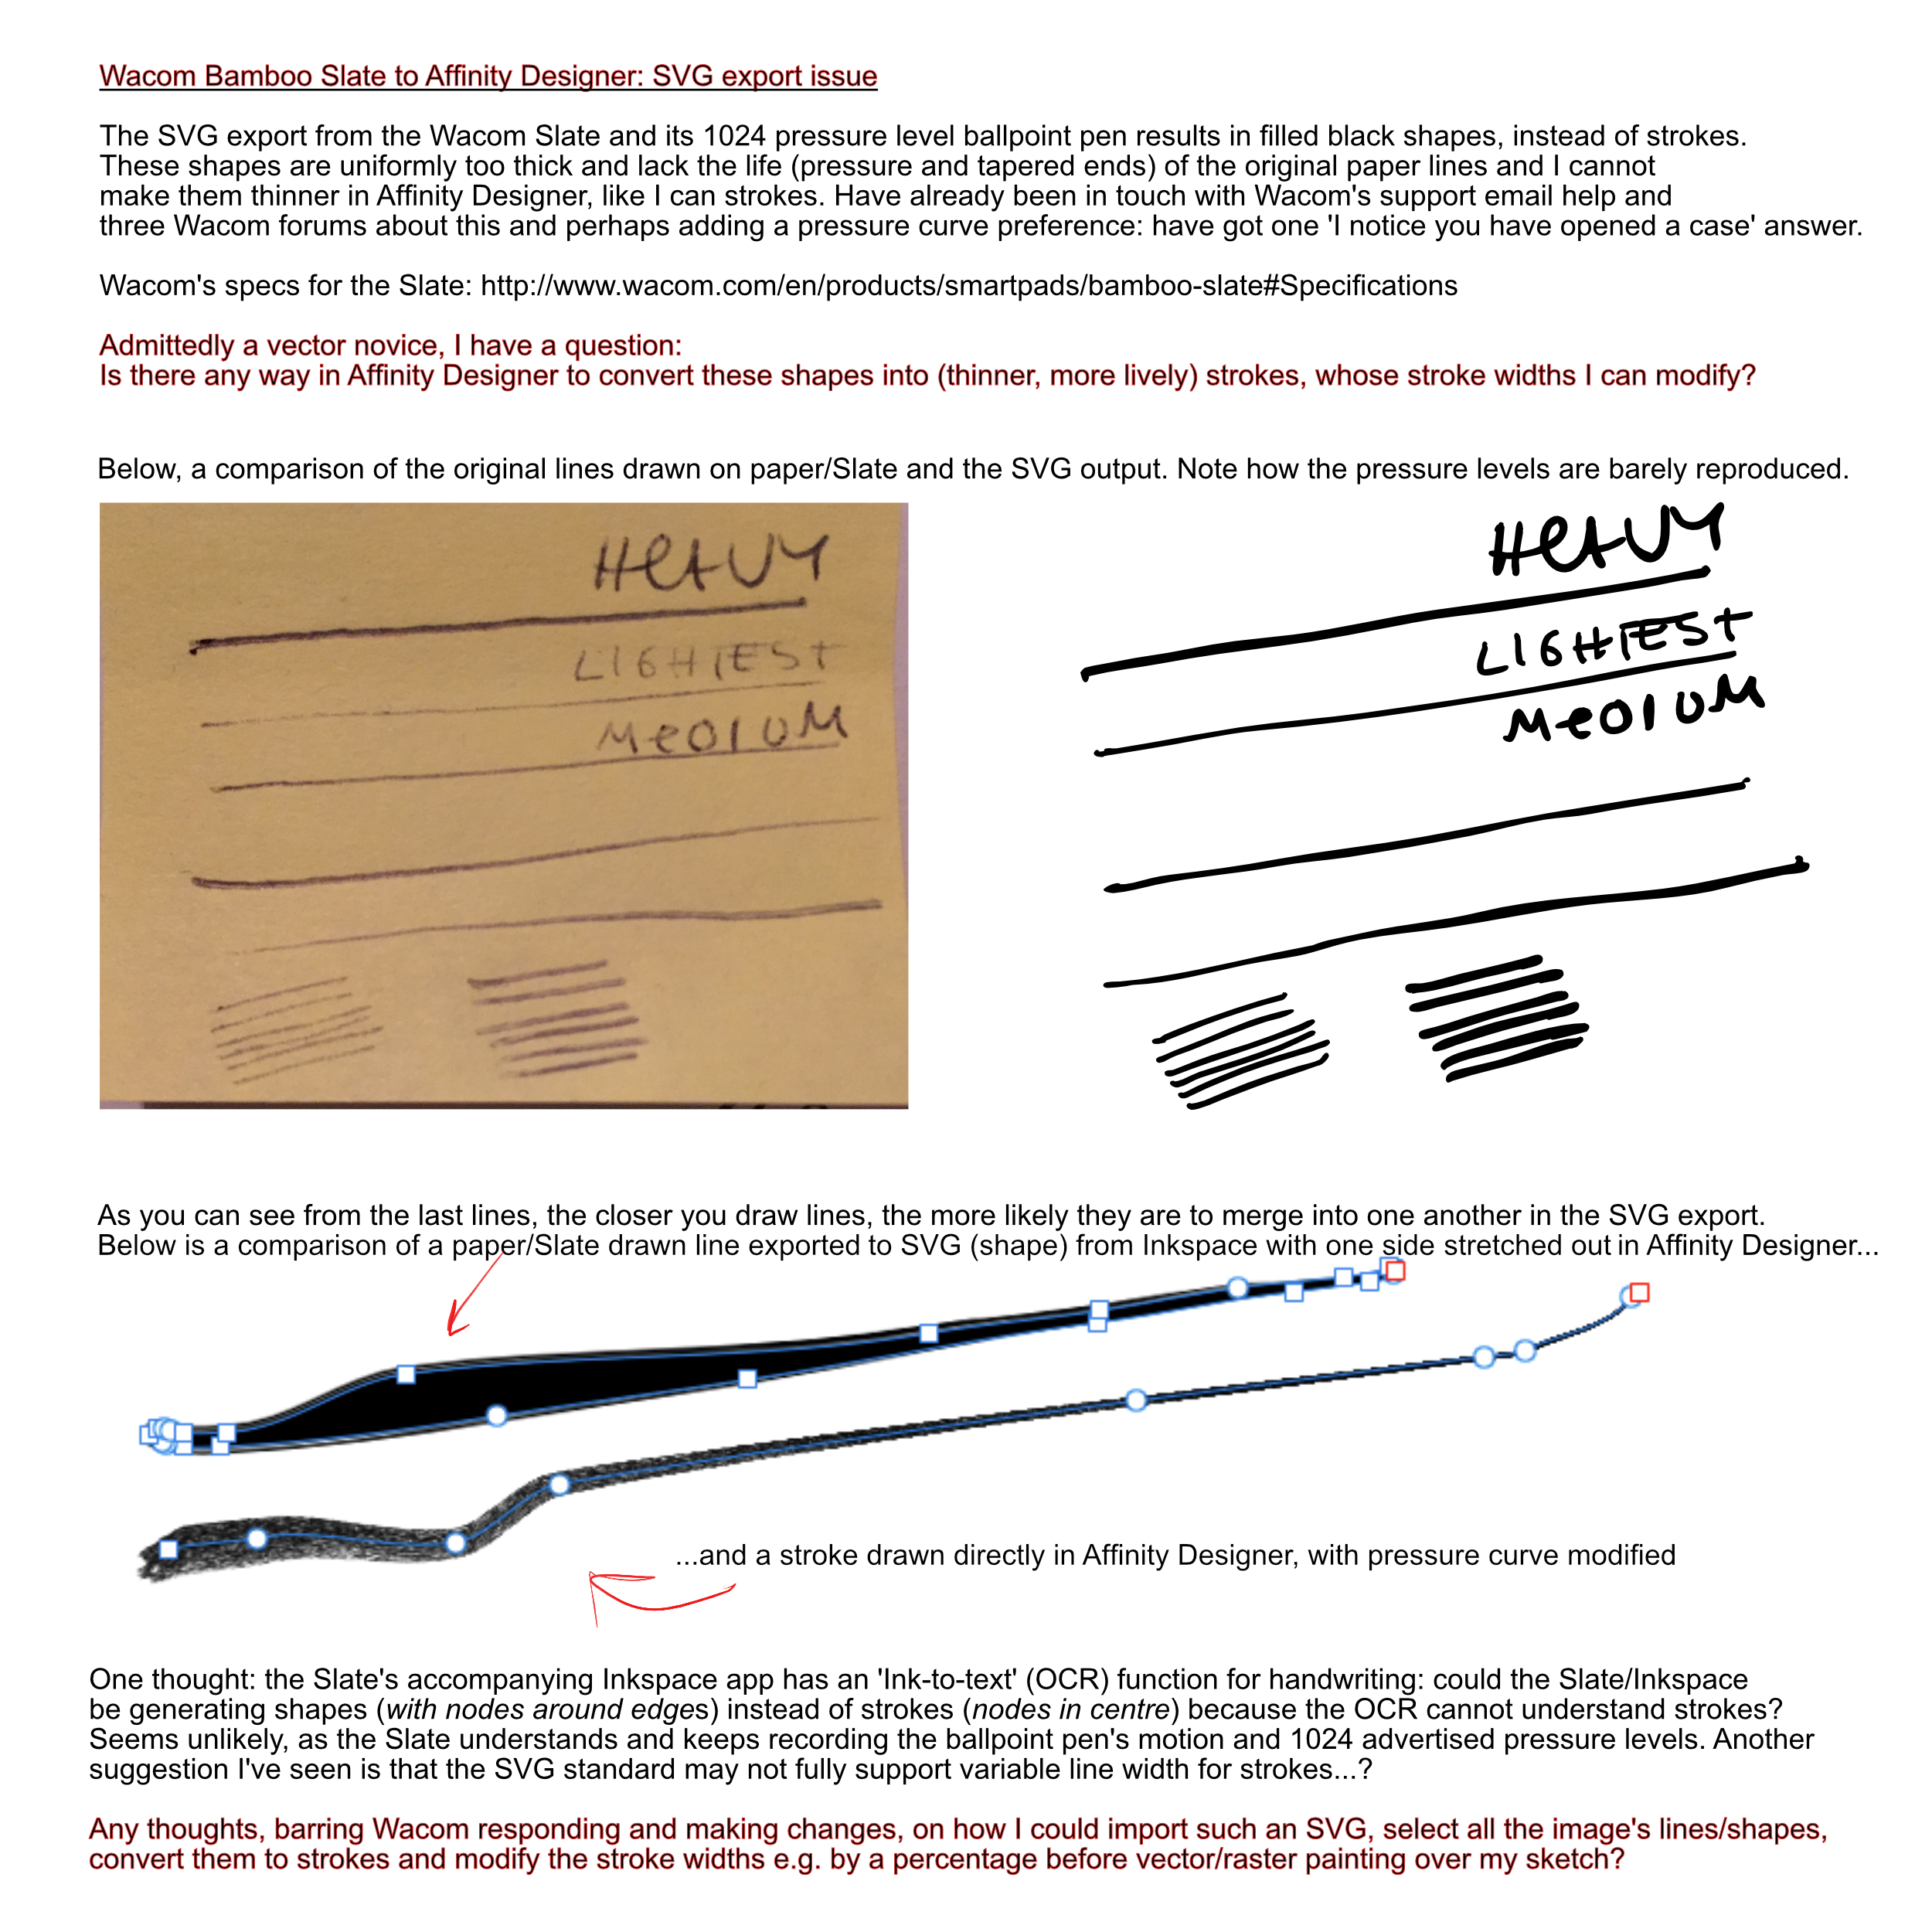
- thicker than on real paper meaning that when I do 'crosshatching', or a lot of lines close to each other, they visibly just turn into one black area (as if I was colouring in the area).This just looks like a 3rd gen photocopy.
- and the lines are pretty uniform in line pressure, compared to the lines on paper.
So, my problem is that the digital versions of the drawings are very clumsy and don't look like ballpoint pen (the Wacom Slate's pen).
For this reason, I originally asked Wacom about this issue and suggested that there could be a pressure curve preference in their Inkspace app, so that people with either heavy or light hands could set the sensitivity of the pen and get more elegant lines. I mean, they already have code for this kind of thing in their drivers etc. Painting apps also have similar pressure curve features, on mobile and desktop. 1024 levels of pressure sounds a lot for a ballpoint pen - honestly I'd be happy with X levels of pressure that *really looked like* thin/light lines and normal thickness/dark lines!
Thanks for the links to the optimisation tools and code! I'll deliver this information to Wacom and hopefully they'll have means to approach this, as I'm not sure what else to do other that just get on with it. Will let you know what they say, unless they write here first.
-
Hi there,
That's odd about the embedded PNG image. However, looking at the SVG export window in AD, I can see that I made a mistake here. I had a 'rasterise unsupported properties' and some other boxes ticked, which would explain the lack of vector data. With some changes and opening the SVG file in a plain text editor, the format of the code became similar to your earlier SVG examples.
Using your new SVG code sample, I also tried to experiment with my earlier SVG files' code. I removed the fill, added the black fill and used <path stroke-width="2" and "1" etc. But, of course, this didn't change the thickness of the original shape outline, so unfortunately it's not an improvement. As far as the WILL file is concerned, perhaps if other companies get to look into Wacom's SDK, compatibility might improve...?
Anyway, thanks for all the help!
I tried Wacom's email support and three forums on Facebook earlier, with no real help. So, being an AD user, I thought I'd try here, in case I could learn more about Serif's support for SVG (or WILL) or possible mistakes of my own. It looks like I will have to deal with the issue and definitely not shade things too closely in drawings. Or, stick with pencil. Seems like the hardware part of the Bamboo Slate product is being slightly wasted as far as pressure and vector export is concerned. But - I'll get back to Wacom in the hope of an answer!
Thanks again -
Dmitry
-
Sounds familiar...
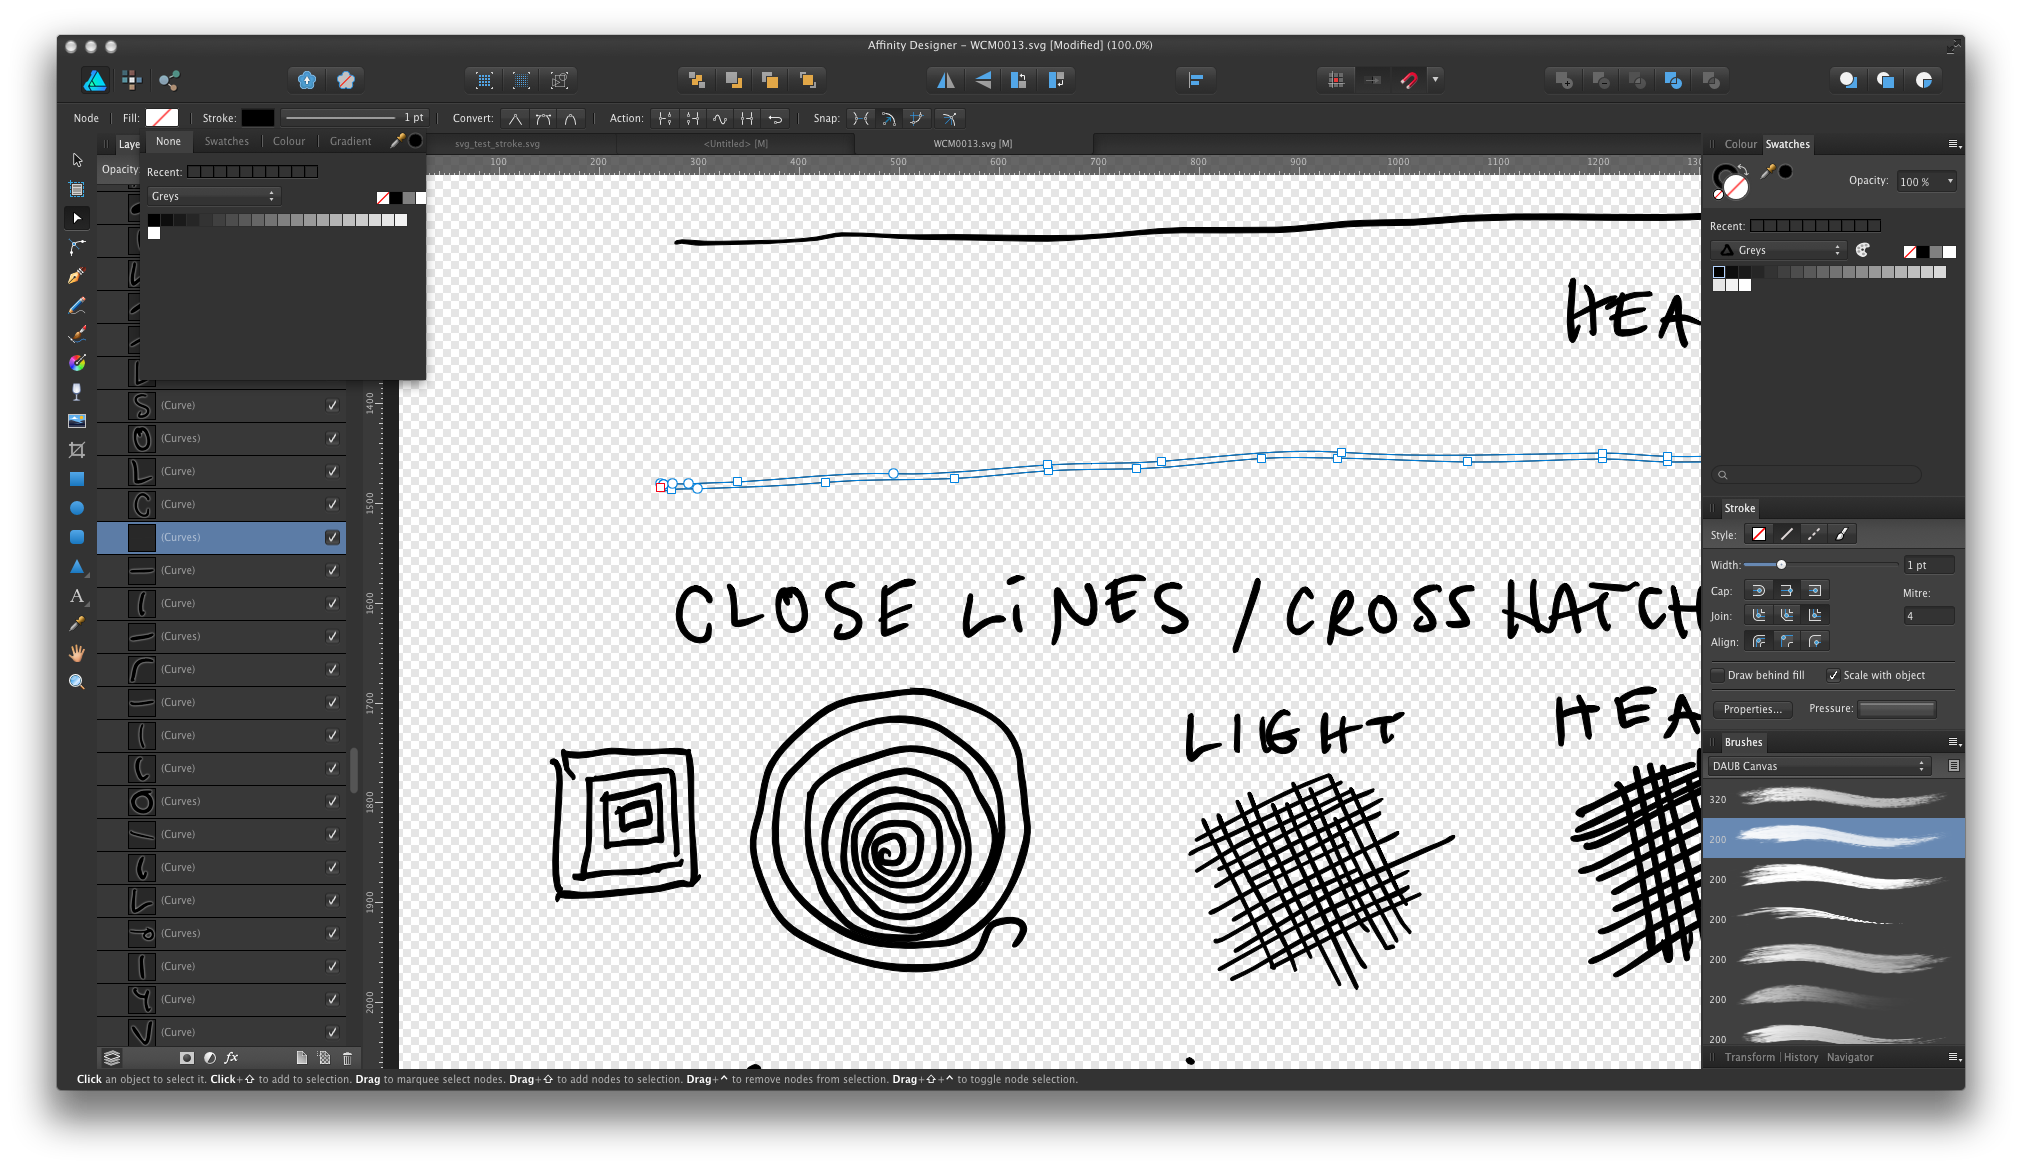
Here's a screengrab of the WCM0013.svg file in AD, when selected and with the black fill removed. Note the stroke palette (1pt) - I guess this is what you mean, right? Makes sense in this case that the stroke value would only affect the outline of the Inkspace exported images. And why I can't reduce the size of the whole shape 'like a stroke'.
By the way, I just noticed that when I try to re-import the image I attached in my previous post (real stroke drawn in AD, svg_test_stroke.svg), it opens as an (Image) layer and I can't edit the stroke's nodes at all, like I can the outline nodes of the SVG exported from Inkspace. Shouldn't I be able to re-import that AD exported SVG and edit the nodes?
Although, I return to what I was wondering about earlier: does no method / tool exist to convert a filled outline shape (as exported by Inkspace) to an stroke? Or in any vector application - is this just not possible?
Again, I'm not a programmer, but one would think that if the Inkspace app/Slate is recording each line/stroke's coordinates *in the right order* to the WILL/SVG file (as in the SVG code sample you quoted), then the first 'coordinates' for each stroke could be interpreted as the beginning point of a stroke and the last coordinates as the end point of a stroke?
-
Hi there,
Thanks for the SVG tutorial!
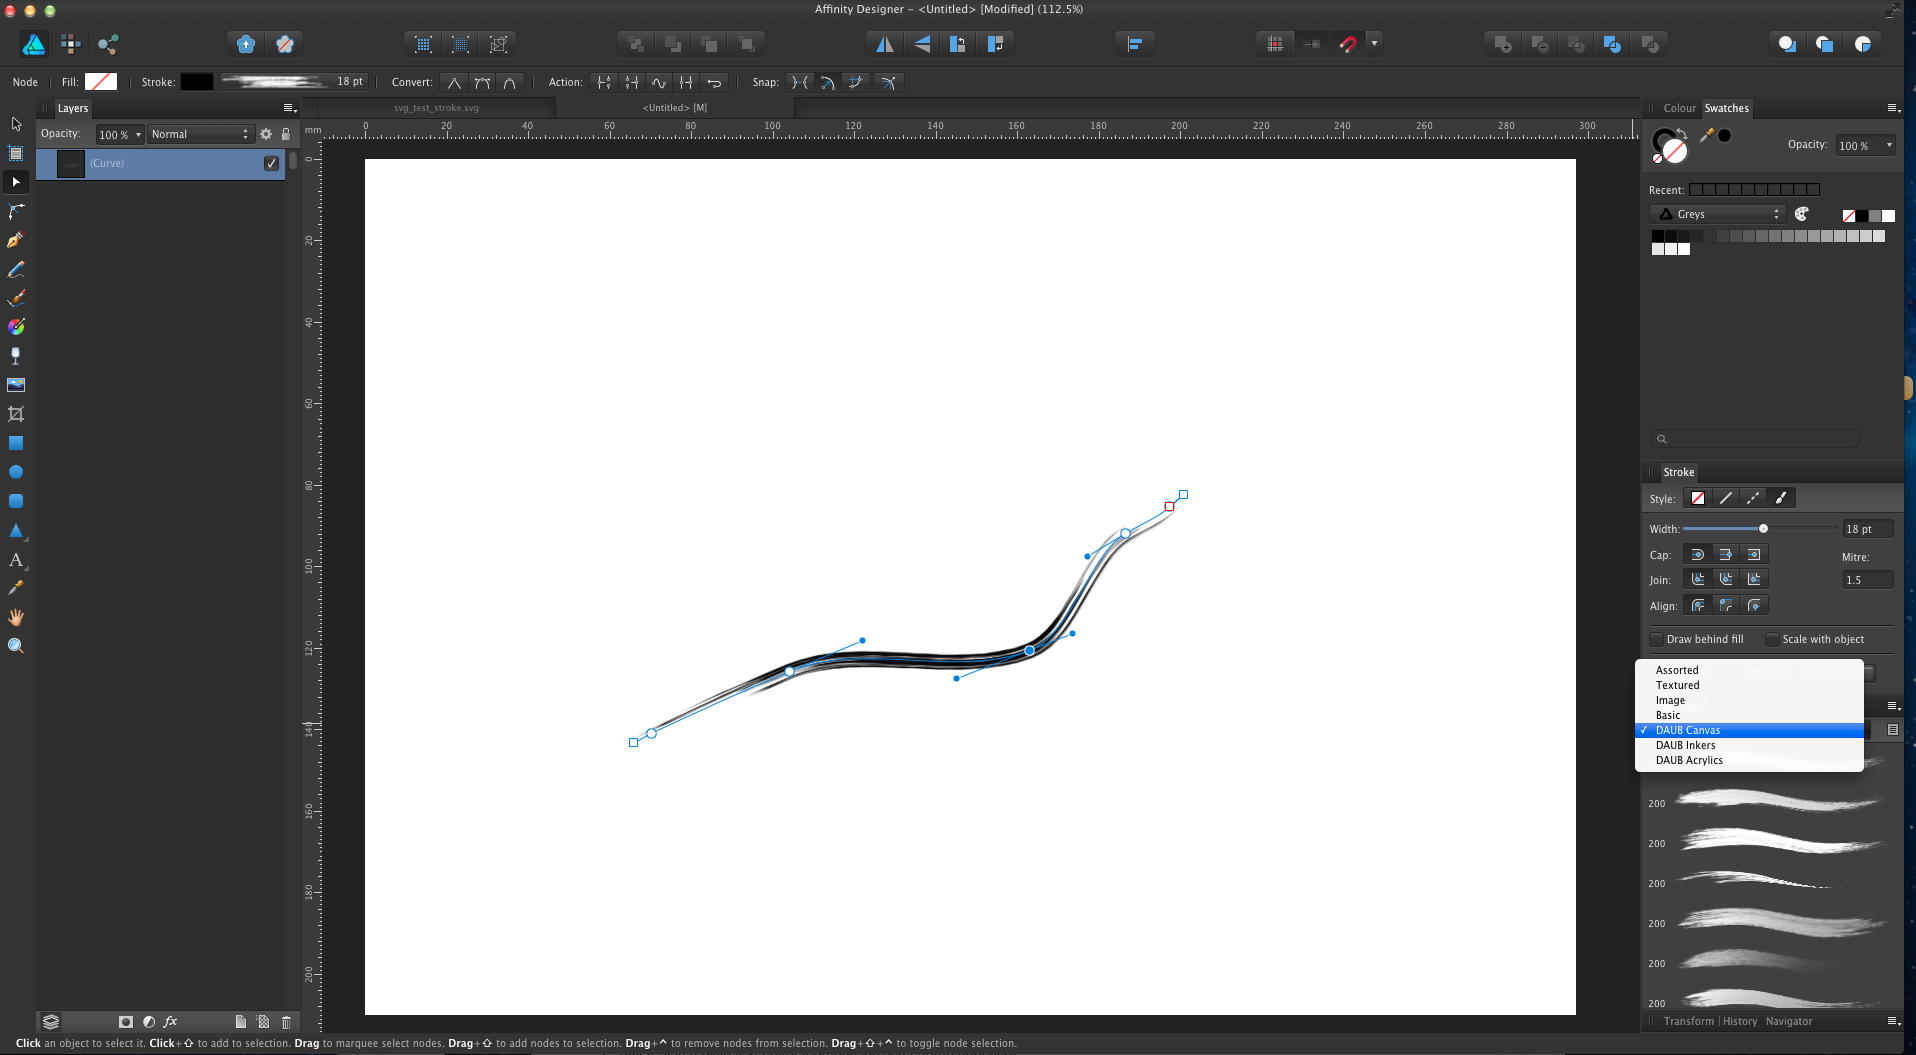
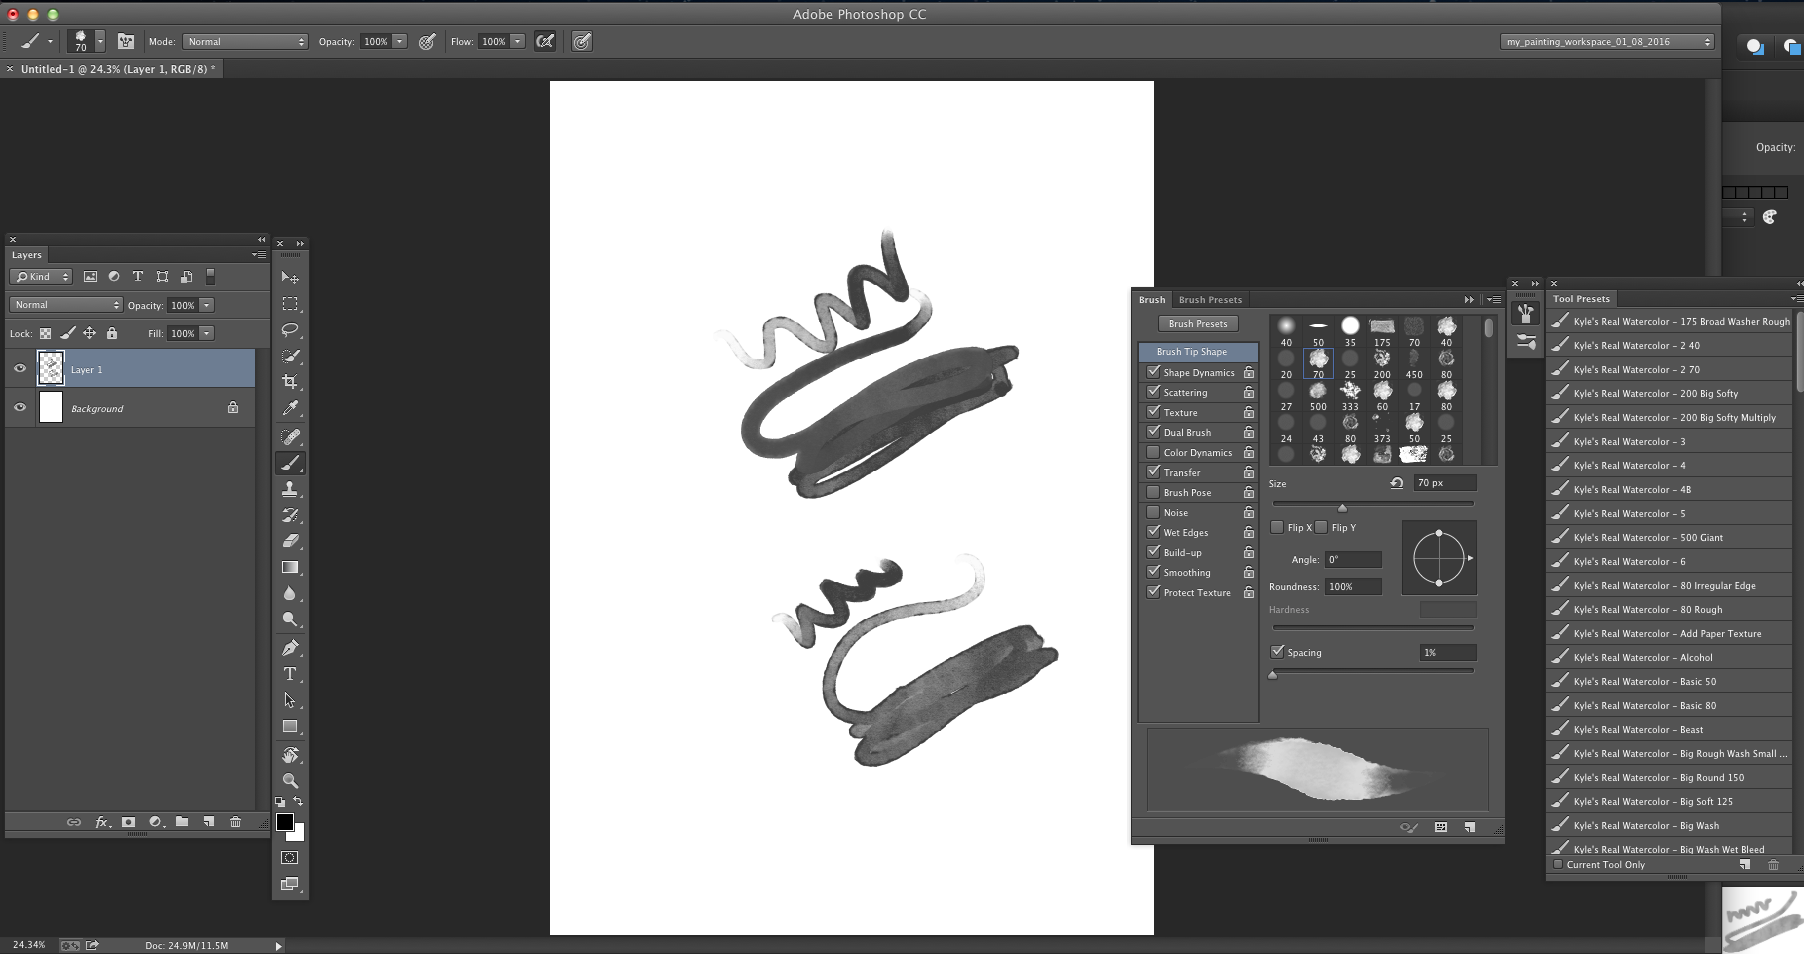
Vector brush - yes, I'm pretty sure it was a vector brush... erm, I was in the vector paint side of AD and using one of DAUB's/Paolo Limoncelli's brushes (please see screengrab and the AD-exported SVG), so yes, that should be OK.
I don't know about Wacom and their WILL format either. I have been trying to get information from Wacom and whether they could export the SVG as a stroke that I could make thinner or that they could have a pressure curve preference in their Inkspace app for people with a lighter touch (the line thickness/tapered ends issue), but I'm still waiting for information. I'd be happy with just thinner lines, but I guess that defeats the purpose of Wacom advertising pressure sensitivity etc.
-
Hi Alfred,
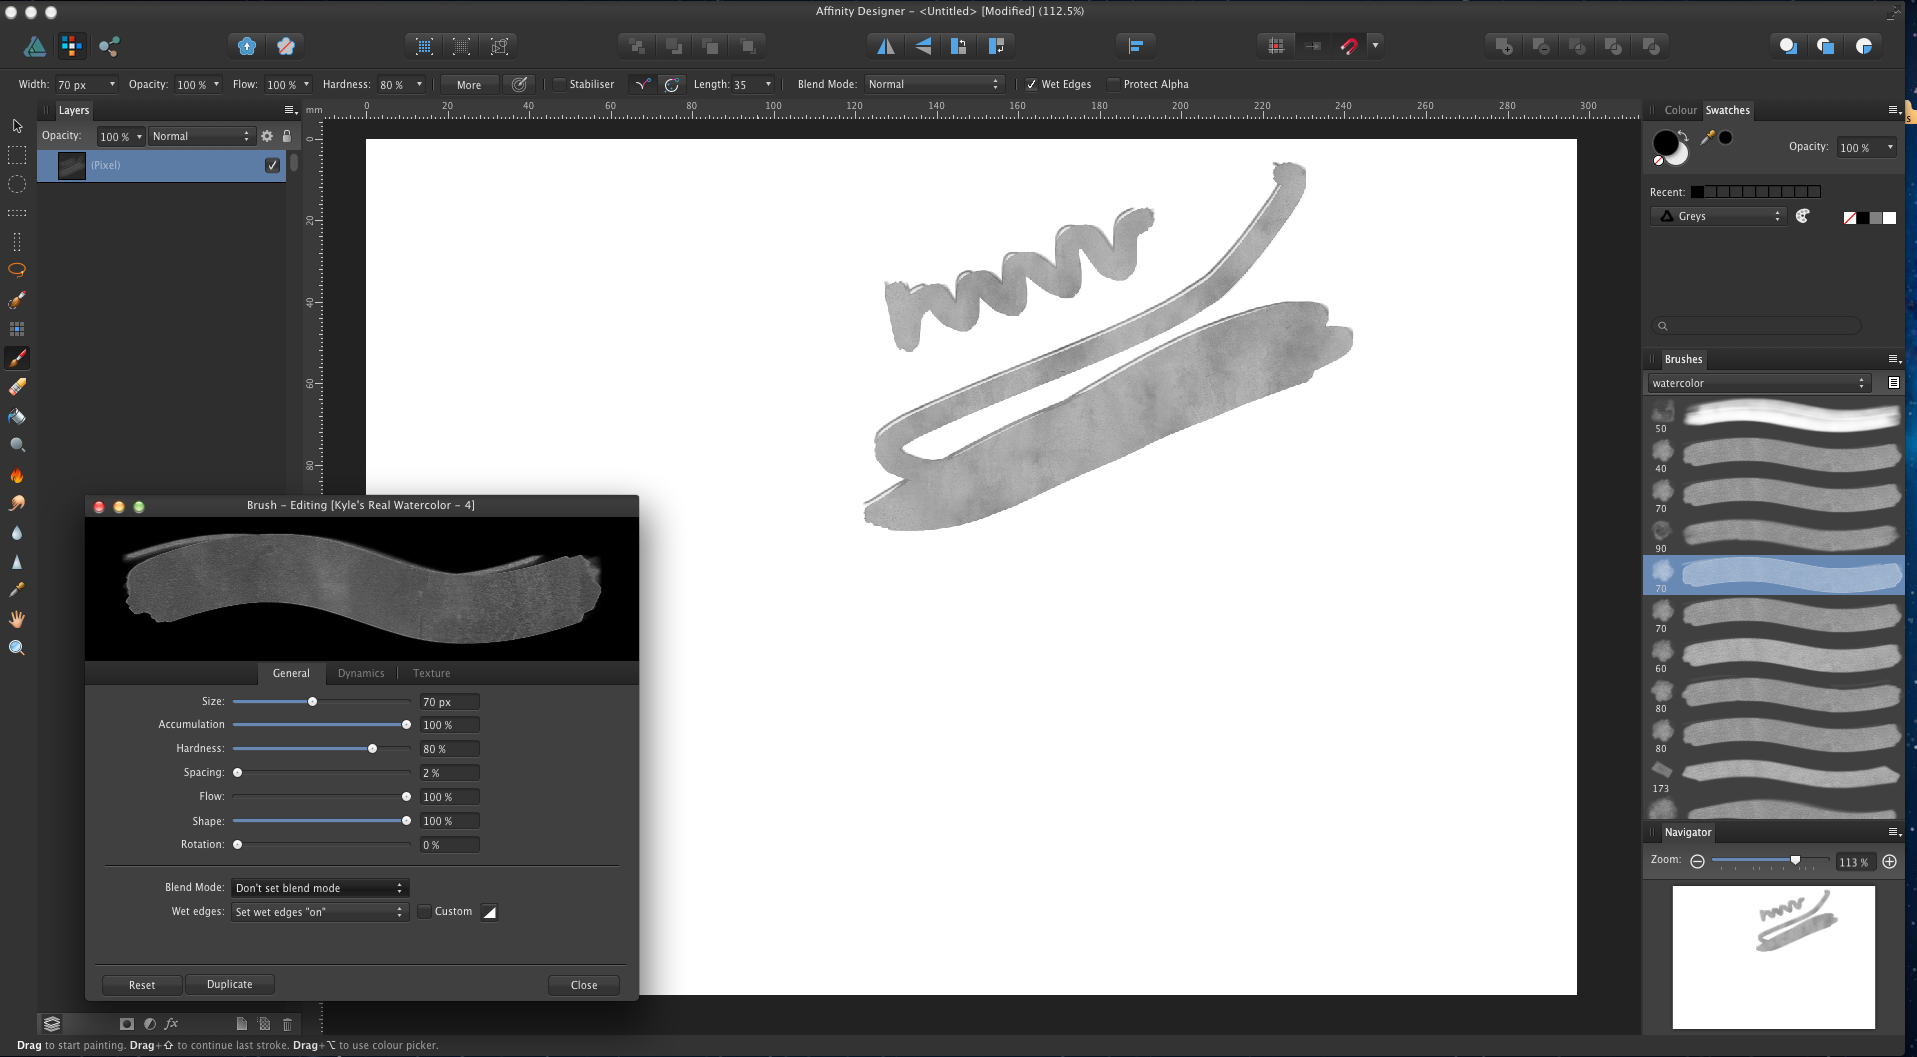
That's interesting, thanks! I should have a look at the file extension, although I already installed the 'new and enhanced ABR standard' versions, which should retain some of their Photoshop preset values like size and 'wet edges' etc. ... I hope? (attaching screengrabs of the same brush in AD and PS)
I guess it's just a case of simply tweaking the AD brush settings to get the brushes to work/look a little more like they did in Photoshop (taking into consideration brush engine differences AD vs PS)?
-
Hi v_kyr,
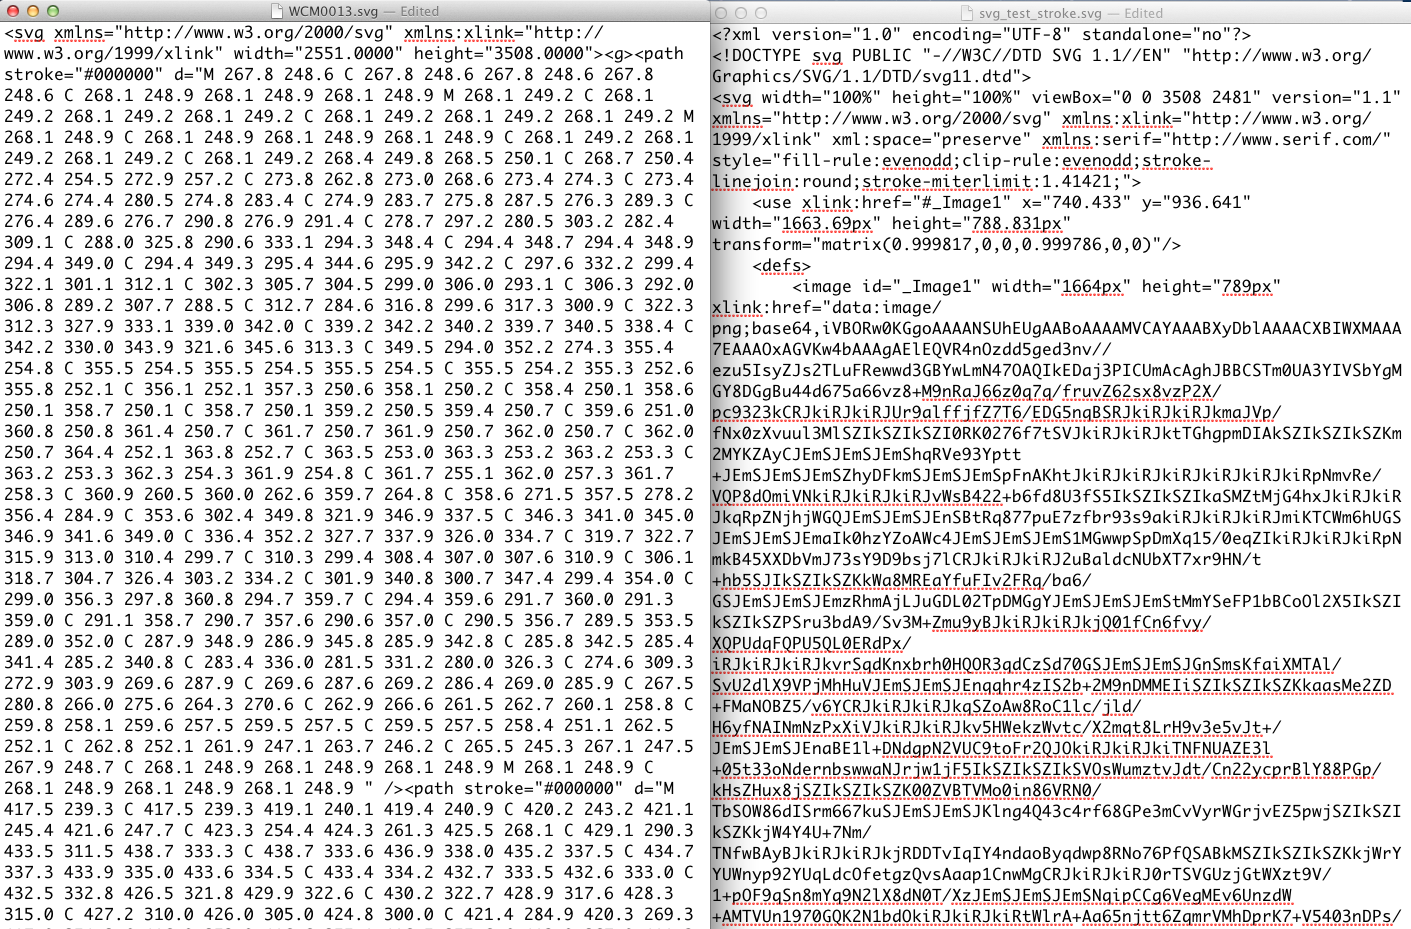
Thanks for your detailed reply! I'm not a programmer, but I could sort of follow your SVG code example and rationale, which I think is in keeping with what Wacom's Inkspace app seems to be doing when exporting an SVG file (specific coordinates creating filled shapes with a black #000000 colour).
When I create a single stroke with a vector brush in Affinity Designer and export to SVG, the resulting file looks scrambled and very different in a plain text editor (comparison screengrab attached).
With your knowledge of SVG code, would you reckon that Wacom could feasibly export an SVG file from their native WILL file, with strokes you can re-size instead of these filled shapes? Or, are Wacom's developers dependent on the SVG standard (not) supporting strokes/strokes with variable width and, really, we're stuck with this?
None of this is the end of the world, but it's a shame that the otherwise nice hardware features of the Wacom Bamboo Slate product (and other products e.g. Neo Smartpen N2) are hampered by Wacom software issues or SVG file standard issues. For something like pen pressure or crosshatching (in the above photo), the SVG can look like a dark mush instead of natural hatching, which is a pity!
-
I have bought a bunch of Kyle T Webster's great brush packs in the past, but as they were TPL files, they couldn't be imported into other apps like AD or Krita. I'm curious as to what AD/AP's ABR support is like - how it works. I tried some of the new ABR brush versions in AD and, sure, they look different - but is there a pattern to what exactly works differently in the ABR files?
Does Serif have to reverse-engineer the file format to see what works with the AD/AP brush engine or is it simply a question of supporting the 'newest version' of the ABR file format?
-
Hello again,
I received a reply from Wacom, but as it doesn't really take us any further, I have asked for clarification and given more details.
"Thank you for contacting Wacom Customer Support.
I am truly sorry for the late answer.
Pressure changes are really only visible in SVG and higher zoom factors.
Vector images: pressure is the thickness of the line so you can only see it in case that he will export as SVG.
But is this is only visible under high zoom then in Raster will become blurry is this the conclusion?
* Raster image - you still should see the pressure sensitivity in this case when exporting in JPEG."
Any new thoughts from Serif's side as to how we could approach and alleviate this issue - is it a SVG standard issue, Affinity Designer issue or Wacom Bamboo Slate issue?
-
Hi and thanks!
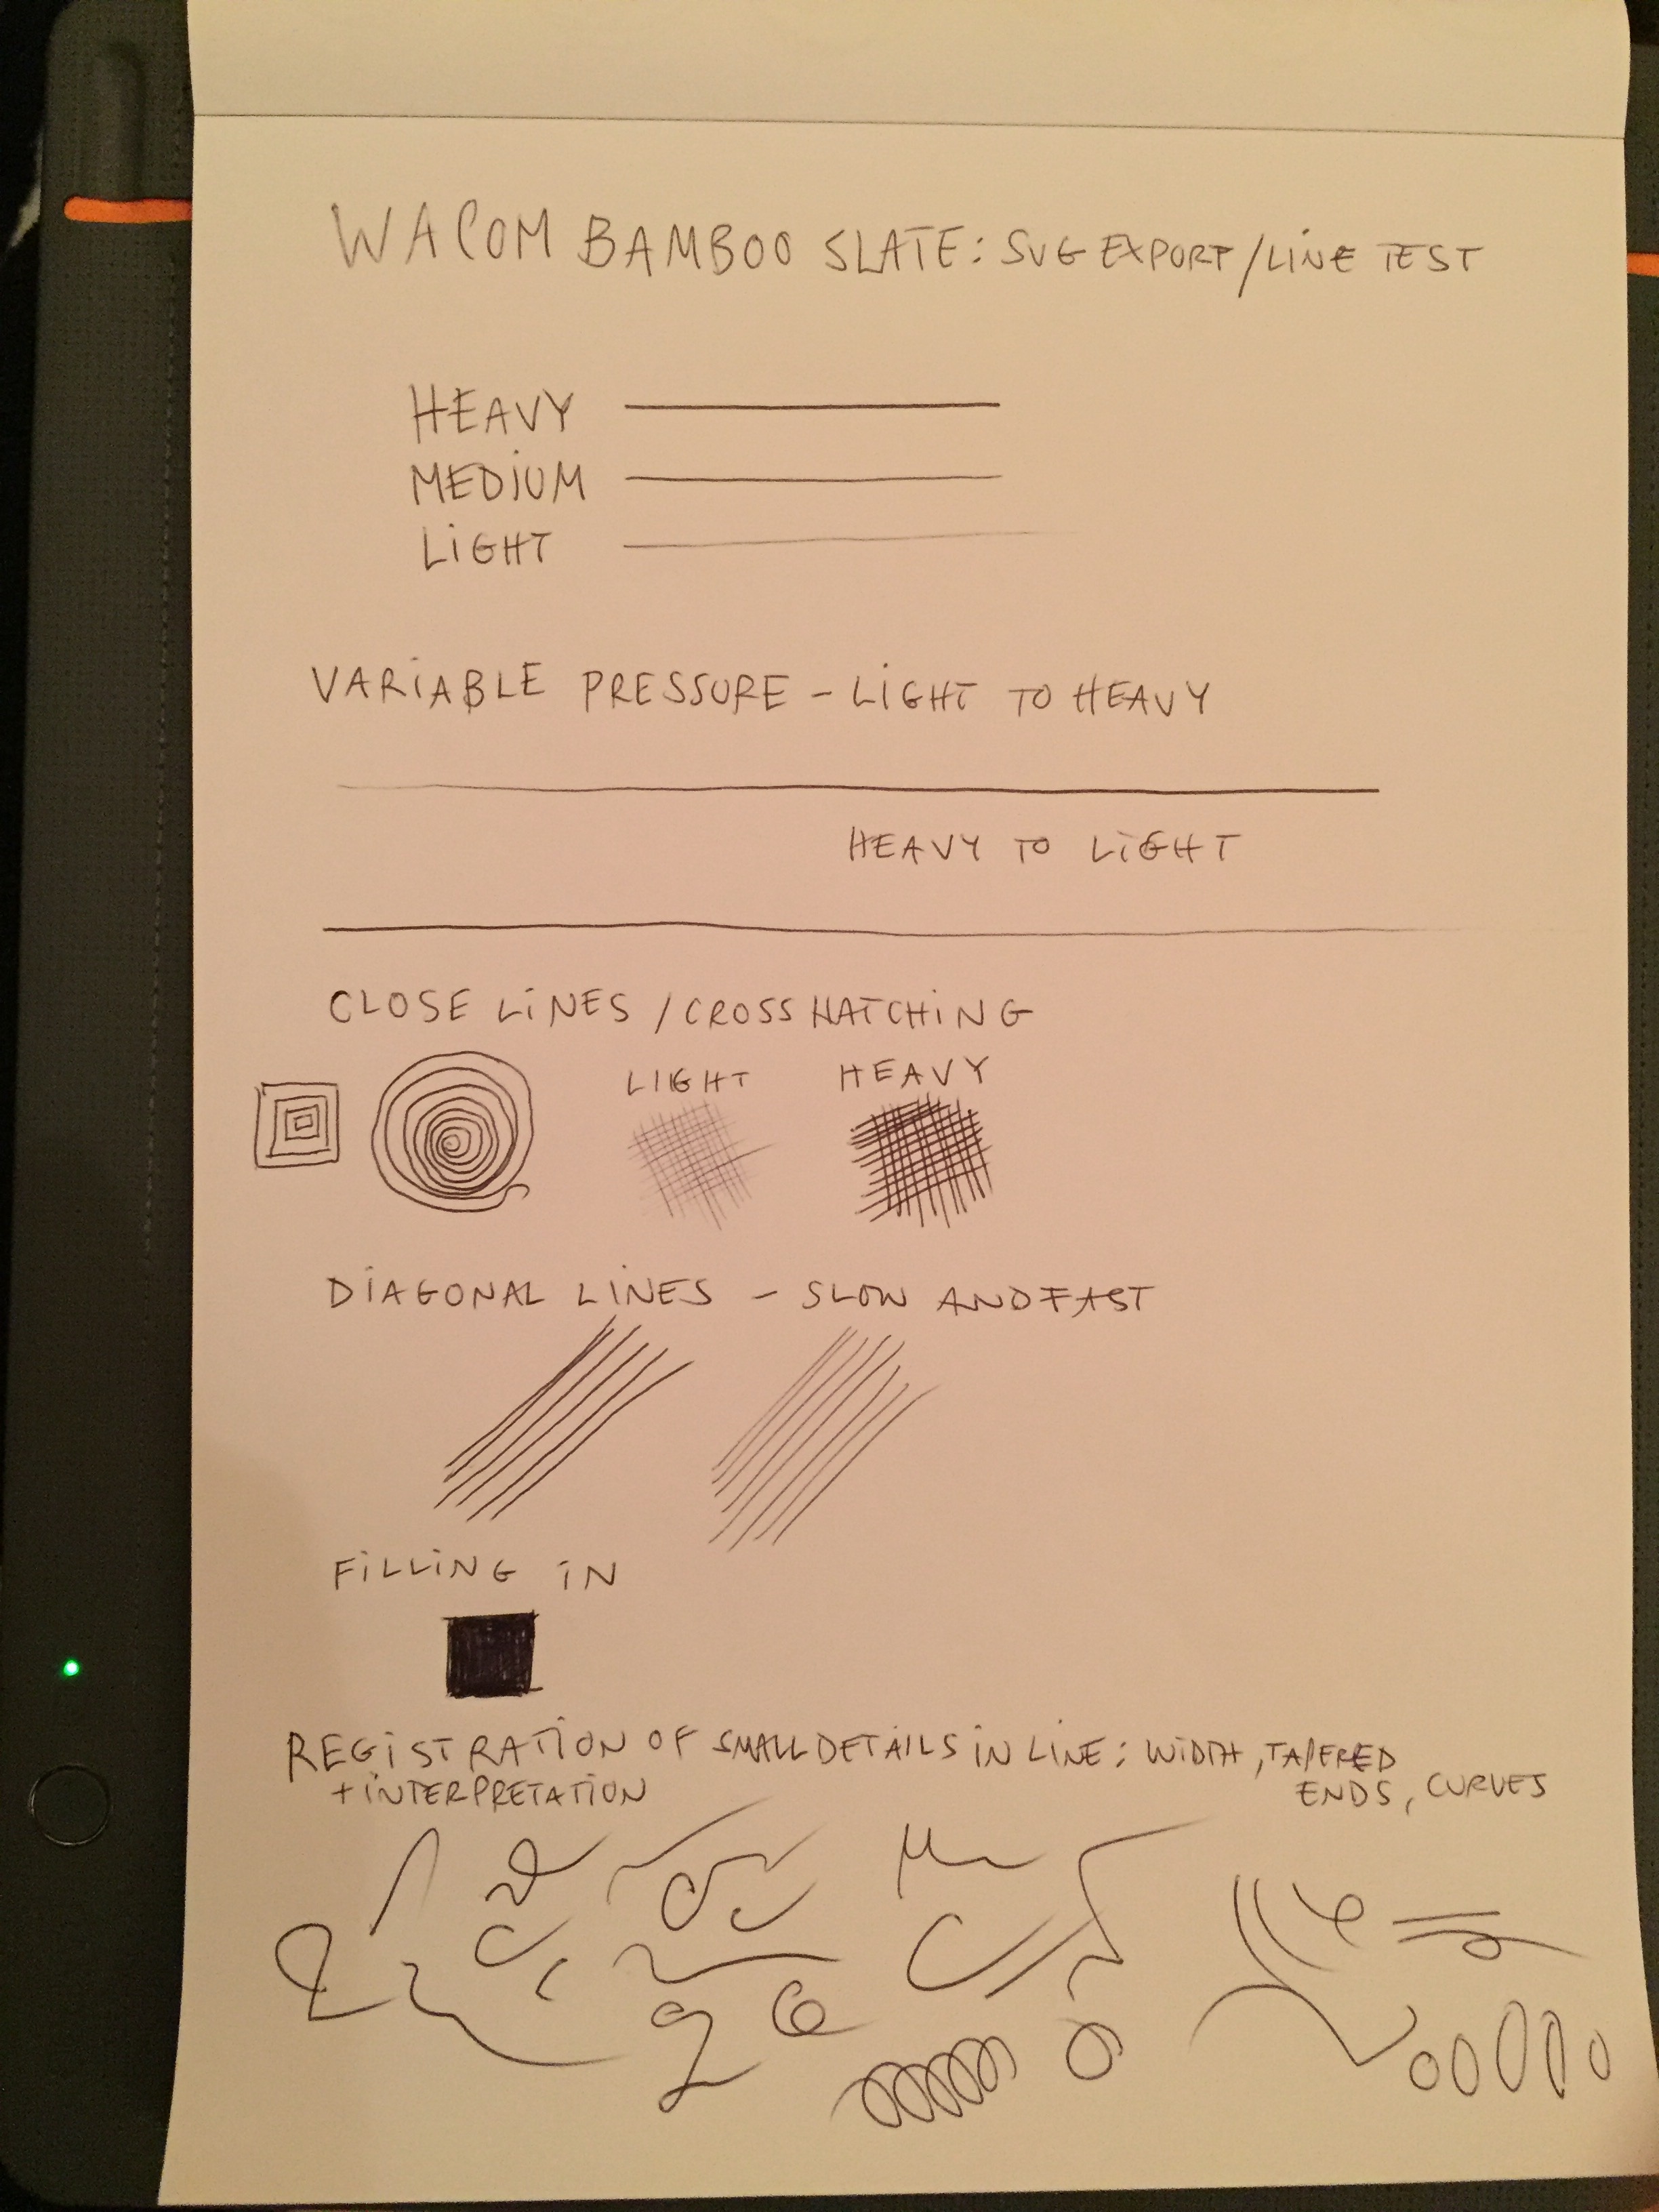
Please find attached the exported SVG file of a line/pressure test and a photo of the paper drawing for comparison. In case it's useful to you guys, I'm also attaching the original WILL file of the test.
I'm not very familiar with it, but WILL is Wacom's native 'vector ink' format in which the Bamboo Slate (and Intuos Pro Paper Edition, I think) records your work. They have even provided an SDK for others to use:
- https://developer-docs.wacom.com/display/DevDoc/WILL+SDK+for+ink+-+File+Format (see 'WILL Architectural Overview' for details on the WILL file format and its use of SVG)
- http://www.wacom.com/en-us/enterprise/will
- http://developer.wacom.com/en-us/will-sdk-digital-ink
Best,
Dmitry
-
Hello there,
I am drawing on a Wacom Bamboo Slate, which can export your drawings (and writing via a kind of OCR) to text, image formats and SVG. Here's Wacom's specs for the Slate: http://www.wacom.com/en/products/smartpads/bamboo-slate#Specifications
The Slate's ballpoint pen is marketed as having 1024 levels of pressure which in theory seems a bit much for a ballpoint pen, but would be nice if it could reproduce the light and heavy strokes you have made on paper.
My problem is that the SVG files exported from Wacom's Inkspace app are filled black shapes instead of strokes. The shapes are thicker than the original paper lines, losing most of the line width variance, and I cannot find a way to reduce the width as you would with a stroke. I am attaching an image to illustrate my problem.
Any thoughts on how to convert these shapes into strokes so that I could make them thinner?
Many thanks in advance!
PS there may be an answer in the thread below ('line width is not yet fully supported in the SVG standard'), but I'd like to confirm if something can be done about this using Affinity Designer?

Wacom Bamboo Slate to Affinity Designer: SVG export issue
in Pre-V2 Archive of Affinity on Desktop Questions (macOS and Windows)
Posted