firstdefence
-
Posts
11,458 -
Joined
-
Last visited
Everything posted by firstdefence
-

Draw (graphic) to affinity
firstdefence replied to danielscott63's topic in Affinity on Desktop Questions (macOS and Windows)
A PDF should maintain layers but if not also try exporting as a Tiff file. -
Also called the Option Key
-
Draw (graphic) to affinity
firstdefence replied to danielscott63's topic in Affinity on Desktop Questions (macOS and Windows)
Welcome to the forum @danielscott63 Have you exported the draw file as a PDF, this is generally the preferred method from Draw to Affinity. -
You cannot change Raster to Vector in Affinity but there are quite a few tracing apps on the internet such as https://www.vectorizer.io/ there are also apps like Inkscape that has a built it trace feature, it's basic but usable, other than that you have paid for apps like VectorMagic, but the cost is steep so only valid if you know you can make the money back in either profit or time saved.
-
There is a filter forge rep on here @Filter Forge maybe have a chat.
-
Works for me, although I use FF 9.008 as that's the licence I have.
-
I personally don't think there should be Affinity Photo and Affinity Designer, I think the two apps can quite easily be merged, I find the fact they aren't to be an over complication for the sake of it. In Affinity Designer you have a cut down version of pixel editing and a slight confusion over what layer types there are. You need to make sure the layer is a pixel layer and not an image layer, if you make your selection then press delete and the whole layer disappears you have an image layer and you need to right click and rasterise that layer, else make your selection and simply press delete and everything within your selection will be deleted.
-
This behaviour is just nonsensical, Photoshop is logical it makes absolute sense to enable the move tool so you can position the newly added object where you want it, why would the hand tool be selected, when have you ever wanted to move the canvas when initially adding an object. Just another weird UI bafflement that makes using Affinity that little bit more clumsy, Photoshop selects the move tool because it's simply logical to do so, Affinity should do the same, not to be like Photoshop but because it's common-sense. Photoshop does it because it makes sense. I would love to hear the logic of Affinity's selection of the hand tool in this situation.
-
It is frustrating @namd3, by default Affinity should change/select the move tool, not the hand tool, to allow for positioning of the added object, it's annoying to have to continually change to the move tool (V), why is the Hand tool selected!!!!! Logically the move tool should be selected because what else are you going to do with a newly added object? This is a difference Affinity need to correct, the hand tool, why? this baffles me.
-
Probably, exporting the EPS to PDF will do much the same as SVG and open the layers better, so PDF seems to be a better option for a file that is also EPS.
-
The file is not in error, it's the way Affinity opens it... From Illustrator: Layer 1 is the chequered background and as you can see it's easily turned off in Illustrator. Saving as an SVG from Illustrator kept the layer structure intact and Affinity opened it as per Illustrator. Affinity does not maintain the layer structure when opened as an EPS file, especially with regard to how it interprets the background within the lens.

-
Affinity opens this in such a way that all the chequers are individual objects, where it fails is the lens on the magnifying glass. I opened the eps in Illustrator and I have deleted the background, I have saved it as an SVG because it maintains the layers structure and the document dimensions, it's also quite a bit smaller re file size This is with the background left in. [MOD EDIT, ATTACHMENTS REMOVED]
-
I assume the reason for wanting to scroll is because you are trying to make an accurate selection so you are zoomed in? What are you trying to select, which selection tool are you using and have you seen the Mode options for the selection tools such as Add, which will allow you to add to a selection, in this way you can make a selection, move the screen with the Hand tool and then go back to the selection tool and add more area to the selection you are making.
-
I have had experience of On1 Effects and the UI is dire and not at all intuitive, you literally have to force yourself to learn it and that is a frustrating experience in itself, in the end I just gave up because the fancy pants features just didn't work reliably. This topic has gone very quickly from Generative fill, e.g to resize an image and fill and extend that empty space with content to look like an extension of the original image, to selections that either don't work properly, can't be worked out to work or just plain doesn't work lol!
-
Nobody is going to do that!!! But, you're in luck, because Affinity's website will do that, click this link: https://affinity.serif.com/en-gb/ go to the website Click on BUY NOW...
-
When selecting the background colour which radius do you use? for the selection displayed I used 17 x17 When using the refine options, do you ever change the preview mode to black and white? using black and white preview mode can show more of what is "soft selected" my own term. Using a small brush can help by turning some of the grey area's whiter and tighter to the edges. Have you also considered making a tighter crop on the subject to reduce background colour variation and then pasting into a document size you want.
-
File corrupted
firstdefence replied to R.M. Archer's topic in Affinity on Desktop Questions (macOS and Windows)
I'm afraid it's a start over job, unless a mod wants to take a look at your file: @Dan C -
Change banner color?
firstdefence replied to yanksno1's topic in Affinity on Desktop Questions (macOS and Windows)
I took a sample from another high res image overlayed it and matched the colour.
-
An addition to Bruces suggestion is to create a clipping mask, use a specific sized vector (integer numbered size and integer numbered location) Make a note of these so the next clip can either be butted up or add say a 5 px overlay so you don't get gaps.
-
Isometric grids and snapping
firstdefence replied to RichiePhoto's topic in Affinity on Desktop Questions (macOS and Windows)
Not quite sure what you want but on the isometric panel, if you click on the face you want to draw on the grid will change. and will have vertical lines. -
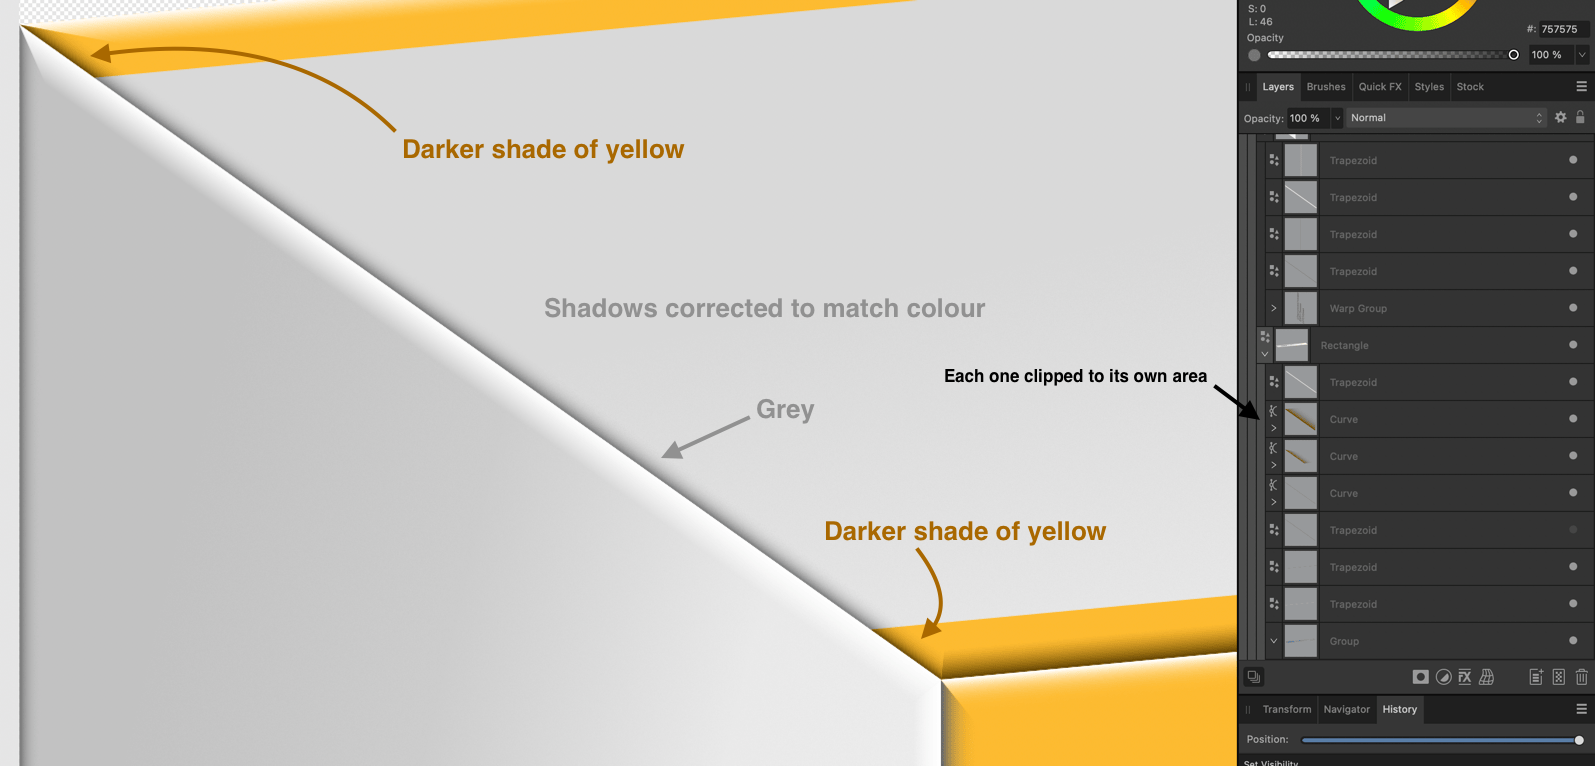
Hi sorry for the delay in replying, I've had a look at the file and in part it's due to miss-aligned shapes like the trapezoid shading and highlights, zooming in shows how the shadow trapezoids are not aligned correctly but even when they are it still shows some jagging, I'm still trying to work this out, it may be down to the app rendering. See screen grab below for how the shadows are out of alignment. another tip re the shadow is not to use grey as the base colour for the shadow when over a colour, but use a darker shade of the colour the shadow is overlaying, this gets more complex when you have different colours over a single shadow line, a point in case is the top face of the box on the left side so I'll use this as an example. You have a yellow shape, a white shape and then a yellow shape. to improve the shadow we need to duplicate that shadow trapezoid two times so you have 3 instances of it then clip each instance to the yellow, the white and the yellow. The all grey shadow Colour corrected shadows This may be more work than you are will to do but I add it to help.
-
I'm gonna hazard a guess that this is about the Move By Whole Pixels under Affinity Designers Snap settings and the fact it will continue to to maintain a non-integer X:Y position.
-
Who gave you these instructions? So this is an exercise to familiarise yourself with Affinity Publisher, to create a template for repeatable web graphic generation in publisher for export into file formats, such as png, webp and jpeg.
-
Changes to EPS Export
firstdefence replied to DonC123's topic in Affinity on Desktop Questions (macOS and Windows)
Isn't v2.4.0 going to have DXF export: -
Changes to EPS Export
firstdefence replied to DonC123's topic in Affinity on Desktop Questions (macOS and Windows)
Just tried on Mac with the MOI Cad trial and eps imports ok from Affinity Designer 2.3.0 It was a straight EPS (for Export)