firstdefence
-
Posts
11,455 -
Joined
-
Last visited
Everything posted by firstdefence
-
 Guides. while the Move tool is selected you can go to the rulers and pull a guide out, you can also use the Guides Manager to place guides exactly where you want them either as a percentage or placed in mm, px, inches etc depending on what your document units are set too. At the moment you can only create guides with the move tool selected but hopefully in the 1.7 update they will allow you to create guides while using the Node Tools and maybe a few others. From the Help files. Guides Guides are non-printing, non-exporting lines that float over page objects and assist with their positioning. They can be created and positioned by dragging from a ruler (for 'by eye' placement) or via the Guides Manager (for precision using the document's units or a percentage). To add a guide: Do one of the following: Drag from either the horizontal or vertical ruler which can be switched on via the Viewmenu. From the View menu, select Guides Manager. Click the Add new guide icon for either horizontal or vertical guides. To move a placed guide: Do one of the following: Drag the guide with the Move Tool when you see the cursor change. From the View menu, select Guides Manager. Double-click on the value for the guide you want to edit and type a new position into the value field. (Note that you do not need to type the units.) To position guides by percentage: From the View menu, select Guides Manager. Select the Percent option. Percentages are calculated from the top-left of the document page. To show or hide guides: From the View menu, select Show Guides. A check mark is displayed next to the menu item when the guides are visible. If guides are hidden, they will automatically become viewable again if a new guide is added by dragging from a ruler. To remove guides: Do one of the following: With the Move Tool selected, drag the guide off the page. From the View menu, select Guides Manager. Click to select the value for the guide you want to delete and then click the Remove guide icon.
 -
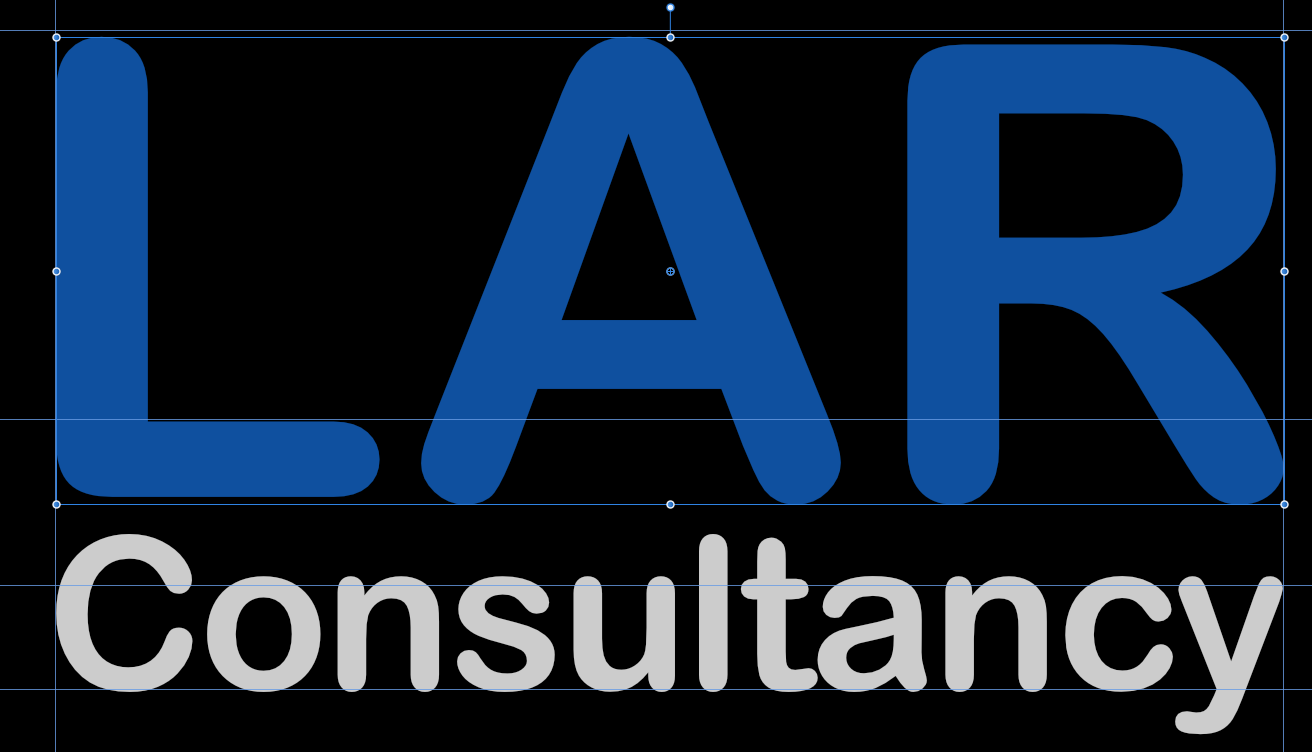
@MediSpera here is the afdesign file: LAR-Top-banner-Split-2.afdesign try exporting to SVG from this file, SVG does have a habit of separating the characters in words, I've modified the file a tad because on zooming in on the word LAR I noticed the letters 'L' & 'R' were slightly off in the vertical, not sure why that would be on a font like Arial Rounded MT Bold, anyway, I typed the 'L' & 'R' separately to get the letters to align to the baseline. (See images for what I mean.) After typing each letter separately and doing a small resizing of each letter.

-
Agreed, best way to demonstrate for people is on the image they are trying to get a selection from.
-
Well, when the day be like... We get lots of time to play in Affinity Photo
-
star sticker edited.afphoto Again saved with History so you can scrub back and forth in the History Panel Also replaced all of the stars and moon with shapes, didn't take long at all, the trick is to create the shape at the size that you want, Press Alt and drag as many stars as your need for a given size, then resize the last one you made and press alt again for the smaller stars, literally took 5 mins. star sticker Star and moon redrawn.afphoto
-
Yes
-
Try selecting the star but not adding the 2px grow, then try unsharpened mask, you could then try selecting the star again and adding the 2px grow and fill. If you don't mind, would it be possible to add the file, maybe just leave the stars and the background so we can have a go at working this out on the subject.
-
Great minds think alike
-
To get a harder edge would it not be easier to just create a star shape, You can adjust the opacity of the shapes fill to get the star dimensions correct
-
Edit > Fill gives you some great options actually but if you don't have a pixel layer to fill onto it will edit the original image.
-
What are you selecting from? an image, a shape.
-
It wouldn't it would have explained why there is an overspill on your selection
-
Have you applied some feathering?
-
is the opacity set to 100%?
-
To fill the entire selection just create a new pixel layer and use the bucket fill Saved with History: Twinkle star.afphoto You can go to the History panel and scrub back to see what I have done.
-
Changing image size (scaling and resampling) In Affinity Photo there are options to change a document's or image's pixel dimensions and/or print resolution. You can change the 'size' of an image by scaling or resampling it. These can be undertaken independently or simultaneously. Scaling Scaling will embed a specific print resolution into an image's metadata to force it to print at a specific dpi (e.g. 300 dpi). The image's pixel dimensions remain unaffected. Resampling Resampling will do one of the following: increase the number of pixels in an image (i.e stretch it) to make its overall pixel dimensions bigger. This is known as upsampling. This will also increase the image's file size. decrease the number of pixels in an image (i.e compress it) to make its overall pixel dimensions smaller. This is known as downsampling. This will also decrease the image's file size. When you resample an image, you have the option to: Maintain the image's aspect ratio or resize unconstrained. Select from a variety of interpolation methods (see note below). Simultaneously scale your image. Resampling may be carried out to: Enlarge an image to specific dimensions in preparation for printing. Reduce an image for on-screen display and to optimize file size. To scale an image: From the Document menu, select Resize Document. Ensure the Resample option is switched off. Change the DPI to control the number of pixels (dots) which will be printed per inch when your document is printed. Set higher values (e.g., 300dpi) for professional printing. Click Resize. You will see no change in the image on the page as this procedure only affects the image's metadata. To resample an image: From the Document menu, select Resize Document. Ensure the Resample option is switched on. Enter your new document dimensions in the Size boxes—left box for width, right box for height. To resize the width and height independently, click the lock icon (to unlock) between the Size boxes. (Optional) Select a different measurement unit from the Units pop-up menu. Rulers will update to the new measurement unit. Change the DPI to control the number of pixels (dots) which will be printed per inch when your document is printed. Set higher values (e.g., 300dpi) for professional printing. Select a Resample method from the pop-up menu. Click Resize. Resampling methods The following resample settings are available: Nearest Neighbor—simple resampling which has the fastest processing time. Use for hard-edge images. Bilinear—algorithmic resampling for use when shrinking images. Bicubic—algorithmic resampling for use when enlarging images. Resampling is smoother than Bilinear but has a slower processing time. Lanczos 3—complex algorithmic resampling which gives the best results but with the longest processing time. Available as 'separable' and 'non-separable'; the latter gives marginally better results, but is slightly slower than 'separable'. Instead of adding absolute input values you can enter expressions instead. See Expressions for field input for details.
-
Really need a screenshot of the the apps and upload to an image hosting website, then post the link here.
-
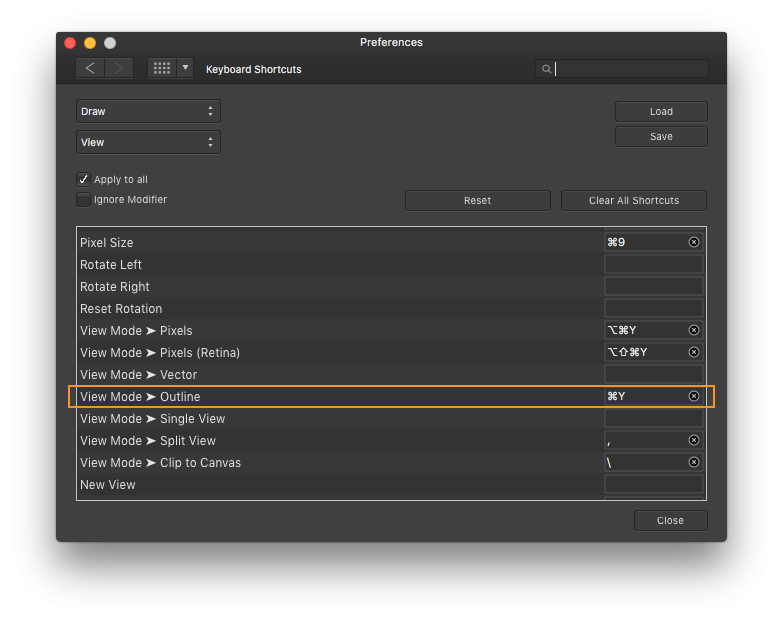
You have turned on Outline Mode, You could have accidentally turned it on via the keyboard, the keyboard combo for Outline Mode is ⌘+Y
-
I think this should be a request, to have the option to use any selectable units by default.
-
Knowing how to use the refine option helps a lot, it is an oft ignored part of the selection process, once I got to grips with it, the selections process became a lot easier.
-
You can easily cut this out with a smallish Selection Brush Tool and a bit of refining. Original Image. Skater Selected, I added a bit of artistic licence in the form of DOF blur on the board to give a bit of action.
-
Have you tried exporting as SVG for the web? this comes out at approx 3Kb and the text is crispy, I did a mock up of your home page banner to test. LAR-Top-banner-Split-2-png.svg
-
Which app are you using? Affinity Photo or Affinity Designer
-
You can upload your images here you don't need a linked image