firstdefence
-
Posts
11,458 -
Joined
-
Last visited
Everything posted by firstdefence
-
 John Kettley lol!
 -
Ooh that led me on a trail of intrigue and a journey of learning and discovery
-
Affinity Designer - Operations
firstdefence replied to blanko's topic in Feedback for Affinity Designer V1 on Desktop
You can use Divide in Layer > Geometry: Divide -
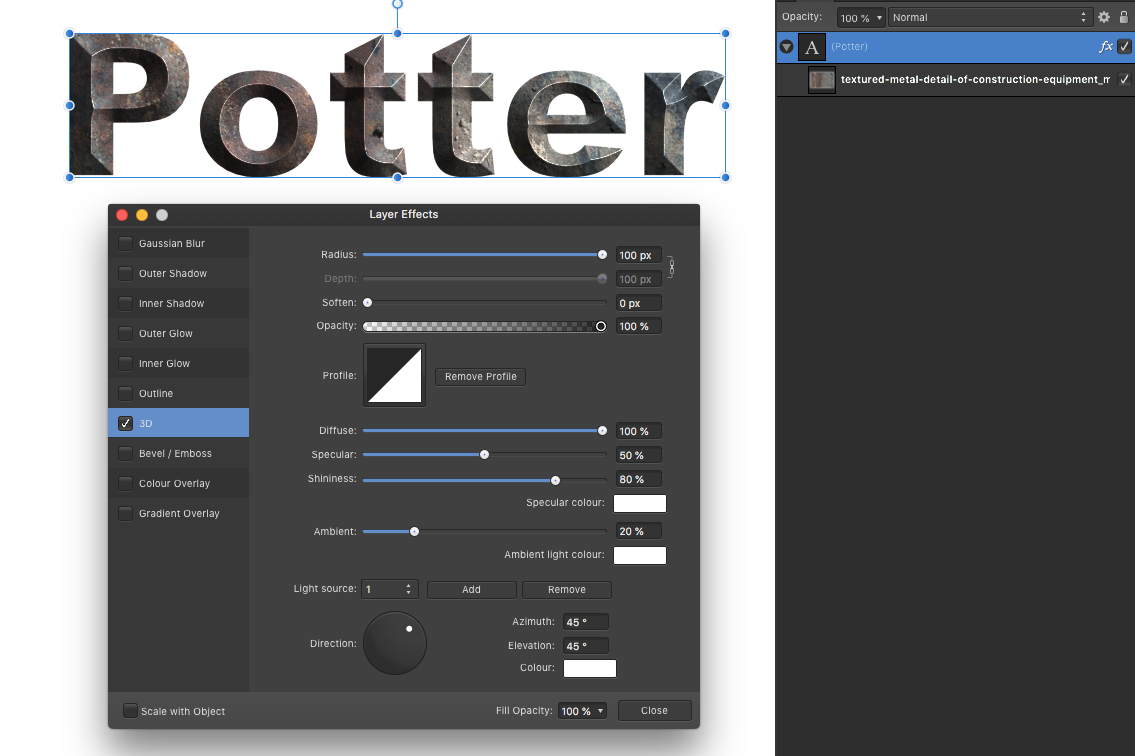
Alfred Potter.afphoto

-
I think there is an option to effectively reset the app back to defaults by pressing the Ctrl key while starting the app, this will lose you any customisations you may have set, including added brushes etc. With CTRL key held, when the window appears, release CTRL and click the Clear button.
-
Have you tried the OpenGL option instead of Metal
-
The metal texture is made a child of the text, make sure the texture is directly underneath the text on the workspace, then use the 3D fx to make the sharp bevel and the diagonal profile to get that sharp chiselled look.
-
A post you may be interested in:
-
You could use the Threshold Adjustment Filter to find the whitest white in the image by sliding the slider all the way over to the right to approx 98-99% then mark the "hotspot" with a vertical and horizontal guide. If you wanted to pull back on the whitest white so that you no longer have hotspots, you could keep the threshold adjustment filter and add a Shadows/Highlights Adjustment Filter to the image and adjust the Highlights slider to a minus figure somewhere around -5% to--7% or until the threshold filter no longer displays hotspots you can then turn off the Threshold Adjustment Filter. Original untouched image. Threshold Adjustment Filter tuned to 98% showing hottest part of the image Shadow/Highlights Adjustments Filter Tuned to eliminate Hottest Part of the Image Image adjusted, this is a very subtle adjustment.
-
Got ya, so scale the object not the fill.
-
Looks like it's sizing to the Pixel Grid, if you zoom in on an Artboard and in File > Document Setup, change the Document Units from Points to Pixels you will see why the Export Persona is showing that extra bit on the edges as it converts the Points to Pixels. What was the reason for setting the Artboards to Points? As far as I am aware Export will not do Points as a unit of measurement. Units set as Points Units set as Pixels
-
You don't say which app you are referring too? What do you mean by another operation? Designer and Photo will scale the bitmap pattern if you use the Fill Tool, then if you later add an effect or increase say the stroke width you can still come back to the Fill Tool to adjust the bitmap fill. Unless you rasterise the layer the fill will be editable and not baked into the shape.
-
Could you not just select the Move Tool, and drag a selection over the text and icons, then click on the Transform Panel and either type in the required move in the Y axis or click in the Y box and move everything selected by pressing the down arrow key or in Windows use the scroll button if your mouse has one I think pressing the shift key while doing this will move the selection in units of 10 so in your case units of 10pts. I've just created the symbols and dummy text and done just this and it works fine, no funny movement with the symbols.
-
from what you have typed I'd recommend you stay with CorelDraw for the moment, it fits your workflow and your client base, Designer is getting there but I think you my get frustrated, Designer is good but needs another couple of 1. x version updates. Use the trial to give you an idea of whether it would fit your workflow and product creations but as simple a work as you appear to do, it may be simple in CorelDraw but not so simple in another app. Art Text is just awesome and so much fun to use, to get Designer to do what art text can do would be hard work but doable but why work hard when you can just buy Art Text, especially if its going to earn you money, then it becomes an investment.
-
Just tried and as far as I can see this filter is broken, there is no point in being able to create multiple lights when their parameters setting like shininess are globally applied, each light should be completely independent. Unfortunately you cannot even have a workaround by creating multiple filters as the second will not show, the dominant filter is the topmost if you have say 2 Lighting filters. I think this filter needs some work on it.
-
I have Precise clipping enabled Toltec and it doesn't get rid of those lines. If the box isn't going to be shaded put a black shape behind the lines.
-
Affinity Photo doesn't have Layer > Expand Stroke Affinity Designer Has Layer > Expand Stroke. What are you trying to achieve, maybe we can show you a way to do what you want?
-
Which Operating System are you on? What version of Affinity Photo are you using? What version of Neat Image are you using? http://www.miguelboto.com/affinity/photo/plugins-support/
-
Smart Text
firstdefence replied to ConniB's topic in Pre-V2 Archive of Affinity on Desktop Questions (macOS and Windows)
Do you have a link to that PDF? -
Focus Magic hasn't been tested on Windows but on Mac it has, it does have issues however: http://www.miguelboto.com/affinity/photo/plugins-support/
-
Do you have Windows > Separated Mode Checked?
-
Waiting for an eBay auction to finish so... [EDIT] attachment removed (copyright issues) [/EDIT]
-
I have saved this document as an .ai file and .pdf, you will have to organise the objects into their respective groups but its better than it was in .EPS format. [EDIT] attachments removed (copyright issues) [/EDIT]
-
Gradient
firstdefence replied to MarcinJ's topic in Pre-V2 Archive of Affinity on Desktop Questions (macOS and Windows)
Open File Make a selection with the Pen Tool Fill Selection Made with the Pen Tool Go to Select > Selection From Layer (You should now have the Marching Ants around the Can) Note: Make sure you are on the Background layer, this is so you can Copy and Paste the Can to a New Layer So with the background Layer selected and the Marching Ants displayed Press ⌘+C to Copy and ⌘+V to Paste the Can to a New Layer, we'll call this the Can Layer. Now create a New Pixel Layer and drag it Below the Can Layer. Select The Fill Tool from the side menu and choose Linear Gradient The Gradient should be applied to the Pixel Layer Now you can modify the gradient to your own taste. The Layer should look something like this...
-
Gradient
firstdefence replied to MarcinJ's topic in Pre-V2 Archive of Affinity on Desktop Questions (macOS and Windows)
Basically its like an actions recorder and you can slide back and forth through the history, Affinity allows you to save the history with the file, so, its like a mini macroised tutorial.