firstdefence
-
Posts
11,458 -
Joined
-
Last visited
Everything posted by firstdefence
-
 Something like this.
 -
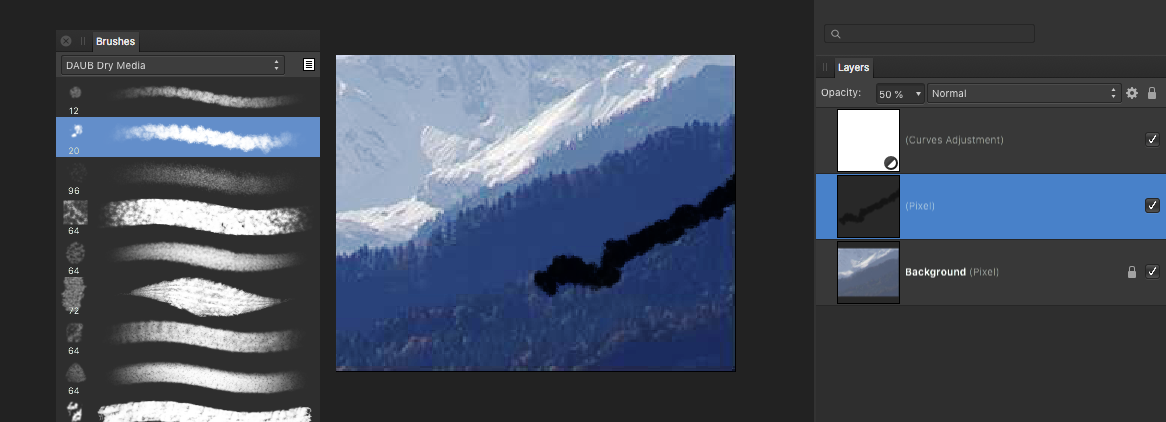
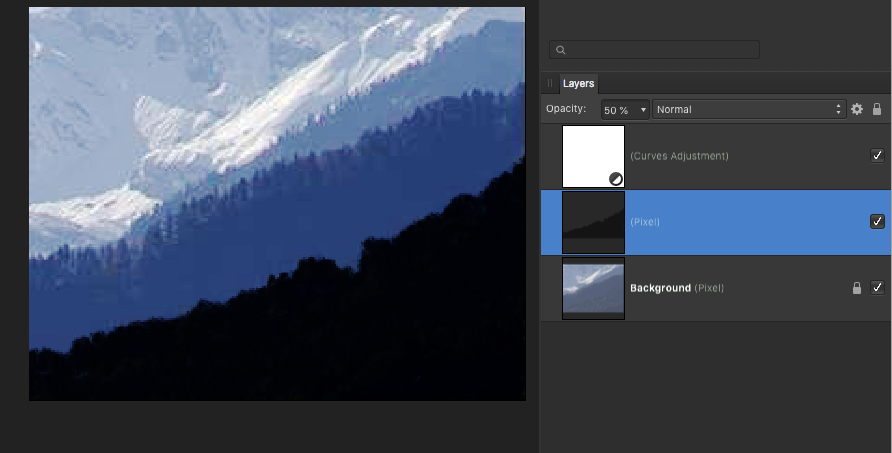
I would use something like Daubs dry media brush "Greasy Pencil" see highlighted brush in the image, I would create a Curve layer to get better definition and create a pixel layer to paint black onto using the selected brush. I would check the edge and if need be use a textured brush with the eraser to refine the edge, I would keep doing this until I was happy with the edge. I would block in the black with a basic brush, use the pixel layer to make a selection and then a spare channel. Obviously this is a rough example but a lot of the skill is in the refinement.

-
Here is a fun link, pen tool practices sheets.
-
I loved having a tablet such as the XP-Pen Dec03 but the biggest step I took is having a display tablet, working on the actual surface and seeing a drawing develop under the stylus was almost a zen moment. The hardest part were the buttons on the stylus, the application and placement of them feels decidedly clumsy and that was for any stylus I've used, I'd go as far as to say it's just bad design, even today I avoid using them, I do have the luxury that my display tablet has plenty of buttons to accommodate all the things I need. Movement is different when using a stylus, more so on a display tablet than a tablet, on a display tablet movement is "exaggerated" or it feels like that. At first you feel like you are doing a poor imitation of Magnus Pyke, but on a basic tablet movement is scaled down so it's not dissimilar to a mouse.
-
To get a node to appear on the curve, select the picker by clicking on the Picker button, move over the image and click and hold on a point, now move the cursor slightly and a node will appear on the curve line. Keeping the mouse button held down will modify the images values as you move it around.
-
This would be a good project to start. Creating step by step tutorials, they are easier to amend than video's can be fairly easily updated or reused on an updated version and can be printed off.
-
No approach is going to be easy on a low contrast image and would invariably utilise multiple methods. The eye is always drawn to straight lines and in a selection or change of contrast will only become more obvious, using a ragged edged brush can, to a point, make selections less obvious. So, even though the edge may not be perfect it goes a way to making the selection look more natural. the use of a matte, such as black on white can can aid in making accurate masks and selections, during their creation lowering the opacity helps as a guide.
-
A single straight line can be achieved by the click at point a. then at point b. if that is the end of the line press esc to deactivate the node you ended at.
-
Translated for English readers: Good evening, I'm new and I greet everyone. I have a problem on Affinity (desktop computer). Ever since I switched to windows 10 on the new computer I haven't been able to open raw files properly. I have a Panasonic Lumix DMC GX80 camera that takes RW2 format files (if I shoot in JPG no problem) and when I upload them to Affinity they are very dark and I cannot edit them. The RAW files on windows 10 told me that they open automatically, before on windows 7 they did not open only with affinity and everything worked. These downloaded files on the desktop have the visible and correct icon, when I go to open them, first you see the correct photo but after a second it becomes dark, underexposed and thus opens on Affinity. I don't know how to do it, but it seems to me an Affinity problem that doesn't read Panasonic's RW2 format. Please if you can help me I am grateful. I attach the file in question. This image opens in an alternative RAW editor called Rawtherapee, it opens just as dark. Questa immagine si apre in un editor RAW alternativo chiamato Rawtherapee, si apre altrettanto scuro.
-
Link to tutorial?
-
Select the move tool (V) Click on an Artboard and drag it over. You can also select multiple Artboards and drag them over. Drag a single Artboard Drag multiple Artboards
-
I would have thought other than increasing the contrast a bit would be to manually define the area's using the pen tool or making a matte with a textured brush to define a ragged edge.
-
affinity designer AffinitySigne Formation 3D Logo
firstdefence replied to eegler's topic in Share your work
Probably because the wall is placed as a floor when it should be a wall. -
this is from the Affinity Licence Agreement. https://affinity.serif.com/en-gb/licence/
-
If you have a zebra texture or any texture to that mind, you can over-size it to the border you want and just sit the image over it, this is probably the easiest way to do it. Another way is to again oversize a rectangle and fill it with a bitmap pattern and sit any image over it, the latter is more flexible. Getting a textured edge requires masking and generally more than one mask, so a mask to create the textured edge (Rasterise to mask) and another to mask the image to the inner area of the frame (Mask to below) these can then be grouped and an outer shadow added to the group. Here is a zebra texture I made in Filter Forge
-
Morning Tanya, Yes I rasterised the black and white image first. There are 4 very small white dots that make the bounds of that image larger than it needs to be, to reduce the bounds of that image You need to use the eraser on the four dots: see image below, I have circled where they are, you will need to zoom in to at least 100% to see them, erasing them snaps the blue bounds tighter to the image. Dot locations Bound before erasing dots Bound after erasing dots Here are the layer fx settings, shadows are rarely a neutral colour (greyscale) especially when cast onto a colour, so I selected a dark colour from the image to use as the shadow, the background colour is also a selection from a brighter area of the image.
-
If you do this on a regular basis you can draw these scales out group them and create assets that can be reused. https://affinity.help/photo/English.lproj/pages/Panels/assetsPanel.html
-
Odd that I had that issue but the update to Firefox fixed it, so must have been a bug of some sort. Just had a look over some of the fixes from FF70 to FF72.0.1 and most relate to security and memory issues.
-
HD 6000 does support metal, there is usually settings active under the performance tab in preferences: James can help explain here: https://affinity.serif.com/en-gb/tutorials/photo/desktop/video/342249763/
-
. dumb answer struck, I need to learn to read lol!
-
I have just watched callums vid in Safari 13.0.4 and it runs fine, but on FF 70 it runs for 2 seconds and then stops. Note: video runs correctly in FF 72.0.1 latest FF so update your FF Garry.
-
@LuckyMan So your Mac can't use Metal?
-
Image posting is working now, In Affinity Designer it might be the end nodes are twisted
-
What happens if you change the render settings on the performance tab in Affinity Preferences
-
Welcome to the forum bakfiet, the image doesn't show so try uploading the image again please. If that doesn't work try using an image host like https://imgbb.com I use these all the time.