AndyQ
-
Posts
200 -
Joined
-
Last visited
Everything posted by AndyQ
-

rotate counterclockwise?
AndyQ replied to AndyQ's topic in Feedback for Affinity Designer V1 on Desktop
They also had vector displays on computers in the early days, with no such limitation (CRTs but with lines drawn by a beam moving from coordinate to coordinate). These were still around in the 80's (some video arcade games used them). Other vector devices, like plotters, also have a long history. I think the first vector graphic program I used was "Y-up"; Zenographics Mirage, on DEC VAX systems (ported to early PC's in the mid-80's). I think you're right about screen coordinates being based on the raster scanning order of CRT's, but I still find it annoying - especially as someone who draws lots of graphs where I'm plotting Y-up on a Y-down page....(which means arsing around if you're doing this programmatically ) -
"Use Precise Clipping"
AndyQ replied to AndyQ's topic in Pre-V2 Archive of Affinity on Desktop Questions (macOS and Windows)
Thanks. Methinks the option needs renaming or at least the manual should be updated with a precise descriptions. -
If the object perimeters have exactly the same data; the same coordinates, and sizes, then the object behind shouldn't show through. The approach should not to be to render an object then render another object on top, but to calculate all objects together for a final composite then render the result. I've not tried rendering to a raster format, but it is noticeable on PDF output. Of course I can get around this, I'm just not used to having to take the extra steps. In the most part making "compound" objects is useful in dealing with my particular design issues; preserving hidden geometry for future use/reference/variations. Cheers.
-
rotate counterclockwise?
AndyQ replied to AndyQ's topic in Feedback for Affinity Designer V1 on Desktop
Sweet. It does also say that bearing angles are measured as positive in a clockwise direction, which would explain my association of clockwise with "positive". I've just done a quick flick through a bunch of other applications, from vector to VFX to 3D apps and there's a mix of approaches. What's weird is that I never really thought of this before - I must be subconsciously adapting to different application approaches many times during a working day - the apps I use most are Photoshop (positive clockwise), 3DS MAX (positive clockwise), Illustrator (anticlockwise), CorelDraw (anticlockwise), After Effects (clockwise), InDesign (anticlockwise) and HitFilm (clockwise). Also checked were Blender (anticlockwise), Fusion (anticlockwise) and Powerpoint (clockwise). I got tired of opening/testing applications after that little set, although I could go on. It's interesting to see Adobe using different conventions amongst its programs - counterclockwise for the "paper-based" idioms of AI and ID, but clockwise for the "screen-based" programs like PS and AE. -
Am I the only one who finds it unusual that the rotate angle in the transform palette work counterclockwise? - i.e. 15° is counterclockwise, (-15°) is clockwise? Is that "left handed coordinate system" related thing (y axis goes down) or something trig-related?
-
I'm usually here to ask questions, complain about UI annoyances or request features/changes, but I thought I should pipe up with something positive and say that the non-destructive Boolean operations ("compound" objects) are freakin' super-useful and something I've wanted in my vector graphics for a long time. Good work Affinity.
- 1 reply
-
- 2
-

-
"Use Precise Clipping" is an option in the "Performance" preferences. The manual doesn't refer to this by name, but under the performance options topic it does mention "Choose a clipping option for optimizing (sic) performance.". Can anyone please elaborate on what this does? For the stuff I'm working on I'm not seeing any visual difference in the display.
-
Something which is irking me endlessly in Designer: the visible faint outlines of objects that should be obscured, both in the on-screen display and on PDF output. The attached example shows a blue square behind a white square. The white square is a copy/paste version of the blue. It's the of same dimensions and coordinates and should completely obscure he blue square, but a faint outline still appears; like the perimeter of an antialiased line. In this particular case export to PDF shows nothing - the white square does obscure the blue square completely, but in other cases, where there are angled lines or curves, the artifacts show through. I'm having to do extra work to trim objects that should be "behind" others and non-visible in areas with a common border. I do have reasons for this, so please don't point out that I should simply get rid of the "object behind" or otherwise move common borders inwards. Cheers!

-
Further to this topic, Affinity Designer seems pretty slow dealing with new font installations whilst running, locking up for quite some time with the ""font added to cache" message displayed This is on a Win7 installation with a font manager called Typograf, which is kinda dodgy, but I'm comparing the speed of reaction to AI CS6, AICC and CorelDraw on the same system.
-
It came with the 1.7 version, which is when I bought the suite of products (I've only used Designer thus far, but have done some minor testing on Publisher/Photo). I'm pretty happy with the snapping capabilities in general, and snapping handles to grid was essential feature I was waiting for (logo and icon design work).
-
Thanks! - that does the trick. I'd resorted to workarounds joining multiple objects with "join curves" and was getting a bit cranky.....
-
Yep. This is driving me insane; I can't seem to do the simplest things. The only ways I can see that nodes can be "welded" together to create one continuous curve out of two or more is to use an automated method such as "close curve", however I have no control over which nodes are being joined - it joins the closest ones. I swear, I'm gonna start to cry; especially as seeing your post is dated from 2015....
-
The documentation says: "To continue an existing curve: Place the pen pointer over the final node on the path that you want to continue. Click once to select the node. Continue to place new nodes as needed." However, I'm going spare trying to figure out how to make this work. I'm testing by drawing a simple curve, just four points zig-zagging. I deselect the object. I then want to go back and continue the zig-zag line. I've tried selecting it first then changing to the pen tool and clicking the last node; I've tried going straight to the pen tool without selecting the object, clicking the last node then clicking to draw new segments/points. I either end up with a new object or linework that is part of the same object but not joined to it (i.e. coincident vertices rather than a shared vertex). I just want to start from an open end point and continue adding segments from there. That also brings into question how to "weld" coincident vertices if I have two open paths in the same vector shape.
-
Set brush angle and roundness
AndyQ replied to John Mevis's topic in Feedback for Affinity Designer V1 on Desktop
Thanks for the suggestions, I don't see any workarounds (it can't have any bitmap component); the only way to get the kind of vector shape I'm after would be to draw it as an outlined object. It's not a problem - I can do the job in CorelDraw or Illustrator instead, although I'd like to flag this as a function that I'd place a high priority on. I do like a lot about the AD application interface, snapping features and vector drawing capabilities; I'm just hoping to nudge it along so it can become a complete replacement for the tools I usually use. Cheers!- 5 replies
-
- 1
-
-
- painting
- brush setting
- (and 1 more)
-
Set brush angle and roundness
AndyQ replied to John Mevis's topic in Feedback for Affinity Designer V1 on Desktop
As far as I can see "Rotation" is only an attribute for raster-based brushes. I'm after a hard-edge, scalable vector line, applied to a carefully constructed existing curve. I'll likely convert the stroke to curves ("outline" it or whatever the terminology is) once the design is complete. I do a lot of this for logo designs; this is the first time I've used Designer on a "real" job hence the frequent posting! -
One more nudge distance option.
AndyQ replied to elmonopascual's topic in Feedback for the V1 Affinity Suite of Products
Hellz yeah! Thanks. -
One more nudge distance option.
AndyQ replied to elmonopascual's topic in Feedback for the V1 Affinity Suite of Products
That would be handy. Also, I seem to have a single decimal place limit on nudge distances, so I can't set a 0.25 mm nudge. Please at least 2 decimal places on this for mm! - preferably four! -
I'm out here, same as you, pining for calligraphic line styles. Luckily I've got both CorelDraw and Illustrator so I'm swapping to one of those for now, neither of which I'm happy with for differing reasons (Corel's too-different interface is hard to handle when you spent 90% of your time in Adobe products; Adobe's "Rental Software" makes me violently angry....)
-
Set brush angle and roundness
AndyQ replied to John Mevis's topic in Feedback for Affinity Designer V1 on Desktop
I've just been looking for this; a way of setting the brush angle so a stroke can be applied to lettering to emulate a calligraphic pen. I kinda assumed this would be here somewhere and that I was missing something obvious. The brush setting seem to have no capability of dealing with the concept of a brush angle and head shape and take a different approach, which has it's benefits but which is of less use to me than the approach taken by Corel and Illustrator. I'd have to put this in my "Essentials" request list. -
Have been checking the manual and can't see a way to duplicate an object whilst "nudging" from keyboard. You can duplicate whilst moving an object with a pointing device (digitiser/mouse) by holding CTRL (Windows) but that doesn't affect when moving the object(s) by keyboard.
-
Different fish kettle - this is for speed of formatting so you want a couple of open palettes at so you can select paragraphs or text then single-click tag the selection with either a paragraph style or character style, usually one (set para) then the other (highlight some text). A dropdown takes at least two clicks, and if you have 50 styles or so a shedload of scrolling on top. It's not the ability to do something, it the ability to do specific things quickly. Despite my resentment of Adobe, you can certainly learn a lot from them and interface flexibility is something they've done well with (as they should, with a huge user base and an army of developers). Cheers!
-
Indent to here
AndyQ replied to machadodesign's topic in Feedback for Affinity Publisher V1 on Desktop
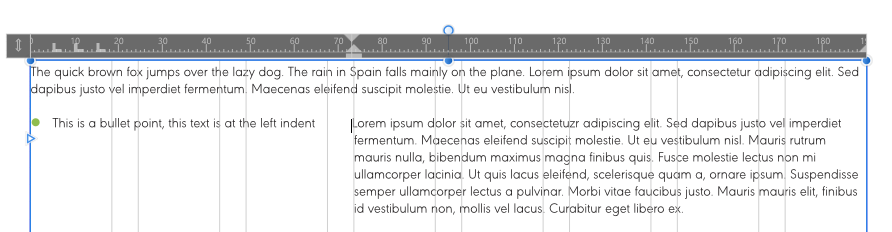
That does work to get the result as pictured above, and I could use that suggestion in a lot of cases, but the downside is flexibility as you'd require different styles for different situations. In the sample image I provided a "indent to here" character would let me set up a single bullet point text style that could act as "normal" bullet text, so it would wrap a long paragraph correctly that has no tabs or need for the "2nd column", however I could also have tab-stops set up for each column position and choose to start the second column at any of those points depending on need. I'm certainly still yearning for an "indent to here" equivalent -
A minor request: could we please have separate palettes for the paragraph and character styles? This gives more flexibility to arrange the interface for quickly going through a document and tagging various paragraphs and sections of text without having to constantly scroll up and down a single palette.
-
I think support for Win 7 finishes in Jan 2020; they certainly do look after the O/S for a long, long time. You don't need much grunt to run the Affinity stuff, (well, that's from a 3D/video guys perspective...) so you don't need the spankiest new workstation to be productive with it. I'm currently drawing in Designer whilst I've got some video composites rendering in the background, a few dozen browser windows open, a spreadsheet and miscellaneous utilities and I'm not noticing any performance issues.
-
Indent to here
AndyQ replied to machadodesign's topic in Feedback for Affinity Publisher V1 on Desktop
I'll have to test that suggestion but I don't think it's quite the same thing. With "indent to here" you can set up a bullet-point paragraph where you're already using the left indent to define the first chunk of text after the bullet, you then use a tab for a wrapping column further along, with an "indent to here" character at that tab point. That'd give you an effect as per: (The above sample is a fudge in Publisher where the second column is a separate paragraph with a multi-line baseline shift; which isn't really useful but gives you an idea of how this would look. Indesign makes this super easy, and it's a layout approach I use in nearly all of my documents)