Dave Vector
-
Posts
130 -
Joined
-
Last visited
Everything posted by Dave Vector
-
 Thanks @Aammppaa you a solid tropical fish! I just tried it and I can confirm the Isometric Artboard... Crazy!
 -
Is anyone from Serif getting this behavior?
-
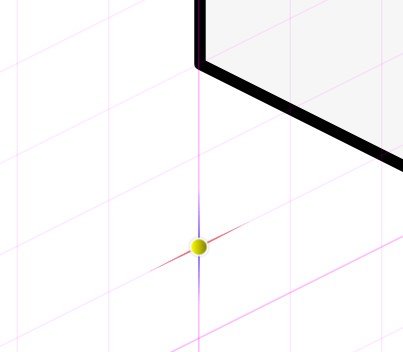
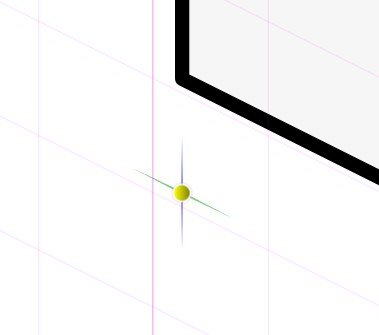
Hi, I am having issues with grid snapping in isometric view with a second artboard Create a new document Type: Web, Page Preset WXGA (1280 x 800, 16:10), Create Artboard Checked. Enable Snapping, choose only Snap to Grid. In Isometric studio, click Modify Grid... Choose Preset: Isometric 64x32 Pixel Isometric (with Planes) In Isometric Studio, Current plane choose Top With the rectangle tool draw a rectangle. the rectangle snaps to the isometric gridlines, as expected. If Front or Side plane is chosen, and a rectangle is drawn, snap to those grids also works as expected. Choose the Artboard tool and click on Insert Artboard in the context menu. On the new artboard, repeat steps #3 to #6, except the drawn rectangle does not snap to the gridlines anymore. I have attached a sample file (see below the images) with the issue, created with the above steps. Can anyone confirm they are getting the same behaviour? Second Artboard Iso Grid Snap.afdesign

-
Nicely done!
-
Object Selection by Path Only
Dave Vector replied to Henric's topic in Feedback for Affinity Designer V1 on Desktop
@valcoholic Nice little gem I did not know about. Thanks for the tip! Serif, perhaps this tip should be included at the very bottom left of the AD window, with all the other bolded tool instructions? I noticed it was not there. -
Where did Construction Mode go?
Dave Vector replied to Dave Vector's topic in [ARCHIVE] Designer beta on Windows threads
Thanks @Patrick Connor Here's where I got that quote: https://affinityspotlight.com/article/affinity-designer-17-beta-now-available/ Under Tools, second bullet point. -
I was looking for construction mode as described here: "Node and Pen tools have a new Construction mode which gives easy access to common construction features to help you build complicated shapes or intersections accurately and easily." I remember testing it in an earlier version of the 1.7 Beta, but it seems to be missing from my context toolbar. Was this feature removed from the beta, or has my GUI blindness reached new heights? Thanks!
-
Hi, A "show grid" checkbox seems to want to be on the front page of the ISOmetric Studio (Tab). Every time my mouse goes to the Isometric panel, it craves the "show grid" checkbox to be there, for quick and easy viewing of ungridded artwork (see example below). Yes, I am aware of the venerable keyboard shortcuts , but it sure would be handy to have the check box here as well. Please consider implementing it for 1.7!
-
@JET_Affinity Thanks for chiming in on these ideas. I have never used Macromedia Freehand, so I was not aware of those robust functions you describe, and yes, I would not want to limit the idea of "Select By" to just what I described, so selecting by ranges, line length, etc., would exceed my expectations. Similarly, your comments on every colour functionally being a global colour is a great way to handle colour swatches. This gets me excited again for the possibilities, so thanks for your comments! I personally found Illustrator's colour manipulation tools clunky to use and I cannot say I am loving Affinity Designer's solutions either. Without offering any concrete suggestions, I wish the colour tools were more elegant and intuitive to use. Serif, I realize your job is not easy, and to make something not just functional, but a joy to use, is really difficult. Please consider this as constructive feedback to help grow your new customer pool. "Elegant" is what inspires a user base to become passionate, evangelical and sell your product with very little advertising. After thinking about how I use my time creating assets for clients with Affinity Designer, I wanted to present the following use-case. I love creating assets for clients from scratch. Nothing beats the joy of assessing their needs, collaborating on concepts, and then creating a unique set of assets they are happy ultimately with. But the other side of my job, the less glorious, but inanely practical side of my work, is taking a client's existing assets and building something new from it. This is, for example, an old PDF with a chart in it that needs to be revamped. If I can reuse some of the old vectors from that PDF, that would make my job much easier, or maybe the client just needs a few tweeks, like updating the font or updating a few colour choices. This is where powerful selection tools or "find & replace" tools become essential. I think that is it: Powerful "Find & Replace" tools can relieve tedious tasks and save designer's time! Please continue to look at the Affinity suite of products through that lens. Serif, I hope this offers you a perspective that I am sure is shared, and has been shared, by many of your enthusiastic users. I just wanted to express my feedback to help make your Affinity tools more valuable. Please consider this use-case and incorporate these ideas. Thank you.
-
First off, thank you for Affinity Designer's powerful toolset. It's a joy to use! When I am using Affinity Designer to create complicated presentations with multiple artboards and nested groupings, I wish for 3 key tools to make my job faster, easier, and more controlled. Tools that obliterate tedious tasks can mean the difference between enjoyable and monotonous, between making money and losing money as a designer. Let me know if you think these three suggestions should be added to Affinity Designer. Apologies if these have already been suggested... 1. SELECTION SETS a. Summary – Select a bunch of objects across artboards, even within groups, and save them out as a selection set. b. Distinction – Not the same as grouping because the selection set can span multiple groups. Also spans objects located on different artboards. c. Procedure – Select the objects you wish to have in the selection set, save them as a selection set, give the set a unique name. Choose your selection set from a list at any time. The selection is made, ready to modify, hide/unhide, lock/unlock, etc. d. Advantages, examples – Easy to select multiple objects within complicated group structures. Many 3D apps have this, like 3DSMax. 2. SELECT BY… a. Summary – The “Select By” command allows you to select objects by stroke, fill, or effect properties. b. Procedure – Select the source object with the properties you wish to select, activate the “select by” command, choose the properties you wish to select by (stroke, fill, effect) Affinity Designer will select all the matching objects. c. Advantages, examples – Allows you to select all objects with similar properties and easily change those properties. E.g.: If you determined that your assets would look slightly better with a 6-pt. line thickness, rather than a 4-pt. line thickness, you can select them all and change them easily, without adjusting adjacent objects with a 5-pt. stroke. Adobe Illustrator has this. 3. COLOUR MODIFY a. Summary – If a group of selected objects have the exact same stroke and fill colour, this command will allow the user to change identical stroke and fill colours simultaneously, rather than have to change the stroke colours and fill colours separately. b. Distinction – Not the same as using Global colour on a stroke and fill, where the global colour swatch can be changed, because this affects all items using that colour, not the selection exclusively. c. Procedure – Select the objects with the colour you wish to change, activate the “Colour Modify” command, choose the source colour, choose the new target colour, all the selected objects’ fill and stroke colours are modified if they are the exact same colour. d. Advantages, examples – This comes in handy of you have an asset comprised of a mixture of lines and shapes all the same colour and you wish to change that colour, which can be complicated when those objects are grouped, and/or have mixed colour stroke and fills.
-
Hi @Sean P, I just tried to replicate that issue now, but I could not, so I am not sure why I was getting that error on Tuesday. I hope I didn't send you on a wild goose chase. I was using a BenQ 4K IPS monitor running at 3840x2160 with a Scale and layout setting at 150%. My secondary monitor is a Dell Canvas 27 but Affinity Designer was not on that one. I attached the zip file. I hope that helps. 1.0 (Beta).zip
-
Sure thing @Sean P. I am glad I actually saved and kept the file just in case :-) Node Tool Selection Lasso Bug.afdesign
-
Minor thing, but thought I would let you know... The Picture Frame Properties "Done" and "Cancel" buttons do not fit into the pop-up window. Create a shape. Right-click on it for context menu and choose "Convert to Picture Frame..." In the context toolbar, with the shape selected, choose "Properties". Nice feature btw; this is going to be very handy!
-
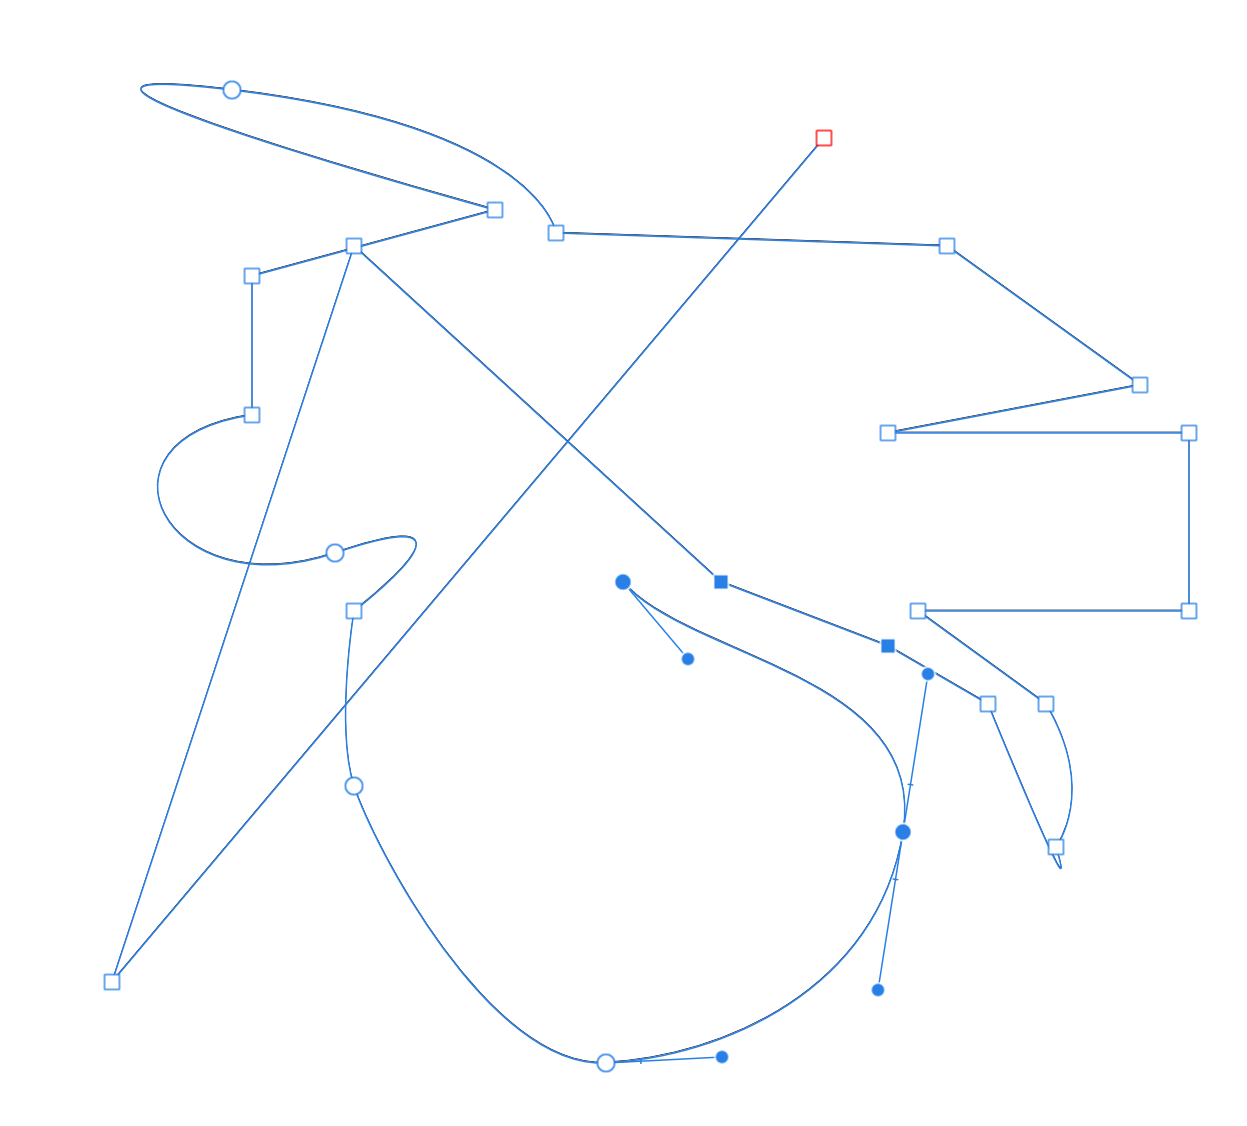
Hi, I was testing out the Node Tool Selection Lasso. With Node Tool selected, Alt-Drag around the intended nodes to select on your open shape. Sometimes the lasso will select nodes not within the lasso boundaries. Seems to happen when starting a lasso and it is ambiguous as to which "side" the selection is going to be. I uploaded a screenshot of the entire shape I was playing with. Admittedly one would probably not be using a shape like this for anything, but worth noting how it affects the lasso selection. The two screen grab videos show the irregular behaviour. 2019-03-12_08-12-28.mp4 2019-03-12_08-17-17.mp4
-
Thanks @Aammppaa and @Sean P.
-
Update: I took the time to transfer the Layer Effects over to AD 1.6.5.123 I had to do this by hand since the styles are not backwards compatible. I had the same crash so I filled out the automated crash report. Seems like it can happen when adding colors to the gradient or adjusting the mid points between multiple colors. I hope Serif has enough information to get this fixed. (That, and the ability to add color gradients to the palette from "Outline" and "Gradient Overlay" in Layer Effects )
-
I was trying out the new multiple strokes, multiple fills feature, and when I use the drop down menu to change the blending mode, deselect then re-select the object, the blending mode reset to normal. Am I using it incorrectly?
-
Cursor - Tool Icon Consistency
Dave Vector replied to Dave Vector's topic in Feedback for the V1 Affinity Suite of Products
@carl123 Thanks for helping us figure out what that can cause the cursor inversion. @dominik, can you verify this? -
Cursor - Tool Icon Consistency
Dave Vector replied to Dave Vector's topic in Feedback for the V1 Affinity Suite of Products
@dominik I must have some other setting different from yours, because my Move Tool arrow does not invert color on either Dark or Light mode. It stays the same color always. I'll keep looking... -
Hi, Affinity Designer 1.7.0.251 Win10 64-bit, version 1809. I have been playing with Layer Effects gradients in "Outline" and "Gradient Overlay" adding multiple colours. I have also added "Inner Shadow" and "Bevel/Emboss" with involved contour profiles, and blend profiles. There are multiple vector objects in the scene with these Layer Effects applied to them. Often when I add effects I can hear the fans of either my CPU or video card ramp up (sorry, I cannot tell which fans they are.) I am running an Intel i7-8700 with 16GB RAM and a GTX 1080 Ti with a BenQ 4K primary display and a Dell Canvas 27" 2560 x 1440 display. Nothing is overclocked. The crash happens often, but not consistently, so it is hard to reproduce the same way each time. Usually happens when I am adjusting the gradients on an Layer Effect. I will continue to play with it and see if I can provide more detail. In the meantime, I thought you should be aware of it in case others are having the same problem.
-
I was looking for this feature and I found the request posted in 2016. I wanted to added it to the new feature requests as it is a pain to replicate complicated gradients created in the Layer Effects area into other areas of Affinity Designer. Adding a feature to Add the gradient to swatches would be ideal. Maybe: Select object, right-click context menu, Add to swatches...\ From Effect. It could add both the "Outline" and "Gradient Overlay" gradients, if there are any, to the open Swatches palette. Or maybe a little palette icon in the gradient window in the effect. So resurrecting this request. Hopefully it can be added to the software, thanks!
-
Cursor - Tool Icon Consistency
Dave Vector replied to Dave Vector's topic in Feedback for the V1 Affinity Suite of Products
@dominik I normally run in Light UI mode, so I switched to Dark to try out what wrote about. I am not sure how to replicate what you mentioned, but my cursors don't invert their color according to the background color over which they are positioned (both in light and dark UI mode). My cursors stay the same color, except for the node tool. It switches to black when you hover over a node. So, I'd love to try what you are noticing but I am not sure how... Also the vector brush tool for me is only an outline and it seems to be fairly visible, so if the node tool was black with a white outline, I think it would work. But like I said, my idea for a fix is not the only solution. It would be nice if the tool icons and cursors were more consistent. -
Greetings, I am re-suggesting this to encompass all the Affinity products, especially Affinity Designer and Affinity Publisher. For the most part, Affinity cursor and tool icon shapes are very clear to understand and the cursors match well with their tool icons, except for the Move Tool. When switching between the Move Tool and the Node Tool with keyboard shortcuts, the two cursors are so similar they are quite visual ambiguous. I suggest changing them so they are consistent and clear for the user. My suggestion below is not the only solution— you may have a better one. I really hope you can reduce the user interface ambiguity and increase the consistency.
-
Hi, This might have already been suggested but I could not find it. Currently if you name-search an asset using the asset search field, it will yield results from the currently selected category, searching within all the subcategory drop downs. It would be very handy to have the search work across ALL the categories. I have 17 categories each with numerous subcategories of assets, and if I type in "Folder" to the search bar I would like to see all the results across all the asset categories. Otherwise I have to repeat the search 17 times. Thanks!
-
Thanks @αℓƒяє∂ I am grateful it's possible. You got me started on a list too. Here it is: 1 https://vimeo.com/272723714/79409f3002 UI overview Explore the Affinity Designer for iPad user interface. 2 https://vimeo.com/273643227/ead5575b93 Gestures Learn the gestures you need to use Affinity Designer for iPad. 3 https://vimeo.com/272724251/2291984bca New and save Start a new document and save it to local or cloud storage. 4 https://vimeo.com/272726696/45e5f324f8 Open and import Open from cloud storage and import from cloud storage/Apple Photos. 5 https://vimeo.com/272741704/5f35b71ba8 Placing images Introduce an image into your vector design. 6 https://vimeo.com/272728260/c890bf2740 Pan, zoom and rotate canvas Navigate around your document and rotate the canvas. 7 https://vimeo.com/272735632/2a46dac3a6 Selecting Edit one or more objects by object selection. 8 https://vimeo.com/272736180/6edfd6c8a7 Moving, resizing and rotating Transform objects on the page or via Transform Studio. 9 https://vimeo.com/272736820/55feb120ca Grouping Collect together related areas of your design by grouping. 10 https://vimeo.com/272737362/7c5dfeaea6 Ordering Learn how to change the Z-order of objects, i.e. how objects are placed in front of (or behind) each other. 11 https://vimeo.com/273287904/b1b7ec72fa Layers Studio Manages all your objects by storing in layers and groups. 12 https://vimeo.com/272738081/8a68c959da Align and distribute Multiple objects can be perfectly aligned with each other, as well as distributed (spread) evenly. 13 https://vimeo.com/272729523/f6c4ff31b2 Copy, paste and power duplicate Essential clipboard operations while editing. 14 https://vimeo.com/272730196/65755f27fb Undo, redo and history Use simple gestures and history scrubbing to step back/forward through your edits. 15 https://vimeo.com/272735340/af9c8b137b Quick export Output your current selection or entire design to a recognised graphic format. 16 https://vimeo.com/272727390/53ab8082f6 Artboards Create a new artboard from scratch or add extra artboards. 17 https://vimeo.com/272742120/bd935e5387 Symbols As intelligent linked objects, symbols allow global editing across your design. 18 https://vimeo.com/273288063/fe332b0d81 Assets Studio Take advantage of pre-designed UI elements stored within this Studio. You can also store your own custom assets here. 19 https://vimeo.com/272733789/278ce33fe2 Snapping Use snapping for positional accuracy when positioning an object to another object, guide, grid line or spread. 20 https://vimeo.com/272743284/55028676a5 Constraints Selectively control object scaling and anchoring across differently sized artboards. 21 https://vimeo.com/272731188/083a95d4d6 View modes for pixel preview Preview your design in different pixel modes or skeletal outline with split-screen comparison. 22 https://vimeo.com/272752194/5b7c92aec4 Pen Tool Draw Bézier curves and closed shapes using the Pen Tool - an essential tool for most designs. 23 https://vimeo.com/272747486/6eb4b491d8 Node Tool Edit previously drawn curves, vector strokes and shapes. 24 https://vimeo.com/272739495/9a399ee019 Advanced curve drawing Create and edit Bézier curves and lines using gestures. 25 https://vimeo.com/273643664/6e392c204b Editing strokes Control the line width, style and line pressure. 26 https://vimeo.com/272749894/f6cd564300 Pencil Tool Draw freehand pencil strokes with optional smoothing and editing (sculpting) of existing strokes. 27 https://vimeo.com/272772312/e4753799b0 Shape tools Create geometric shapes and morph them into any shape variant you want. 28 https://vimeo.com/272749107/f0b28fe5b8 Corner Tool The tool rounds any sharp corners on curves and shapes. 29 https://vimeo.com/272737147/824bdf211a Boolean operations Join objects together using Add, Subtract, Intersect, Divide and Combine operations. 30 https://vimeo.com/272918757/2b3f76f5e5 Colour Picker Tool Sample colour from anywhere on your screen for object fill, stroke or brush colour. 31 https://vimeo.com/272765553/c38361f7ec Fill Tool Create colour gradients across objects, including linear, radial, elliptical, and more. 32 https://vimeo.com/273644041/9d24feb280 Advanced colour Change the stroke and fill colour of your object, with the option to store colours in palettes. 33 https://vimeo.com/272740839/3f00569cea Gradients Draw colour and transparency gradients separately or as part of the same gradient. 34 https://vimeo.com/272765889/7e670c49ab Transparency Tool Create transparency gradients across objects, including linear, radial, elliptical, and more. 35 https://vimeo.com/272750449/386e0f0029 Vector Brush Tool Paint using vector brushes (hard-edged, textured intensity or textured image brushes). 36 https://vimeo.com/273644549/e73c510b69 Managing vector brushes Modify your brush settings and manage your brushes in the Brushes Studio. 37 https://vimeo.com/272921080/fe342ad991 Pixel Tool The tool paints a hard-edged brush stroke without anti-aliasing. 38 https://vimeo.com/272924117/5278a2f871 Paint Brush Tool Paint using raster brushes (soft, hard, textured, or image). 39 https://vimeo.com/273645405/c3e6960f8d Advanced brush options Modify your brush settings using the context toolbar. 40 https://vimeo.com/273645691/fce0d48271 Managing raster brushes Import, export and manage your brushes in Brushes Studio. 41 https://vimeo.com/273645985/3b50388a89 Smudge tools Blend images and brush strokes. 42 https://vimeo.com/272924573/eb705e612b Erase Brush Tool Remove areas of your design directly under an erase brush stroke. 43 https://vimeo.com/272924914/0a6548fc2a Flood Fill Tool Flood image, pixel selection or object with a chosen colour. 44 https://vimeo.com/273281334/ae205d189f Flood selections Create pixel selections using colour. 45 https://vimeo.com/273281218/efb471a647 Drawn selections Create pixel selections using freehand, polygonal or magnetic modes, or use shape marquee tools for geometric pixel selections. 46 https://vimeo.com/273284946/e48c013bfa Selection modification tools Feather, grow/shrink, smooth and outline existing pixel selections. 47 https://vimeo.com/272947161/54b2eba7d4 Smart Selection Brush Tool Take a brush-based approach to make pixel selections. 48 https://vimeo.com/273285157/19f326ed32 Refine Selection Tool Use refinement to separate a subject from its background image accurately. 49 https://vimeo.com/273285319/f2eb0835f2 Slice Tool The tool creates drawn export areas to be exported as individual files. 50 https://vimeo.com/273285740/1d712d6c8a Export Persona - Slices Studio The Studio exports chosen slices as files to a preferred file format. 51 https://vimeo.com/273286342/3dbe5aa264 Export Persona - Layers Studio Use the Studio to identify pages, artboards, layers, groups and objects for export as slices. 52 https://vimeo.com/272919379/22bc3c2e55 Frame Text Tool Add reflowing frame text to your design. 53 https://vimeo.com/272916409/f72d8a2a1e Art Text Tool Add scalable decorative text to your design. 54 https://vimeo.com/273646946/94d45c2f97 Advanced typography Edit your artistic and frame text's character and paragraph properties. 55 https://vimeo.com/273647336/ccf23d014a Text on a path Artistic text can follow a line, curve or outline of a shape. 56 https://vimeo.com/273647530/29173f6f24 Importing fonts Import and manage your fonts. 57 https://vimeo.com/273647784/6bbc918327 Applying adjustments Apply non-destructive adjustments to layers and control them in your layer stack. 58 https://vimeo.com/273648117/0364de4e91 Masking adjustments Use raster brushes to erase adjustments and use vector tools to create clipping masks. 59 https://vimeo.com/273648442/ad0f387960 Layer effects Apply non-destructive layer effects and control them in your layer stack. 60 https://vimeo.com/273648756/e795a03d2b Advanced layer effects Adjust opacities, scale effects with objects and copy and paste effects to other layers. 61 https://vimeo.com/273649568/91a1c47ba3 Blend modes Blend your layers with complete control using blend modes. 62 https://vimeo.com/273649742/8e694a31f9 Styles Create and save your own styles for consistent effects.