Dave Vector
-
Posts
130 -
Joined
-
Last visited
Everything posted by Dave Vector
-
 I noticed this post was started in 2015, so I am hopeful this export file format is just around the bend ☺️ I just started going down this rabbit hole yesterday of finding an ICO export tool because it is missing from Affinity Designer. Affinity has the lovely Export Persona all ready to crank out batches of icons, so I also +1 this feature! A few words of caution for people needing to convert assets to ICO files in 2020. Be careful with online converters. Read the "Terms of Service" carefully to make sure they are not reserving the right to publicly post the resulting ICO files they generate for you. Also some companies claims the use of your files forever and wherever. I did find one online converter that seemed to be protecting your conversion, but still I did not trust it. Remember, once it's out there, its out there. So the next stop was a local app. After digging around looking at top 10 lists of image converters, I discovered that many of the apps that did convert to ICO only did them in an uncompressed format. So, for example, a 256 x 256 PNG file that was 10K in size, would convert to an ICO file that was 240K! Apparently there is a PNG (Vista) conversion option in some apps that I assume is compressing them. The result is apparently not backwards compatible, but so what? Would it matter if the ICO doesn't display on an OS older than Windows Vista? I would prefer the leaner file sizes. My tests with the smaller file size ICOs concluded that they were compatible with my end use. The software I ended up using was IcoFX version 1.6.4. Very slow converting the files, in comparison to other software, but it gives you small files and plenty of resolution and transparency options. Yes, shocking that ICO is still a relevant format in 2020, so please Serif, make our lives easier!
-
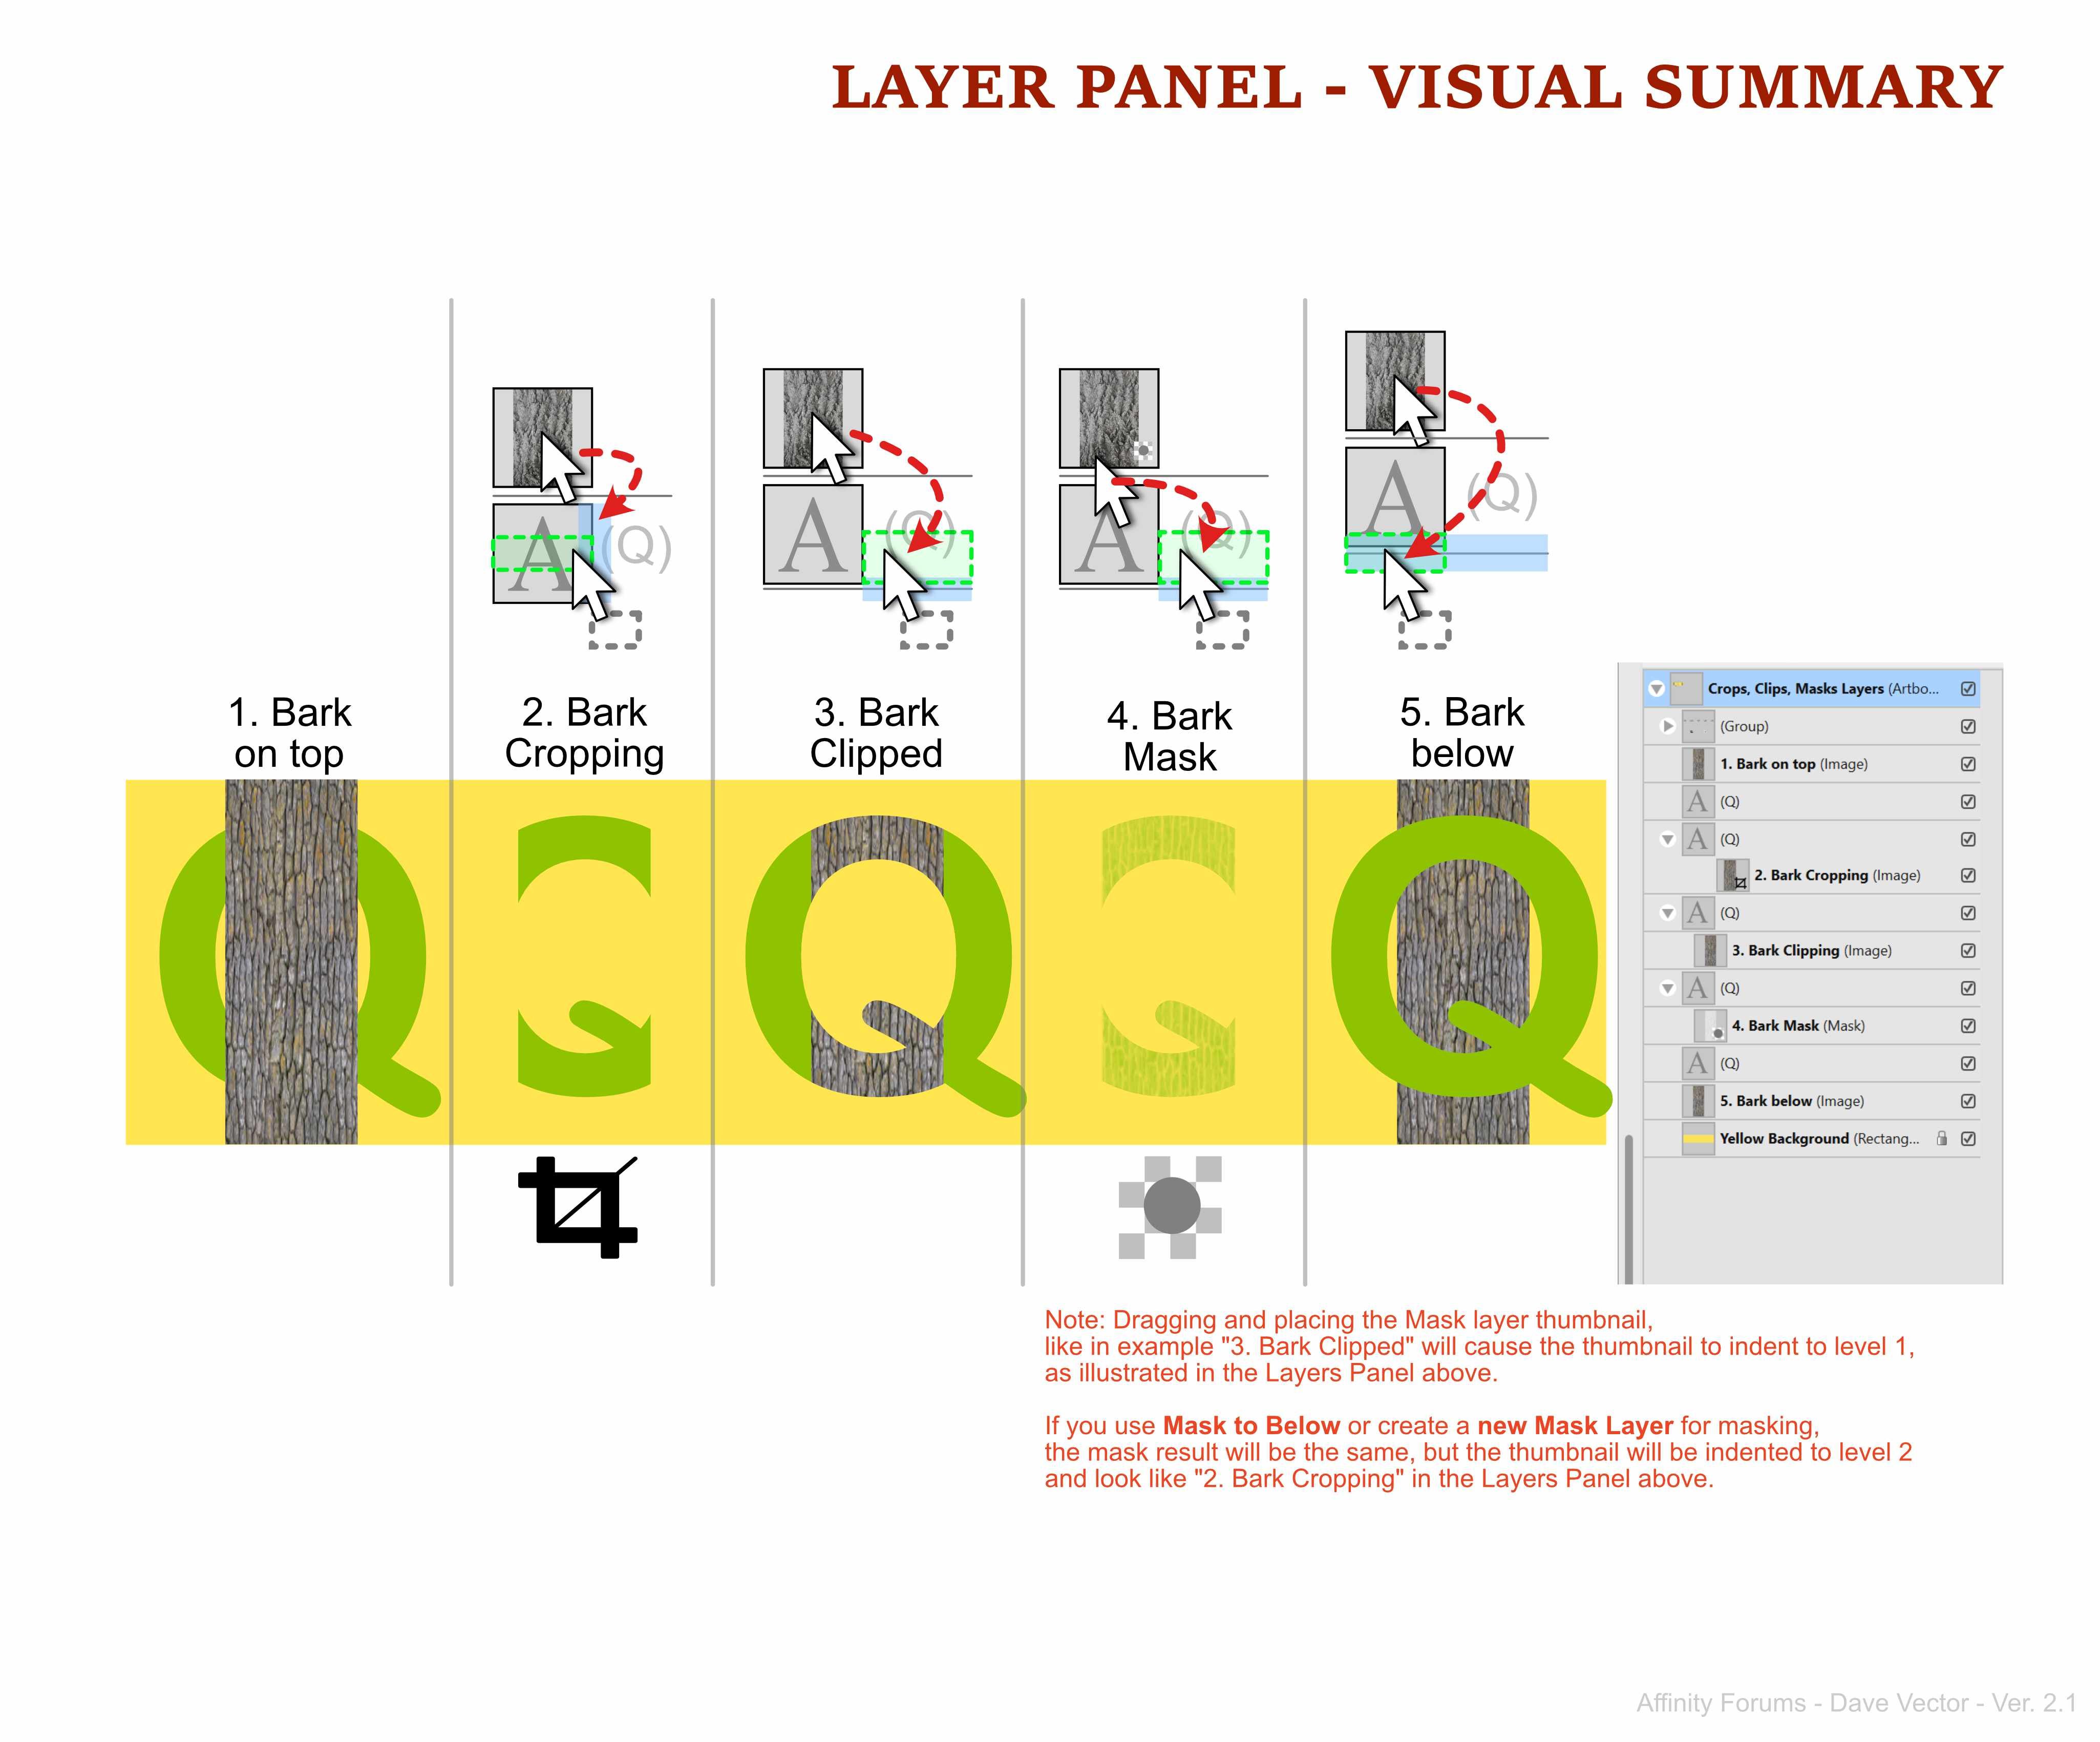
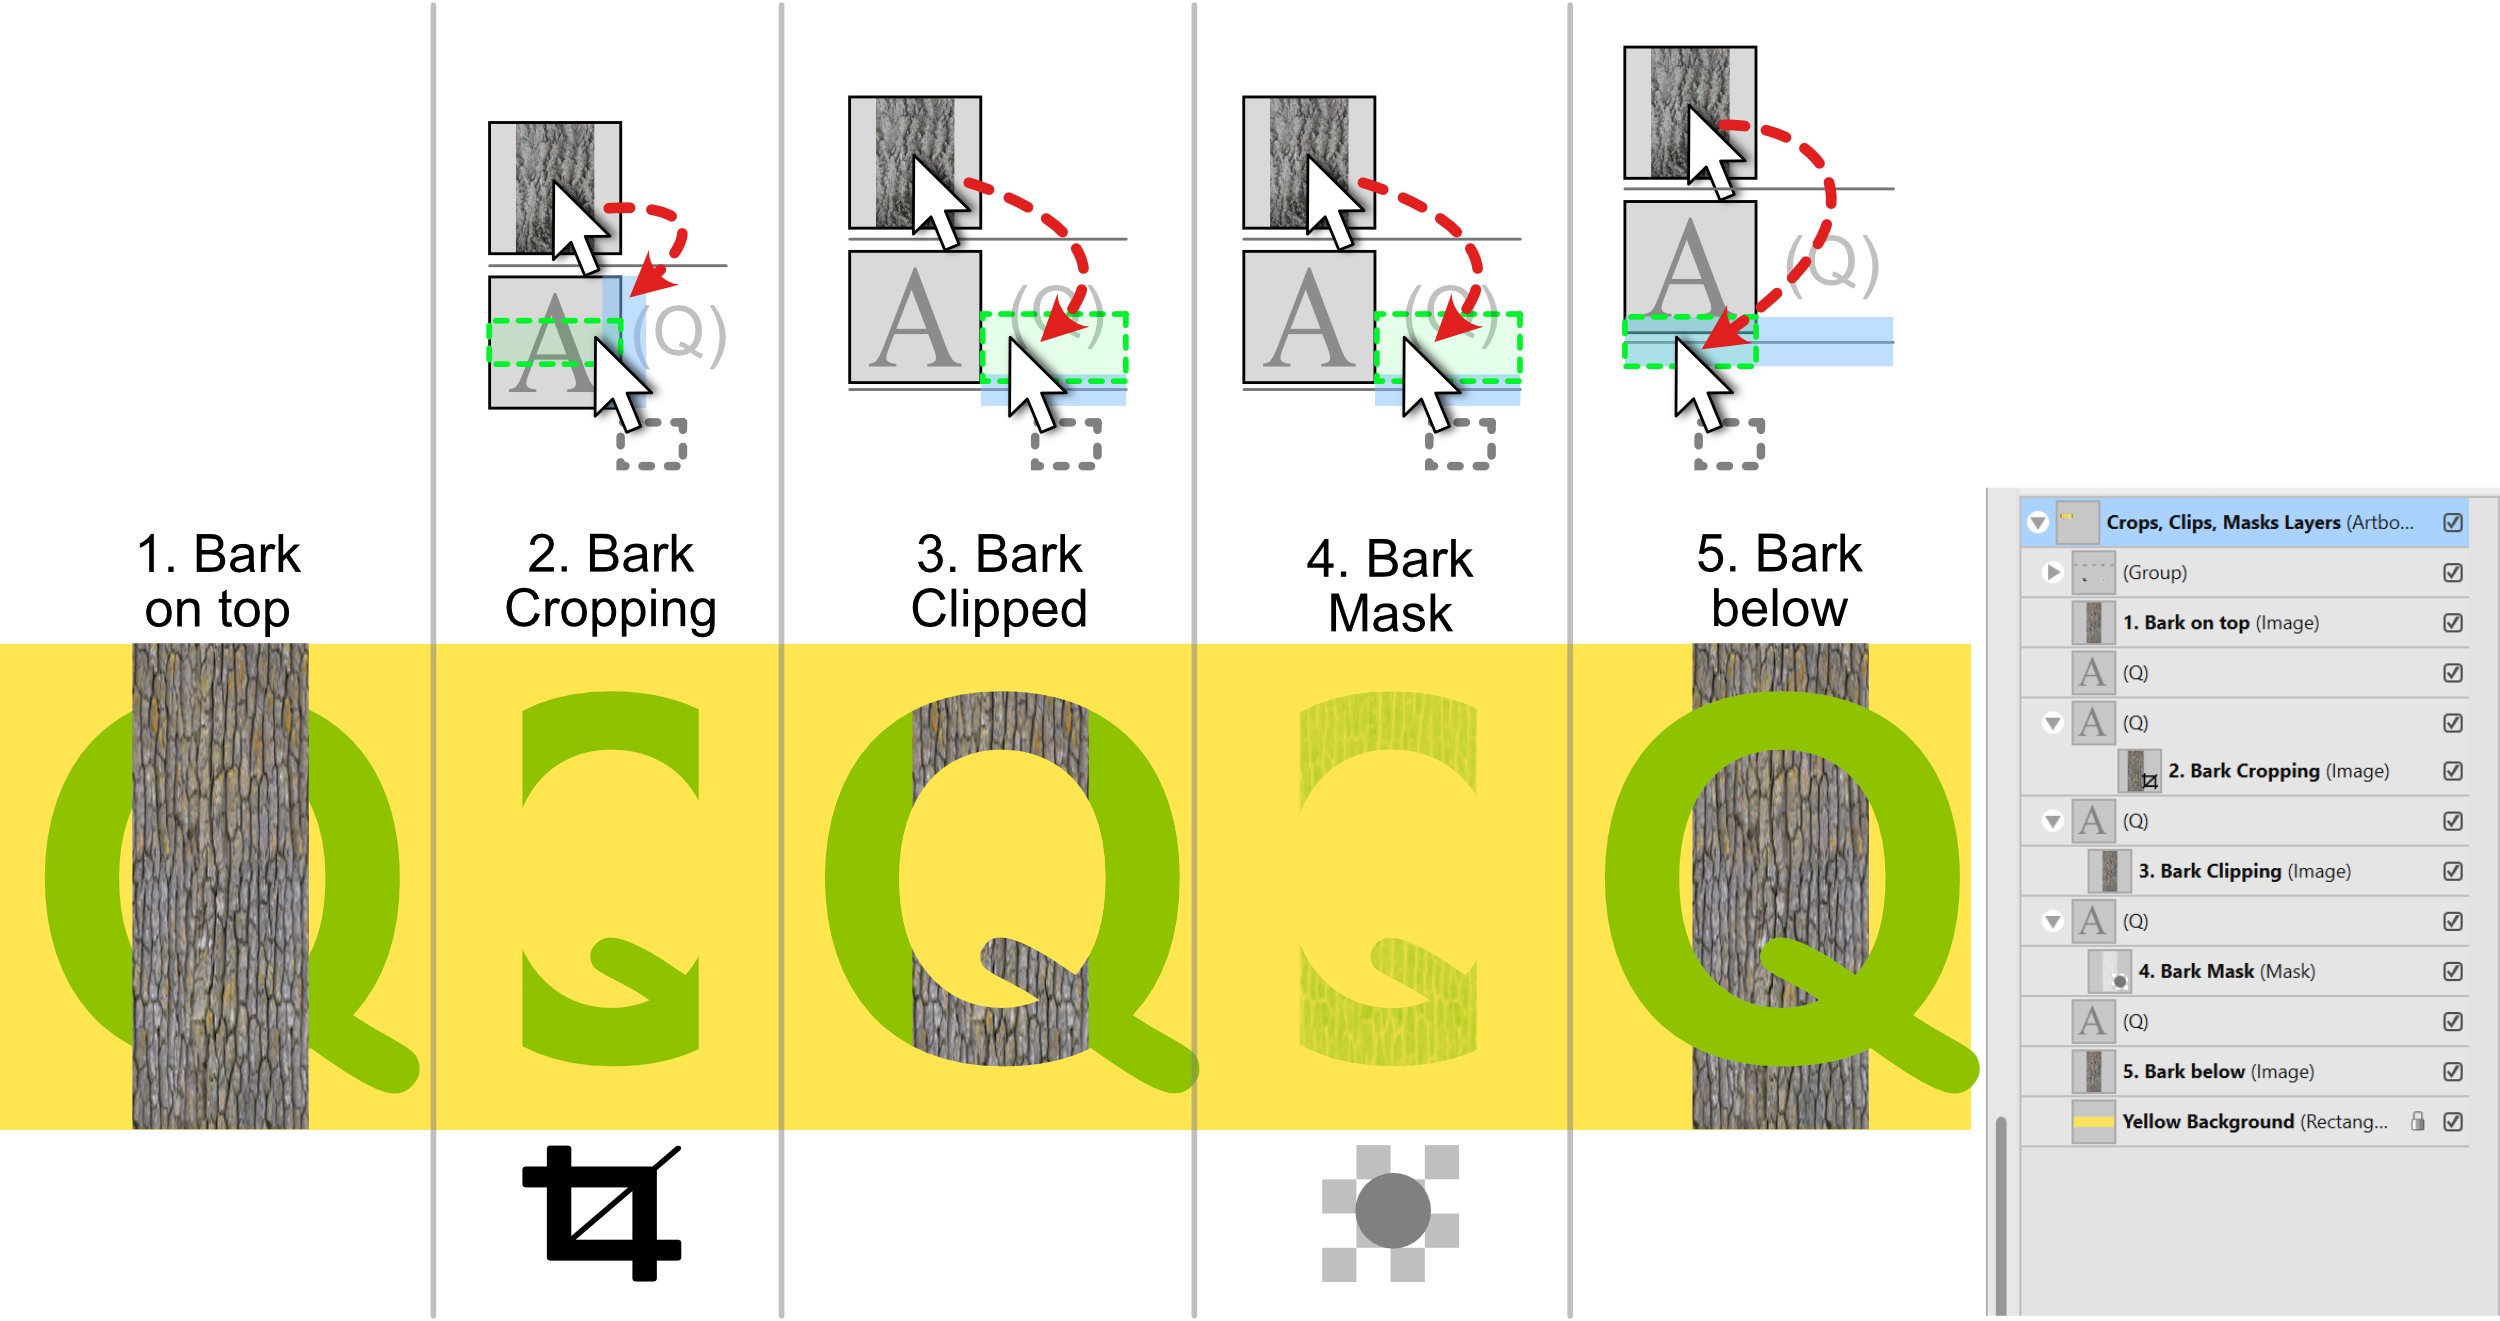
Thanks @BeauRX your advice is noted! I updated the PDF version to illustrate the different indentations in the Layers Panel and made notes to call attention to the different indentation levels. Unfortunately indentation is not consistent with Masks. In other words, a Mask thumbnail can exist at either indentation level 1 or level 2 but the results seem to be the same, unless someone more knowledgeable than I can refute my claim with an example. Hopefully adding this to the summary and the PDF does not make masks more confusing than they already are, but currently this seems to be the reality. So here is the updated summary illustration as well as the updated PDF downlaodable below! Affinity Layers Guide - Understanding Masks, Moves, Crops, Clips, Adjustments v2.1.pdf
-
I am hoping someone from Serif can comment on these ideas, perhaps let me know; are there plans to implement any of these ideas in 1.9 or 2.0? I'd love to hear your thoughts! Cheers, Dave.
-
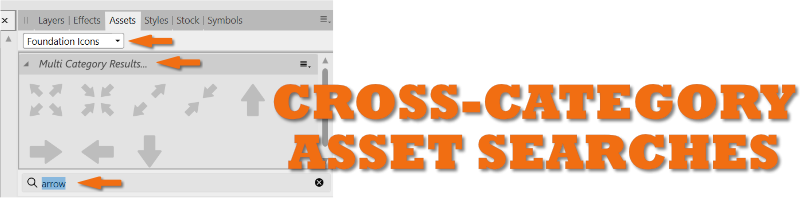
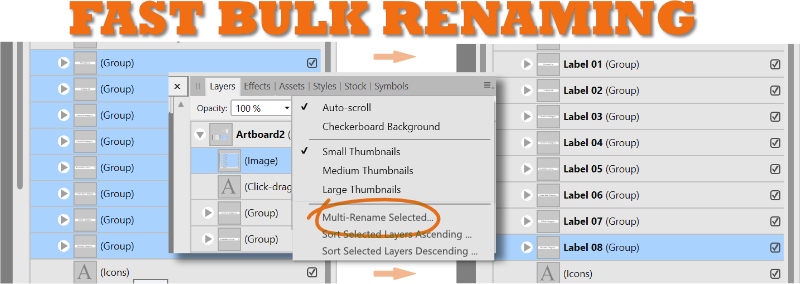
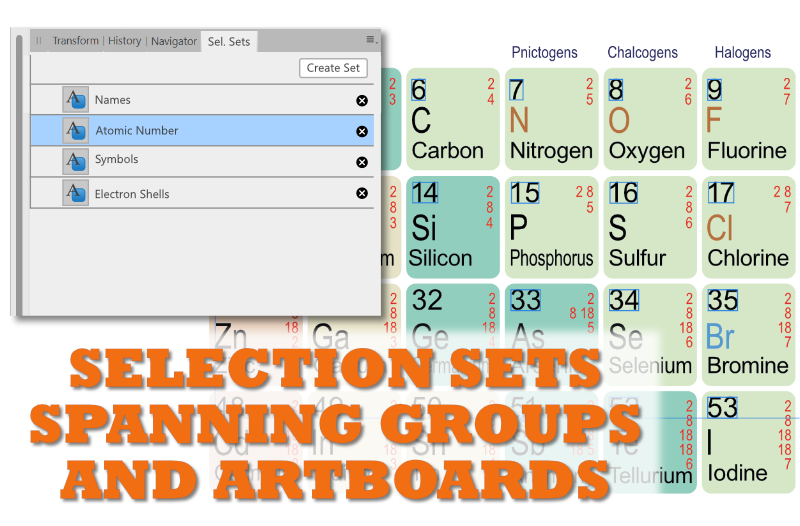
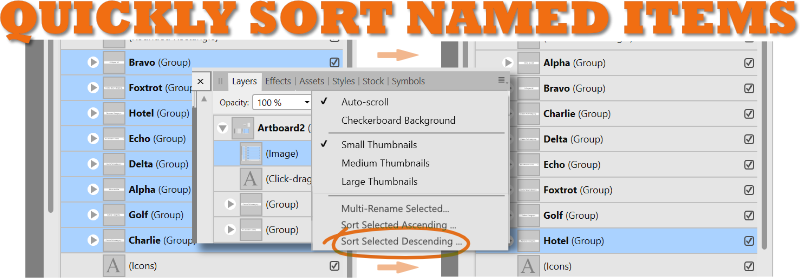
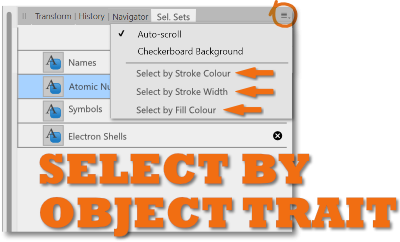
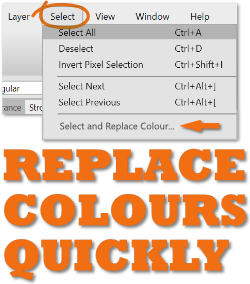
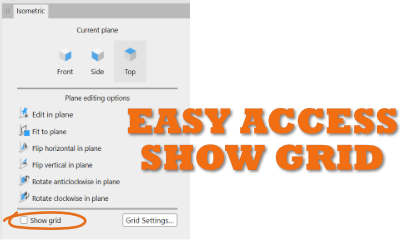
After using Affinity products professionally for quite some time and observing the development team’s patience and openness to new ideas on the forums, I have a few “unsexy” suggestions to enhancements to take the tedium out of repetitive tasks and keep designers organized. I am truly impressed with Affinity’s products. In gratitude for that, I am inspired to create this Wishlist with some new ideas, and to chime in with some support for the classic, already-suggested ones. Thanks for reading/listening! Most of these suggestions can span all the affinity desktop products some are Designer specific. 1. Organize Assets, Swatches, Brushes, Style Libraries with an edit mode, using an interface like the the "Presets Manager" in Shapes, to allow for re-arranging, renaming, moving between categories. 2. Stoke Pressure Profiles can be saved on an application level. Organize and manage, with an interface like the "Presets Manager" in Shapes. It’s all about efficiency, and not having to reinvent the wheel (stroke!) every time. 3. Layers Panel – Select objects and groups and rename them with a multi-rename tool. Instantly get organized so you and even other people can understand the layer groups and objects in your Affinity document. Interface would allow the user to add a numerical counter as a prefix or suffix when renaming. Handy before using Export Persona to create some basic naming conventions. 4. Sort Layer Groups or artboards in the Layers Panel alphabetically, ascending, descending. Yes, it will change the arrangement order, but properly organized groups can make complex file layers much easier to navigate. Handy for PDF Exporting where the order of pages depends upon the artboard order. 5. Save selection sets that can select items spanning multiple artboards and also within groups. Often similar objects need to be adjusted or moved, but they are on multiple artboards or nested in other functional groups. This can quickly solve that problem. 6. Select by object trait (stroke color, stroke thickness, fill colour). A handy way to quickly select and adjust objects with similar properties. Otherwise selecting these can be a nightmare in complicated projects. 7. Select and replace non global identical colours. Does your client want all the red elements blue? What would they look like in teal or taupe? Play rapidly to your heart’s content. 8. Search Assets Panel ACROSS BOTH categories and subcategories, results displayed as filtered choices. Do you have multiple categories/libraries and need to find the right icon fast? This can save you time. Currently a search has to be made within each asset category, which can take some time if you have multiple asset categories. 9. Handy Show Grid checkbox in Isometric Studio Panel. True, you can use a keyboard shortcut, but it would be nice if this button was upfront. Handy when you are working in Isometric view you have to turn on and off the grid to see the artwork uncluttered. Chances are you have the panel open to constantly switch planes anyways… I hope this helps to add votes for the unsexy underdog features. 😊
-
I appreciate everyone's feedback. I updated the PDF to more accurately reflect the row indentations in the Layers Panel. PDF below. I also added a summary page that looks like this: Cheers! Affinity Layers Guide - Understanding Masks, Moves, Crops, Clips, Adjustments v2.0.pdf
-
In Affinity Photo 1.8.3.641, if you are creating vector shapes with a transparent color as the foreground and then switch to the Paint Brush Tool, the transparent primary color in the inkwell icon will switch to white, but the brush will retain the transparency from the previous mode, so when you try to paint, the brush will not paint white but be "off". You have to click on the small Transparency circle in the bottom left corner of the inkwell tool for it to display correctly. Display error is consistent on both the Tools Panel 2-column inkwell icon and the one in the Color Studio. Examples of the inkwell icon/tool:
- 1 reply
-
- 1
-

-
- primary color
- seconadary color
- (and 7 more)
-
Yes, it feels missing coming from the Photoshop world. I am not sure why they decided to eliminate the "Default Foreground/Background Colors" button, but nice to know it's only a hotkey a way! Affinity Photo choose to use the inkwell icon's corner real estate with a transparent mode button. When in brush mode, setting the primary color to transparent essentially just turns off the brush, which admittedly is not very useful, but it retains a consistent tool "look" to how it functions for vector objects. If anyone has any insights as to how the Paint Brush Tool with transparent as it's Primary is useful, I would love to know. Also be cautious! As of Affinity Photo 1.8.3.641, if you are creating vector shapes with a transparent color as the foreground and then switch to the Paint Brush Tool, the transparent primary color in the inkwell icon will switch to white, but the brush will retain the transparency from the previous mode, so when you try and try the brush will not paint white but be "off". You have to click on the small Transparency circle in the bottom left corner of the inkwell tool for it to display correctly. Definitely a bug.
-
Hi Andrew, Perhaps the key it not set in the keyboard commands. Go to the Edit menu at the top of the screen, then click on Preferences... at the bottom of the menu. In the pop-up window, click on Keyboard Shortcuts. Make sure the two top left drop menus are set like in the image below (Photo and Miscellaneous). Scroll down in the main area to see Set Fill to Black and White. To the right there is a box which contains the corresponding shortcut. If the box is blank, click it so the cursor is flashing in side, then immediately click your "d" key. That's it! To save your Keyboard Shortcuts hit Save in the top right of the pop-up window to save them for later installs or resets. Click Close in the bottom right of the pop-up window and test your new shortcut!
-
@dubtronics I just created a handy Layers Guide to help navigate some of the eccentricities of Layers and Masks. I posted it in the Tutorial Forum here: Hopefully it can help you attain mastery of wrangling layers.
-
@Robin L. I just created a handy Layers Guide to help navigate some of the eccentricities of Layers and Masks. I posted it in the Tutorial forum here: Affinity Layers Guide - Understanding Masks, Moves, Crops, Clips, Adjustments Seems like you have it figured out, but I thought some extra info wouldn't hurt, especially those who have the same questions. 😊
-
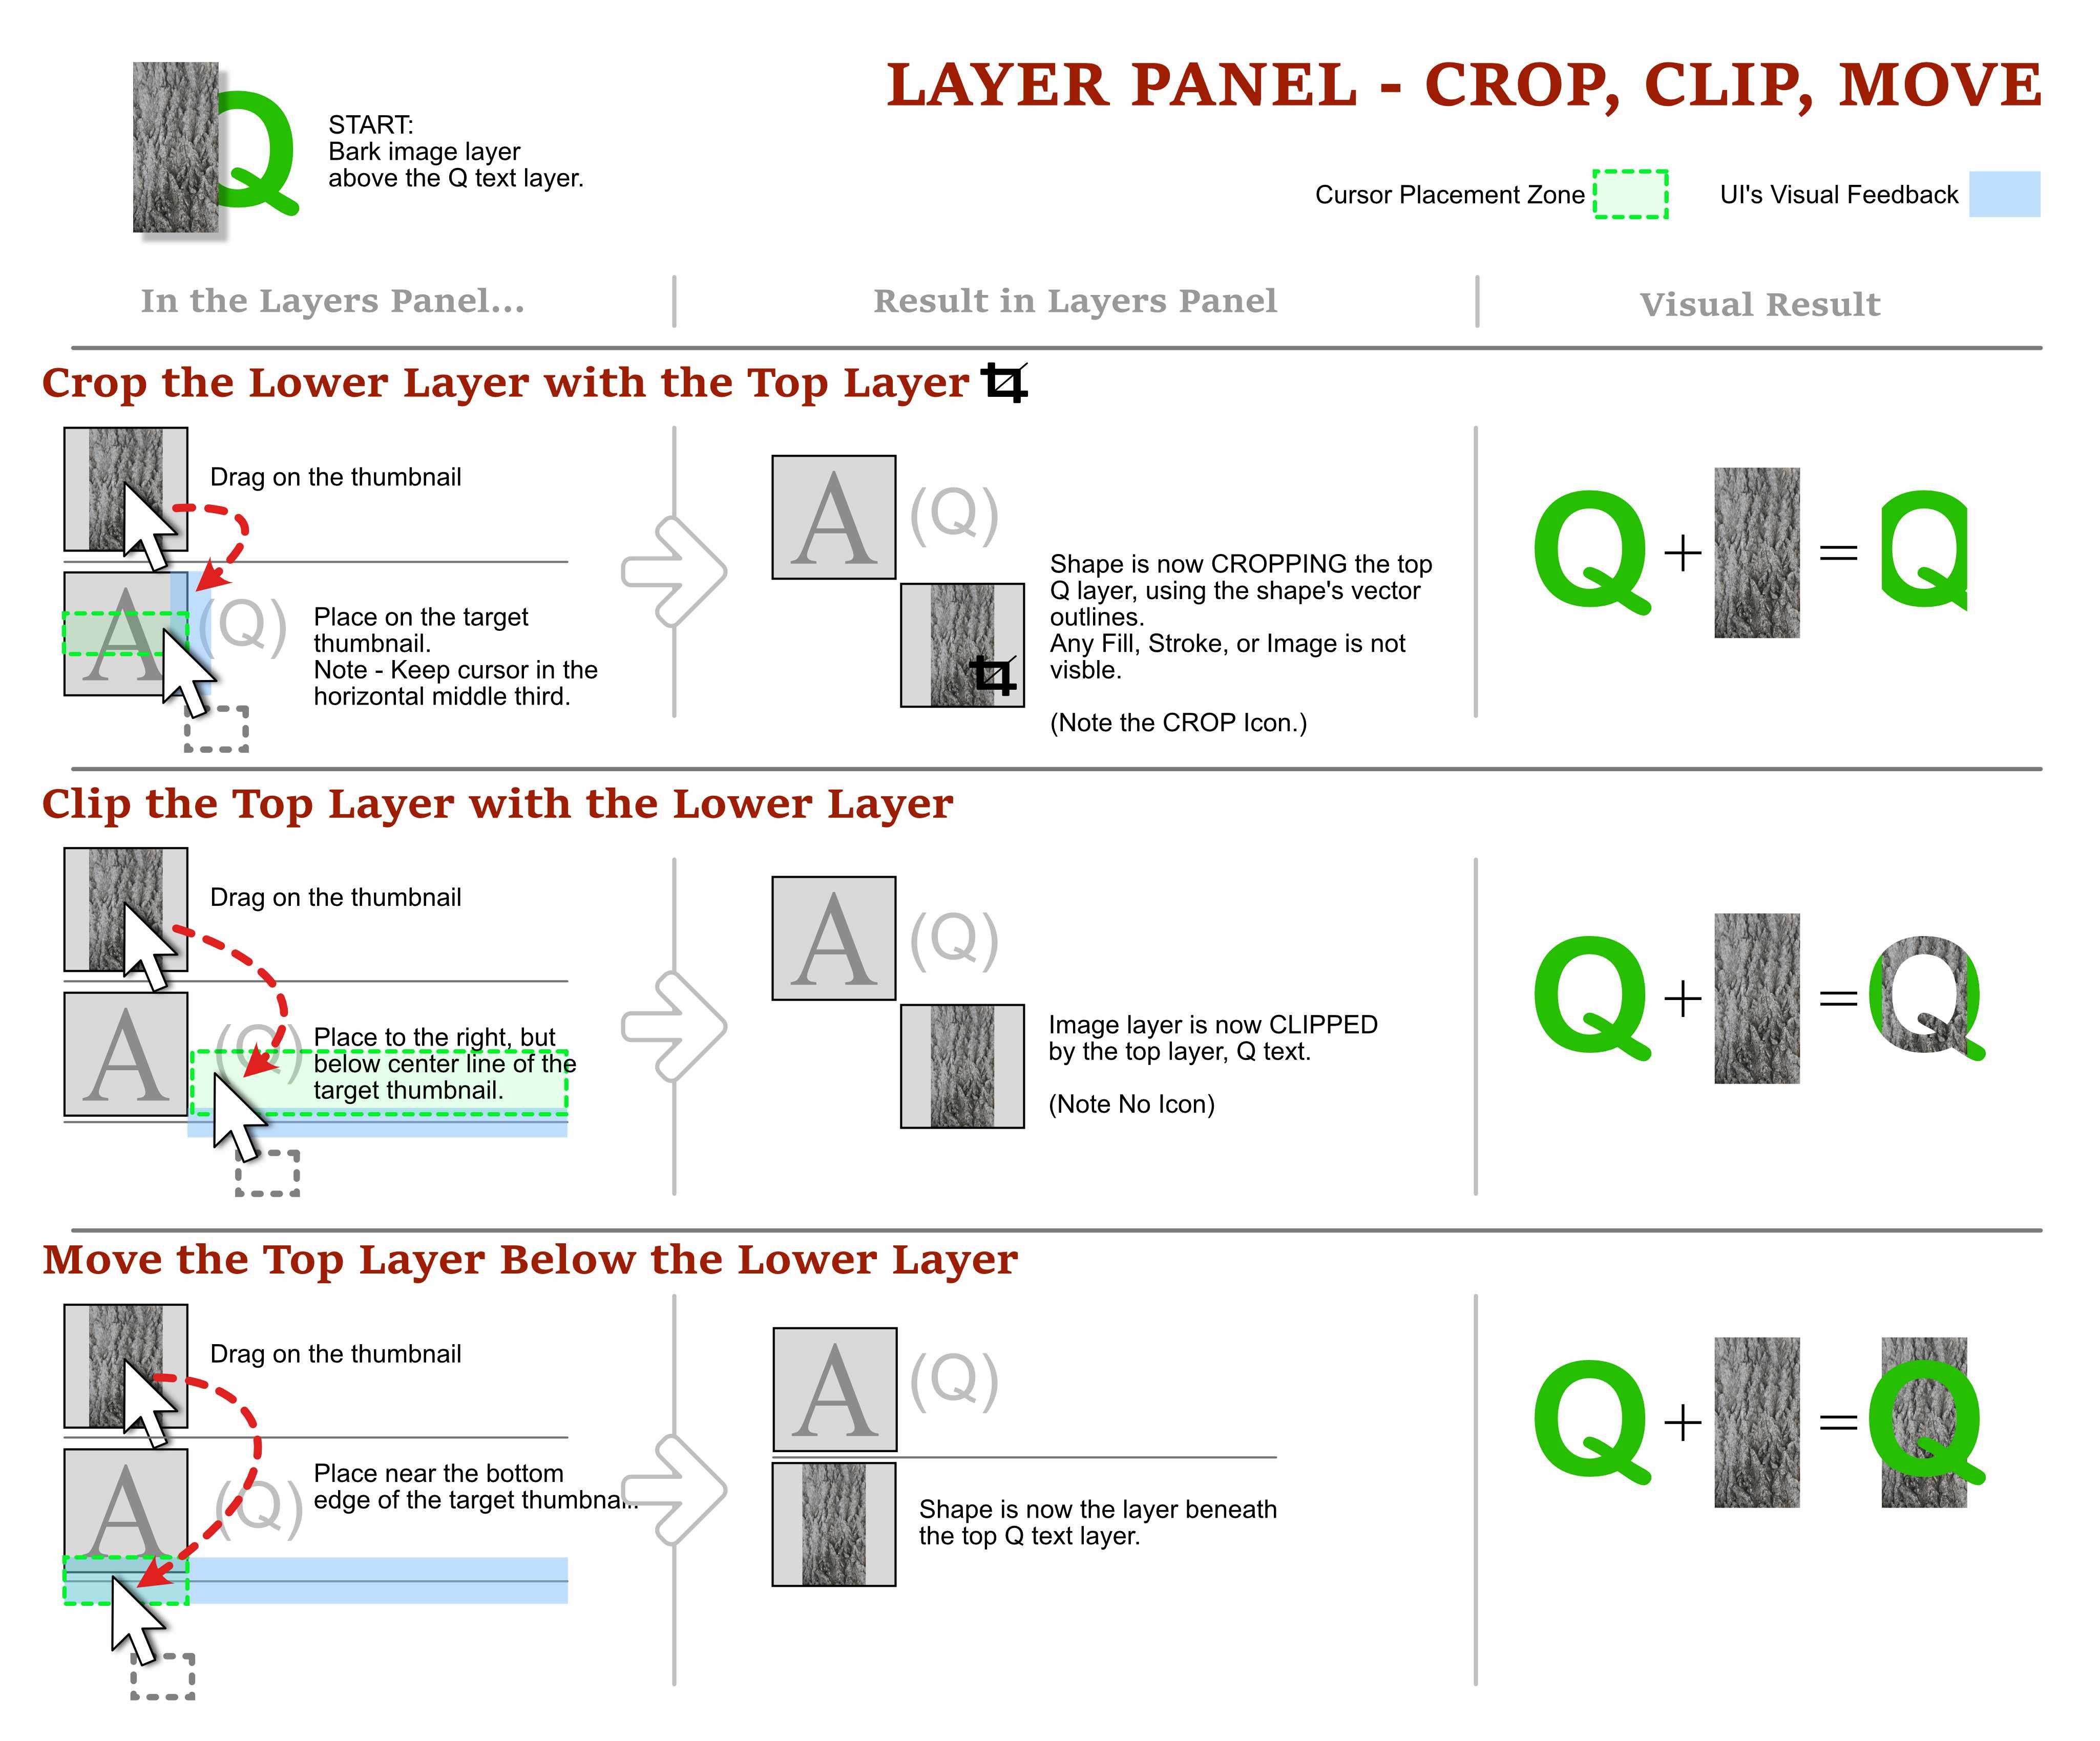
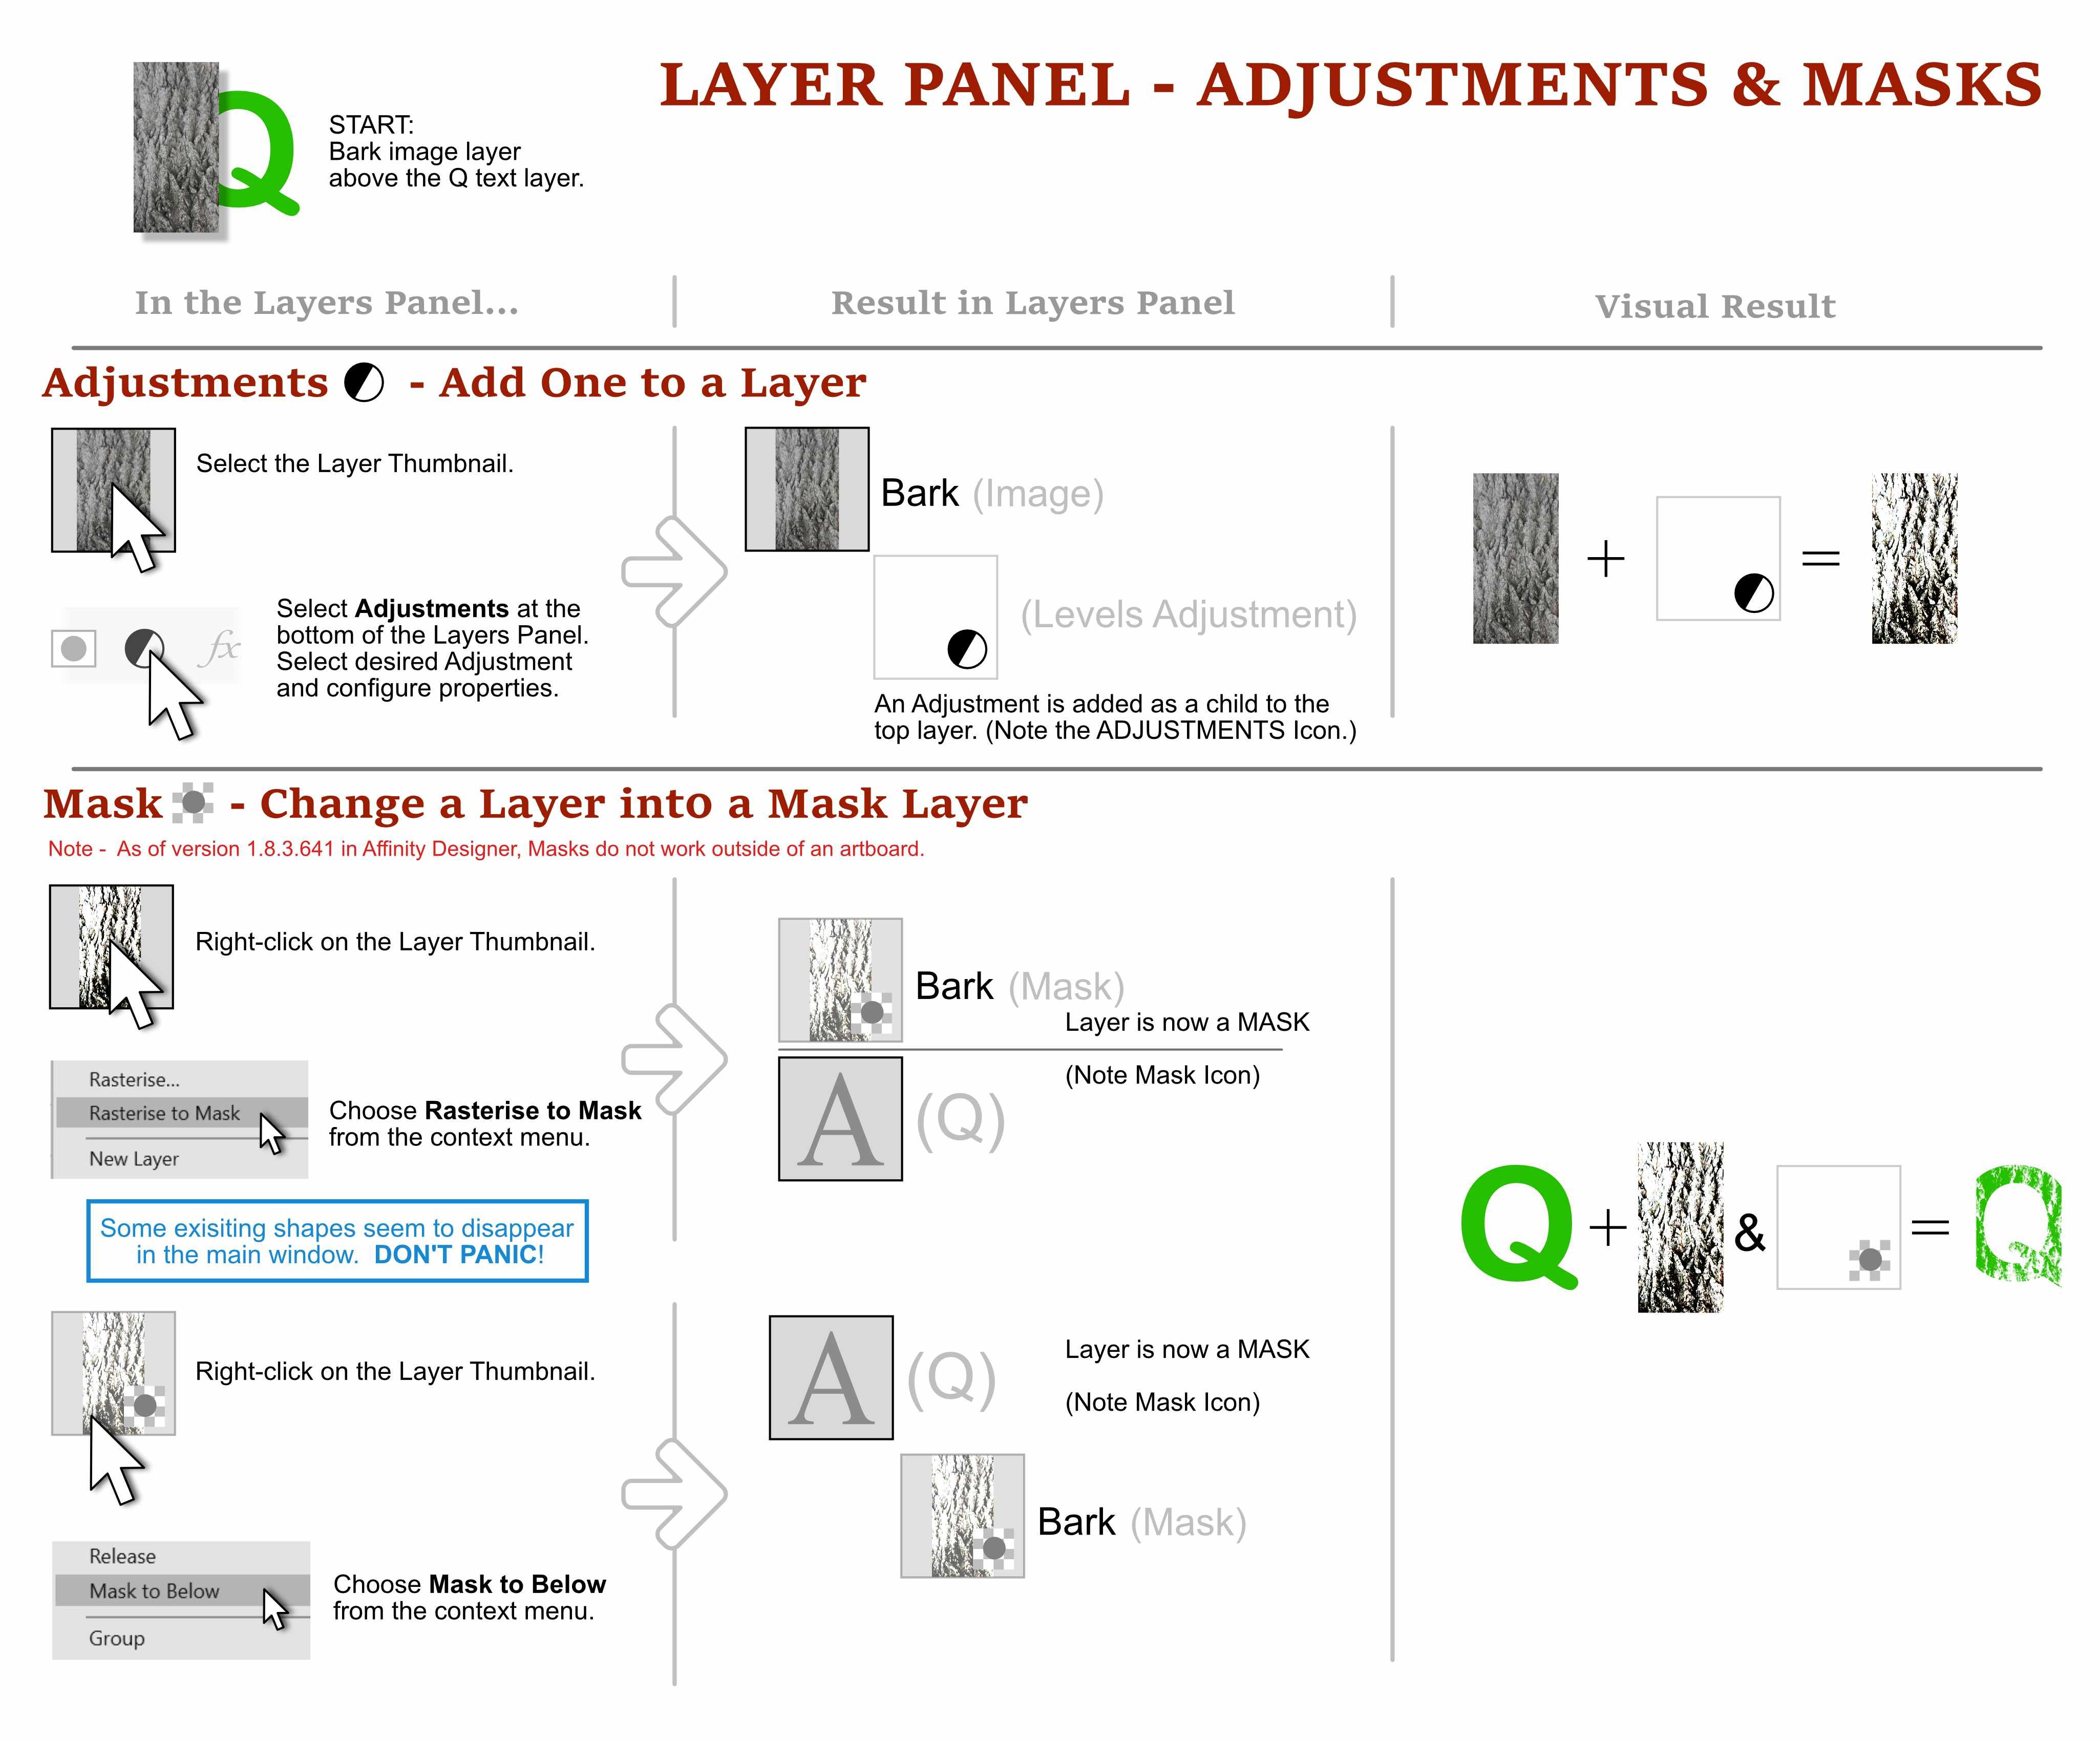
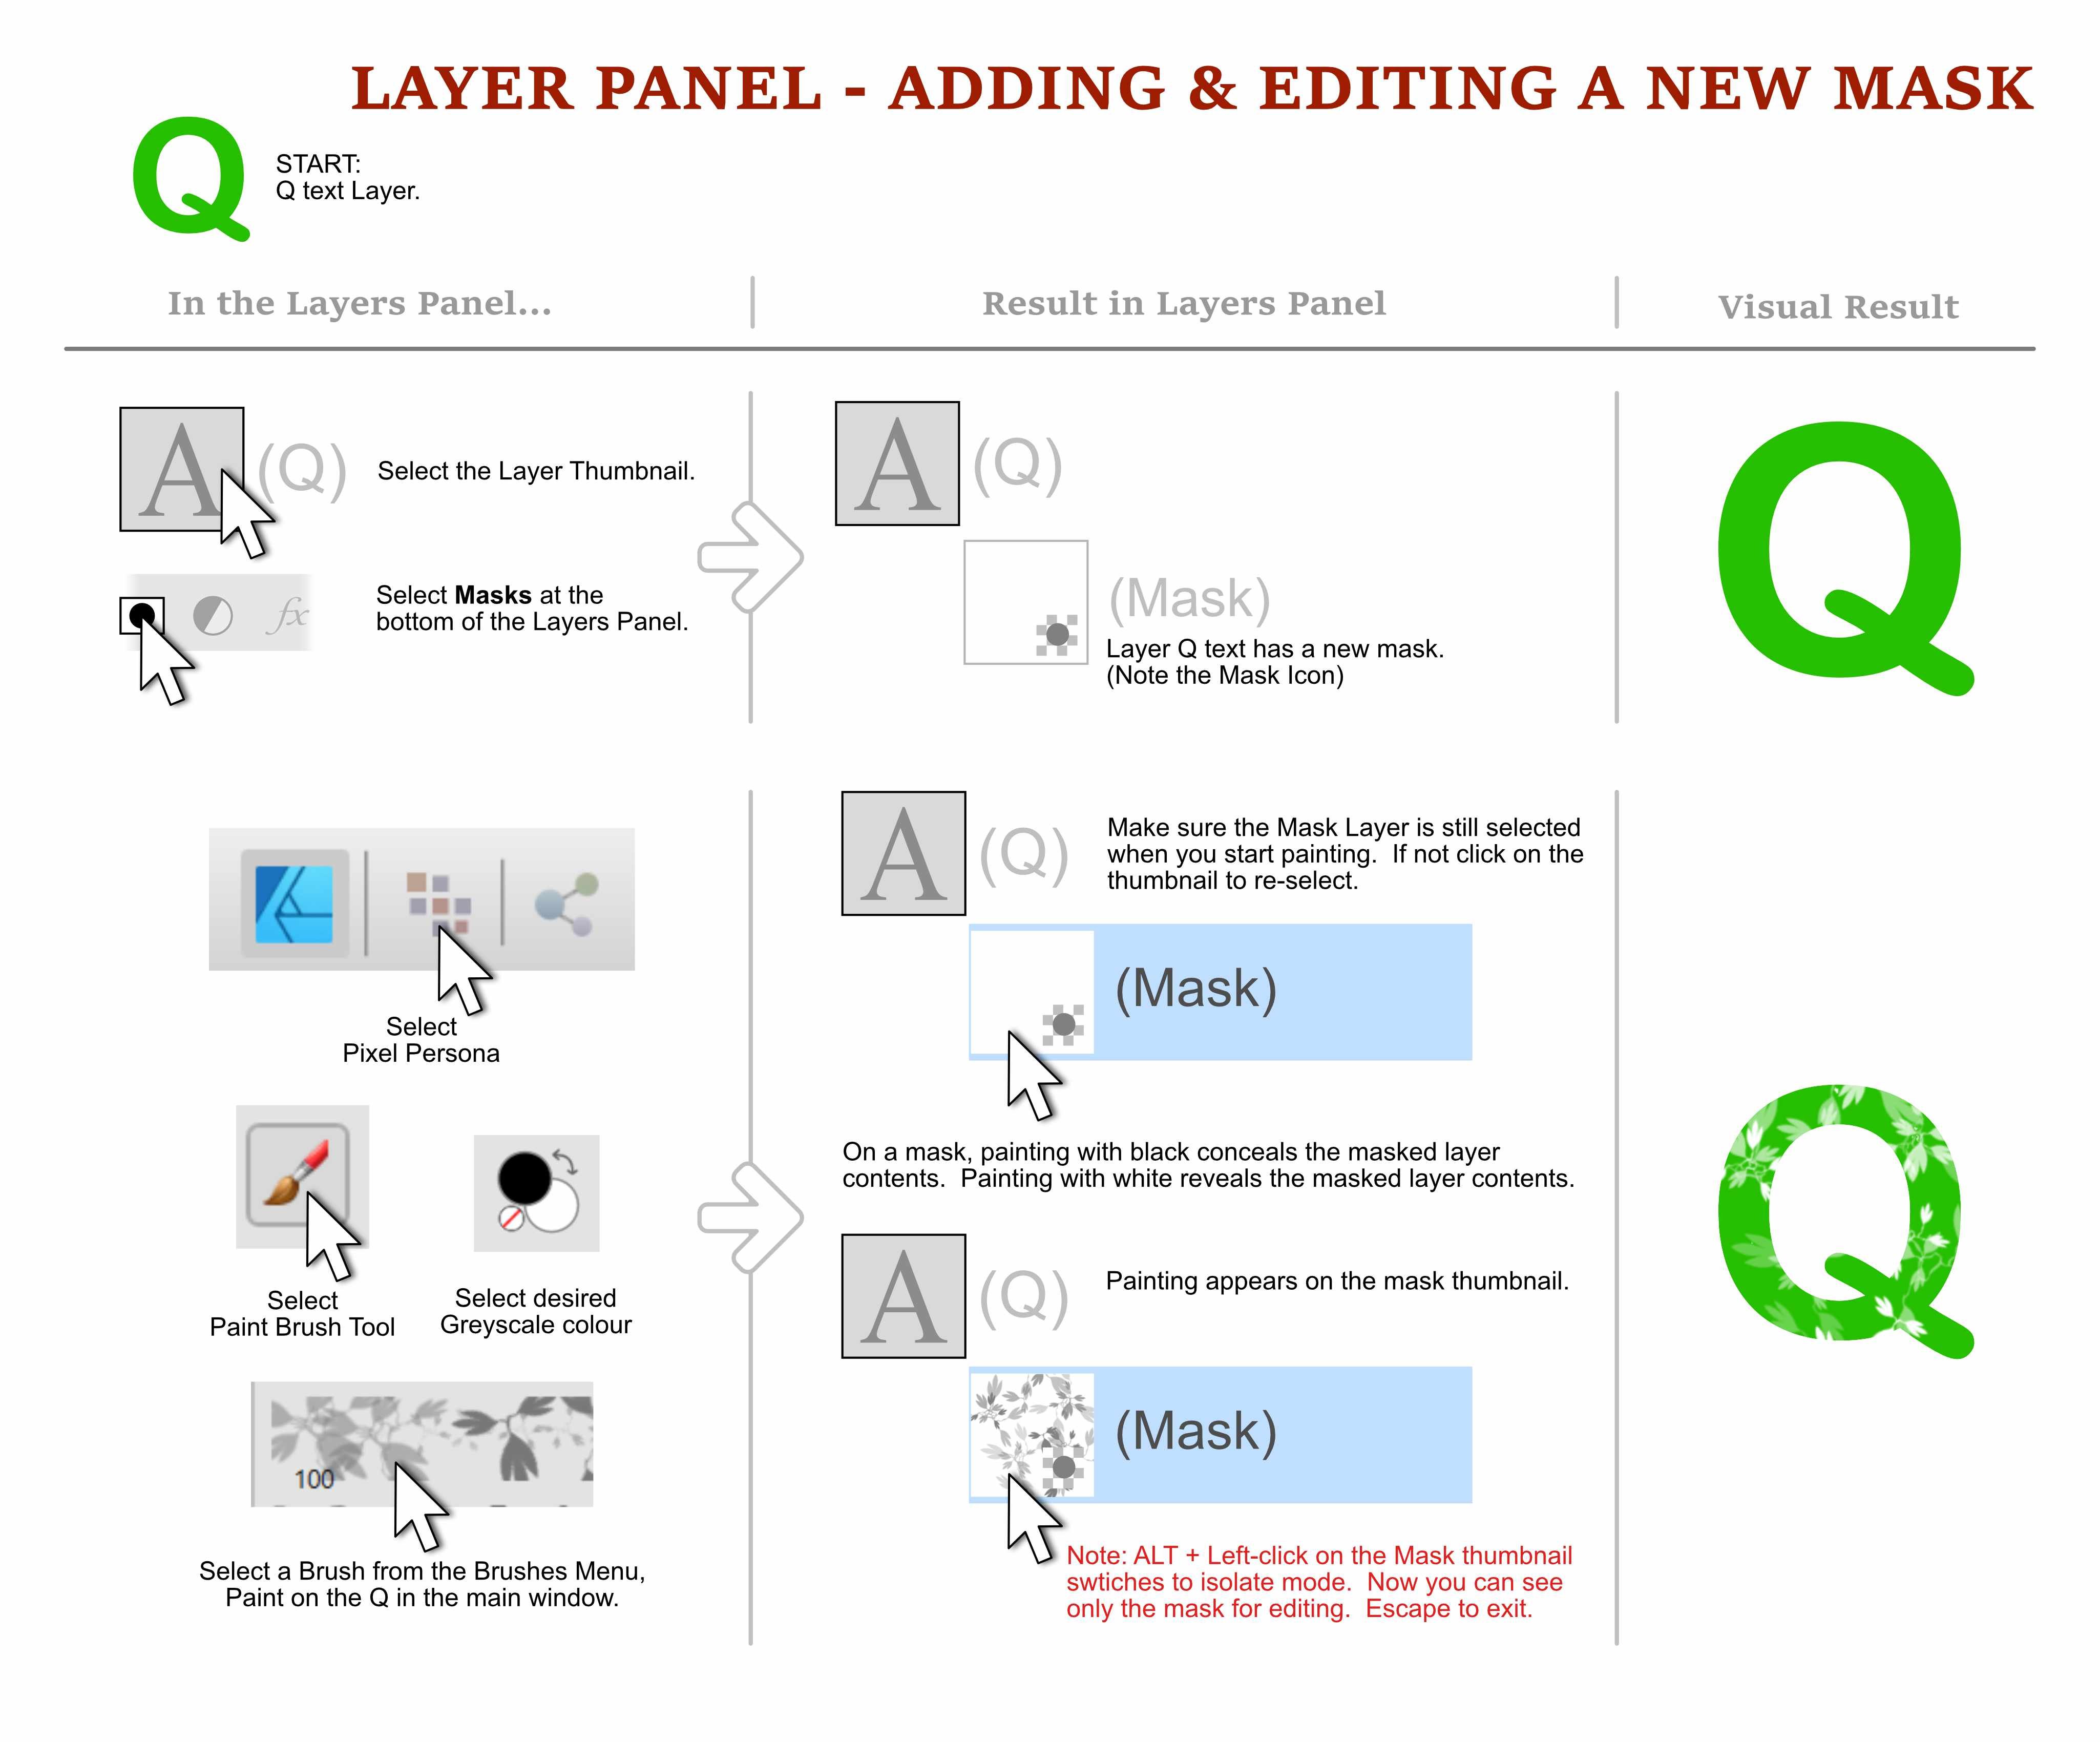
Have you ever tried to arrange objects in the layers panel only to loose them, and then find it nestled in a collapsed group of objects? Ever try and move an object so it clips anther object and it ends up with an unexpected result? Ever wonder what those enigmatic icons in the layer thumbnails are trying to tell you? This guide is for anyone with those questions. From folks that are new to Affinity Products, to people who has been using it for years and struggled with the behaviour of layers. This 3-page visual how-to guide will hopefully help reveal any or all of the cryptic layer mysteries! The guide is in English for desktop versions of the products, designed the Windows version, tested mostly in Affinity Designer, but should translate well to Affinity Photo and Publisher. I would love to hear your feedback, if you notice any errors, have any additions, and/or let me know if it helps you, please chime in! NOTE: PDF DOWNLOAD AT THE BOTTOM. Please download it! Cheers, Dave Vector Affinity Layers Guide - Understanding Masks, Moves, Crops, Clips, Adjustments.pdf
- 46 replies
-
- 19
-
-

-
Affinity Designer for Windows - 1.8.0
Dave Vector replied to Patrick Connor's topic in News and Information
Yes, I have to chime in and express gratitude for the continued improvements to this more-than-reasonably-priced, non-subscription-based software! Your team rocks! -
@Patrick Connor Thank you! I am grateful for the fix.
-
Ah, I thought maybe they had a list of proposed features that I was not seeing. Thanks for the replies.
-
Hi, I have read the "fixes, improved, and added" bullet list in the top post called "Affinity Designer Windows Customer Beta - 1.8.0.486" Is this the official place to find a list of all the proposed new features for Affinity Designer 1.8? Or is there a better place I can find a proposed new features list? Thanks, Dave.
-
@dominik yes, good point. I would love to hear from Serif if they are considering a feature like this and if so, where it roughly sits on their timeline of potential new features. @fde101 the idea of tags is a good one and an interesting solution to this issue I had not considered. I like that tags give you an even broader functionality. Nice one!
-
@dominik You have some good points and they gave me opportunity to think about them and test them out. I was using Affinity Designer today to create about 74 icons, all with a similar style. I was relying on symbols to give me the freedom to alter shapes within the icons. Then I wanted to "un-sync" the symbols to shift the colours on certain groups of them. It became apparent that, although symbols are like powerful selection sets in and of themselves, having the ability to save a selection of elements within a bunch of groups (or symbols) would be a very powerful addition to the tools. Imagine a user attempting to do this type of deep selection in the Layers Tab. The user has to expand the drop-down arrow in each group or symbol, and select the crucial elements to change their properties. But if the user can SAVE the selection, they do not have laboriously go back, expand all the grouped layers, to select those elements ever again. It would be a HUGE time-saver and further enhance the power of Affinity Designer. Combine (2.) Select By... to easily pick elements of similar properties with (1.) Selection Sets and, as an artist, you would be "owning" your file instead of your file "owning" you!
-
Hi, I realize that my requests for (2.) Select By... and (3.) Colour Modify have been vigorously discussed. Does anyone finding themselves wishing for (1.) Selection Sets? Please read above for details. Serif, thanks again for listening to our deluge of requests. We can surely make them faster than they can be filled! Mostly, it comes from a place of passion and the value we see in these tools!
-
Yes, I am looking forward to it!
-
Yes, just last week I pulled this out of "older posts" and re-posted it to this forum here:
-
Serif and @MattP, any updates on this issue/idea? Fellow Affinity users: Would this enhanced precision interest you?
-
I felt I should resurrect this post from "Older Feedback & Suggestion Posts". @MattP indicated this was an important issue, and not trivial to implement (which I totally respect). I was hoping this would get addressed in version 1.7, but it did not. Can anyone from Serif talk about where this sits in the development schedule? THANKS! Original Post: MattP's Post:
-
*Missing!? - Affinity Type & Font Persona
Dave Vector replied to Dave Vector's topic in Older Feedback & Suggestion Posts
I had a look over this proposal again, and I really hope Serif will run with the spirit of this idea and implement it more elegantly than my suggestion. It is so exciting to see all three tools work so well in concert with each other, it really changes the established desktop workflows for 2D design. Again, I hope that Serif can aim to beat the competition when it comes to font/typeface management as it is so neglected as a design pillar in most software. Thanks! Dave -
Thanks @Sean P!