Dave Vector
-
Posts
130 -
Joined
-
Last visited
Everything posted by Dave Vector
-
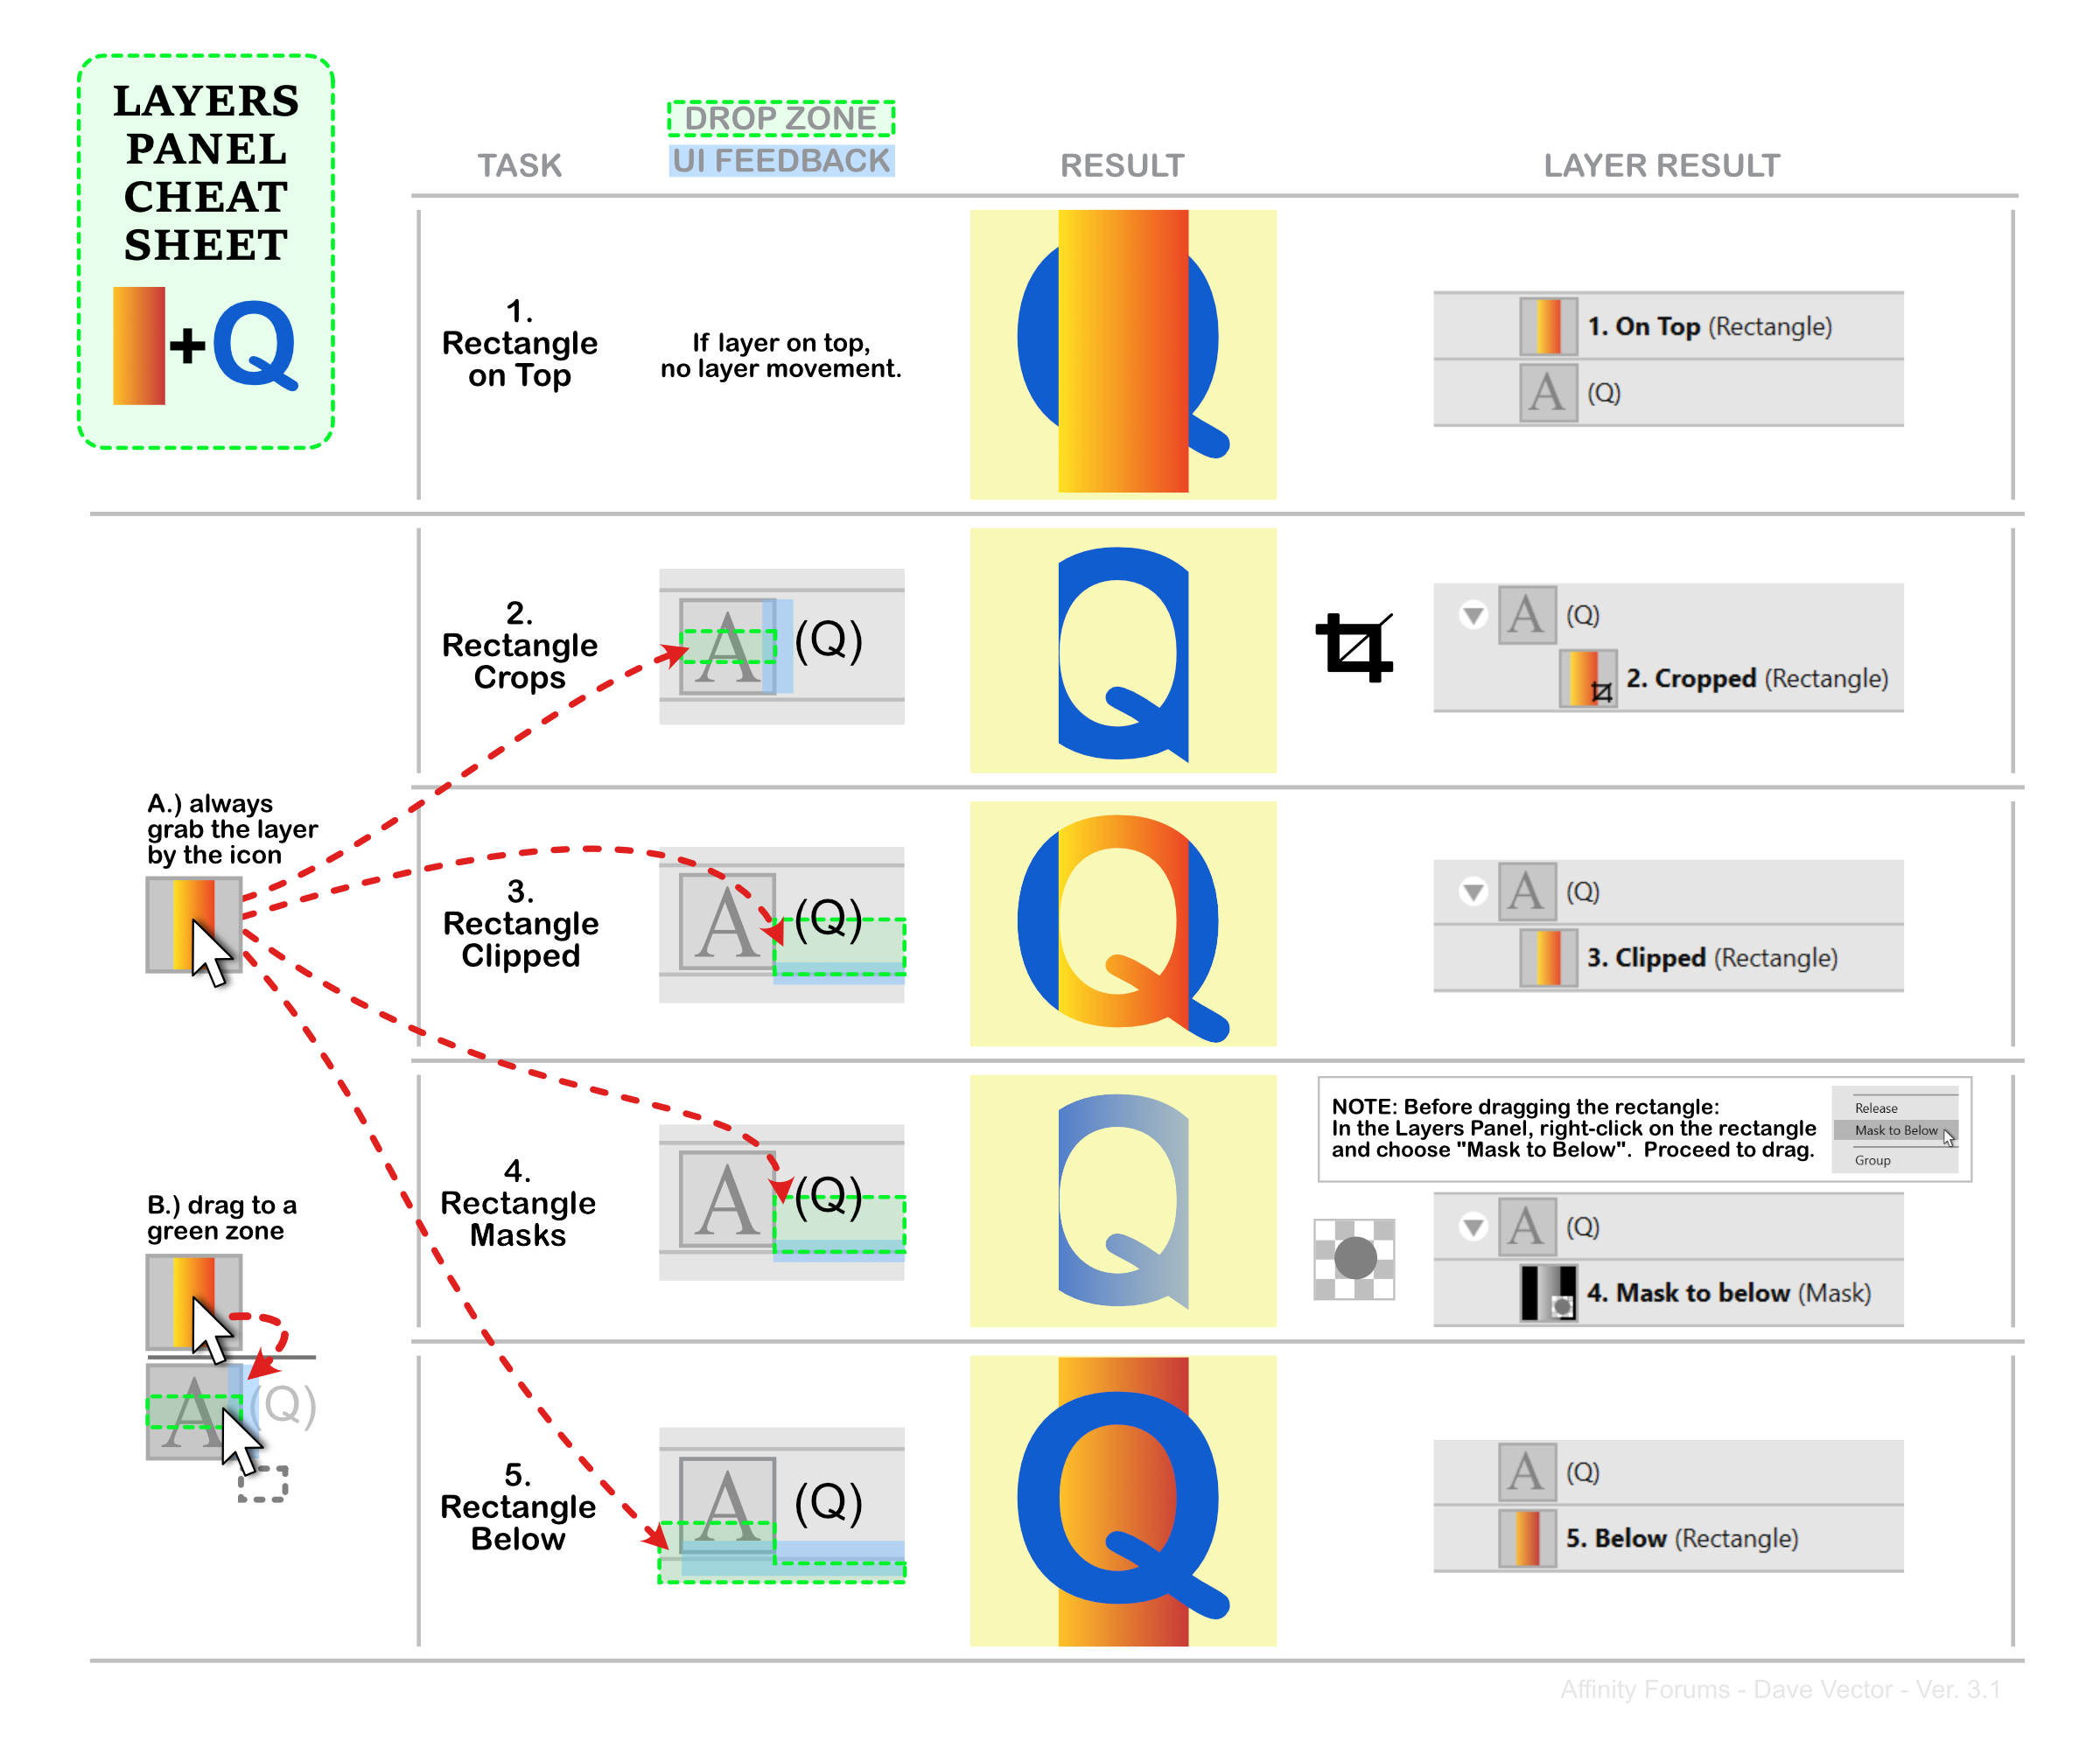
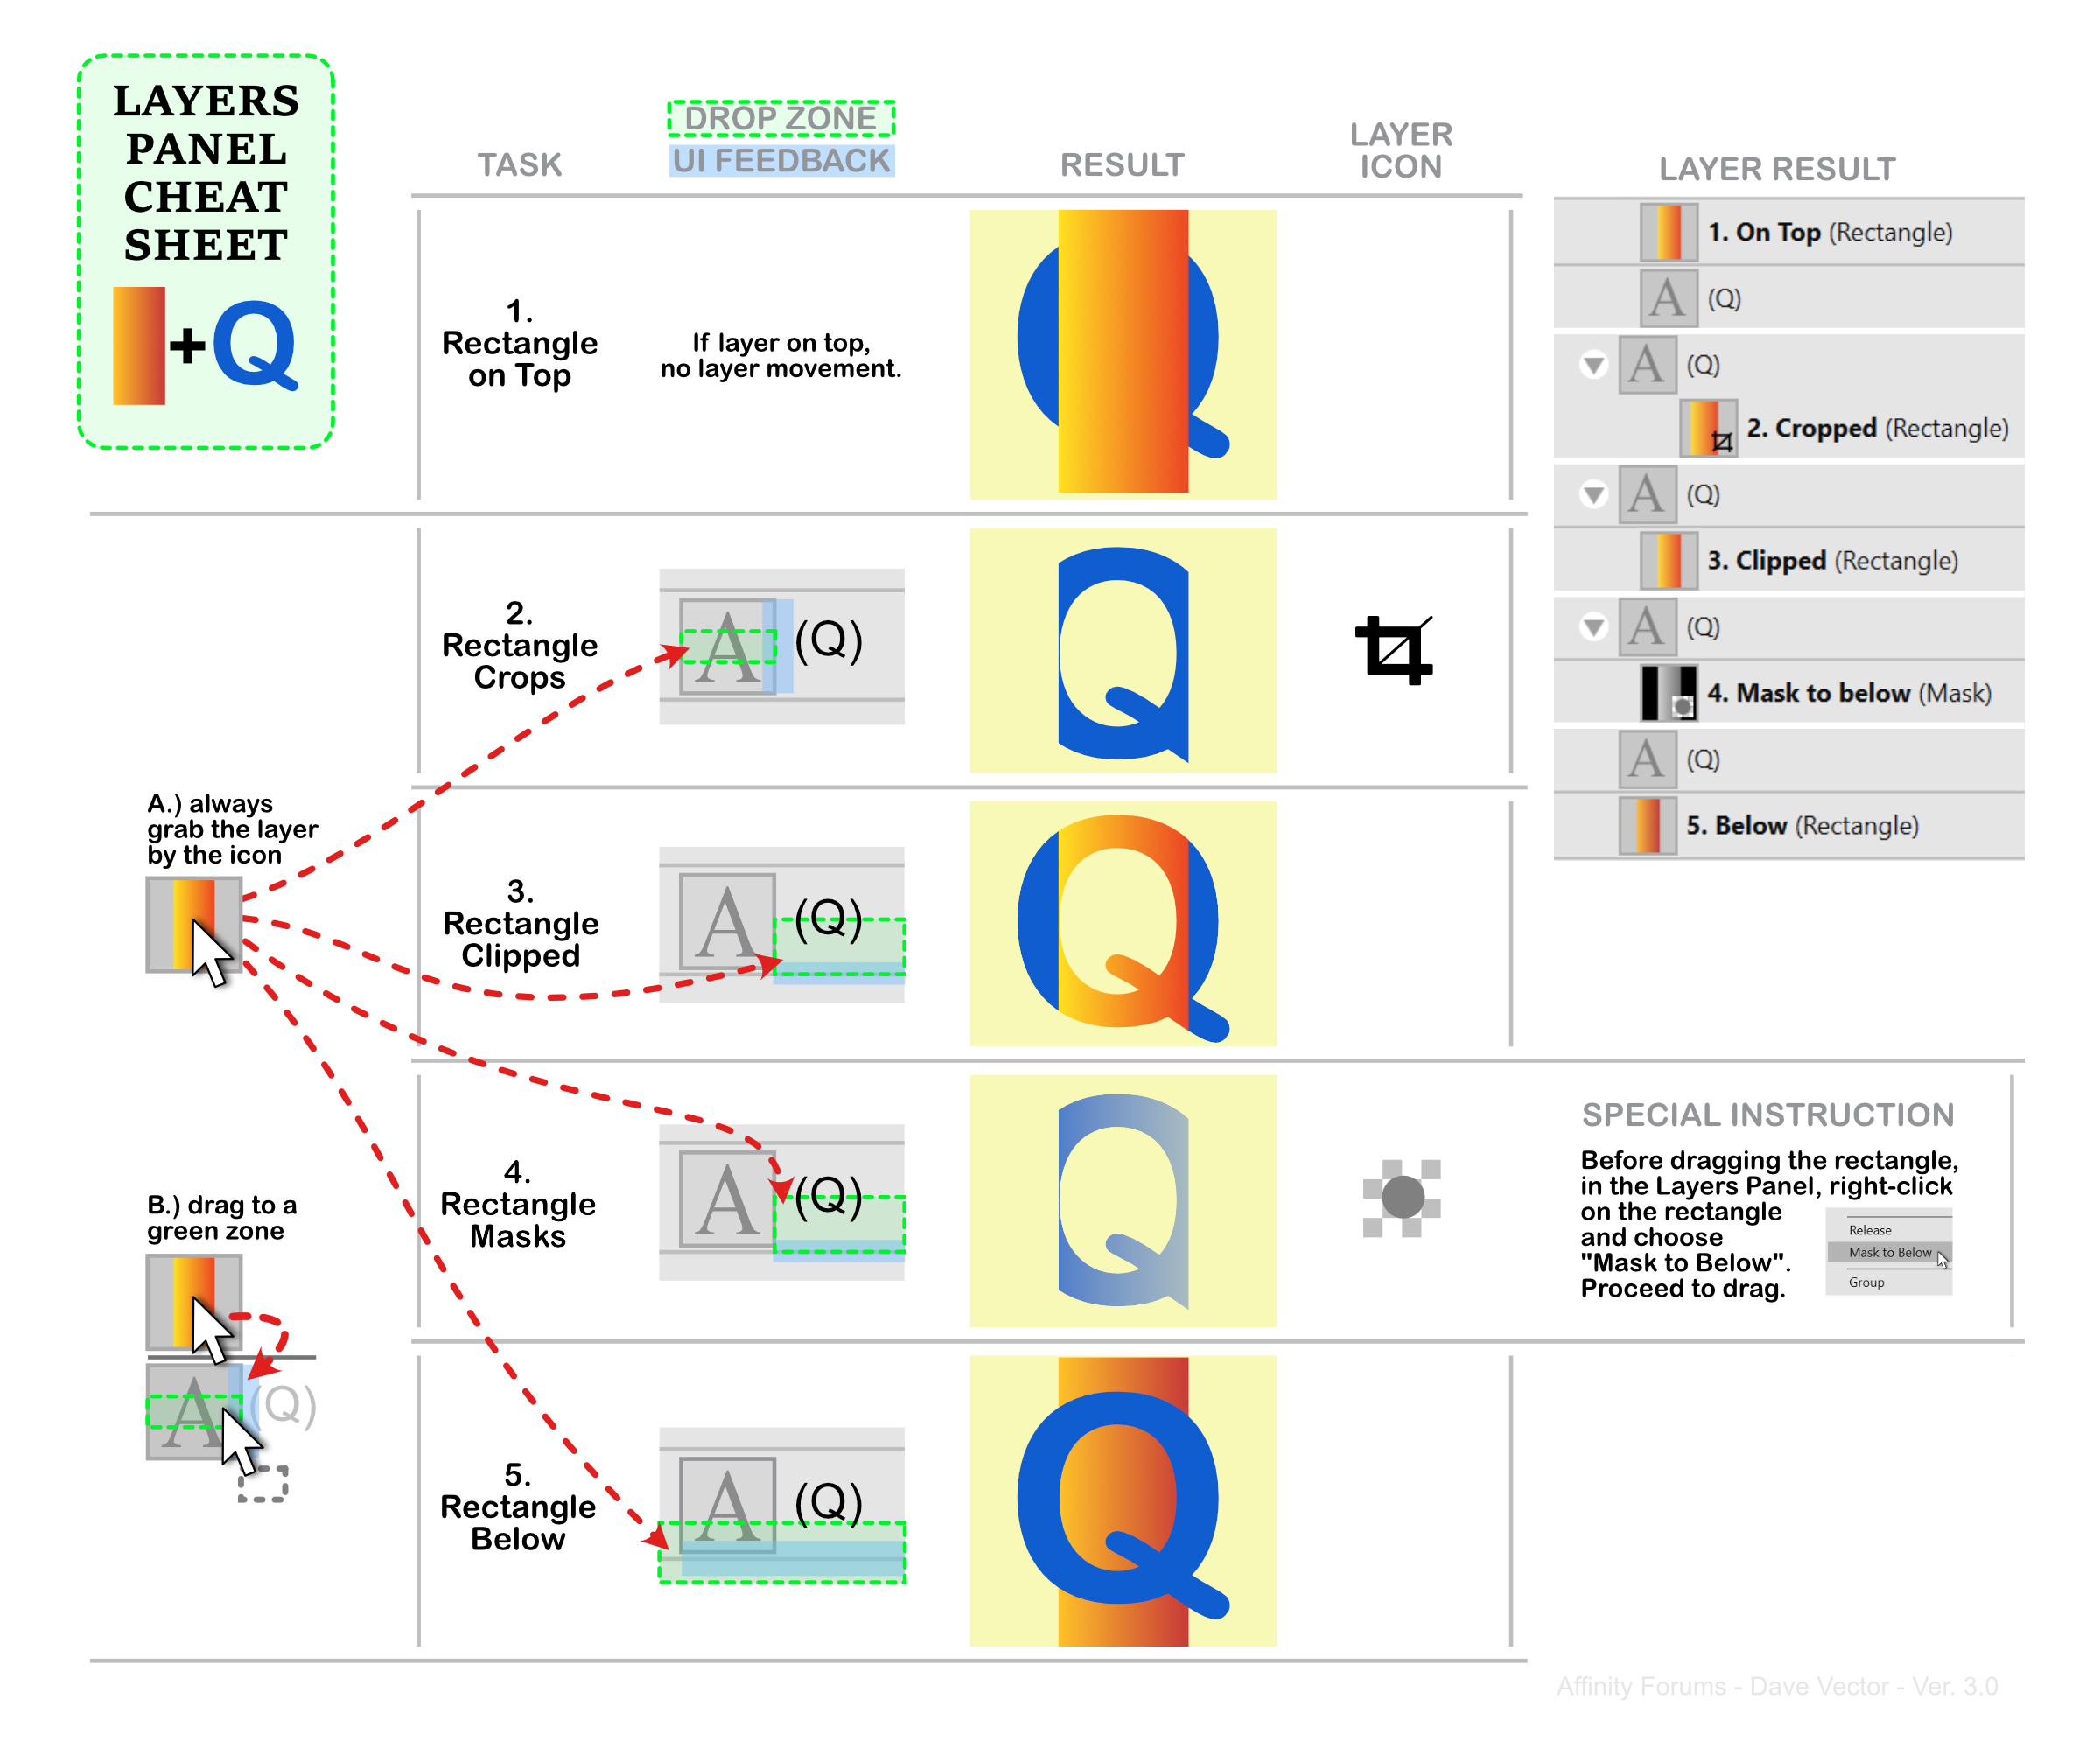
 @Washishu First off, I am pleased this learning resource could benefit you and others. My understanding of ADs layering system came after much confusion which is why I made the cheat sheet and I still sometimes lean on it for my own work because the UI drop positions are not intuitive or easy to "catch" with the mouse. I would love to suggest to Serif more intuitive ways to do this, but I am not sure how much weight my voice would have. So for now this is what we got, and it is pretty powerful when you know how to control it. To answer your last question first, regarding why newly created shapes do not appear in a layer, I suppose they do indeed exist in some "phantom" layer. Maybe a better way to look at it is the objects exist at a document "root" layer. So the dark grey space is some sort of giant canvas and all new objects start there at the root layer, essentially layer-less. It's a bit confusing that you can start with no artboard, yet there is this white rectangle there delineating the chosen dimensions of the newly created document. I suppose this is a more of an "output area guide" for delineating export and printing. Creating an artboard will add your first layer, replacing the "output area guide". Now every object you previously created within that guide area will now be in that artboard layer. Obviously the Layers studio (panel) is your best friend here to watch how the objects behave by observing their hierarchical indentations. Creating any new layers at this point is really for organization but it is interesting to note that you can create a layer not within the artboard hierarchy, yet the objects can be still have the artboard below/above them, if that makes sense. So a created layer can transcend the artboard in some way and objects within that layer are independent of the artboard. Grouping is just a handy form of a layer, with very specific contextual hierarchical results, depend upon what is selected at this point. All types of layers (Artboards, Layers, Groups) can have Layer Effects and Adjustments applied to them for some awesome flexibility. And yes, even an object is it's own layer. On to Cropping vs. Clipping (do you have your cheat sheet handy?). When Cropping (2), the top shape (rectangle) is used to limit the exposure of the bottom shape Q. Note that it is only using the path of the rectangle as a means to limit what you see of the bottom Q shape. No fill or stroke elements are applied. When Clipping (3), the bottom Q shape uses it's outline to limit the exposure of the top rectangle, but note that both objects retain their fill and stroke. Masks (4) behave like Crops, but their specific function is to use light and dark values, AND the outline of the top rectangle, to limit the exposure of the bottom Q shape, the extra dimension of darkness is being used to affect the visibility of the bottom Q shape. If you notice on the cheat sheet in the layer result column of the (4) Masks row that the layer panel view shows black around the Masking shape as well as the gradient fill to black, obviously black is the value for 100% transparency. As for your difficulties to get Clipping (3) to work, I am not sure what to suggest, but the UI delineation for the mouse pointer seems to be the bottom half of the layer to the right of the thumbnail. Cropping/Masking is always dragging the top layer with the mouse pointer in the middle third of the thumbnail. I just tried it will the latest Affinity Designer 1.10.5.1342 and it still worked for me. To answer your question: "Does it matter that I only have two layers?" No it does not. Please note in your Layers panel, or in the "Layer Result" column of the "Layers Panel Cheat Sheet.pdf", that there is also specific indentation distances for each of the 3 states (Crop, Clip, Mask). Personally I think that Crop and Mask should have the same indentation and the same mouse pointer drop zone but Clip and Mask should be different because the visual results are more similar, but I am sure Serif has a technical reason even if it is not intuitive. I hope this helps anyone with similar issues. Thanks again for your kind words! Dave. PS: Here is he latest version of the "Layers Panel Cheat Sheet 3.2.pdf" (<-PDF link), found a few posts back (page 1), here: https://forum.affinity.serif.com/index.php?/topic/114361-layers-guide-understanding-masks-moves-crops-clips-and-adjustments/&tab=comments#comment-771765
 -
@Lmpessoa On behalf of all the people who still need the .ico format, I thank you for sharing your creation! Perhaps one day Serif will have support for plugin/extensions, but in the meantime I will give your app a try. Cheers, Dave
-
Vector/pattern fill
Dave Vector replied to jc4d's topic in Feedback for Affinity Designer V1 on Desktop
Well, thank you, @SureWeb! That was my tipping point. I just bought a copy now... I purchased with PayPal so no need to give credentials to BlueTailCoupon.net. The download link they provide points to the VectorStyler.com official website, and the License code worked without a hitch. -
Glad I could help you out in your learning journey, @anim. For anyone looking for the cheat sheet, click on the post below for a link to the most recent version:
-
Ahh, under Layer > Geometry > Separate Curves. I knew I was missing something. Humbled. Thanks. @Alfred
-
Sure, I made an example file (attached) to protect the client's privacy. The first image is the curve layer with a bunch of closed-curve elements. Selecting it with the node tool, gives us the result of the second image. I wish to node-select a "two-circle, 5-pointed star" element and extract it as a distinct object (assume the element is a more complicated shape not easily recreated, like this simplified example file). If I attempt to copy and paste a single element, the result is the entire curve layer (the whole pattern) duplicated as a new curve layer. Is this possible in Affinity Designer 1.10? Please tell me if I am missing an obvious solution and then I can feel humbled :-) Thanks! Copy Nodes to Distinct Object.afdesign

-
I ran up against this issue while editing a client's file today. I have a layer that is a bunch of closed curve elements all part of a single curve layer. I wish to node-select one of these elements and extract it as a distinct object. Is this truly not possible in Affinity Designer 1.10? I thought I would check because I must be missing something. Any help would be appreciated.
-
Thanks to @Yolanda and @anon2 for the recent clarifications to the Cheat Sheet, Task 4. You feedback is appreciated Here is the latest version: Layers Panel Cheat Sheet 3.2.pdf
-
Thanks @anon2. The crop icon AD uses to indicate a vector mask confuses me. I think there are a few things about layers that are not intuitive or easy. I will update the cheat sheet.
-
Hmmm, to address this question: Task 2 I called "Crops" because it a.) added the crop icon beside the layer when the task was executed, and b.) behaved the same as using the Vector Crop Tool. For Task 4, I now see that the right-click "Mask to Below" pre-step is also performing the crop action and adding the crop icon beside the layer. In order to do Task 4 (use above layer rectangle object as a mask) the pre-step is now: "In the Layers Panel right-click on the rectangle and choose 'Rasterize to Mask' in the drop-down menu". Then proceed to drag onto the layer below, otherwise it will mask everything below that layer. I do not remember it working this way in previous versions of Affinity Designer. Before I go updating the Cheat Sheet, can anyone confirm if this is new deliberate behaviour from an update to Affinity Designer? Currently using Affinity Designer 1.9.2.1035 Can anyone confirm if "Mask to Below", acting like a crop and also showing the crop icon, is a bug? Thanks, Dave
-
Thanks Jason, I appreciate the feedback!
-
@ashf I appreciate your feedback. I see you are referring to my original (first) post in your comment. I admit my first attempts to articulate the layer behaviour in Affinity Design was not perfect and I have since updated the descriptions and the entire explanation into a single handy sheet. Please see my February 19, 2021 post. The attached PDF contains the same information as the inline PNG. "The first example" you are referring to is now in the "Task" column labelled "2. Rectangle Crops". I hope that makes more sense than the original description. I made the "Task" labels short descriptors and hopefully easy to understand. So to be clear: The Rectangle is on the layer above of the "Q" The Rectangle Crops the "Q" The Rectangle is Clipped by the "Q" The Rectangle Masks the "Q" The Rectangle is on the layer below the "Q" Does the updated February 19, 2021 post help?
-
Affinity Designer for Windows - 1.9.1
Dave Vector replied to Patrick Connor's topic in News and Information
Thank you @Patrick Connor. I appreciate the updates. Please thank that team for me as well! -
Hi, I noticed the Drop Zone (green dotted area) for 5. Rectangle Below was not correct. Below is the corrected version and downloadable PDF. I also took the opportunity to make it clearer. Don't mean to spam ya'll but hey, it's free! Layers Panel Cheat Sheet 3.1.pdf
-
Hello! I made an updated version of the "Layers Panel - Visual Summary", now called the Layers Panel Cheat Sheet. The procedural flow is now horizontal, so hopefully it's easier to understand. The link to the PDF version is below. Enjoy! Layers Panel Cheat Sheet 3.0.pdf
-
Vector/pattern fill
Dave Vector replied to jc4d's topic in Feedback for Affinity Designer V1 on Desktop
Thanks for the great tip. I too am starved for vector patterning tools, but this works quite well especially with snapping and symbols. Followed the simple guide laid out by @dominik for the Data Merge Layout tool in Affinity Publisher. Results are very encouraging!
-
Improve selection methods
Dave Vector replied to Aleksandr Novakov's topic in Feedback for Affinity Designer V1 on Desktop
I like the idea of different select behaviours depending upon if the user is drawing left to right, as opposed to right to left. You could have a similar function with the lasso depending upon whether your drew it clockwise or counter-clockwise. -
@prophet Indeed! Colour tags give you 7 "selection sets". I would wish for more, either with named sets or more colours.
-
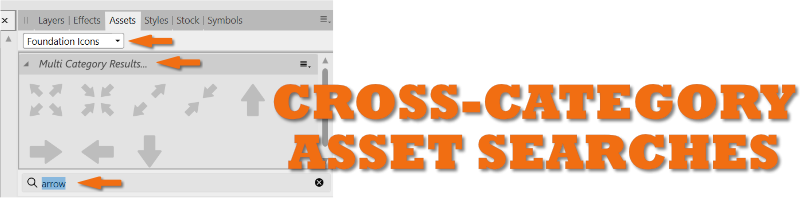
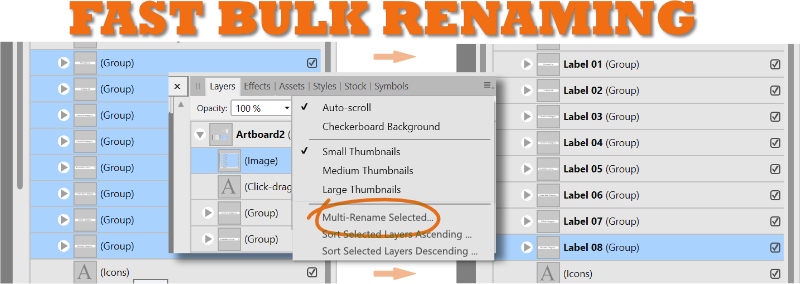
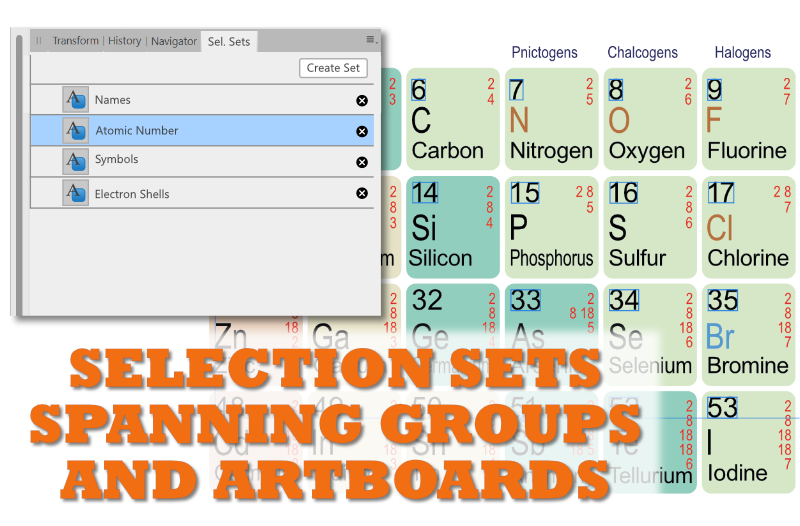
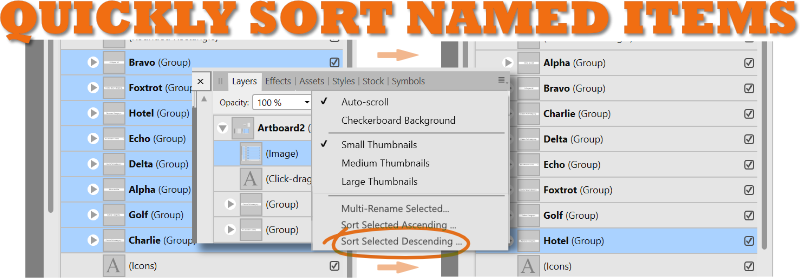
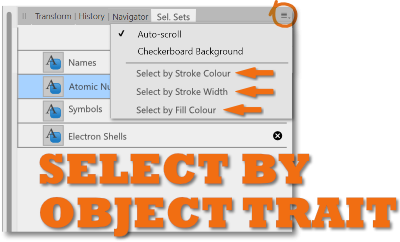
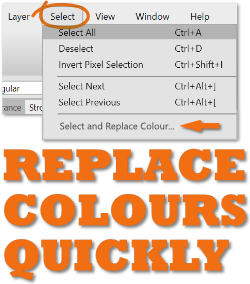
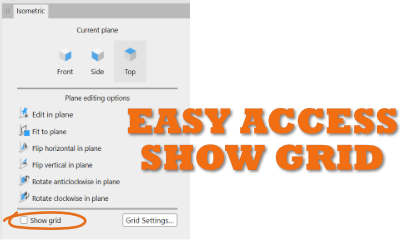
I wanted to thank the Serif team for adding what I called "Select Object by Trait..." (listed as #6 in last year's post) to Affinity Designer 1.9. It definitely helps speed up the workflow. I certainly appreciate the added functionality; great job!!! Hopefully we can see a few more of these remaining 8 features. I listed them here again and would love to hear people's thoughts on them. Most of these suggestions can span all the affinity desktop products, but some are Designer specific: 1. Organize Assets, Swatches, Brushes, Style Libraries with an edit mode, using an interface like the the "Presets Manager" in Shapes, to allow for re-arranging, renaming, moving between categories. 2. Stoke Pressure Profiles can be saved on an application level. Organize and manage, with an interface like the "Presets Manager" in Shapes. It’s all about efficiency, and not having to reinvent the wheel (stroke!) every time. 3. Layers Panel – Select objects and groups and rename them with a multi-rename tool. Instantly get organized so you and even other people can understand the layer groups and objects in your Affinity document. Interface would allow the user to add a numerical counter as a prefix or suffix when renaming. Handy before using Export Persona to create some basic naming conventions. 4. Sort Layer Groups or artboards in the Layers Panel alphabetically, ascending, descending. Yes, it will change the arrangement order, but properly organized groups can make complex file layers much easier to navigate. Handy for PDF Exporting where the order of pages depends upon the artboard order. 5. Save selection sets that can select items spanning multiple artboards and also within groups. Often similar objects need to be adjusted or moved, but they are on multiple artboards or nested in other functional groups. This can quickly solve that problem. 6. Select by object trait (stroke color, stroke thickness, fill colour). A handy way to quickly select and adjust objects with similar properties. Otherwise selecting these can be a nightmare in complicated projects. YAY! THANKS FOR ADDING THIS AND MORE! 7. Select and replace non global identical colours. Does your client want all the red elements blue? What would they look like in teal or taupe? Play rapidly to your heart’s content. 8. Search Assets Panel ACROSS BOTH categories and subcategories, results displayed as filtered choices. Do you have multiple categories/libraries and need to find the right icon fast? This can save you time. Currently a search has to be made within each asset category, which can take some time if you have multiple asset categories. 9. Handy Show Grid checkbox in Isometric Studio Panel. True, you can use a keyboard shortcut, but it would be nice if this button was upfront. Handy when you are working in Isometric view you have to turn on and off the grid to see the artwork uncluttered. Chances are you have the panel open to constantly switch planes anyways… I hope this helps to add votes for the unsexy underdog features. 😊
-
[ADe] Is there any line smoothing? (implemented)
Dave Vector replied to GRScott's topic in Older Feedback & Suggestion Posts
@SrPx Have you tried the rotate canvas functions in Affinity Designer to "spin the paper" so to speak, and take advantage of the natural arc of your drawing arm? It can really help one get a nice smooth arc with those long, perfect curves, without the need for the stabiliser, just like drawing on a sheet of paper in the analog world. The three rotate functions are located in the View menu, just under the Zoom functions. If you set up some convenient hot keys for the rotate functions, it can be quite a pleasure to use Even better, map those hotkeys to a Microsoft Surface Dial and it's a really slick experience! I ended up purchasing a Dial to try it (yes, a Dial trial) and I love it. It snaps angles, 6 steps in 90 degrees. Seems good enough to get those long, perfect curves we yearn for :-) -
@kirk23 since posting this idea a year and half ago, I expanded upon it with a few UI visuals. Check it out here:
-
@anon2, thanks for helping clarify this odd behaviour with a great example. I hope Serif's team will address this bug soon as it makes things confusing.
-
@Sabina Beg I appreciate that feedback. There are often many repetitive tasks that, with a bit of automation can make them way less tedious. I too often have to pick apart someone else's Legacy PDF or Ai file to resurrect some data for a client project. It happens more often than one would think!
-
I disagree. The project I was just working on needed ICO files each with a single icon. Also there seems to be quite a few online converters that to this very task, so it must be fulfilling a need. Still I am not denying the need for the many-to-one functionality...
-
I was referring to mainly to the task of converting a bunch of slices/exports into a bunch of individual ICO files, not the process of bundling a bunch of slices into a single ICO file. Yes, @Pšenda it would be a much more involved task to add that "many-to-one" functionality, but a good first step solution would be to implement the one-to-one conversion.