Inrumpo
-
Posts
15 -
Joined
-
Last visited
-
 Zenon reacted to a post in a topic:
Have Shadows and highlight in Develop affect exposure
Zenon reacted to a post in a topic:
Have Shadows and highlight in Develop affect exposure
-
Inrumpo reacted to a post in a topic:
Shadows & Highlights in Raw
-
Shadows & Highlights in Raw
Inrumpo replied to IndigoMoon's topic in [ARCHIVE] Photo beta on Windows threads
Nice! That new beta-functionality looks exactly the way we were expecting it to work. I hope they will do the same (well, the opposite, kinda..) for the highlights slider. -
Affinity Photo and Designer 1.6 have launched!
Inrumpo replied to TonyB's topic in News and Information
As far as I know, it's "just" bug fixes. It's the sum of changelogs from the beta subsection. This is the latest one: -
PaulAffinity reacted to a post in a topic:
Shadows & Highlights in Raw
-
Shadows & Highlights in Raw
Inrumpo replied to IndigoMoon's topic in [ARCHIVE] Photo beta on Windows threads
This one was reported before. I think the problem is that those sliders manipulate the levels and not the exposure. I have to use an other tool to develop my RAW files for the time being. More info as well as a workaround in this topic: -
+1 for a change. As of now, I need to use another program just for developing raw-files. Thanks for your input. I've been asking myself what's "wrong" there. Now I finally know what's going on. And thanks @James Ritson for your workaround. I'm hoping to see some progress here soon (9 months passed by now).
-
You get that info from the ICC profile: Paper color via white point tag and black ink via black point tag. I'm not too sure on how they accommodate for colour. It's more about brightness. Anyway: You need to set up one ICC profile per every paper-printer combination you want to use. Yes, depending on how many papers and printers you are using, that will be a lot of profiles. But this doesn't fully answer your question: How to find out the correct black and white point tags and implement those into an ICC profile? I need to pass on that one. Fortunately, I only need to apply the profiles. I don't need to set them up.
-
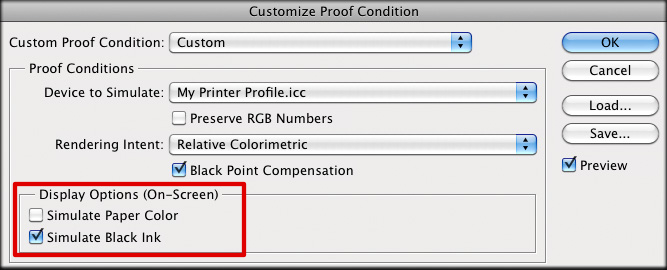
Yes I know. But this would also turn off the soft proof. Therefore makes no sense. If that is ture, then good to know. Thank you for a clear answer. You set it in the ICC profile. Other programs do it as well. This is no witchcraft. Maybe I just haven't been clear enough. All I wan to know is where to find the options marked in the screenshot below. And if Affinity Photo doesn't offer them, then I'd need to know if those are on or off by default.

-
I agree with yout. There is no paper simulation during "normal work" outside of the soft proof. That would make no sense. Still: If the soft proof adjustment does add paper simulation, then I need to know how to turn it on and off. Sometimes I need it in the soft proof, sometimes I don't.
-
I did chose the needed ICC profile I got from the printer. I only need to know if there is a paper simulation by default and if yes, how to turn it off.
-
I assume that because with the profile I need to use for a specific print, blacks get turned into grays. That's typical for paper simulation. They could know it by reading the information in the ICC profile.
-
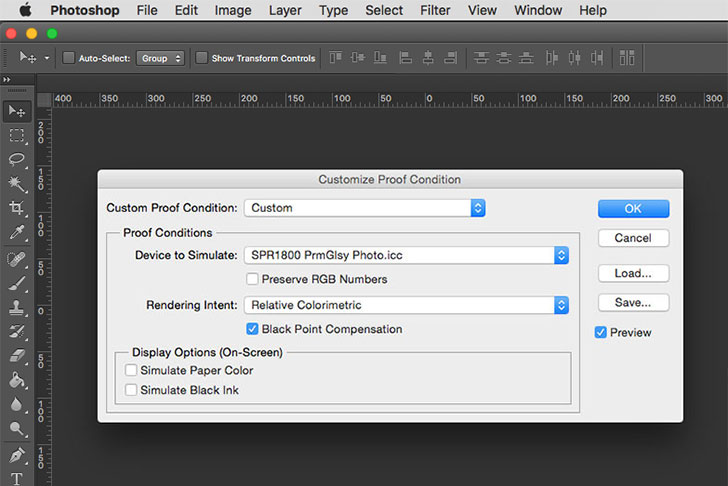
Yes sure. That's what option 1 is for. I've attached a screenshot from "a popular image editing software". On the bottom you can see two checkboxes. I'm looking for those. I assume that Affinity Photo is simulating paper color by default. I need to turn it off.
-
Hello Affinity community! I'm using Affinity Photo 1.5.2.69 on Windows 10. The soft proof adjustment offers me the following options: select profile Rendering Intent Black point compensation Gamut Check Opacity Blend Mode Blend Options But where can I enable or disable "simulate paper color"? I can't find it. Thanks for your help!
-
Shadows & Highlights in Raw
Inrumpo replied to IndigoMoon's topic in [ARCHIVE] Photo beta on Windows threads
I'm experiencing the same issue. I'm not sure if that's not by design. Anyway, it made me use an other RAW developing software. I hope that this will be changed.