gypsythief
-
Posts
8 -
Joined
-
Last visited
Everything posted by gypsythief
-
affinity photo Focus Merge in Affinity Photo
gypsythief replied to gypsythief's topic in Share your work
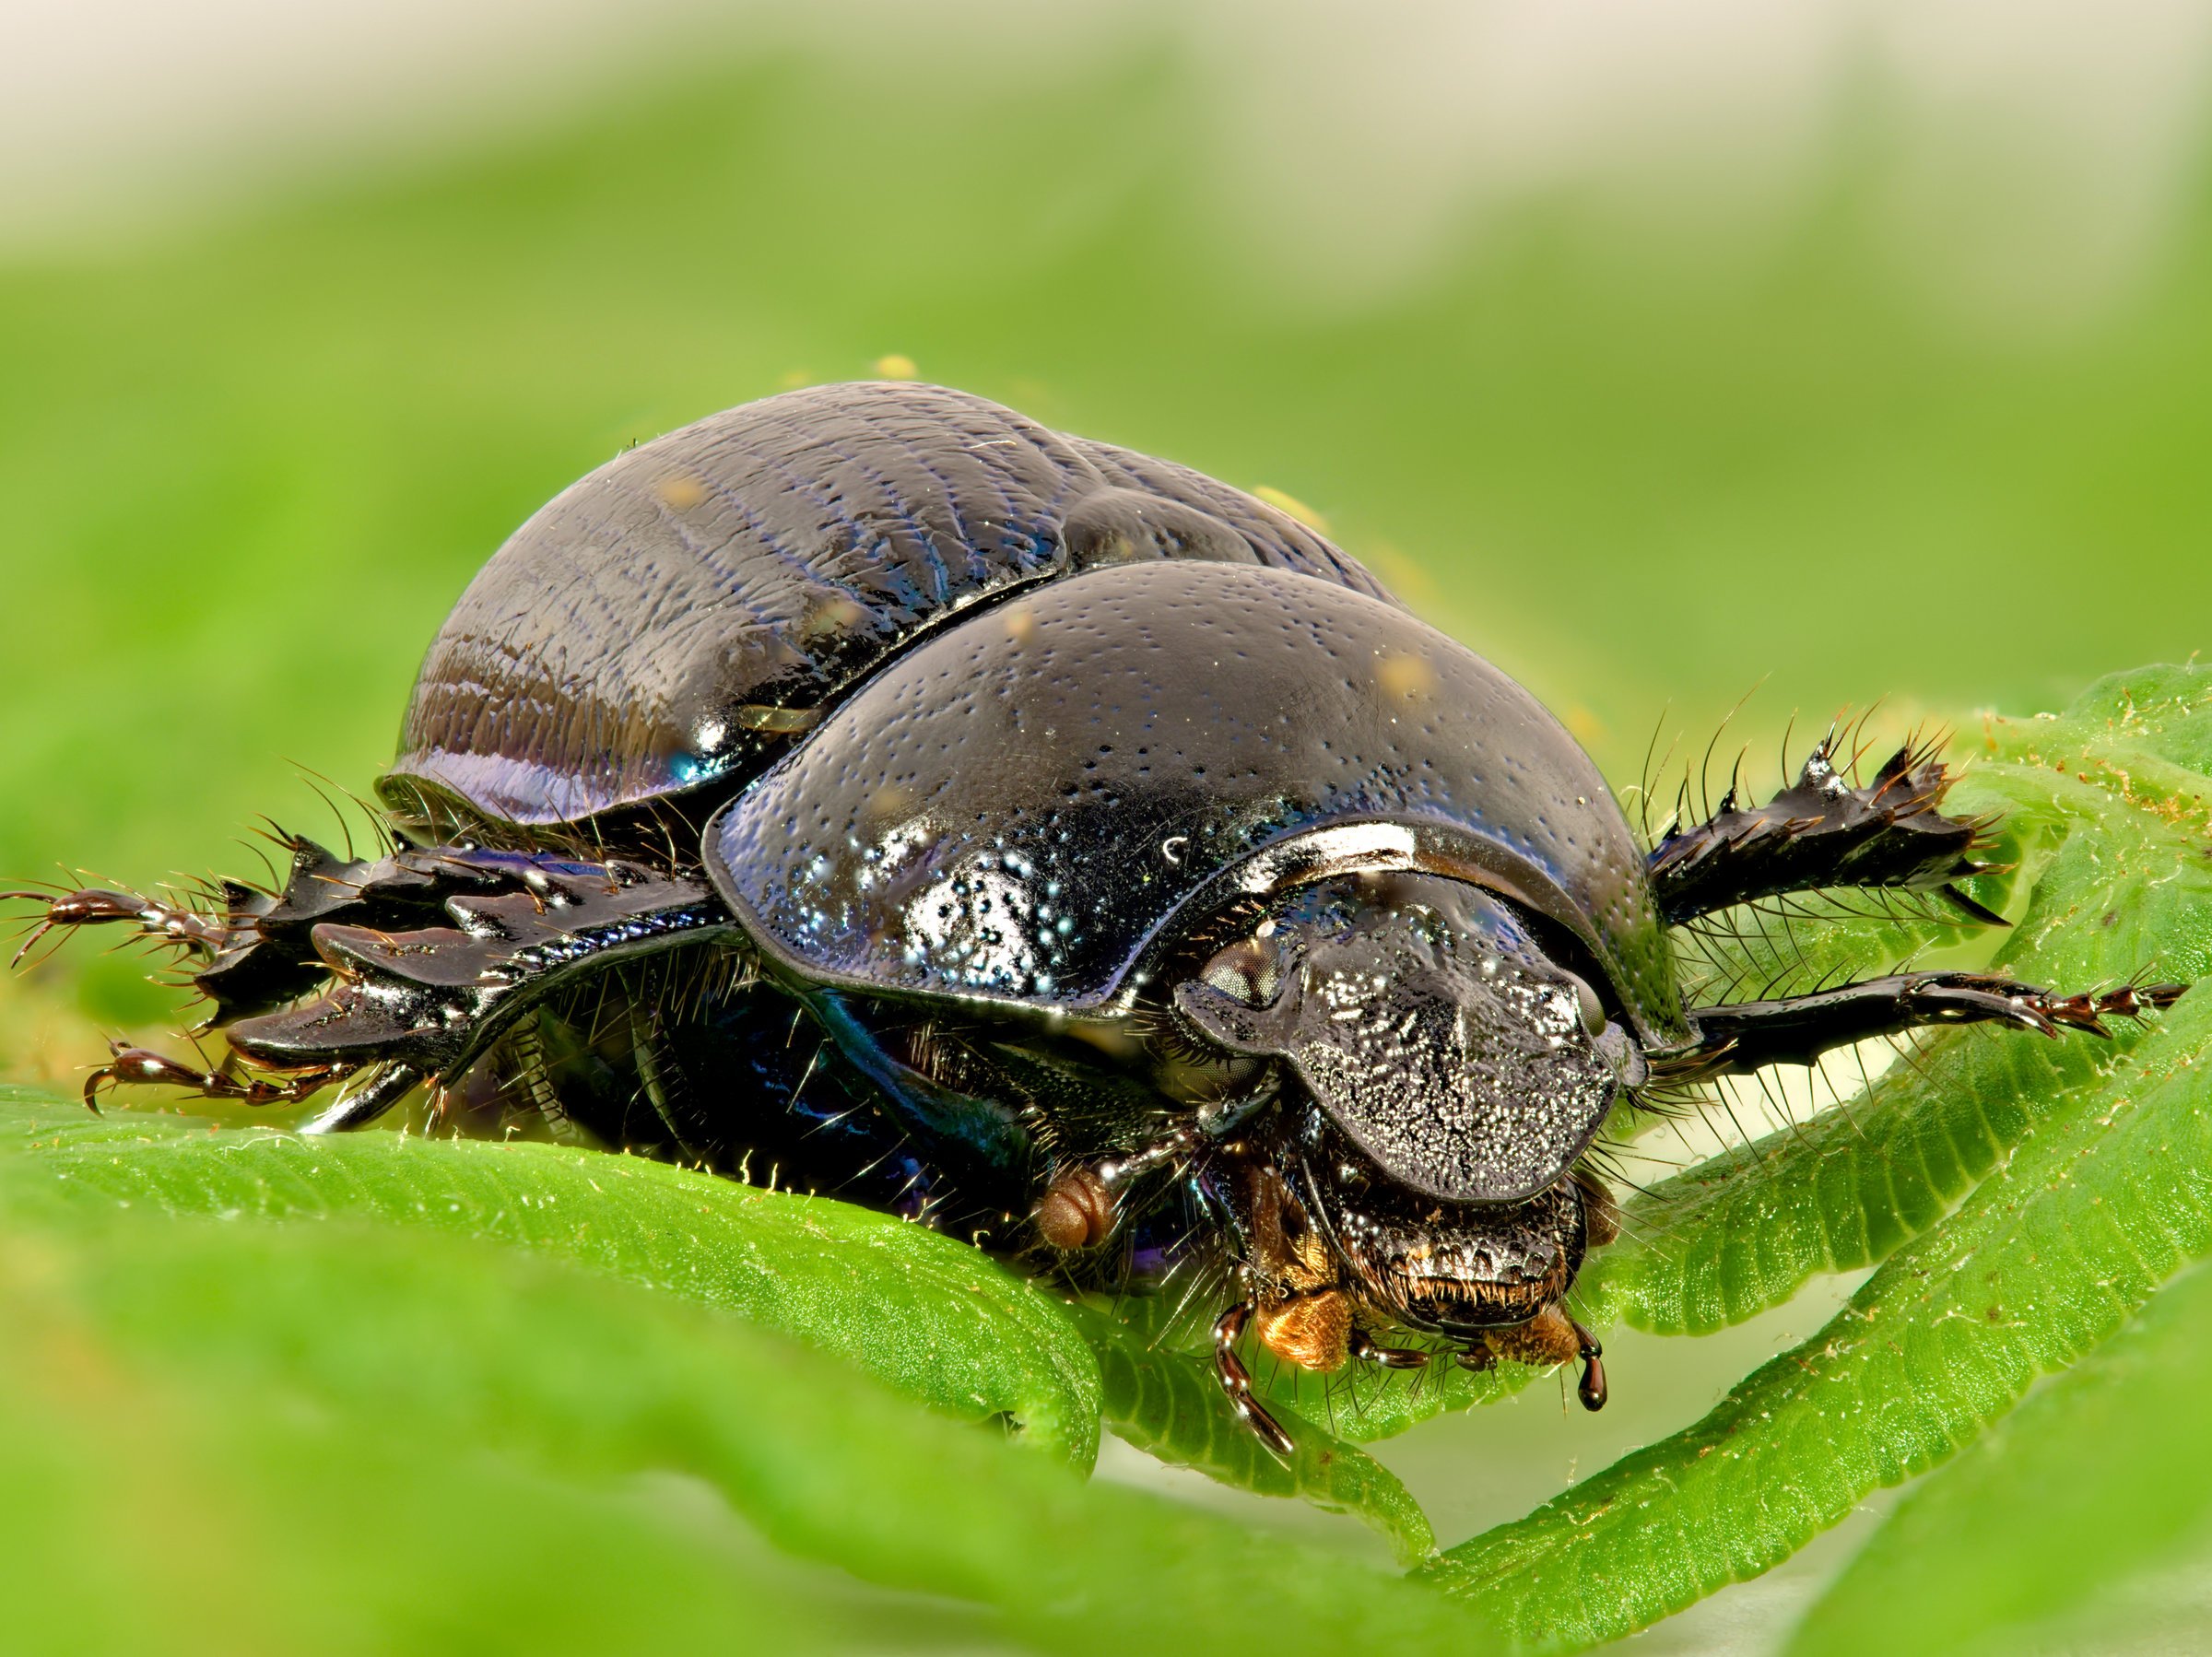
Busy week, so a bit late posting back! The lady bird was unfortunately a bit too dead, so I won't post the photo I took as it wasn't great. I did find GBracket to be a really useful app, though. First off, it showed me that the stepping is not arbitrary, as I stated in my fourth post: "You specify the number of shots and the "stepping". This is an arbitrary number from 1-10 and the amount it moves the lens' focus varies wildly with lens, focal length and focus distance, so it's guess work as to the right number." Going by how GBracket works, the focus on the lens is divided into 1024 steps from minimum focus to infinity. The stepping of the focus stack directly corresponds to these 1024 steps, so a stepping of 1 gives 1024 shots from minimum focus to infinity, whilst a stepping of 10 gives 102 shots for the same range. GBracket allows you to select the near and far focus points of your stack and shows the focal distance in terms of the 0 to 1024 steps of each focus point. It is then some simple maths to calculate the number of steps your focus merge covers and select a stepping that gives a reasonable number of shots to cover the required range. Whilst the lady bird was a bit too decayed, I found another beetle like the one in my original post. Using GBracket I was able to photograph it with an optimised number of photos rather than the somewhat "spray and pray" method of the photo I first posted. I took this earlier this week; I haven't kept the original shots so I don't know exactly how many there were, but it was around 30: Unsurprisingly, a tenth of the shots from my first post stacked 10 times faster, so the optimisation provided by GBracket* was very useful. *If this is starting to sound like an advert for GBracket, I apologise, it isn't meant to be. I did find it very useful though!
- 9 replies
-
- 2
-

-
- beetle
- focus merge
- (and 1 more)
-
affinity photo Focus Merge in Affinity Photo
gypsythief replied to gypsythief's topic in Share your work
@Peter47628 Those two images you posted are very impressive; the first one especially looks like it was taken through a microscope. It has a fantastic level of detail. Thank you for that tip about Gbracket, it looks like it should take a lot of the guesswork out of focus stacking. I've just acquired a 10" android tablet (I've been busy rooting it and removing all the junk for the last couple of days, hence the delay in replying!) which I think will be great to use with it as it has a good sized screen. As luck would have it, a dead Lady Bird fell out of a bunch of parsley I bought this evening, which should make a good subject to test GBracket with. I've bought the app, and I'll give it a test over the weekend with my lady bird and see what the results are like. Hopefully, I'll have something worthy of posting back! -
affinity photo Focus Merge in Affinity Photo
gypsythief replied to gypsythief's topic in Share your work
@John Rostron Some good questions and points here which I'll address a bit out of order, as that should make more sense. Q: Was it by focussing or with a rack? Was it automated? A: It was automated: the camera has a focus bracketing function. You specify the number of shots and the "stepping". This is an arbitrary number from 1-10 and the amount it moves the lens' focus varies wildly with lens, focal length and focus distance, so it's guess work as to the right number. After that, you press the shutter button and leave it to it until it's done. In terms of further automation, in both RawTherapee and Affinity it was simply a case of loading in all the photos and batching them whilst I did other things, the former whilst sleeping, the later whilst walking the dog! Q: Why 270 images? A: I wanted as sharp an image as possible. As I mentioned above the stepping is largely guess work so I simply set it to 2. I tried 30 shots to start with and the focus only crept forward a bit, so I simply cranked the number of shots up to 300. This nicely covered the scene, so I stuck there. The first 30 were totally blurry, and were discarded. I could have tweaked the stepping to reduce the number of images, but I started to get curious about whether Affinity Photo would handle so much data. Which it did, quite admirably. The depth of the image was much more than 27mm; the beetle alone was about that (it was a very big beetle!). The vetch in the background is running off for some distance at about 45°. I don't have the scene set up anymore so I can't give you an exact figure, but I do have some maths: I've just tested my camera and lens photographing along a ruler using the same settings I used for that shot, and 25 shots moved the focus about 1mm, so 0.04mm per shot. At 270 shots, that would give a depth of the image of 108mm. This agrees with what I would estimate from memory. In terms of how many shots I could have taken, the quick tests shots I mentioned above showed a depth of field of about 2mm, which ties with what Olympus claim in their depth of field chart for this lens at f/3.5 between 0.19 and 0.3 metres. With a 2mm depth of field, I'd probably go for 1 photo/mm for maximum sharpness and to give a good overlap of focus for the stacking. So I would still have needed 100 photos for the 100mm image depth, but that would have been nearly I third of the processing time. Edit: Thinking about it, I was probably a bit further back; the depth of field chart shows 2-4mm depth of field between 0.3 and 0.4 metres; averaging that to 3mm, and I could have done the stack in 66 shots. That would have definitely sped things up! (I should also mention that this was all done at around 10 o'clock on Friday night after a few cold ones, so there was much more enthusiasm than technical analysis!)- 9 replies
-
- 1
-

-
- beetle
- focus merge
- (and 1 more)
-
affinity photo Focus Merge in Affinity Photo
gypsythief replied to gypsythief's topic in Share your work
This is something I've some across before; to wit: "the secret to wildlife photography is to move the wildlife to somewhere interesting". Obviously not possible with a grumpy Lion, but a dead beetle: quite do-able! -
affinity photo Focus Merge in Affinity Photo
gypsythief replied to gypsythief's topic in Share your work
Thank you! I feel I should mention it is staged; I used a dock-leaf as a back-drop, and vetch to provide interest. Our rabbit scoffed the vetch after the shoot! -
Not too long ago, in a land not very far away, I came across the concept of focus merges to dramatically increase depth-of-field of photos, especially macro ones. This was one of the reasons I bought Affinity Photo, as having learned the technique I had a requirement for affordable software the could do a good job of a focus merge. The focus merges I have done thus far have typically been hand-held and of fairly large 'macro' subjects such as mushrooms and flowers. Generally, these consist of 10-30 shots that Affinity Photo churns through and merges in very short order. Due to the hand-holding, there are often a few ghosting artefacts around some edges, but nothing that a bit of AffinityPhotoShopping can't sort out. Yesterday, I came across an unfortunately-demised beetle which seemed to be a perfect opportunity to try a more technical, tripod based, photo merge. One of the reasons for this post is to showcase the ability of Affinity Photo which coped with a quite staggering amount of data (the other reason is a desire to share what I think is a quite stonking photo!). To achieve the focus merge, I took 270 20-megapixel raw photos, totalling 7.8 GB of data. These I then processed into 16 bit/channel PNGs using RawTherapee which came to 24.7 GB. I then fed them into Affinity Photo's Focus Merge and let it churn away. It took just over 1.5 hours to complete the merge, and I'm very pleased with the results: In case anyone is interested in the hardware involved, here's the list: Camera: Panasonic DC-G9 Lens: Olympus 60mm f/2.8 Macro Images shot at: 0.5 sec, f/3.5, ISO 200 CPU: AMD Ryzen 1500X RAM: 16 GB DDR4 2666 GPU: nVidia Geforce GTX 970 I largely seemed to be CPU-bound during the various processing stages. Memory usage from RawTherapee and Affinity Photo pottered around the 2-3 GB mark; RawTherapee thrashed all 4 cores / 8 threads in the Raw -> PNG conversion (but still took ages; I left it going over night, so I don't know quite how long...) , whilst Affinity Photo used 1 core / 2 threads for the stack. A lower core count / faster GHz processor would therefore seem to be an advantage during the stacking process in Affinity Photo, whilst RawTherapee clearly liked all the cores it could get it's sticky little paws on. I included my GPU in the list as Affinity Photo does seem to use it a bit: 5-8% GPU activity shows up in Task Manager during Focus Merges; I've no idea if it makes a difference though. In conclusion, I'm very impressed with the ability of Affinity Photo to deal with huge amounts of data without choking. A few more threads might be nice though
- 9 replies
-
- 8
-
-
- beetle
- focus merge
- (and 1 more)
-
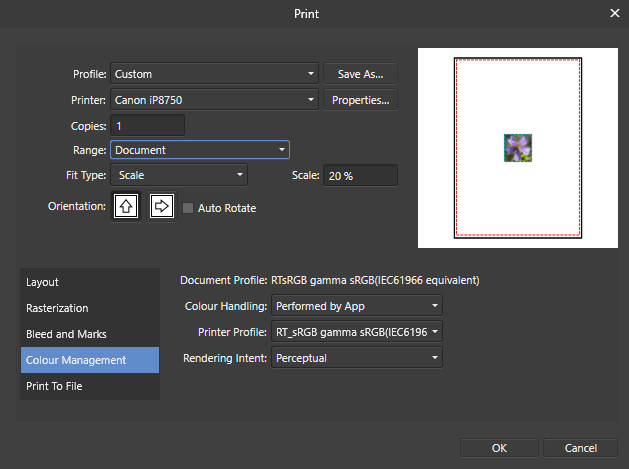
Thanks for letting me know! In the mean time, I opened a thread on another forum regarding colour managed printing, which drifted to my issues with Affinity. I ended up getting answers to the two questions I posted, so I'll add what I learned here in case any other newbs like me are curious: 1) The colour management issue can be worked around in Affinity by going to the Document menu -> Convert ICC Profile, and selecting the ICC profile you want to print with. Alternatively, I found that if I select the ICC profile in the print dialogue as the very last thing before clicking print, it was used correctly (and got some very funky prints by printing with random profiles. Who knew green could be _that_ green?!?) 2) As per this thread on the Affinity forums, to layout the page simply create a new document the size of the paper you are printing on, and plonk your image on where you want it! Simple really! Anyway, I'm really enjoying my Affinity trial; it might well be a keeper...
-
I am currently trialling Affinity Photo, specifically for its printing capabilities, but I have run into a couple of problems. 1) Having recently bought a new printer capable of using fine art papers and the like I needed some software that could do Colour Managed printing, and, not wanting to be price-gouged by Adobe, thought I would try Affinity Photo. As per the attached screenshot, in the print dialogue I can click the Printer Profile drop-down and select the ICC profile I want; the ones I have installed all show up and can be selected without issue. However, if I then click off the Colour Management section, say to Rasterization, and then click back, the ICC profile has reverted back to the default sRGB. How do I make it stay on the one I have selected, and be sure it is actually printing with that profile? 2) Question two comes as a result of attempting to experiment with 1). I thought that maybe if I selected the ICC profile as the very last thing before printing, the program would use that profile for the print. To test this, I was going to print the same image several times on one sheet of paper with different profiles to see if there was a difference. However, there appears to be no way to position the image on the paper: it sits obstinately in the middle. Is there a way to specifically position the image? Thanks for any help!