

hburkes88
-
Posts
18 -
Joined
-
Last visited
Posts posted by hburkes88
-
-
I am having trouble with the color picker in Affinity Design for Mac that I am hoping to get an answer on.
The color picker that is located in the colors panel should and used to work fine to sample a color on any window or app on my computer and I often used designer's color picker while editing raw product photos in Photo to make sure that my backgrounds were fully blown out to be completely white.
Sometime recently it quit working that way and now will only sample colors on the AD window and the background image of my desktop. If I hover over any other window or even the icons on my desktop then the color picker just samples what is behind it on my main desktop photo.
Can anyone shed any light on this? Do I have some sort of setting on/off?
Thanks all!
-H
-
Thanks everyone for your input!
Stokerg , that clears that up, thank you.
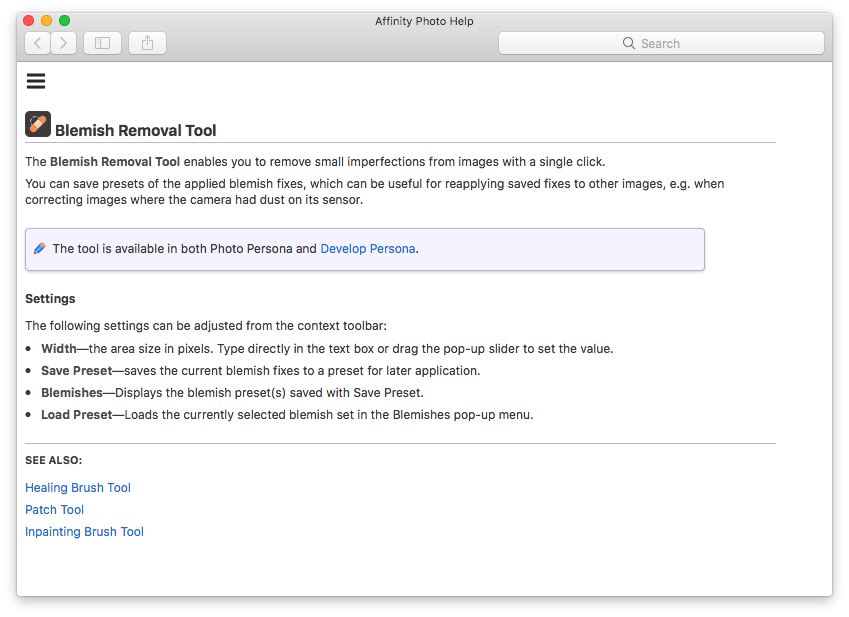
Walt, here is a screenshot of where I had initially learned of the feature.

-
I don't see a button or setting to delete the presets that I have made for the blemish removal tool in the Develop Personal on Photo. Is it possible, and if so could someone please tell me how?
Thanks!
-Hunter
-
I am still having this issue. When this happens the adjustments also start to act strange when I attempt to delete using the delete key often does not work and I have to alt-click and click delete.
Has anyone experienced this issue before?
-
Thank you very much firstdefence! I had seen those already but reviewed them further after reading your explanationa and did some more experimenting and it makes much more sense now.
-
I am trying to fine tune and better understand the process between the "Clarity" setting and the "Detail Refinement" setting. I can tell that they do slightly different things but I have searched extensively and cannot find an answer that will tell me in technical terms what is going on when I apply these settings.
Thanks a bunch for any light that you might shed.
-Hunter
-
Ahh, thank you very much. So for instance, if I had a rectangle with a stroke but no fill over the top of an image and just selected the rectangle the exporting WITH the background would show the image inside of the rectangle and WITHOUT would leave it empty?
BTW, good grief you guys have amazing CS! Not only is it amazingly fast and super consistent for a software company but businesses across all industries could learn a thing or two from your team. Thanks a bunch!
-
I am struggling to understand this feature and am hoping that someone can better explain it to me please.
I understand the selection portion but do not understand the with and without background means. Especially when exporting as a .jpg that cannot have a transparent background.
Any light shed is greatly appreciated!
-Hunter
-
Lee,
thank you very much for your reply. I could not figure out how to send you a link to my file or how to attach it to a PM so I will just upload it here in a comment for your review.
Have a great day!
-Hunter
-
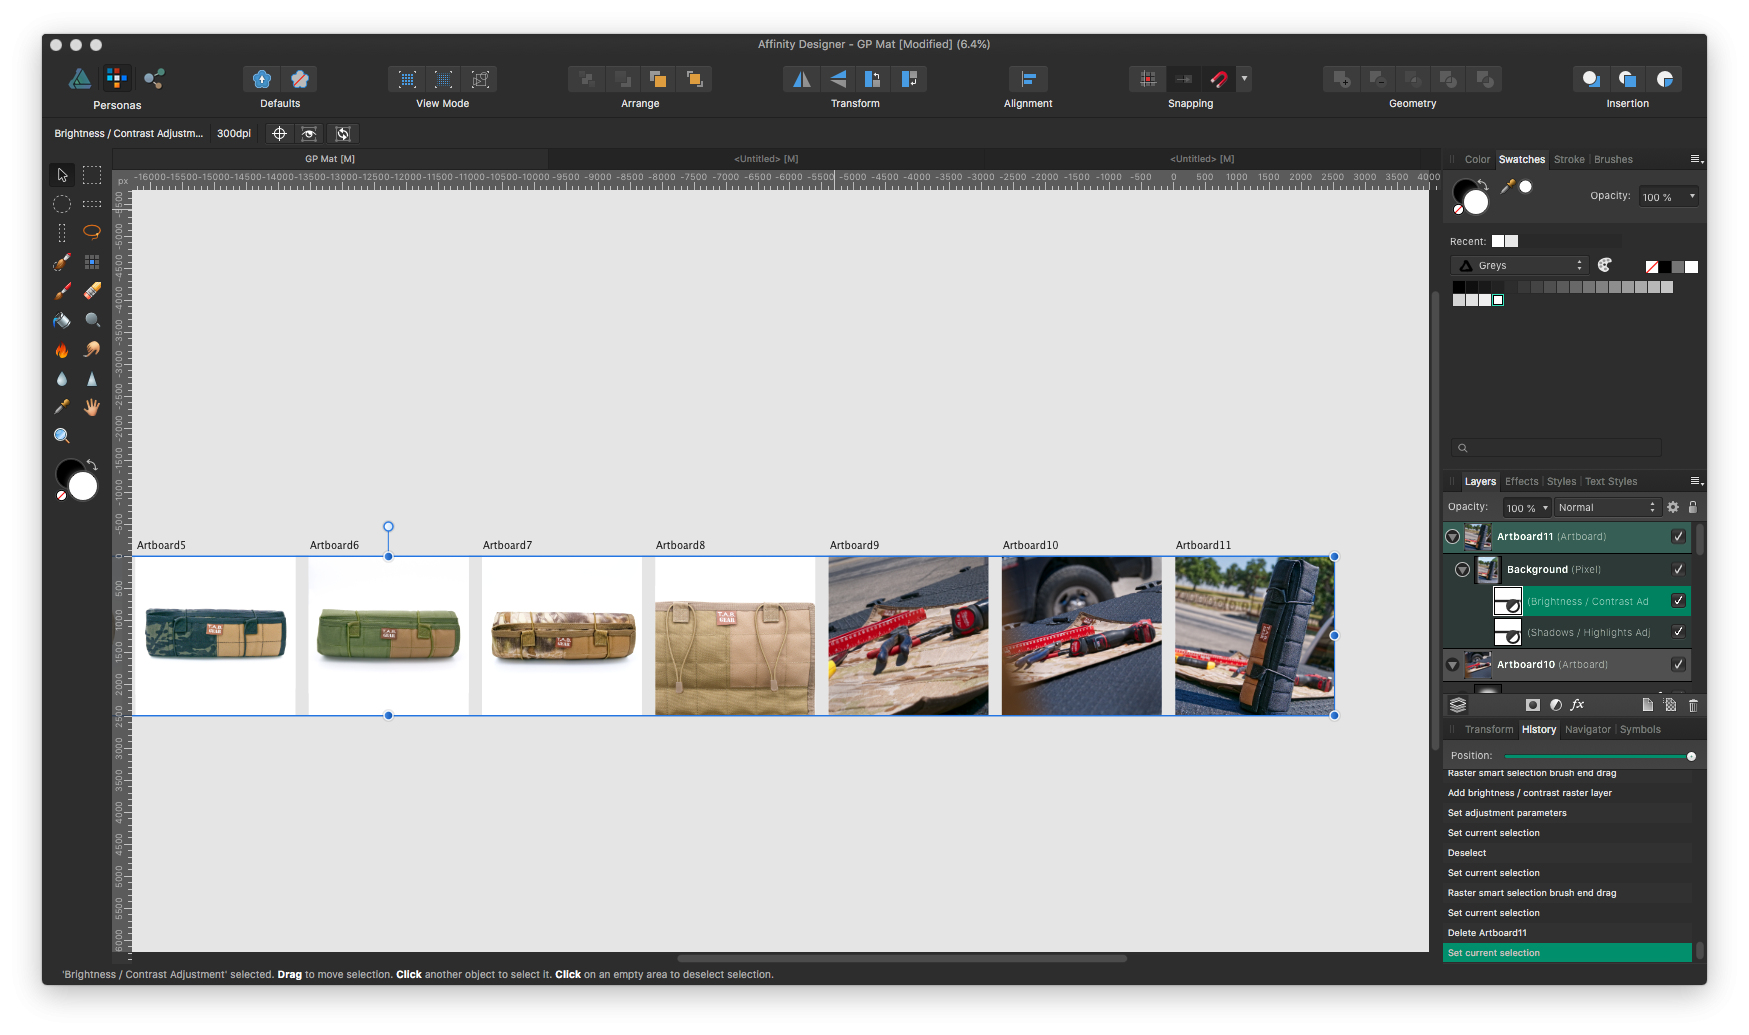
I'm thinking it is some kind of glitch with the artboards maybe? Unless I am completely overlooking something, I have used this workflow before without issue.
I tried duplicating a layer, moving it up, selection brush, and adjustment again and it did it again but included all of the artboards for both rows.
-
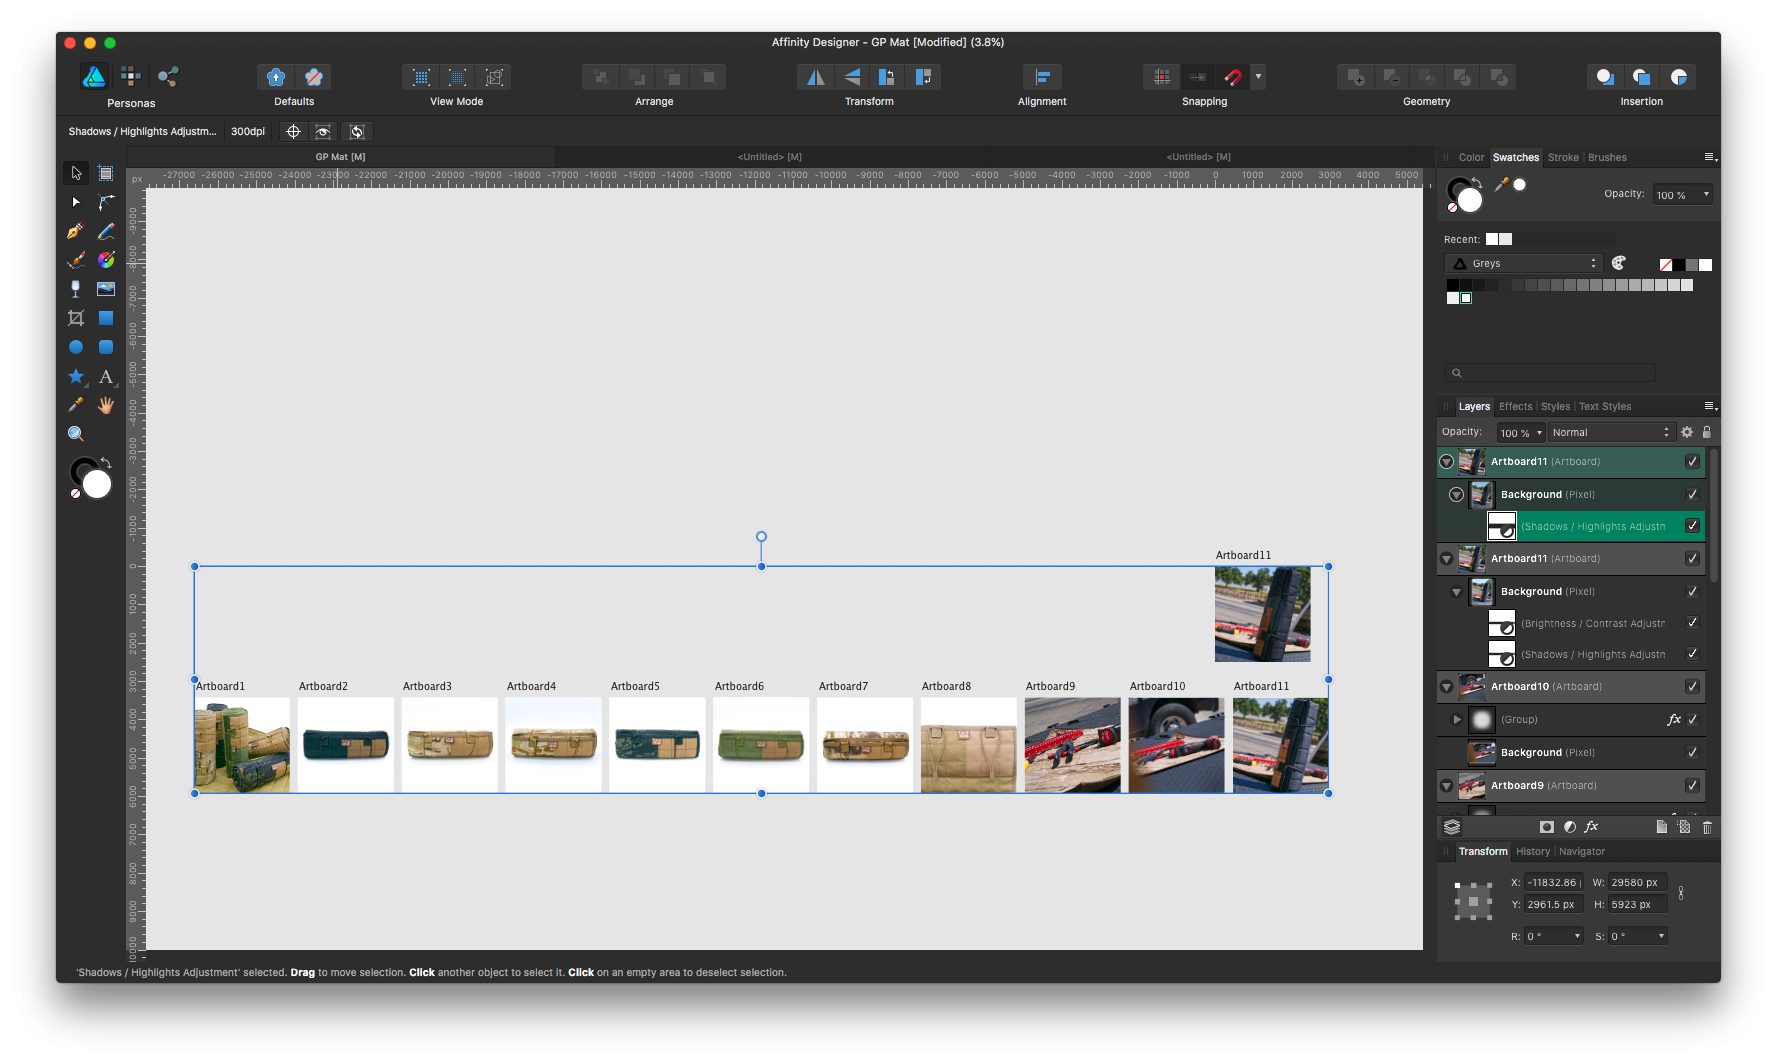
Hi all!
I am having a strange issue in AD where I am editing product photos using multiple artboards. One artboard for each photo. I am able to successfully make an adjustment to a pixel layer (the main photo) using the selection brush tool. (The rolled black mat on the right hand side is what I selected and adjusted successfully)
However when I go back and click on the adjustment itself (also reflected in the adjustment's thumbnail with the long horizontal black box) it selects a bounding box that covers all of the artboards. The adjustment does only apply to the area that I had selected with the selection brush (unless I drag the long, horizontal bounding box off of the top or bottom of the artboard that I applied it to, thus putting it above all of the artboards in the layer panel and applying it to all of them), however I don't understand the program's action.
I am selecting the actual pixel layer that I want to modify after using the selection brush so I'm quite certain that is not my issue.
I would really appreciate any advice or light that can be shed.
Thanks!
-Hunter
-
Got you, R C-R, thanks for your input!
Thanks Fixx! This might be asking a bit much but... Would you mind giving some advice as to what size to make the logo and what optimal export settings would be if it is going to a web developer? I am still unclear on what exactly I am doing when I change the DPI and downsampling settings, etc. (I have read many articles on it but still don't quite grasp it.)
-
1 hour ago, R C-R said:
Rasterize nothing won't preserve the 3D effects on the letters, so the SVG export will look something like this:
With the layers panel expanded for the lower section, there is a cropping mask, a crosshatch image, & a tan rectangle, but they do not combine to form the same texture effect as in the first image above:
Thanks for the replies, RCR and Callum.
So if I am exporting to send to my web developer to build a new site then is it better to lose the FX and export those elements as vector or go ahead and let them rasterize?
Yes, R C-R, that is the other issue That I was trying to describe. If you look at the layers panel on the original .AF file there is no cropping involved. It is just a shape and clipped inside the shape is a raster texture image, with an opacity of about 40% or less and a brown shape.
-
Surely, thanks!
If you would also please look at how,in the exported .SVG file, it crops the raster/texture layer(which has a lowered %opacity) in the bottom of the logo/order and darkens the texture from the original .AF file. (I guess I have done something weird with the paths or the opacity applied to the texture layer is doing this?)
I have tried playing with the DPI settings as well as the resampler to Bicubic or Lanczos but am still unsure of what exactly those settings need to be for, in this case, web and for other formats for usage in different places. I am also unclear on proper sizing of the object before export, even after doing much reading on the subject. Any light that could be shed would be appreciated.
*I have gone through the entire front section of the Affinity Work Book and some of the exercises, so please forgive me if this is covered in the later projects. I am under a time crunch to complete this.
-
-
I have created a vector logo that I am trying to send to my web developer.
I am trying to export a vector logo that has mostly vector elements, with the exeption of an opaque raster background texture. The "TAB" at the top and the shapes at the top are all vector curves.
The issue that I am having is that the text as well as the shapes that make up the top portion of my logo keeps rasterizing when I export via SVG and then open that SVG back up in Affinity Designer. I have been using the default settings for SVG Web as well as SVG Print. Print seems to be clearer but the top object and text still rasterize, while the bottom doesn't. I have tried playing with the DPI and resampling DPI but am still new to formatting and not sure what the optimal settings are to export for a website logo.
I don't think that it is an issue with my paths or workflow because the bottom section is structured the same as the top, but stays as a vector.
I will attach a .jpg of the logo and can send the svg and/or the .AF file if anyone would care to analyze what I am doing wrong.


Color Picker not working off App (Off work area)
in Pre-V2 Archive of Affinity on Desktop Questions (macOS and Windows)
Posted
You are both fantastic! That fixed my issue!
I've gotten a new MacBook recently and assumed that it had worked since that point but on further reflection think that I must have had the permission checked on the old one but not the new.
Thanks so much for taking the time to help me with this. Have a fantastic day!