RCPhotos_FineArtAmerica
-
Posts
55 -
Joined
-
Last visited
Everything posted by RCPhotos_FineArtAmerica
-
Halloween Ghost
RCPhotos_FineArtAmerica replied to RCPhotos_FineArtAmerica's topic in Share your work
carl123, maybe I'll give that a try. I was only attempting to learn the technique, but appreciate your input and am hoping you cover your vehicle with a tarp or car cover, while your infrared cameras are filming. Ok so here's a much reduced exposure layers without resizing the ghost figure just experimenting on the overall and the ghost figure's lighting
-
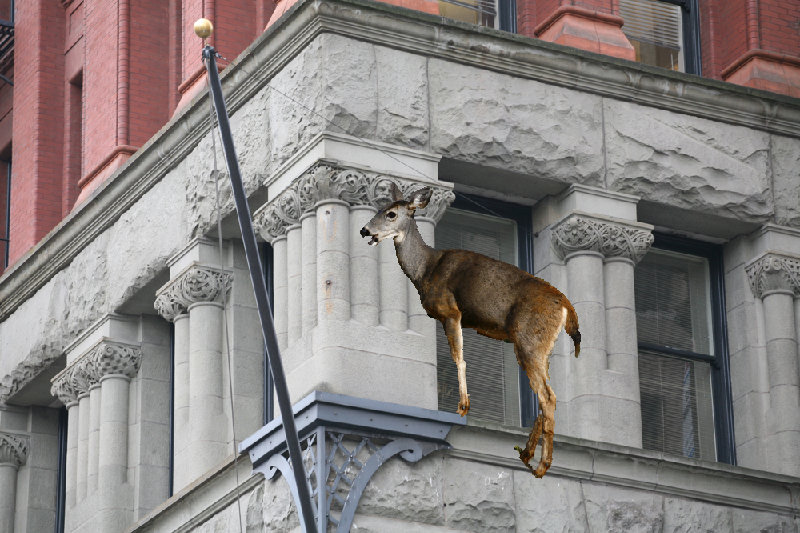
carl123, using your steps, here is the results. Mind you I have not spent any time retouching to remove the area between the rear feet, or the weeds at the neck, which the the Selection Brush always seems to grab. In this copy&paste and move the original building image remains at original size and the deer was C&P then moved and selected and reduced to fit.
-
Thank you carl123, simple straight forward advice. Now I'll give it a go and take a look.
-
Well I seem to be misinterpreting advice. From the advice above, it seemed clear to me that the two images should be the same size. So if the background is just over 3000 pixels width and the second image is closer to 1000 pixels wide, I set about scaling the larger image, the building, to match the smaller image, the deer. Hence the appearance that I upscaled the smaller image larger. So the building image, a little over 3000 pixels, remains the same and the deer, at just under 1000 pixels should be resized up to match the building background image, remembering to use 'Bicubic' or 'Lanczos3 ' for Windows. Do I have this correct this time? I'll wait to hear back before I proceed. And thanks
-
So I resized to 800x533 pixels on both images, then Cut & Pasted, then saved as Export in jpg with Nearest Neighbor, so this scaling should be the least pixelated. A better image for viewing online or in small format. Thanks for the feedback. It's been a fun exercise and I've learned something. Scale prior to cut & paste and saving.
-
Thanks Alfred and thanks GarryP. I'll spend some time working with the Interpolation methods in AF. Very helpful, thank you
-
Affinity Photo 1.5 has launched!
RCPhotos_FineArtAmerica replied to TonyB's topic in News and Information
-
So resize, then save and reopen both images correct?
-
Yah this is better but I have a ways to go to get this perfected. Any suggestions on pixelization when working on images of different sizes?
-
I may have just realized what I did, when moving the deer, I enlarged it about 20 times the size. So if I go back and try it again after first enlarging the original RAW to the same size as the building image, I may solve my problem.
-
So after learning how to use the Cutting Out method from a video here under tutorials, I used two images, one was close to 1000x? pixels and the other over 4000x? pixels. After moving the cut out deer from one image to the building image, I see it is highly pixelated when enlarged. even though the finished image when exported as a jpg, was lowered to near the 1000x? pixel image size. To recap, I used an image 1/4th the size (deer) of the image of the building, then saved saved by reducing 75% and still have major pixelated deer on building. What did I miss? And now I'm editing to add I see you won't be able to see the pixelization as enlarging is not allowed, but its there.
-
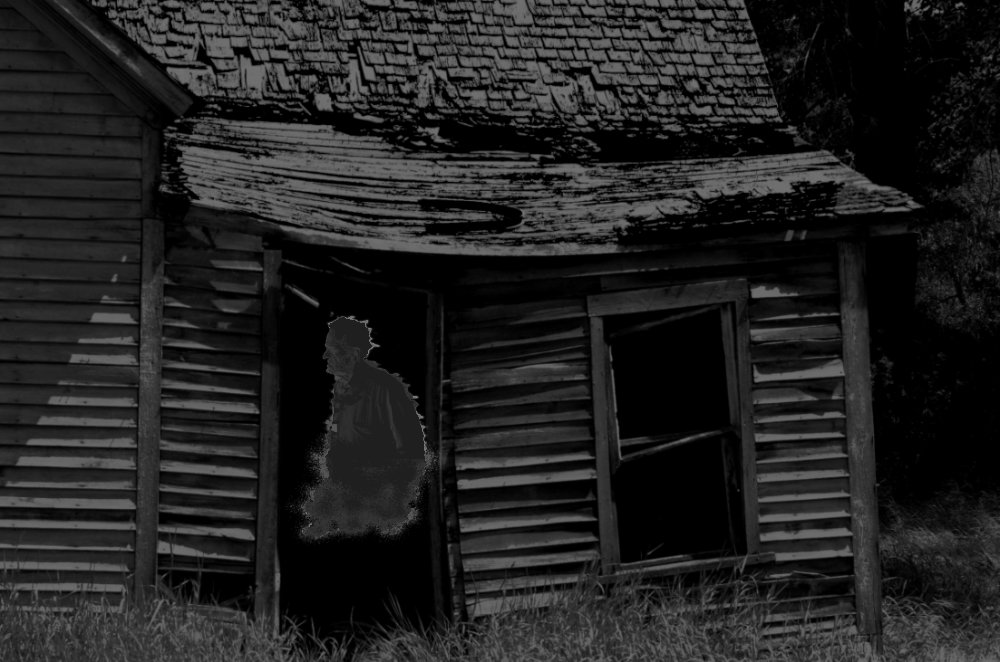
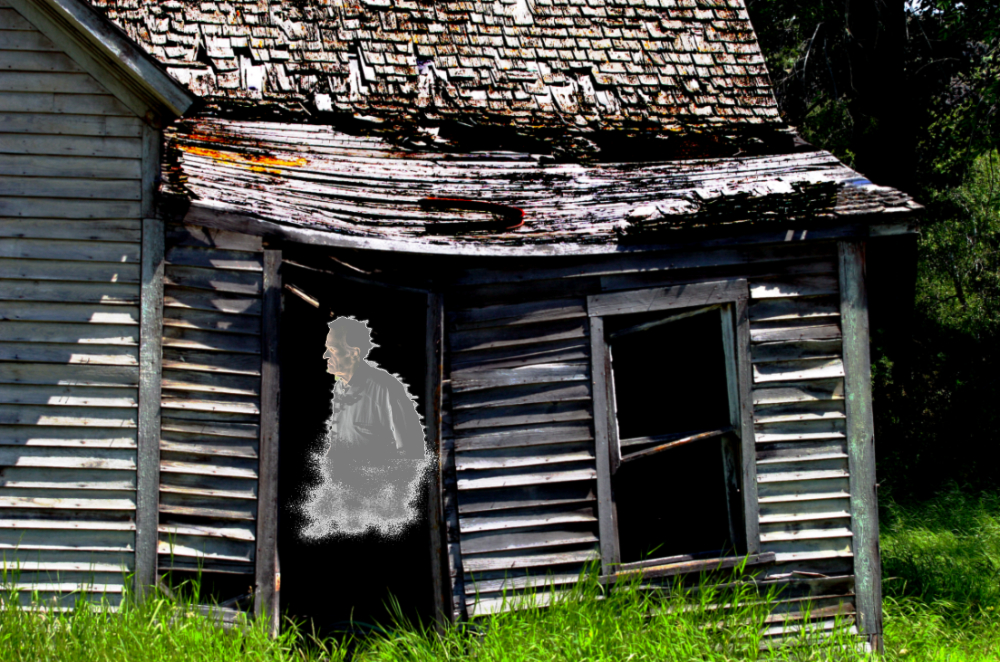
I thought it would be fun to take on the appearance of a ghost in a rustic old home long ago abandoned by using the cutting out method. And I want to thank MEB, Alfred and toltec for their generous help with learning the method. I realize improvements can and should be made to lighten the figure of the ghost of a man even more but this is more about accomplishing what I needed to learn than being paid to produce a fantastic photo. Happy Halloween and of course I'd truly enjoy any critique offered, or just enjoy my first try.
-
Affinity Photo 1.5 has launched!
RCPhotos_FineArtAmerica replied to TonyB's topic in News and Information
Bri-Toon or anyone, I linked through to the link Bri-Toon posted and the link is broken and it won't let me plant it in this post, good reason if it is not reachable. The link was for Beta updates. What I am looking for is just the area where I can check for updates finished. Or how else would we get notified about these when they occur? By the way, I am Desktop. I am not iPad or phone. I like a keyboard and I like a large screen, so if Affinity is not going to continue to serve us desktop users I may have to rethink the photo editor switch from Photoshop. Hoping I won't have to do that, which is why I am asking. I do not see a link from inside Affinity Photo to check for updates either. Where do we look for those desktop finished updates, not the betas? ) -
Looks very simple. Thanks so much, a picture tells a thousand words, (in this case video) and here's what I've accomplished for Halloween. I'll be practicing this more than a few times.
-
Nevermind, I opened up Chrome and its working, thanks
-
What happened when I clicked play, was wording, "No video with supported format and MIME type found" , could this be at my end somehow? If so, what to do? Thanks BTW I am in Affinity Photo Persona trying to accomplish this selection and move
-
Hmmm, no I C&P a Mask layer. Can you give me the link to what I want to accomplish? I can't find it by searching, thanks
-
I think I have both suggestions thus far. Now for how to select just the free-hand area?
-
I missed that inference for Macs, got the separated move now done. Thanks MEB and Alfred. Now do you see any better steps than I've already used to move just the free-hand selected area? Here were my steps: What has partially worked is creating a Mask layer, then C&P into second document, but am not getting only the selection from the image, but the whole image with a transparent frame outside of the selection. I know its hard to see with the selection in the first document as the man, but what I haven't done right is to select and copy just the man instead of the entire image. I used the free hand selection tool
-
Your response is not yet appearing here, but I read it in my email, and I understand. But under the Window tab, I do not see Separated Mode. Where do I find this?
-
Windows, MEB I've tried dragging the selection area, not detaching the document tabs (unsure how to do) but dragging didn't work. Tried C&P also. WHat has partially worked is creating a Mask layer, then C&P into second document, but am not getting only the selection from the image, but the whole image with a transparent frame outside of the selection. I know its hard to see with the selection in the first document as the man, but what I haven't done right is to select and copy just the man instead of the entire image. I used the free hand selection tool
-
In PS I used to be able to select an area of an image, then drag selection to a second image document tab and it would plant into the second image document. I am finding that this is not working in AF and am wondering what I need to do to accomplish that in AF.
-
When creating a new document to work on for devices such as an iPad or iPhone, is staff working on updates to new document devices, if so when can we expect these to be added? The latest devices are dated at iPhone 6 as the latest. My version of Affinity is 1.5.2.69
-
That's more good advice toltec. Thanks again. I have a new folder now created titled Affinity Photo Files for the time being. Just trying to get familiar and appreciate the responses, have a great evening
-
Thank you toltec, that's a great way for me to understand this. When you say save or export, the only way I can see to save is by exporting. And the only trouble with that is I am finding it difficult to find, not to say I can't but its perhaps jumping to a location in my photo files not by date created, which I add to the file, but some other criteria. I'll have to try to figure out why soon or I'll have files all over the place.