
Pedro Soares
-
Posts
88 -
Joined
-
Last visited
Posts posted by Pedro Soares
-
-
4 hours ago, BarKeegan said:
Those gradients are really well handled!
Thanks! 😊
-
1 hour ago, AndyQ said:
very nice, but I'd be hitting my 3D MAX or Blender and modelling the things, ready for when the client says "I love it, but can you rotate it a half degree then we're good to go.."
That's a good point but the idea was to explore what we can achieve in Affinity Designer working only with vectors.
Nevertheless I can give you the AirPods in any color you want 😁
-
7 hours ago, Ren De said:
Fantastic! A delight to see...
Thanks! 😊
-
-
Sometimes I just need a break... and a challenge 😁
Going back to the good old days with this work.What do you think?
Cheers.P.S. - Made entirely in Affinity Designer (lots of layers, transparencies, gradients and symbols).
- buschbrand, MattP, Alfred and 13 others
-
 16
16
-
You're welcome briandrum.
Seems you're doing everything right. My other suggestion is that you play with the Strength value to see if you can minimize the problem.
As an extra you can also use FX effects to get some more realism (I normally use Colour Overlay and Bevel/Emboss).
Nevertheless and as stokerg mention, something is not working as it should. We don't have consistency using the Displace Filter.
Hope you can get the results you need. -
-
Hi Tonitanz, welcome to the Forum!
The problem you mention is real and something several users are facing, just like me.
The solution I know about is to use the latest Beta version where this issue seems to be corrected.You can also expect to be fixed in the next public version.
-
Hi Gnobelix,
Thanks for the feedback. -
Hi everyone,
I recently wrote a post on my blog covering my workflow regarding the steps I follow when I'm editing a portrait. I also made available a PDF file with the same checklist I use so you can download it.
The post is available both is Portuguese and English.
[PT]
http://blog.pedrosoares.photo/lista-de-tarefas-edicao-de-retrato/
[EN]
http://blog.pedrosoares.photo/portrait-retouching-checklist/?lang=en
There are also other articles talking about Affinity and other free resources.
Let me know if it was useful.
Cheers -
-
Hi John Rostron,
Thanks for the feedback. I'm gonna try as you suggested and implement the tip of zooming every time it's pertinent.
For my upcoming tutorials I'm also using a new workstation where I have a better/bigger/higher resolution display so I believe it will improve the quality of them.
Thanks again,
Pedro
-
Hi Vasto7,
I'm really glad that my tutorial could help you in some way. Thanks for the feedback.
I invite you to keep an eye on my Youtube channel and Blog because new posts and tutorials are coming...And by the way, my last blog post was about a quick tip both for Affinity Photo and Capture One regarding retouching and has another two Macros you can download
Cheers
-
Hi Yousuf123,
Hanzz made a very good point, you have to use a PNG or other format that supports transparency. But why don't you work in only one file making your design in one layer and having the t-shirt on a background layer. It could be easier and faster even to see the result as you work.
Cheers
-
Hi Anna,
It's an excellent suggestion. I already had plans to do it so let's see if between my photographic work I manage to do that tutorial in the upcoming weeks ;)
Cheers,
Pedro
-
Hi psycleworkz,
Just to let you know that this is one of my upcoming tutorials.
It's going online in a couple of weeks.
Cheers,
Pedro
-
Pedro, fantastic! There is an amazing amount of training in various effects in this 29 min video. Additionally, I really enjoyed the 9 min of pre-work in AD then moving into AP for the remainder. Seeing how AD & AP can work together on a project like this made me think where it might be effective in some of my own works. Also, the many uses of Adjustment Layers and the duplicating, stacking and grouping of them was extremely helpful. And the result is beautiful. Tons of stuff in this one video - THANKS!
Hi jer,
I'm glad you like it and found it useful for your work.
Its also important to me to understand if the tutorials I'm making are being helpful and built in the proper way, so thanks for the feedback.
More will come very soon.
Cheers,
Pedro
-
Hi Seneca,
Thanks for the kind words. And I don't have intention of stoping here :)
Regarding your suggestion, its something that already came to my mind and that I'm considering seriously.
Let's see if I manage to get the time to do something worth it.
Kind Regards,
Pedro
-
Thanks PaulAffinity, really appreciate your feedback.
You can also find the rest of the tutorials I already made here:
https://forum.affinity.serif.com/index.php?/topic/36656-affinity-tutorials-more/
More to come very soon :)
- Jay D and PaulAffinity
-
2
-
-
Another tutorial uploaded and added to the list (MDNA Cover)
Please see the link in the first post.
Cheers,
Pedro
-
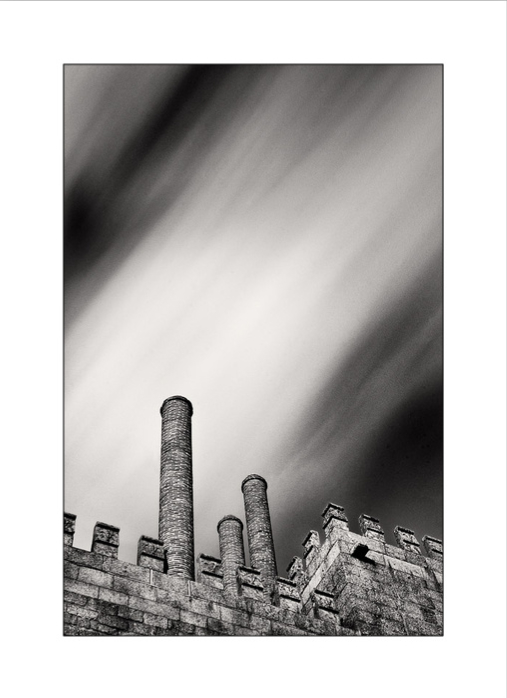
Hi Hson278,
To achieve a real (and good) Long Exposure image you need an ND filter as MBd mention. At least a 10stop maybe more depending of the light conditions. If you just work in shadow, like in a forest capturing waterfalls and river streams you can go with a lower ND filter (2 to 5 stops).
It's not impossible to do it in post-processing but it's not the same thing and you're going to face many challenges (opinions may differ).
Regarding the tutorial to edit this kind of images, its on my list :)
I also share one of my images using this technique with clouds. Same method (as water) but different approach since there are other kind of requirements to take in account.
Cheers,
Pedro
-
You're welcome peanutLion, I'm glad I could help.
I forgot to mention that I also use Nik Plugins (a lot) and as rmar said, they are an excellent option for your needs. I specially like and use Silver Efex Pro 2 for many of my black and white work. Check below the Histogram and you'll find the Zone System. You can choose the zone you want and then correct your image with U-Points to place a specific area of the image inside that zone.
Cheers,
Pedro
-
Thank you for being so generous sharing your techniques.
Hi gdenby,
Thank you for letting me know you appreciate it.
I always loved to share my work. Never was that kind of guy full of secrets. When someone asked how I made this photography or how I edit it, I always shared my technique. I believe doing so I also learn and most important, growth as a person and as a professional. This is the reason part of my work is teaching.
I share with you a thought of Ben Sweetland that sums this believe of mine.
"We cannot hold a torch to light another's path without brightening our own."
P.S. - I can only say if you liked so far, just wait to see the exciting tutorials (and more) I'm preparing to share...
Cheers,
Pedro


AirPods - Just a challenge...
in Share your work
Posted
Thanks a lot! 🙂