Pedro Soares
-
Posts
88 -
Joined
-
Last visited
Everything posted by Pedro Soares
-
 Hi pioneer, and to all, As I mention (based in your suggestion), here's the tutorial on how to create the glow effect in letters. Since the idea came from this topic I decided to use the same theme with minor changes like the text. You can see it in this link (it has english subtitles): https://www.youtube.com/watch?v=ejB93TiS4mU Hope you enjoy, Cheers, Pedro
 -
Madonna MDNA "Mirror" Effect
Pedro Soares replied to Anna Susanna's topic in Tutorials (Staff and Customer Created Tutorials)
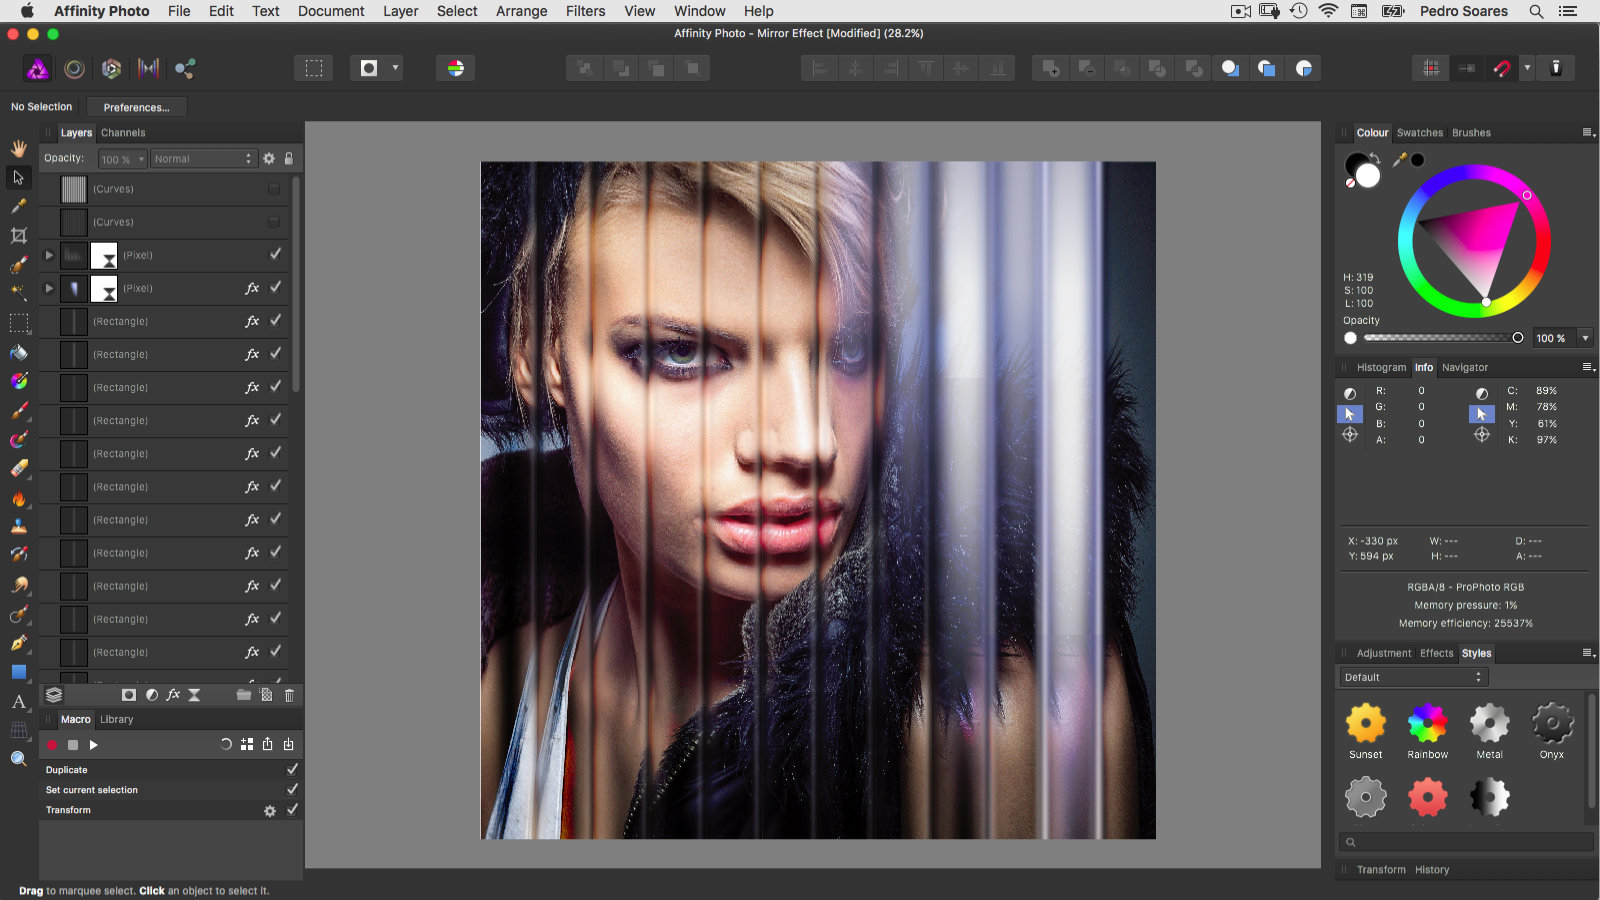
You are correct jer, There are a lot of things to consider in order to get a good result with this technique. Nevertheless you can use it in every image despite the results. And yes, the rectangles can be slanted as you like. Pedro -
How to Extract Detail
Pedro Soares replied to Pedro Soares's topic in Tutorials (Staff and Customer Created Tutorials)
Hi jer, Well, Portuguese is a difficult language and many times the translation doesn't work very well but I understand what you mean and I really appreciate your effort :) For this particular effect the only place where I don't want to use this technique is in woman skin and areas of images where I want to keep a soft look. For the rest you can use this macro with the option to control and adjust the effect, even with the layer opacity. Regarding your particular image, I don't believe this is a good solution since you need to have detail in the first place for the effect to work, and for your description you have a lack of detail caused by the reflection. If you point me to the image I can check the result with this effect or try to come up with another solution. Cheers, Pedro -
How to Extract Detail
Pedro Soares replied to Pedro Soares's topic in Tutorials (Staff and Customer Created Tutorials)
Thanks bumz and rmar for your feedback. I'm glad you enjoy it. :) As for the english subtitles, your welcome. I'll try to add them to all the upcoming tutorials :) -
Madonna MDNA "Mirror" Effect
Pedro Soares replied to Anna Susanna's topic in Tutorials (Staff and Customer Created Tutorials)
I'm still working in another tutorial (three to be precise) before I can do this one but I wanna share what I made just to see if my idea could work. I also want to say that my goal is not to copy the MDNA cover despite you can do it with the approach I'm using. Will see the end result. For now see the attached file and tell me what you think. Cheers, Pedro
-
In this tutorial I cover how to create a custom filter to extract details from your images. In this tutorial you'll also find the use of Macros and a bonus for you to use as you like... ;) https://www.youtube.com/watch?v=JdaySWNEpY0 The language in the video is portuguese with english subtitles. Hope you enjoy the video :) Pedro
- 11 replies
-
- 1
-

-
- affinity photo
- tutorial
- (and 6 more)
-
Who likes to play with snow? :) This are the two brushes I made and normally use (light snow and heavy snow) when I want to get that winter look. You can also check how I made the brushes and how to use them is this tutorial: https://www.youtube.com/watch?v=IlxXqCCx9AM Hope you enjoy them, Pedro Snow Brushes.afbrushes.zip
- 9 replies
-
- 26
-
-

-
- affinity photo
- snow
- (and 1 more)
-
Affinity as "plugin" in Capture One
Pedro Soares replied to pkr1979's topic in [ARCHIVE] Photo beta on macOS threads
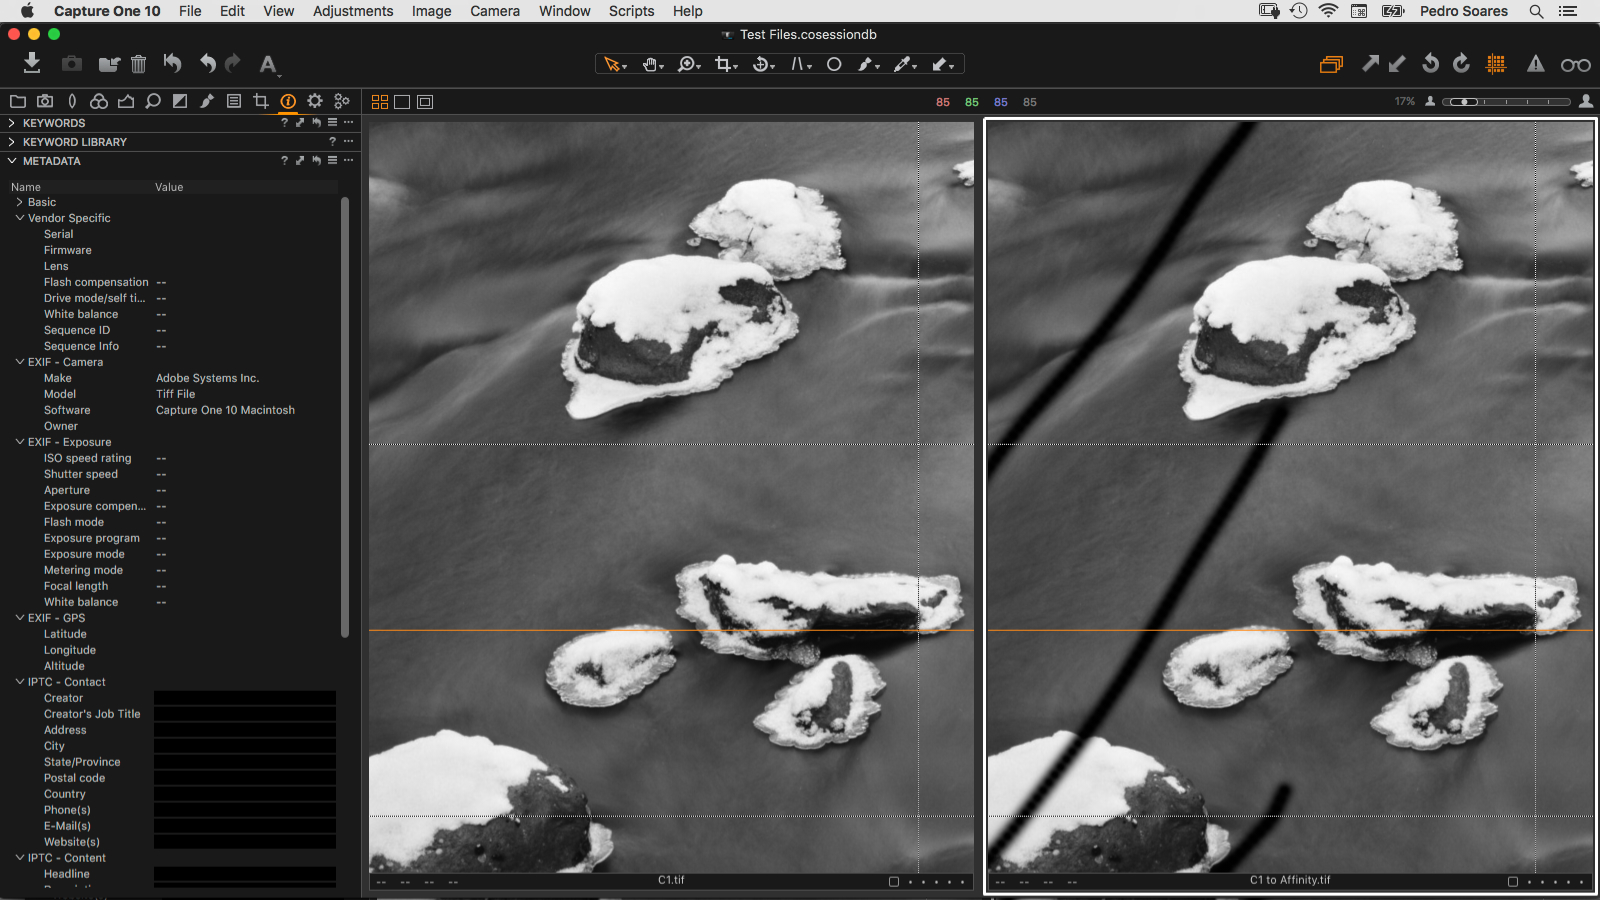
Hi pkr1979, I just run some tests in the files you send me and this is the results I found. The software versions I used were Capture One Pro 10 and Affinity Photo 1.5.1. I opened the two images both in Capture One and Affinity Photo and the two are the same. I didn't notice any bright areas between the two. Since monitors and eyes can some times fool us, I decided to add pixel samplers to check if the values were the same in the two images. And they were. In Affinity Photo is easy to do this, just go to the Info Panel and from the menu at the top right corner choose Add New Sampler. You can use the grid or custom guides to place the samplers in the same place in the two images or even easier just copy both for the same document and create the samplers and just check and uncheck each one at the time in the layers panel. They I made all the process from Capture One to Affinity Photo and back. I choose the option Edit With... (Tiff, 16bits, Uncompressed, Adobe RGB 1998, 300dpi, 100%). In Affinity I just made some strokes with a brush and save the file. Went back to Capture One and again the files were identical (except for the brush strokes). You can see them side by side in the attached file. Please use the sampler method to check the pixels values of each image. Also, if you are using Capture One 9 download the trial of version 10 and see if you get the same problem. Finally check your monitor and colour profiles because in the tests I run I never saw the problem you mention. Hope I could help. Cheers, Pedro
-
Affinity as "plugin" in Capture One
Pedro Soares replied to pkr1979's topic in [ARCHIVE] Photo beta on macOS threads
Hi pkr1979, If the file is as large as you say. it's better to send by wetransfer or some identical service. I send you a private message with my email. Pedro -
Hi understand that MEB but, the first idea you get is that you are talking about Photoshop plugins where instead they are from Google Nik, Topaz, DxO, etc. Of course made for Photoshop as you mention. As I said, it was just a suggestion and I can live with that :D Thanks for your feedback, Pedro
-
Affinity Photo is just awesome and I believe more and more artists are adopting it has I did some time ago. Everything is great and is getting better with every update. But one of the things I never understood was why name the Plugins options in the preferences panel as Photoshop Plugins. I understand that in the beginning we may needed some kind of reference but since it's possible to install and use the plugins without Photoshop and since they aren't done by Photoshop, I don't see the need to make that reference. This is my sincere opinion and a simple suggestion/request, why not name it just Plugins? Thanks for all the effort and support, Pedro
-
Hi pioneer, Thanks :) I'll had the request to my Affinity Photo tutorials list. Just give me a few days since I'm already in the making of two other tutorials to be online this week... Cheers, Pedro
-
Affinity as "plugin" in Capture One
Pedro Soares replied to pkr1979's topic in [ARCHIVE] Photo beta on macOS threads
Hello pkr1979, For your description you are doing everything right. I also use Capture One Pro and Affinity Photo side by side and never face this issue. Nevertheless I just tried with JPG and TIFF files and everything works fine with no changes except the ones I made for testing. If you'll share one of the files where you have that problem, I can run a new test. Cheers, Pedro -
Madonna MDNA "Mirror" Effect
Pedro Soares replied to Anna Susanna's topic in Tutorials (Staff and Customer Created Tutorials)
Hello Anna, Just to let you know that this is one of the topics I'm gonna cover in an upcoming tutorial, the mirror and prism effect. I'll post here at the forum as soon as it goes online. Pedro -
Hi kolaborek, See if this is what you are looking to achive. If you want I can send you my file and you can just copy to your text. Pedro
-
Combining text with images is always a challenge. Most of the examples and work I see uses a destructive method and if sometimes it's not a big deal, others we need to do it all over again. Is this tutorial I show you how you can combine both in a non-destructive way. You'll keep all the editing functionalities of texts, shapes, filters, adjustments and layers. https://www.youtube.com/watch?v=8sqT5qHq2f0 The language in the video is portuguese but this time I add english subtitles. Hope you enjoy the video :) Pedro
-
- 2
-
-
- photography
- affinity photo
- (and 5 more)
-
Need help with Designer
Pedro Soares replied to gideonX's topic in Tutorials (Staff and Customer Created Tutorials)
Hi giondeX, From my experience this is not a problem only in Affinity Designer since I had the same issue in other applications. I made your design based on your images and I get a different result. Less lines but I still did get one. To "fix" this issue and since the shape is very simple, you can skip the Divide step and after Combine just erase the nodes you don't want with the Node Tool. For more complex shapes the approach is a bit different. If you have any doubts see the attached images.
-
Thanks gdenby to take the time to give me some feedback. I have plans to provide english subtitles and also do some tutorials in english. Ler's see if I can upload another one next week :) Let me know if the brush(es) worked for you. Thanks
-
When I started to work with the first beta versions of Affinity Photo, I knew my Photoshop days were over. I can't say enough good things about Affinity Photo even if not everything is perfect (yet). So, for 2017 I decided to start to do free tutorials about how I work with it, and how I face the challenges of creating work that in Photoshop you normally do in a different way. This is my first tutorial and is about how you can create realistic snow with a custom brush made entirely in Affinity Photo. It works very well to create from snow storms to soft falling snow. https://www.youtube.com/watch?v=IlxXqCCx9AM You can also go to my blog and download the brush I created in the video and also another one for more light snow. http://blog.pedrosoares.photo/branca-leve-e-fria/ The language in the video is portuguese (and in the blog) but I'll try to ad english subtitles if requested. Nevertheless it's very easy to follow all the steps I show. Finally the idea is to do a tutorial more or less every week and I'll try to share it here with all the forum members. But if you want to be the first to know about upcoming tutorials, I invite you to subscribe my newsletter and youtube channel. Hope you enjoy the video :) Pedro
- 3 replies
-
- 2
-
-
- photography
- tutorial
- (and 4 more)
-
affinity photo Portrait + Affinity Photo
Pedro Soares replied to Pedro Soares's topic in Share your work
Thanks ronniemcbride, The client also loved it. It seems that this will not be the last creation of this kind with Affinity Photo :)- 2 replies
-
- 1
-
-
- photography
- black and white
- (and 1 more)
-
Recently I had a client for a portrait shoot. She is an actress and someone really talented and full of crazy ideas. The resulting images where very good and but I wanna do something different so I played a bit with Affinity Photo and this is the result.
- 2 replies
-
- 1
-
-
- photography
- black and white
- (and 1 more)
-
Duplication while already dragging
Pedro Soares replied to Daniel Gibert's topic in Older Feedback & Suggestion Posts
Despite I understand Daniel Gibert need and suggestion I agree with Ben in terms of functionality. To achieve more or less what you want I prefer to use the Cmd key instead of the Alt key since this way I don't have to select first the object I want to duplicate and drag. You can then combine it with Alt key to override snapping or with the Shift key to constrain the dragging to 0º, 45º and 90º angles. Another option is to use the command Cmd+J to duplicate the object but this is an extra step despite it gives you extra options. -
Hi yellosub, Yes, you have in Affinity Photo the same tool. It's the clone tool (keystroke "S").
-
Hi Paekke, That's something I didn't realise because despite I have the MAS version, I normally work in the Beta version to try the new features and improvements. But I'll take a look and see if I can discover where's "Wally" :D
-
Thanks Achim63, I already have some grass, leafs and trees brushes but I'm thinking to add some more. I'll try to share them in the next days :)