telemax
-
Posts
928 -
Joined
-
Last visited
Everything posted by telemax
-
 Snap1.mp4 Snap2.mp4
 -
Recolor.mp4
-
Hi, I would use a vector. Vector.mp4
-
Can you edit layer masks like a normal layer?
telemax replied to a topic in [ARCHIVE] Photo beta on macOS threads
The power of this method is that you can edit the mask like a normal layer without any restrictions. You can also use a group as a mask! Everything you put in this group automatically becomes a mask, and you can mix them together in Multiply mode, for example. This way a mask can be a composite of multiple layers of any type (raster, vector, color, grayscale). This gives full creative freedom. -
Can you edit layer masks like a normal layer?
telemax replied to a topic in [ARCHIVE] Photo beta on macOS threads
You can use a normal layer as a mask, and do with it everything you can do with a normal layer. 1. Select the layer that should be the mask 2. Change its curve in Blend Ranges 3. Change its blend mode to Erase Non-destructive_Mask.afphoto Non-Destructive Mask.mp4 --- -
This can be done more easily by deleting segments with Ctrl + Click, and then separating the curve. Contour.mp4
-
Unfortunately, this will require additional steps. Expand_Stroke.mp4 Boolean.mp4
-
I was able to get fairly accurate results with the Cloud tool, with 12 Bubbles. I checked the result with a star with 12 beams as @NotMyFault advised, as well as with 24 beams, and got a good result. Circle.afdesign Circle_1.mp4 Circle_2.mp4
-
Power duplicate around circle not precise. What am I missing?
telemax replied to Jaroslav's topic in V1 Bugs found on macOS
Here's a simpler version. I was able to get fairly accurate results with the Cloud tool, with 12 Bubbles. I checked the result with a star with 12 beams as @NotMyFault advised, as well as with 24 beams, and got a good result. Circle.afdesign Circle_1.mp4 Circle_2.mp4- 28 replies
-
- 1
-

-
- power duplicate
- cmd+j
- (and 4 more)
-
Normal Map Generator
telemax replied to telemax's topic in Tutorials (Staff and Customer Created Tutorials)
Yeah, sure. There is also an addition to this: -
I miss Scatter in Affinity. With it, we could create stunning Halftone-style work, using not only circles, but other shapes, hex, etc. The AP allows you to work interactively with Halftone, which is awesome. But it is a bitmap effect that is not suitable for laser cutting, etc. Halftone.mp4
- 7 replies
-
- 1
-
-
- dots
- affinity designer
- (and 3 more)
-
Hi, Fill and stroke can be conveniently controlled from the colour panel. Fill_&_Stroke.mp4
-
Dash line
telemax replied to Mexie7's topic in Pre-V2 Archive of Affinity on Desktop Questions (macOS and Windows)
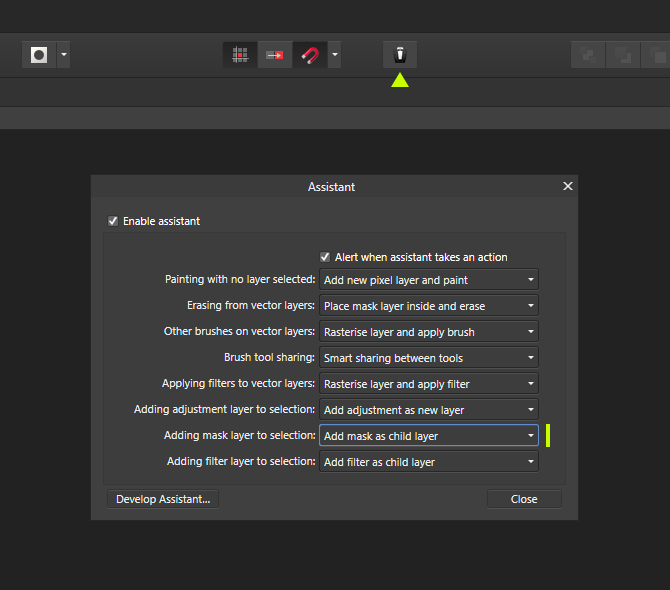
Hi, Edit > Preferences > User Interface Uncheck this box:
-
Hi, This is a very generalized question. A visual representation would not be superfluous. What app are you using? It's probably a shot in the air:
-
Use Boolean operations: https://affinity.help/designer/English.lproj/pages/ObjectControl/compound.html Before the merge operation, hold down Alt, this will make the merge non-destructive and allow you to edit the text and shape. HB.afdesign HB.mp4
-
Hi, Welcome to the Affinity Forums! This principle will also work in Affinity Designer.
-
Background Blur
telemax replied to Ammar's topic in Pre-V2 Archive of Affinity on Desktop Questions (macOS and Windows)
Here's another way to blur the background, it's created in AP, but it can be opened and used in AD. Blur.afdesign Blur_Artboard.afdesign Blur.mp4
-
Hi, Perhaps this method will help you. A normal layer works like a mask: This method also allows you to mix several masks in Multiply blend mode.
-
Hi, Welcome to the Forums! If you provide a test file, it will help to figure it out. A similar question here:
-
Press Ctrl+ several times.
-
Multi Gradient Fill
telemax replied to Ammar's topic in Pre-V2 Archive of Affinity on Desktop Questions (macOS and Windows)
Appearance Appearance.mp4 Fill Layer Fill_Layer.mp4 -
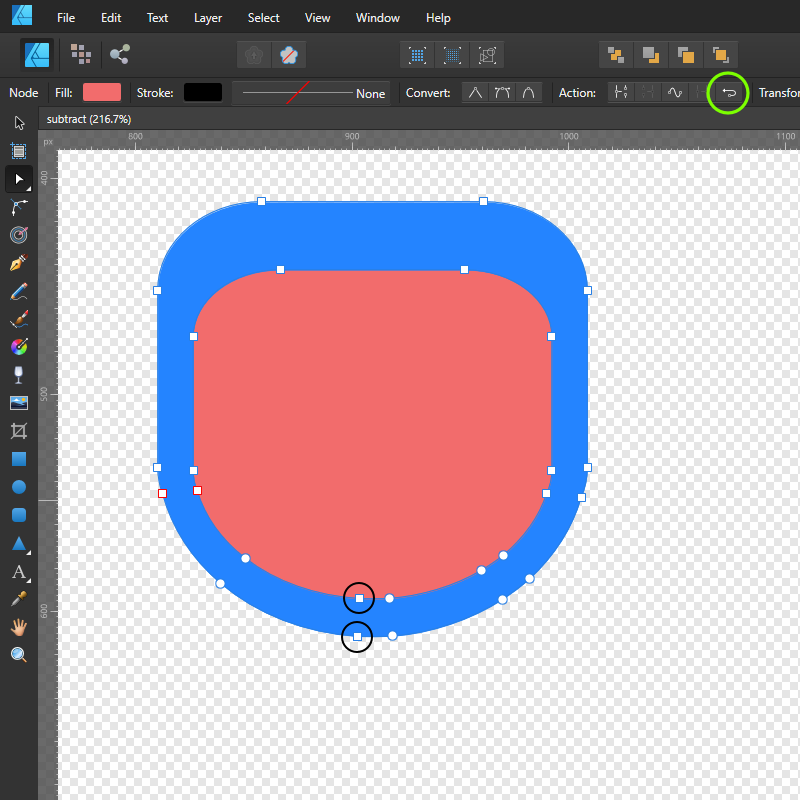
Select the red shape, and click the Reverse curve button. But the two problematic nodes will remain. You can also use a non-destructive Subtract operation by holding Alt before pressing the Subtract button.
-
Hi, and welcome to the forum! Weird glitch. I re-created the gradient, and it worked. This may have something to do with the fact that the rectangle was created from the "arrow" shape, which was edited after the gradient was created.
- 1 reply
-
- 1
-