rvst
-
Posts
216 -
Joined
Everything posted by rvst
-
Colour management question
rvst replied to rvst's topic in Affinity on Desktop Questions (macOS and Windows)
Thanks @lacerto and @thomaso. You're both right about the ICC v2 vs v4 profiles. I'd come across this years ago and typically have always used v2 profiles. Color Navigator does default to v4 profiles, so I'll test with v2 profiles and see if this yields a better result. Perhaps the v4 profiles are not loading properly (the ones I generated with Displaycal were v2 profiles, which is maybe why they worked better). I'll probably still profile the Colour Navigator generated calibrations with Displaycal though, for the reasons below... My other reasons for dissing Colour Navigator: its lack of custom correction matrix support for colorimeters and the rather low number of readings it takes when it does a calibration: I find I have to make multiple calibrations to let it converge on a better solution. Displaycal just does an all round better job, although of course it can't do the hardware calibration, so can only be used to profile an existing Colour Navigator calibration. On the colorimeter support, I'm fortunate to own two calibration devices, one a i1p2 spectrophotometer and the other a i1d3 colorimeter. Typically, my use case has been to use the i1p2 to create a correction matrix for the i1d3 for the specific screen. You can't do this with Colour Navigator - it uses the device's builtin RG-Phospor spectral correction matrix, which gives a distinct cast and isn't very accurate. When I verify a calibration made with the i1d3 by using the i1p2, it's significantly off (dE > 3) - others have complained about this as well, I'm not the only one to note it. So I'm forced to use the i1p2 to actually do the calibration with Colour Navigator. But even then, it doesn't get anywhere close to as good a result as it should. For example, calibrating to D65 consistently yields something around 6650k. And so I have to zero in the target manually, which I can do fairly easily and get a dE of 0 or 0.1, which in itself is huge kudos to the monitor hardware, but it shouldn't be necessary - the monitor can get this level of accuracy, but the software can't. The software should just do more optimisations, with something like a time to accuracy slider to allow the user to control the number of iterations it does. Having to use the spectrophotometer to calibrate is non-optimal because it's not as good on the blacks as the colorimeter, it reads much slower and using it to calibrate just kills the lifetime of the light, which I'm reluctant to do since it's a really expensive device. In general, Colour Navigator just feels like a dumbed down piece of software. But, I can understand why this is - it probably best meets the needs of the majority of non-technical users and is good enough, but it's just a bit too dumbed down for me. No different to any of the other commercial calibration software: i1Profiler is worse in my opinion. I'm probably just used to the extremely high level of control that Displaycal gives me and I've been using it for a decade, so the switch to a less capable piece of software bugs me a bit. -
Colour management question
rvst replied to rvst's topic in Affinity on Desktop Questions (macOS and Windows)
Found the cause. There's something wrong with the ICC profiles generated by EIZO Colour Navigator. They're garbage. They weren't particularly accurate anyway: calibrating to D65 gave a white point after calibration consistently of around 6700k, so I had to make manual adjustments to get a more accurate calibration. After manual adjustment I got a perfect D65 whitepoint with delta-E of zero and a very good grey balance and gamma across the board, saved the profile to the hardware and then used Displaycal to profile the calibrated monitor and generate a new ICC profile. I'm now looking at the left hand monitor set to the native gamut profile with the same sRGB image up in Affinity Photo and a second view of that same image on the second monitor, this one set on a sRGB profile. There's zero visual difference between the two images, light years from what I was seeing previously. So, great monitor. Rubbish calibration software. I've yet to come across any commercial software that has even a tenth of the accuracy and capability of Displaycal. -
Colour management question
rvst replied to rvst's topic in Affinity on Desktop Questions (macOS and Windows)
Yes, correct. A colour managed sRGB file looks totally different on a calibrated wide gamut profile to the calibrated sRGB profile. The effect is as if I'm using a non-colour managed app to view an sRGB file on a wide-gamut monitor: more saturated colours than they should be. The monitor is hardware calibrated and there is an associated ICC profile loader that integrates with Color Navigator, the EIZO calibration software. When switching the monitor profile, this profile loader is responsible for loading the associated ICC profile. It looks to me like it's not working properly even though it seems to be associating the correct profile name. This is what I asserted to the EIZO tech too, who didn't agree. And yes, the problem stays after boot. This does happen with Windows, you're right. Windows colour management profile loading is a bit broken. That's why DisplayCal has their dispcalgui profile loader - I previously used DisplayCal with their profile loader on my old monitors. -
This isn't an affinity related question per-se, but there are a lot of knowledgeable people on this forum and I'll probably get a more coherent answer here than elsewhere. I took delivery of two EIZO CS2740s yesterday. I calibrated two of the monitor custom settings to a 100cdm2 native gamut with a 2.2 gamma on one and to 100cdm2 sRGB profile with gamut clamping enabled on the other. These are the same settings as two of the factory calibrated and built-in profiles and the calibration result is visually indistinguishable from the factory calibrated profiles, so I know the calibrations are good. All the following comments apply both to my created profiles and to the in-built factory calibrated profiles. I have Colornavigator 7 installed and it appears to be working correctly. That is to say, when I change profiles on the monitor between Native, AdobeRGB and sRGB, the ICC profiles used by Windows for the display profile also change to the correct ICC profile that is associated with that monitor profile. This is done by the Colornavigator tray app. I use an NVidia RTX 3070. I've set it in Nvidia control panel to send 32 bit, 10 bits per pixel, full range RGB to the monitor. The monitor confirms on the OSD that this is the signal it's getting. There are no colour adjustments taking place in the Nvidia control panel of course. Color accuracy mode is set to "accurate", so it's not set to bypass the windows display colour transform. Now, I load up a file into affinity photo. The file is an RGBA/16 sRGB file. I've set the working space to sRGB, so all the colours in this file fit within the more limited sRGB colour space and it's not being converted into a wider gamut working space. I would reasonably expect that this file would look the same on my monitor, whether the monitor profile be set to native gamut, AdobeRGB or to sRGB gamut, assuming Windows colour management is working properly. I mean, this is the whole point behind a colour managed workflow, right? However, it doesn't. If I flip back and forth between the native gamut and sRGB gamut profiles on the monitor, there is a visually obvious difference where the native gamut profile on the monitor shows colours of the sRGB file in the sRGB working space as significantly more saturated than the sRGB profile on the monitor. The is the type of behaviour one would expect from an app that is not colour managed, where it stretches an sRGB gamut to fit the wider display gamut. I've even checked with other colour managed apps, not just Affinity Photo, and the behaviour is the same. The EIZO support person seems to think this is normal. Am I fundamentally misunderstanding something about colour management workflows here, or is this indeed unexpected behaviour? The EIZO tech's insistence is making me doubt myself now...
-
Colors - ICC profile and export to PDF
rvst replied to JohannesB's topic in Affinity on Desktop Questions (macOS and Windows)
If your photos are too dark when you print them out, it usually means that the brightness on your screen is too high. This results in you getting something that looks "right" on the screen but too dark on the printed photo. General advice is to calibrate the monitor for 120cmd2 of brightness. I tend to calibrate mine at 100cdm2 as I find even 120cmd2 can result in prints that are a little too dark. -
Editing luminosity masks in V2
rvst replied to rvst's topic in Affinity on Desktop Questions (macOS and Windows)
No. I'm looking to manually edit the mask in non-contiguous areas. One can unmask areas by painting with the paintbrush but not the reverse. -
Getting ICC profiles to work on Win 10
rvst replied to VolkerMB's topic in Affinity on Desktop Questions (macOS and Windows)
You might still be having trouble with the Windows profile loader and some application that is unloading the calibration on the fly. I have a hardware calibratable monitor. What I usually do is to use the vendor's tool to calibrate the monitor and write the calibration to its hardware LUT, then I then use Displaycal to profile the already calibrated monitor (discarding the profile generated by the vendor software). I use Displaycal's profile loader to load the display profile, so if it ever gets unloaded then Displaycal will automatically reload it. Suggest trying this. It would be a shame to get rid of the EIZO. -
Oh, I installed the MSI long ago, when the test 2.03. installer was made available. You're replying to something from the beginning of November, but thanks for the heads up anyway. I was aware when unsandboxing it that it wasn't supported.
-
Programs will not launch
rvst replied to Chris87's topic in Affinity on Desktop Questions (macOS and Windows)
Use the MSI versions of the installers. These MSIX versions are broken. Several people have had the same error. They're also poor at integrating with 3rd party programs. The MSI installers will install Affinity as a "normal" Windows program and you won't have these errors. -
Getting ICC profiles to work on Win 10
rvst replied to VolkerMB's topic in Affinity on Desktop Questions (macOS and Windows)
You're using the wrong ICC profile for your Dell monitor. You can't use the sRGB IEC61966-2.1 profile, since it's not a display profile. Set the monitor hardware settings to sRGB, then use Displaycal to calibrate and profile your Dell monitor. The EIZO looks to be a custom calibration and profiling, since you noted that you used ColorNavigator and the filename seems to indicate a properly calibrated and profiled monitor. -
It sounds like your calibration might have been reset by some other app and then when you activated the ICC profile after Affinity started, it reloaded the calibration as it should and you then see the correct colours. You might be running into problems with limitations of the Windows profile loader, which according to the developer of Displaycal, scales incorrectly and has poor 8-bit quantization. It's also possible to lose the calibration if some other process resets it as the Windows profile loader won't reload it. https://hub.displaycal.net/forums/topic/q-regarding-dc-profile-loader/#post-14013 This is the reason that Displaycal comes with its own profile loader, which you need to check when installing the display profile after calibrating and profiling your monitor. This solves the problem and will reapply the calibration as necessary. I've never seen any colour difference between Affinity Photo and any of my other colour managed apps (the images look identical when viewed side-by-side). I use the Displaycal profile loader. I find Displaycal does a better job than any of the commercial software I've used. Try switching to Displaycal and using their profile loader and see if the problem persists.
-
Cool, thanks - missed that one. I was on vacation so hadn't read that thread. Sounds like I'm not the only one who thinks this should be done
-
Many vendors offer a bug-tracking web page for adding bug reports and tracking bug resolution status. There are lots of open source packages that do this. I'd like to suggest that Affinity use a tool like this and make it available to the user base. I'd also like to suggest much more detailed release notes when new versions are released, listing exactly which bugs have been repaired in any given release. Obviously, one needs such a bug tracking system to enable such detailed release notes, since each bug needs a reference number and description. Release notes are currently VERY thin on detail.
-
MSI Installer upadate?
rvst replied to thegary's topic in Affinity on Desktop Questions (macOS and Windows)
@Patrick Connordo we need to uninstall the test MSI v2.0.3 variant before installing the v2.0.4 MSI or will it install over the test version cleanly? -
MSI Installer upadate?
rvst replied to thegary's topic in Affinity on Desktop Questions (macOS and Windows)
There's a completely reworked and much cleaner variant of this code on my github, although to be fair, I'd suggest anyone just use the test 2.0.3 MSI installer instead. No reason to use the MSIX anymore. -
Affinity V2 (all products) artificial cap on amount of installed RAM
rvst replied to rvst's topic in V2 Bugs found on Windows
Ha. So there's a subtlety to the way the new value needs to be entered. If one simply overwrites the "65536 MB" by changing the 65536 to a different value leaving the "MB" at the end, it doesn't stick. If one overwrites the value by putting in, say "80000" and clearing the "MB" so that ONLY a numerical value is in the entry box, then it sticks. -
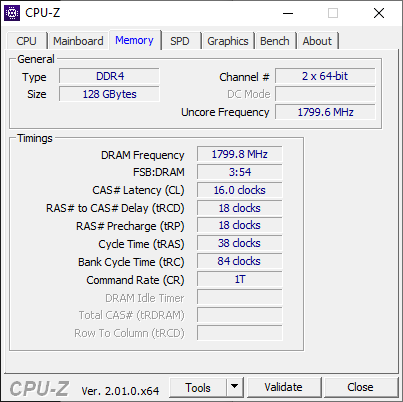
This is a problem that I reported in v1 of Affinity and that persists today: My computer has 128GB of RAM. Affinity appears to hard code a maximum 64GB of RAM. In Affinity v1, I used to be able to override this value by directly entering a value in the input box next to the slider (but was never sure it actually took effect), but as of V2, this value does not stick - it's immediately reset to 65536MB This is a bug. It's an easy to fix bug and it's one that should be fixed. Image editing is very memory intensive and it seems silly to limit usable RAM artificially

-
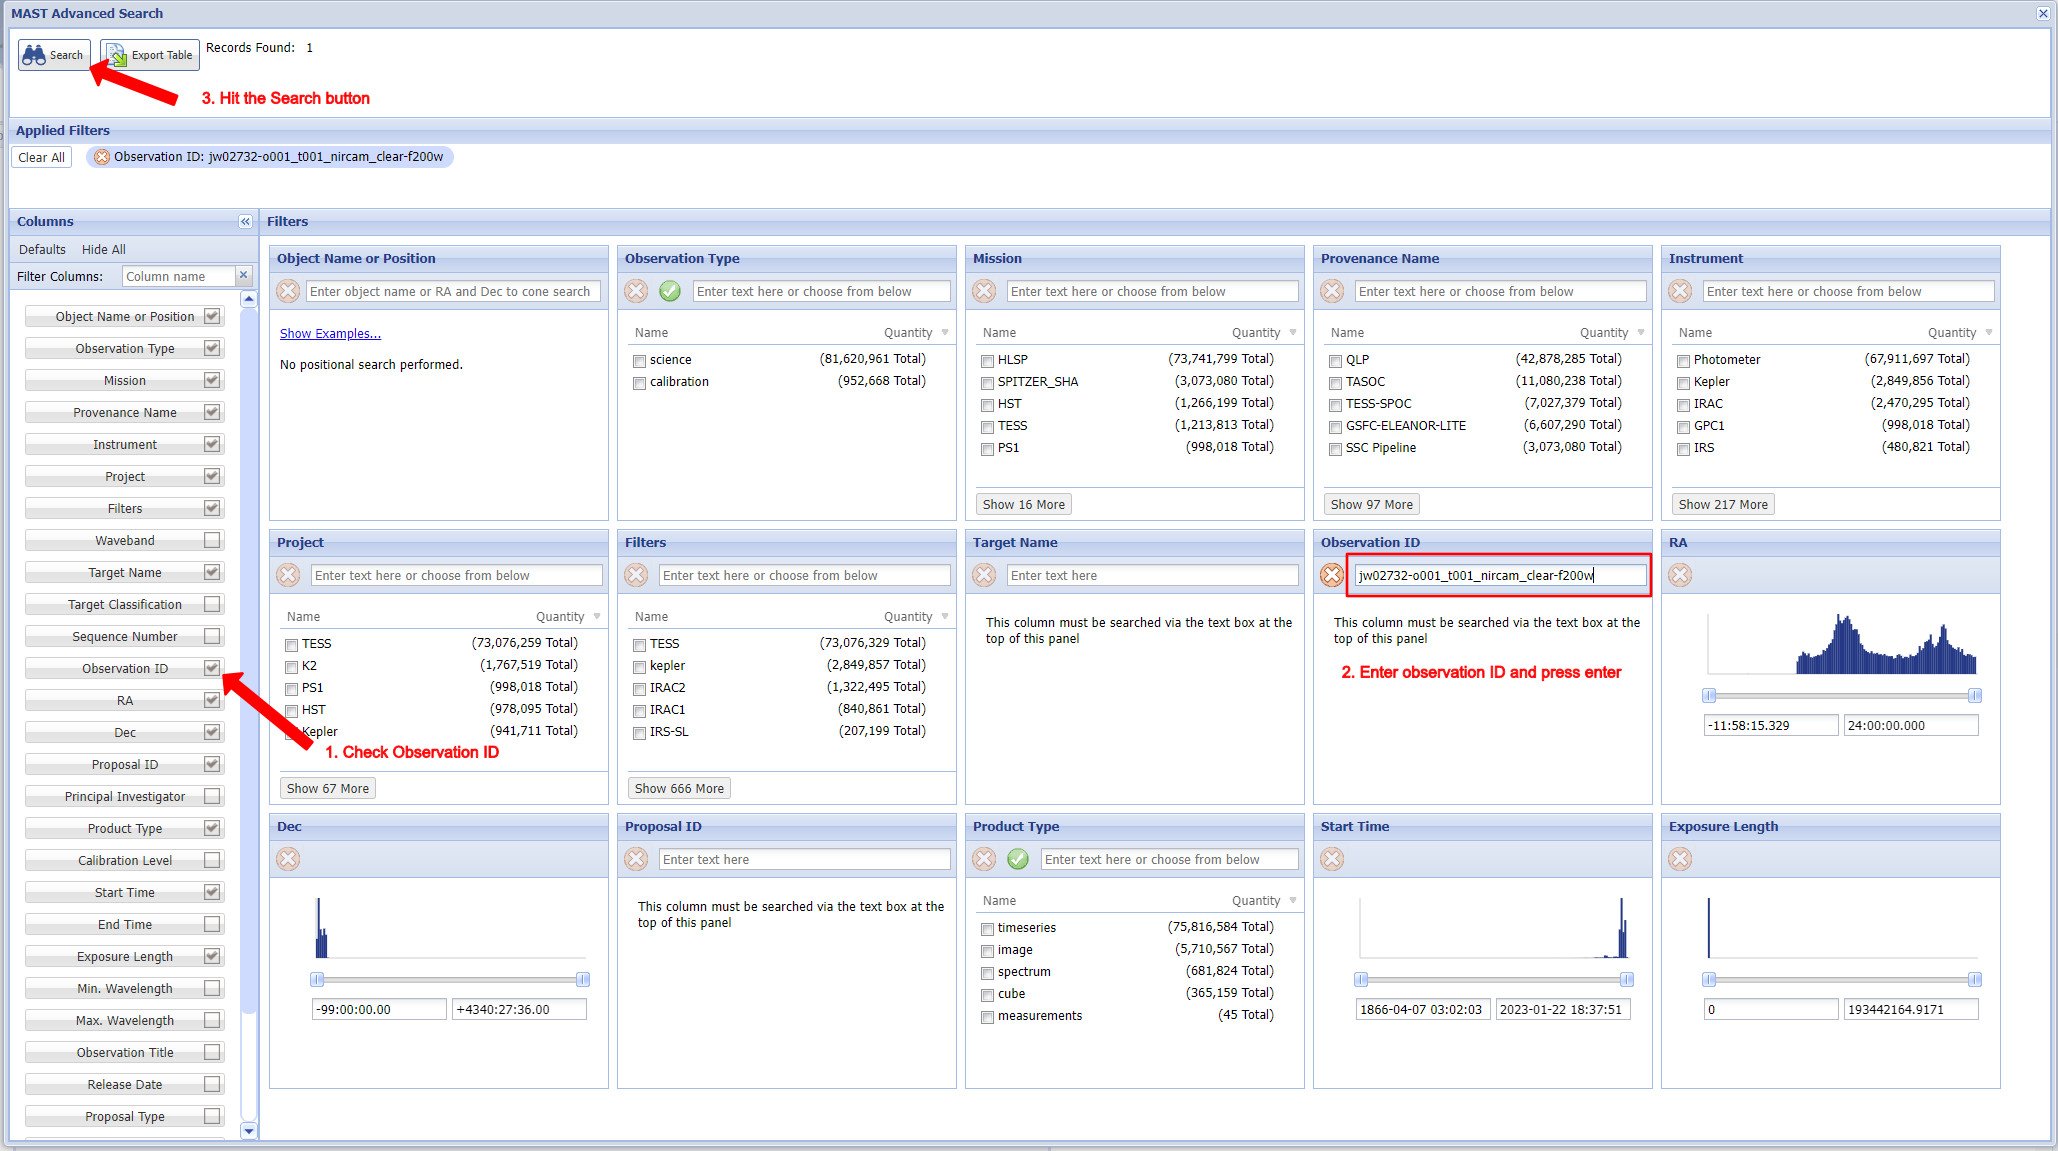
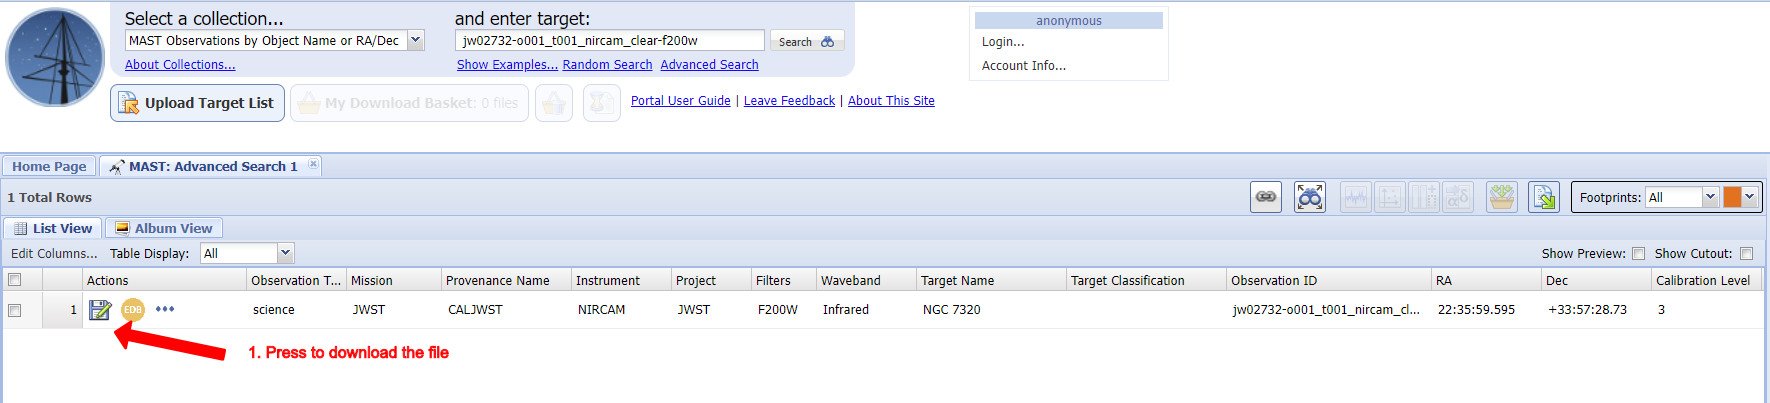
Chris, could I respectfully request that you download the file yourself? I gave you all the information you need. This file is almost 5GB in size, and I really don't want to nail my upload quota by uploading it when it's available for download easily on the site above. Just click on the link above in the original post to go to the portal then complete the steps shown below
-
So your GPU trounces mine on the Geekbench OpenCL benchmark, a full 44% faster, but is 30% slower on the Affinity benchmark. Puzzling.
-
We can't really say that. The benchmark across different versions is not directly comparable, even minor versions.
-
I don't think there is any material difference between those two benchmarks. Mine typically vary by as much...
-
Picture from V2 to Lr 6.14
rvst replied to Gérard Beckers's topic in Feedback for the Affinity V2 Suite of Products
Because you're not listening to what we told you. You cannot launch it directly. This is intended behaviour. Use the aflaunch.exe file contained in the post linked above. The file is attached to the comment. Download it and use this to send the file from Lightroom to Affinity Photo. -
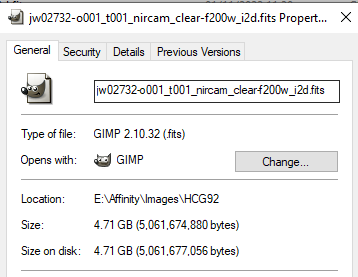
To duplicate: download the following James Webb image from https://mast.stsci.edu/portal/Mashup/Clients/Mast/Portal.html Observation ID: jw02732-o001_t001_nircam_clear-f200w Here's a description of how to use the portal: https://www.skyatnightmagazine.com/astrophotography/astrophoto-tips/produce-images-using-james-webb-space-telescope-data/ Create a new astrophotography stack. Click on files and add the .fits file MAST_2022-12-13T1925\JWST\jw02732-o001_t001_nircam_clear-f200w\jw02732-o001_t001_nircam_clear-f200w_i2d.fits Click on stack Affinity Photo crashes while creating the stack. Every time. OpenCL compute acceleration on or off makes no difference. It still crashes.
-
I doubt it will change anything. At most, it will make a few percent difference. I ran that earlier benchmark with about 20 windows open, WSL2 running a full gnome desktop environment and about 50 tabs open in my browser, all the while working on a huge Excel model and it still looked the same as earlier benchmarks I ran with a cleanly booted system. You should be 20% higher than me on the Affinity benchmark and I doubt a clean boot is going to do that.
-
Yes, that's as it should be: a lot faster than my 3070. Your compute benchmark results are similar to other 3080 users. So it's very perplexing that the 3080 scores lower on an Affinity benchmark than a 3070. And it's not just one person as we've seen - it's affecting two of you. Be useful to see if other 3080 forum users get similar benchmark results with the Affinity benchmark. This points to the performance being an Affinity issue it seems.