

Glenn
-
Posts
41 -
Joined
-
Last visited
Posts posted by Glenn
-
-
Designer 1.7.1
iOS 12.3
I reported this before and it seems still that 100% displays a document - if created in inches - at twice its actual size, with 50% showing it truly at 100%.
A new image created as 1" x 1" @ 264dpi should present on screen at 100% view as 1" x 1". (264 being iPad resolution) but shows as 2x2 on screen.
It seems that if created as pixels or is 'resized' to pixels without changing dimensions - 100% view does then display correctly at 1" 1".
Apologies if I have something wrong here. (I now visit Designer only occasionally and am always unsure if I've properly understood how things work).
-
Designer 1.7.1
iOS 12.3.1
As Title: Trying to duplicate brush from 'Recent Brushes' causes crash (losing recent work).
-
Matteo...
Quite inexperienced myself, I also find many problems and difficulties with Designer but this has not been one of them.
Of course you will certainly have tried it, but I'm puzzled why the Move tool, top of toolbox, does not do what you want?
Yes, I've always found that Double-tapping with Move tool does indeed put you in Node-edit mode (activating the (2nd down) Node-edit tool), but otherwise I myself can find no way to make the Move tool show or affect the vector nodes.
Doesn't help you, I know, but only say this to let you know there's others (I for one) who do not find this happening.
It's more curious because toltec (very experienced) and others do find the same as you.
-
Unfortunately, the Help File referred to here seems to be solely for the Desktop version - with nothing equivalent for the iPad version.
A while ago, Forum member DM1 spent considerable time and effort to transpose the complete iPad version's in-app Help file into pdf format, and made it available to all.
The link to his post is here:
I have suggested to the forum moderators they might place it as a Sticky at the top the Resources and/or Support forum, since so many people have asked for such a useful file.
Sadly, they have not, and so the post has become long-buried amongst past threads.
It is not, of course, an official Serif document, but that is made absolutely clear in the post, and I can assure all it is an almost totally literal transposition - so I cannot see why Affinity have not made it a sticky. Perhaps they missed that (lengthy) thread - (in which case please excuse my irritation).
I'd think the frequent, frustrated, requests for such a resource - not to mention the both accurate and generous efforts of DM1 - plainly make it just as worth highlighting here and in iPad Questions as this post.
-
To the Moderators...
May I suggest this be placed as a Sticky at the head of this Support Section?
Surely invaluable to just about every user as an alternative to the internal version.
(Clearly a great deal of time and effort put into this by DM1 - a shame for it to become gradually un-noticed beneath other posts)?
-
To the Moderators...
May I suggest this be placed as a Sticky at the head of this Resources section?
Surely invaluable to just about every user as an alternative to the internal version.
(Clearly a great deal of time and effort put into this by DM1 - a shame for it to become gradually un-noticed beneath other posts)?
-
Dave...
I also would like to thank you for all the effort you must have put into this. Not just offering a bare-bones account, but It seems you've actually covered in full all the Actual Help File topics.
I can't imagine how you might have achieved this - other than maybe screenshoting each page and somehow doing an OCR on them?
But I'm not asking that you reveal this - just want to say a loud Bravo! Very impressive...
thanks again.
-
Sorry, Gabriel. You keep misunderstanding me. Dpi/PPi is commonly used to define resolution is what i said. Not that Res and Pix Density are the same.
I see no point in pursuing this.
I'm glad you have recognised and logged this issue.
(Please note: None of this is meant to be unfriendly. I often find myself caught up in Forum confusions)....
-
On 8/13/2018 at 1:59 PM, GabrielM said:
DPI/PPI determines the density of dots per inch - or pixel per inch considering your tablet. I believe you got them a bit mixed up
")
Gabriel, I know you say it with a smile, but I do think that rather muddies the water a bit. We know dpi/ppi technically refers to Pixel Density, but isn’t it all but universally used to define Resolution?
But, all that aside, I would still like to know if it’s the Help file that’s not right, when it says (as shown in previous screenshot) that the Navigator’s 100% view applies to all - any unit - documents, or whether (my original point) it is the Navigator itself that’s actually not working as it should?
I don’t pretend to understand the x2 factor you mention, but it seems to add a complication to Designer that I don’t find in other apps.
-
Gabriel, Thanks so much for the detailed explanation.(Sorry, long-winded again - but unavoidable, I'm afraid...
First, I do need to repeat that I have never said, nor ever thought, the dimensions of a document have anything at all to do with a document's resolution. In my example, 6x4" is immaterial (it could have been 7.8x3.6 inches or mm ; the resolution I gave it - in this example 264 dpi (to match iPad's resolution, as I believed it be) would always have been 264 for the purposes of this proposition : i.e. that a document (any dimension, any unit) would be expected to appear at those dimensions on screen if the document resolution is the same as the display resolution.
But what I definitely did not know was the x2 factor of the iPad resolution.
In Apple's tech specs (and other reviews etc I've read) it's stated clearly that the Resolution of the iPad Pro is 264dpi.
I do appreciate you pointing out this x2 factor (cos I really never that), and how this explains why Designer's Navigator displays the size of any document created in units other than pixels not as 100% but 200%..
But, the thing is, I've not seen this in any other app I've used - where any document of any dimensions, any units or non-pixel units, if created at the same resolution as whatever the display resolution, they display that document's dimensions at the same scale when view is set as 100%. This is what I call 'Actual' View.
How could any user know Designer would show things differently, particularly when the Help says....
[Sorry, don't know how to insert image inline. Please see below]
About Grids...
It seems (to me, anyway, in the cases I've tried) the flaw is not limited to the example I gave (6x4, at 264 - needing a reduction to 265dpi to be accurate)... But seems to apply to many documents - pixel or non-pixel, different dimensions, different dpi - when setting the grid to be a divisor of the width.Please Try:
8" x 5" @ 300dpi - Grid division to be 2" [Reverts to 0.853"]
1200pt x 600pt @ 144dpi - Grid division to be 300pt [Reverts to 128pt"]
2000px x 1000px @ 72dpi - Grid division to be 500px" [Reverts to 256px"](There were one or two that did not misbehave - but I didn't record their settings).
-
Sorry if my post was not clear.
On 8/8/2018 at 8:57 AM, GabrielM said:The native iPad resolution is not 6 x 4 inch
But I never said it was. Nor would I: resolution being measured not in inches but dpi (or ppi) - as I said in my post:- Document is 6"x4" @ iPad's native resolution of 264dpi.
On 8/8/2018 at 8:57 AM, GabrielM said:More, your navigator is set to 50%, and not 100%
Yes, I know. That's my point...
When the resolution of a document is the same as the resolution of the display, a 6"x4" canvas (or object) will - should - physically measure on the screen as 6"x4" when the View is set to 100% .
In the case shown, it measured 6"x4" at 50% view.
Only when the doc and display have the same resolution (264 in iPad's case) will Navigator's 100% Pixel View display the image at its actual dimensions. At no other resolution will Pixel view show Actual size.
What I've found is that: if a 6"x4" document is created with pixels as units @ 264dpi (1584x1056), then 100% View in Navigator correctly sizes the canvas or object on screen to measure as 6"x4".
If that 6x4 document is created using inches or centimetres also @264 (I haven't tried other units) then 100% View shows the object at twice its size. As I say, originally: to present its actual 100% size, Navigator needs to be 50% (as shown).
Similarly, while pixel-based docs will create accurate grid spacing, those based on inches or centimetres will have spacing that's not accurate - as in screenshot. (seems to be only @264dpi - not sure).
Likely this hasn't arisen because 264dpi is probably not much used! I use it because I need an actual, Print-size view. Which means Document res matching Display res. Resolution can always be changed (non-resampling) to match media later.
Apolgies for long-windedness. Seem unable to be concise these days..!
-
IPad Pro . Designer 1.6.1.40
Attached is screenshot of:
New Document - 6in x 4in @ 264dpi (Native iPad resolution).
So, should at 100% View, measure 6x4in on screen.
However the Navigator at 100% shows doc at 200%, with actual size of course at 50%.
I reported this before, when helping test iPad Photo beta.
I have included snapshot of Grid settings at the top to show a more serious problem : no matter how many times I specify 1in spacing, it insists on changing it, as in shot, to 0.97. Doesn’t seem a lot, but you can see the result in the grid on the 6x4in image.
I don’t think there’s some config setting I’ve missed - but could well be wrong about that!
-
My thanks again.
Looks like I’d been trying out too many tools and procedures at the same time, only to then forget what i’d just done! Like having used both the transparency tool and the Opacity in Colour Studio on the same object and gradient stops and being mystified when changing the values of one didn’t change the alpha completely.
(And should spend more time visiting the help section...)!
-
Thanks for your patience. I still could nothing to change the objects’ colours and eventually re-installed and re-booted and then all was perfectly ok - could do nothing to replicate the problem. And the ‘ghost’ object outline has not re-appeared. No idea what was going on, but glad it so far seems to have been a one-off.
I did, however, come upon another gradients issue that puzzles me.
You’ll see in the attached .afdesign file (History retained) that the top and bottom rectangles are simple solid fills - with no gradient or transparency applied.
But both are affected by the transparency applied to the gradient stops of the middle rectangle. As they pass across that middle rectangle they change from solid to gradient; and back to solid when beyond the range of the middle one’s gradient.
You’ll see Layer order makes no difference.
Is this something expected, or am I missing something, or doing something wrong?
-
Thanks, R C-R - I get your thinking (I, too, always look first to user error - my own particularly!) but I have worked for several years with several apps and do know an object has to be selected for its properties to be changed...
(The screenshot was after the event, not during).
-
Gabriel... No, it was never undo. By reverting, I meant simply returning to the values they had been as duplicated from the original - all except Hue, for that had been intention (after first ‘playing’ with other Sat, Lum, Transp settings. just to change one from green to blue with everything else the same.
But, even if Undo had played a part, that wouldn’t explain how B and D cannot be changed at all from how they are now - regardless of how drastically or how often I change some or all colour values.
-
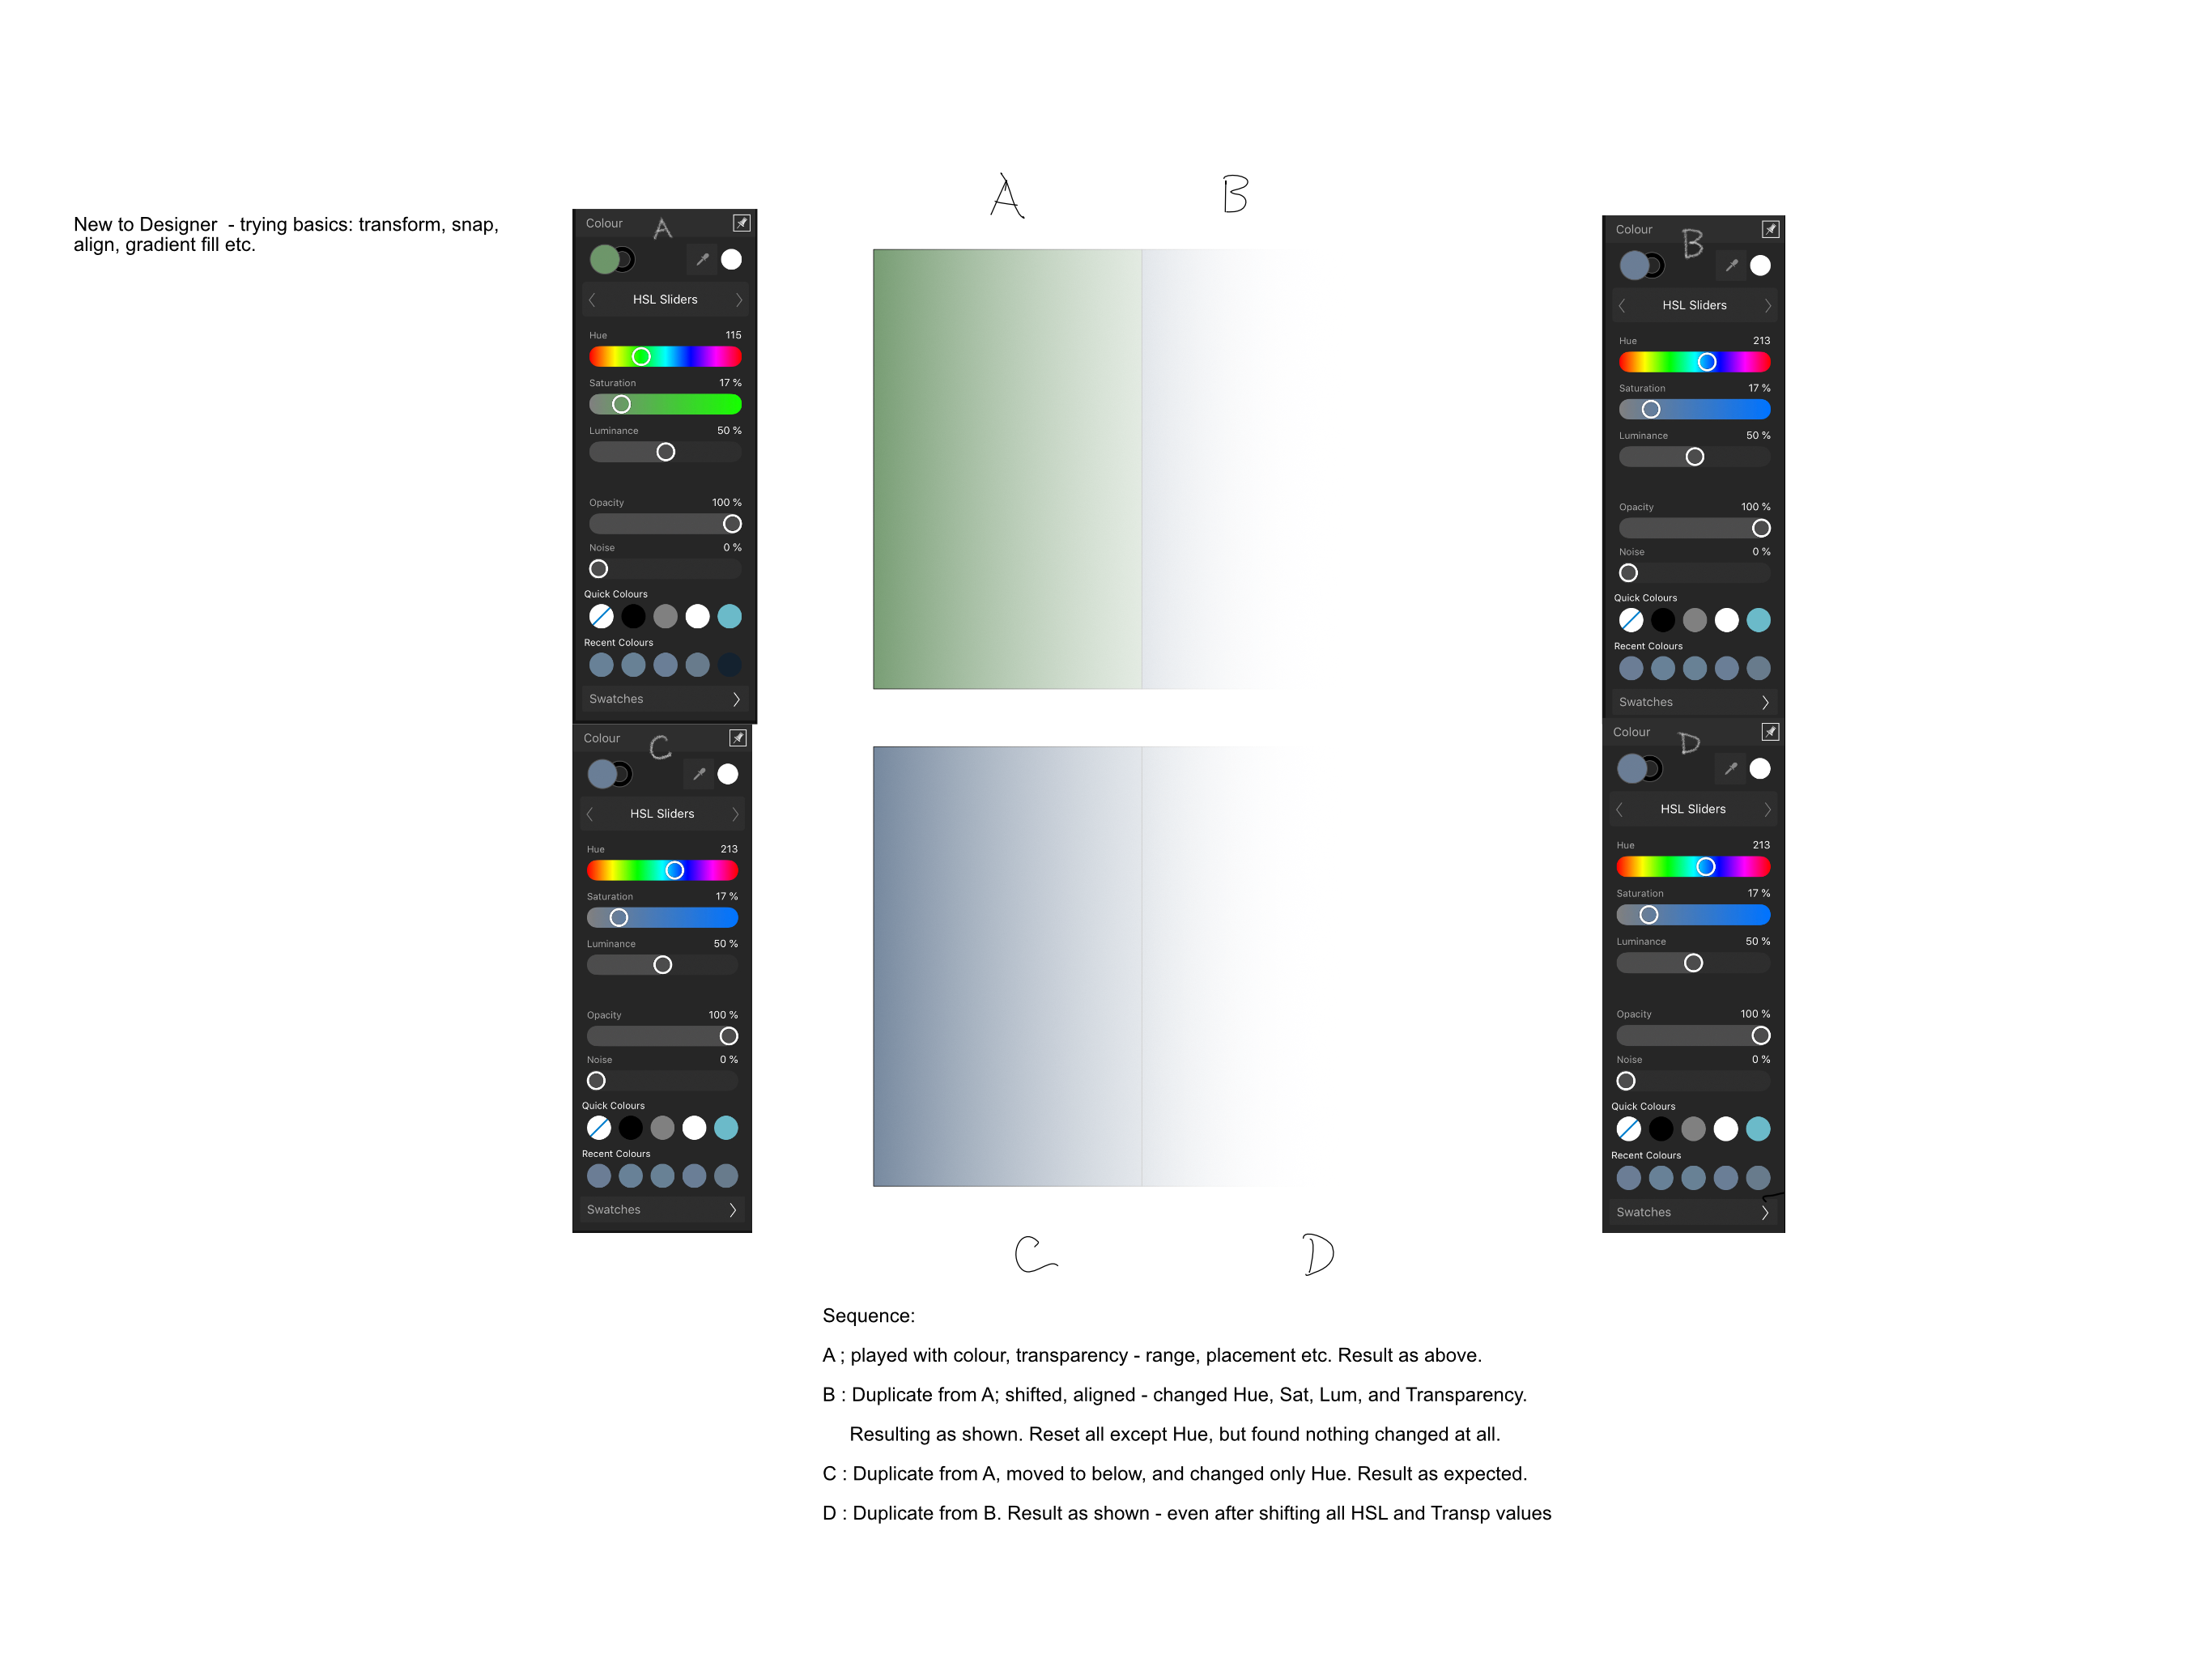
New user - trying basics.
Duplicated vector object, altered HSL (experimenting), tried to revert (wanting to have only Hue changed from original) but was stuck with all the changes I’d just made.
* Attached image has text explaining sequence.
Obviously doesn’t matter in this (testing) case - but a bit worrying.
EDIT....Incidental, about this forum: this png is sharp in Photos. But I see its quality is much reduced here - though it showed the correct MB when uploading. ??
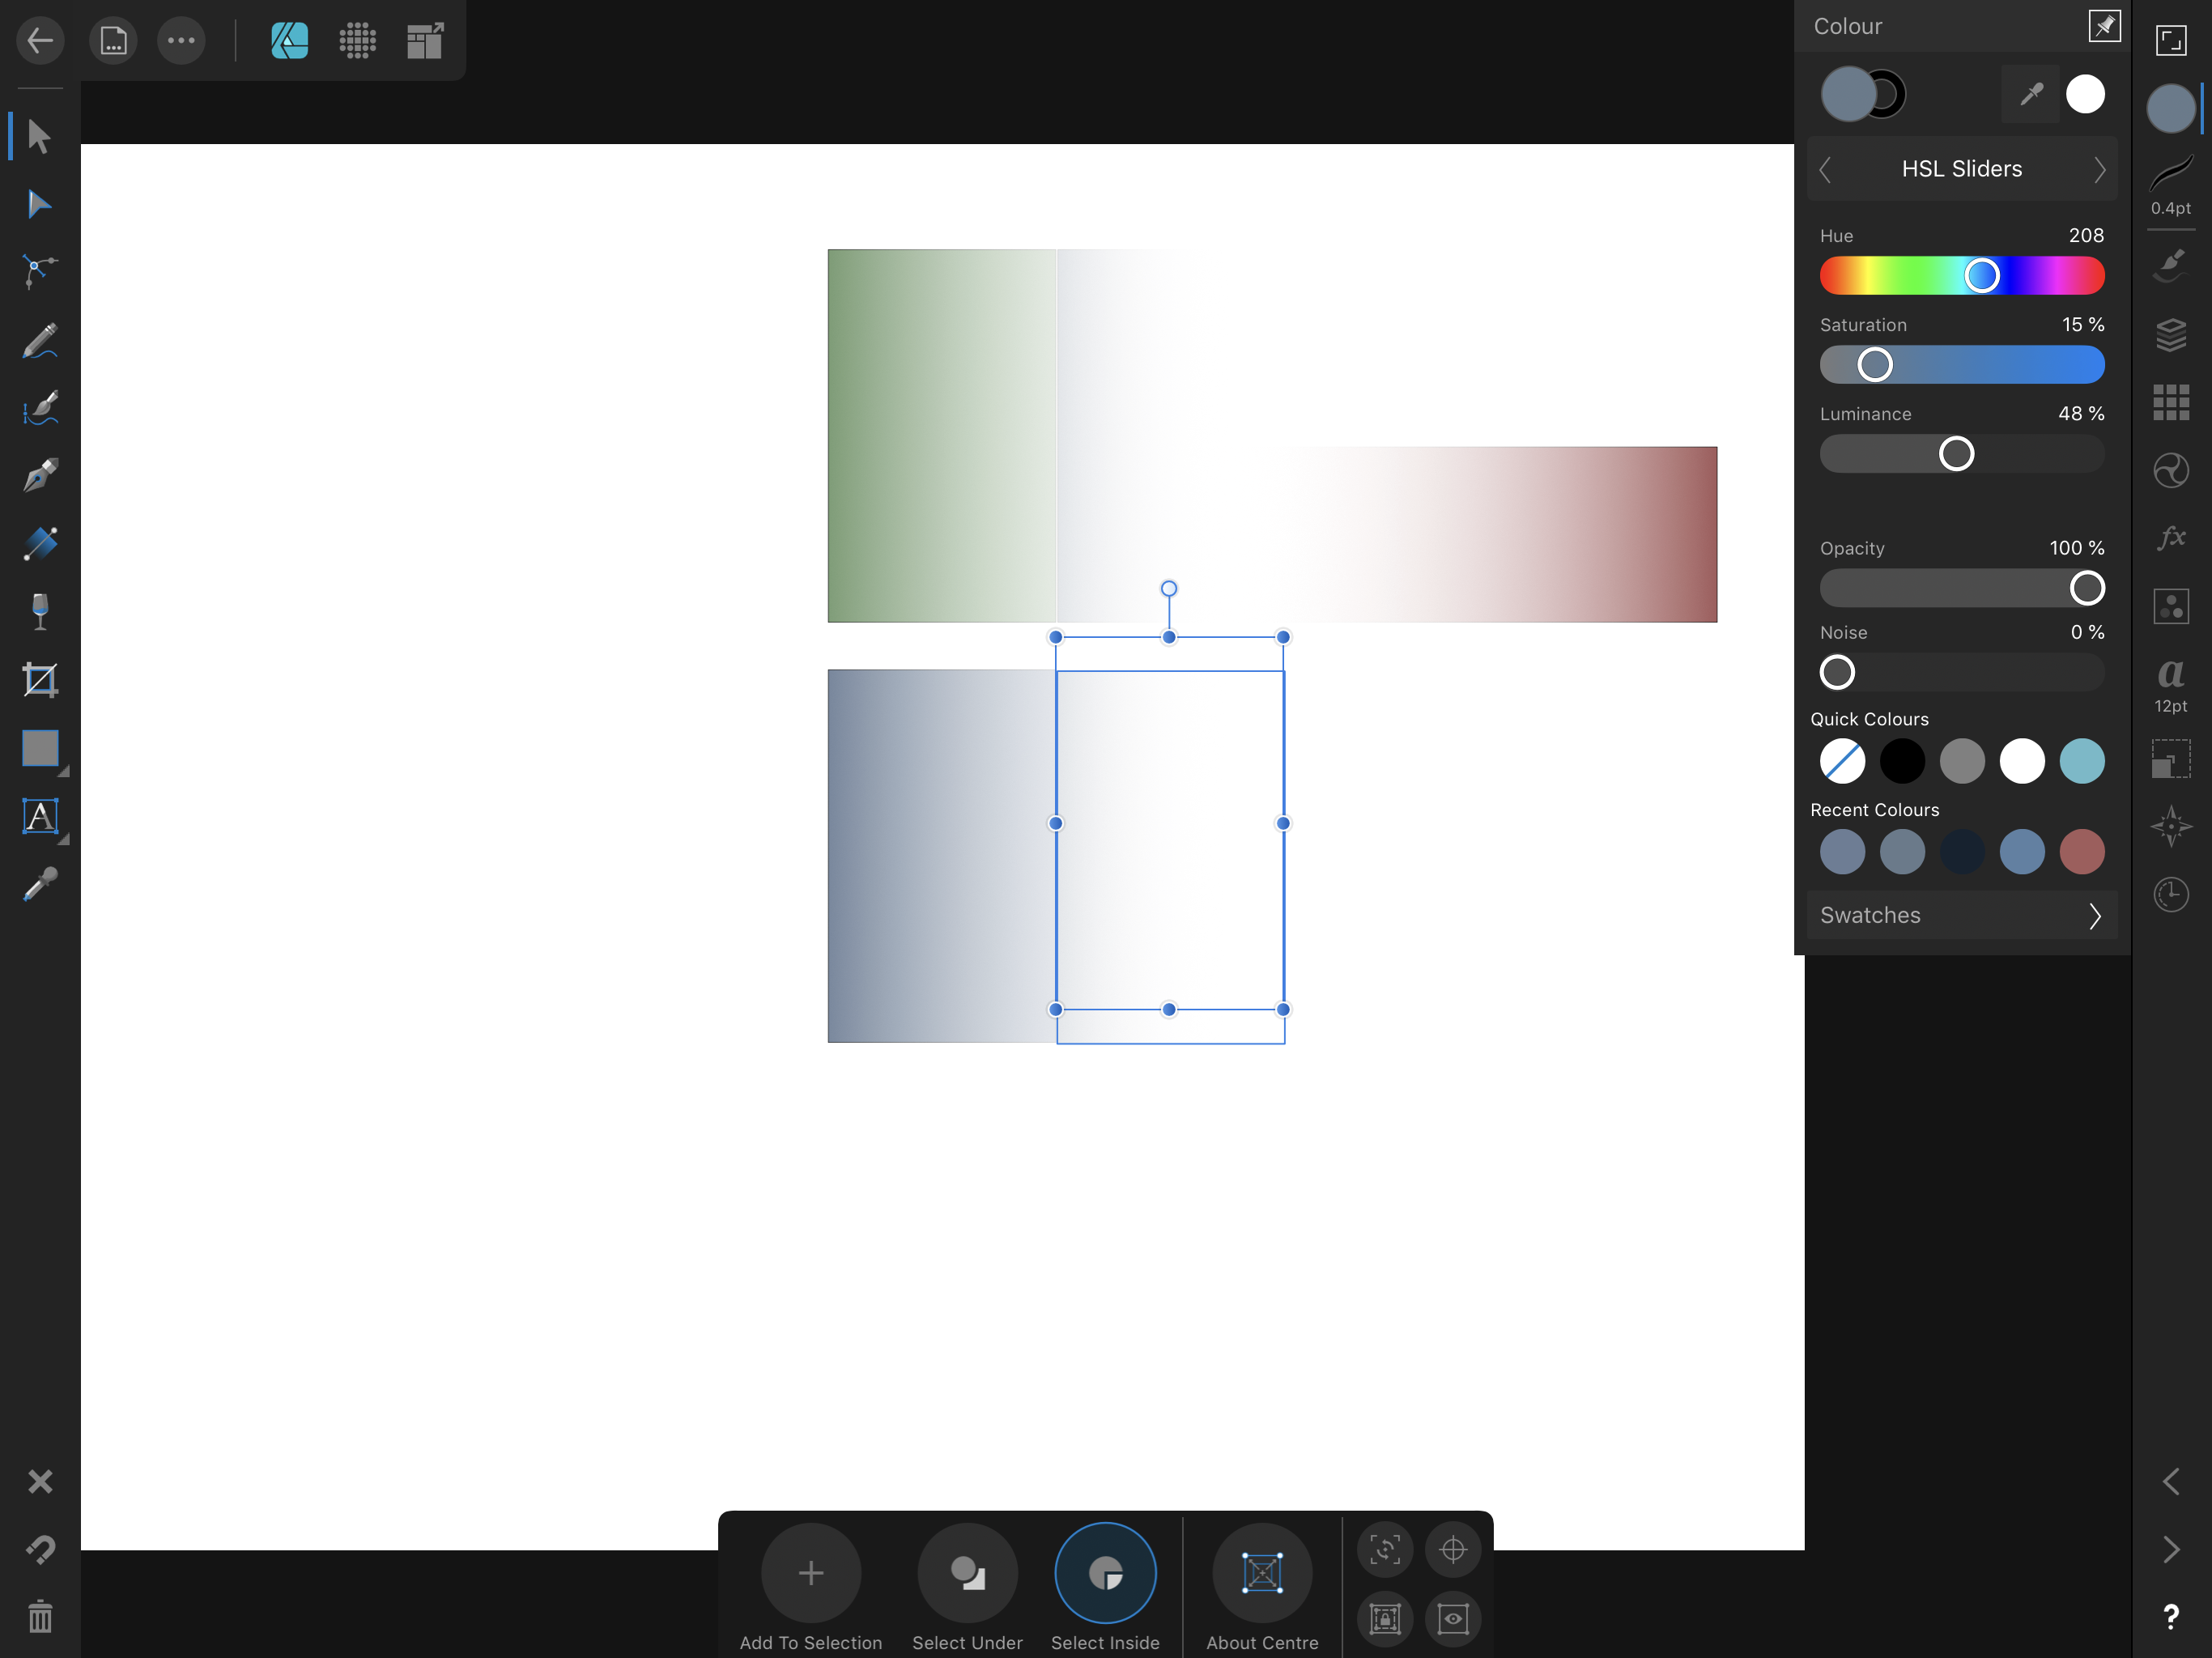
EDIT 2... Also, should have mentioned something odd showed while moving rectangle B down to be D. See second image below...
(Red-brown Rectangle irrelevant)
-
Still learning Designer... So far, I've found .svg to be the best export option.
What I've so far tried: Carries over Text as fully editable; Gradient Fill in shapes ok and editable. Strokes need to be set as no fill (otherwise arrive as multi-noded shapes).
-
VectorCat...
I'm still learning Designer, and came upon the same problem as you; but then found that, after convert to curves, it was necessary to go Edit>Ungroup. I find the nodes then do appear, and are editable.
Hope it works for you
EDIT: I see that Ungroup is only necessary when there's more than one text character. So, apparently, multiple characters convert into a group of curves. Which makes sense, I suppose?
-
Designer - iPad - Pixel Persona
I'm wondering... is there a way to copy more than one selected layer as merged content? So that they then paste as one (merged) layer and not as several individual layers duplicated?
-
Lee D....Thank you for your response. (My apolgies for being slow to reply - been out of circulation)...
- "Retaining settings when switching between brushes isn't an option but would be useful."
Yes, I know it's not an option - and I must say I'm disappointed to hear you say only that it 'would be useful'.
I would say it's surely elementary, and just can't understand why it wasn't considered to be such from the outset, when it must have been obvious how users would be likely to be switching from one amended brush customised in the 'More' flyout to another and back again.
To be blunt it seems that simply providing a wealth of customisable options was as far as the thinking went.
- "It's also not possible to duplicate or save a modified brush or to move a brush from one category to another".
Yet again, a simple lack of forethought - resulting in yet more hindrance to users being able to take sensible advantage of the many options made available.
- "The shape of a brush outside of the Basic category can't be adjusted as they are based on a texture image."
Again, I do understand it's only with brushes in the Basics Set that 'Shape' has an effect. But my point is why is 'Shape' not greyed out, inaccessible, for non Basics? (Like, for example. Nozzle Texture is for Basics)? Instead, users are able to change a Textured Brush's 'Shape' value, click OK and wonder what they've done wrong, why there's no apparent change?
As to the other points, can only hope they too get addressed before long. (As others have pointed out there are issues said to have been 'logged' that turn out to be unresolved two years later).
I really want to like (and use) Affinity Photo: it has so many aspects that really appeal, yet it seems to me there's a fundamental weakness throughout (for it's not just with Brushes) - a basic lack of attention paid at development stage to how users will actually use what's being built.
A successful app, surely, is not about how many features are provided, it's about how they are provided. So many posts on this Forum are it seems all about the same thing - in short: UX...
As I've said before, I'm very aware there's countless accolades been showered on AP - but I still feel it can't be wrong to complain or criticise.
Apologies for length of this!
-
Difficulties and Problems I'm finding:
- Every time a brush is changed and the first re-selected it has lost any modifications just previously made. This is not good. The solution suggested of creating a new brush for each modification is just not a solution. Partly because there would need to be so many per one brush; but also because in the Brushes 'Studio' there would be no visible way to distinguish them and, although there is Rt-click option to 'Rename', individual Brushes show no names!
- It's probably there but I can't find how to duplicate/save any modified version?
- Nor how to copy/move a brush from one Category to another?
- Don't know if I'm missing something but, apart from the 'Basics' category: modifying 'Shape' appears to do nothing at all; similarly, changing 'Hardness' has no effect. Understandble in many cases outside of 'Basic', but why have them always so prominent, as if applicable? These things confuse.
- Modifying Flow seems with many brushes to reach full strength at or below 50%. And in some cases weakens as percentage is increased. (e.g DaubBristles, where with Preset Flow at 4%, anything above 25 and full black becomes dark grey. Similarly, with Drawing6 (4th in Set), Flow effect actually peaks at about 5% etc etc
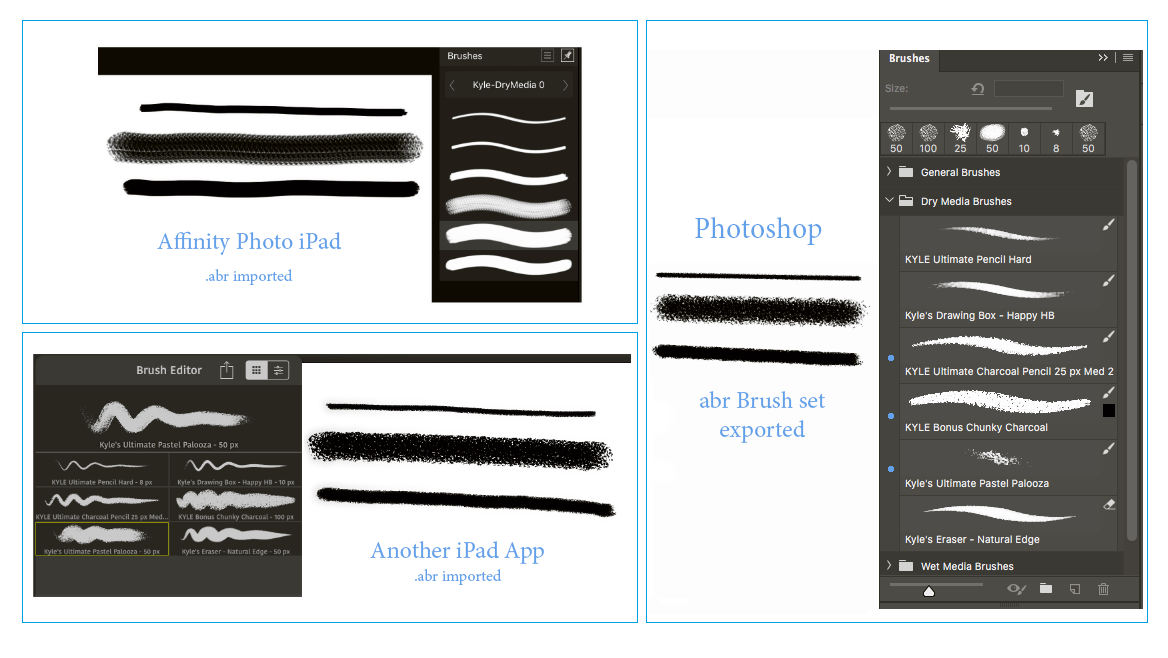
On top of this, I attach graphic showing how misleading it seems to me to offer .abr import as a feature, when so many useful ones are in fact simply unusable.
For all its wealth of features, for me the frustrating struggle to perform any sort of Brushwork - drawing, painting, masking - is one of the things that makes all Affinity Photo's other qualities all but worthless.
With all its awards and praise, I'm clearly very much in a minority on this - so if anyone can show me where I'm mistaken, or point out solutions to the above, I would be glad to hear...
(Sorry if, in this Season of Goodwill, this reads as over-negative...!)
-
photo works.... sorry, I was going to add that I have no experience of SD to iPad at all. I’m not surprised the Apple reader doesn’t show (given the closed-shop ethos of iOS) but Stratospherix might be worth asking.
I’m assuming then the Card Reader will import only to Photos? But the Photos app Library can still be accessed from FileBrowser. Would that not work?
-
iPad Pro 2017 12.9 64GB
iOS 11.2
beta 1.6.7.69
I'm finding: No sign at all of points being laid when creating polygonal marquee.
EDIT.... Closed, re-Opened app. Points and lines of Polygonal marquee now visible while being created as normal. ??


Grid and Navigator Bugs
in V1 Bugs found on iPads
Posted
Beta 1.7.1.1 notes mention Grid improvements. What are they?
This image shows exactly the same issues as reported many months ago.