

AffinityJules
-
Posts
668 -
Joined
-
Last visited
Posts posted by AffinityJules
-
-
A screen-shot of what you're seeing would be helpful.
-
Your file behaves as it should.
I have no idea why it isn't doing as expected for you.
Maybe someone in here can get to the bottom of it, but it's beyond me.
-
Scrub my suggestion.
I think I misunderstood your question.
-
try using an HSL adjustment to desaturate, then use a selective colour adjustment to target whites, neutrals, and blacks.

-
("4 rows of 3 pictures")
It sounds to me like a collage - butting together all pictures in one frame rather than a cut out composite?
-
1 hour ago, Alfred said:
Serif PhotoPlus had this capability (via the use of modifier keys) more than a decade ago.
How strange!
It would seem that Serif is in forward gear so to speak, but some aspects of their software is in reverse. 😕
-
Affinity photo (if that's what you're using) has no such option as far as I am aware.
It's been mentioned many times before, but as yet, it has not been included in any update.
You have to drag each handle separately and do the best you can.
-
1 hour ago, SolidSnake2003 said:
@AffinityJules @iconoclast @v_kyr @Dan C @firstdefence @carl123 @TrentL @Komatös Here is a version of the cover where the background characters are now outside of the background and more visible. I added a space background in the green area, and a screenshot of the sewer entrance from the 1990 mini-series as the background representing IT's lair. I also added characters on the ground as well to make it more like the Stranger Things poster.

Hope you all like it.
Hmm...
do you not think that there should be shadows present casted by the 3 new characters to help ground them to the floor?
The 3 of them look like their hovering and, the figure behind is way too big to my eyes.
- SolidSnake2003 and Komatös
-
 2
2
-
1 minute ago, walt.farrell said:
Good thought. The Stabilizer is enabled in that screenshot, from what I can see.
Yes, you're right. Didn't see that - my eyes are dodgy these days.
-
I can't tell from your supplied image but, it sounds like you have checked the stabiliser. Uncheck it if you have and your brush will return to normal.
-
Open the start menu and find the app (affinity photo etc) this is for win 11, so I'm not sure if it will work in win 10.
Drag the icon to the desktop and it will create a short cut.
-
-
And now for the colouring in?
-
Set the brush from 1 or 2 pixels in size - anything bigger than that tends to not look natural.
My quick example I set the brush to 1 pixel.
-
What I normally do when faced with a situation like this is: clone/inpaint/heal as per normal, or whatever works best.
Then, I would use a smudge brush to drag the missing hair parts so that they reconnect with each other. You would have to set the smudge brush strength quite high, 75% or more other wise they might not be visible.
There are other ways I'm sure, but this method has always worked for me.
-
-
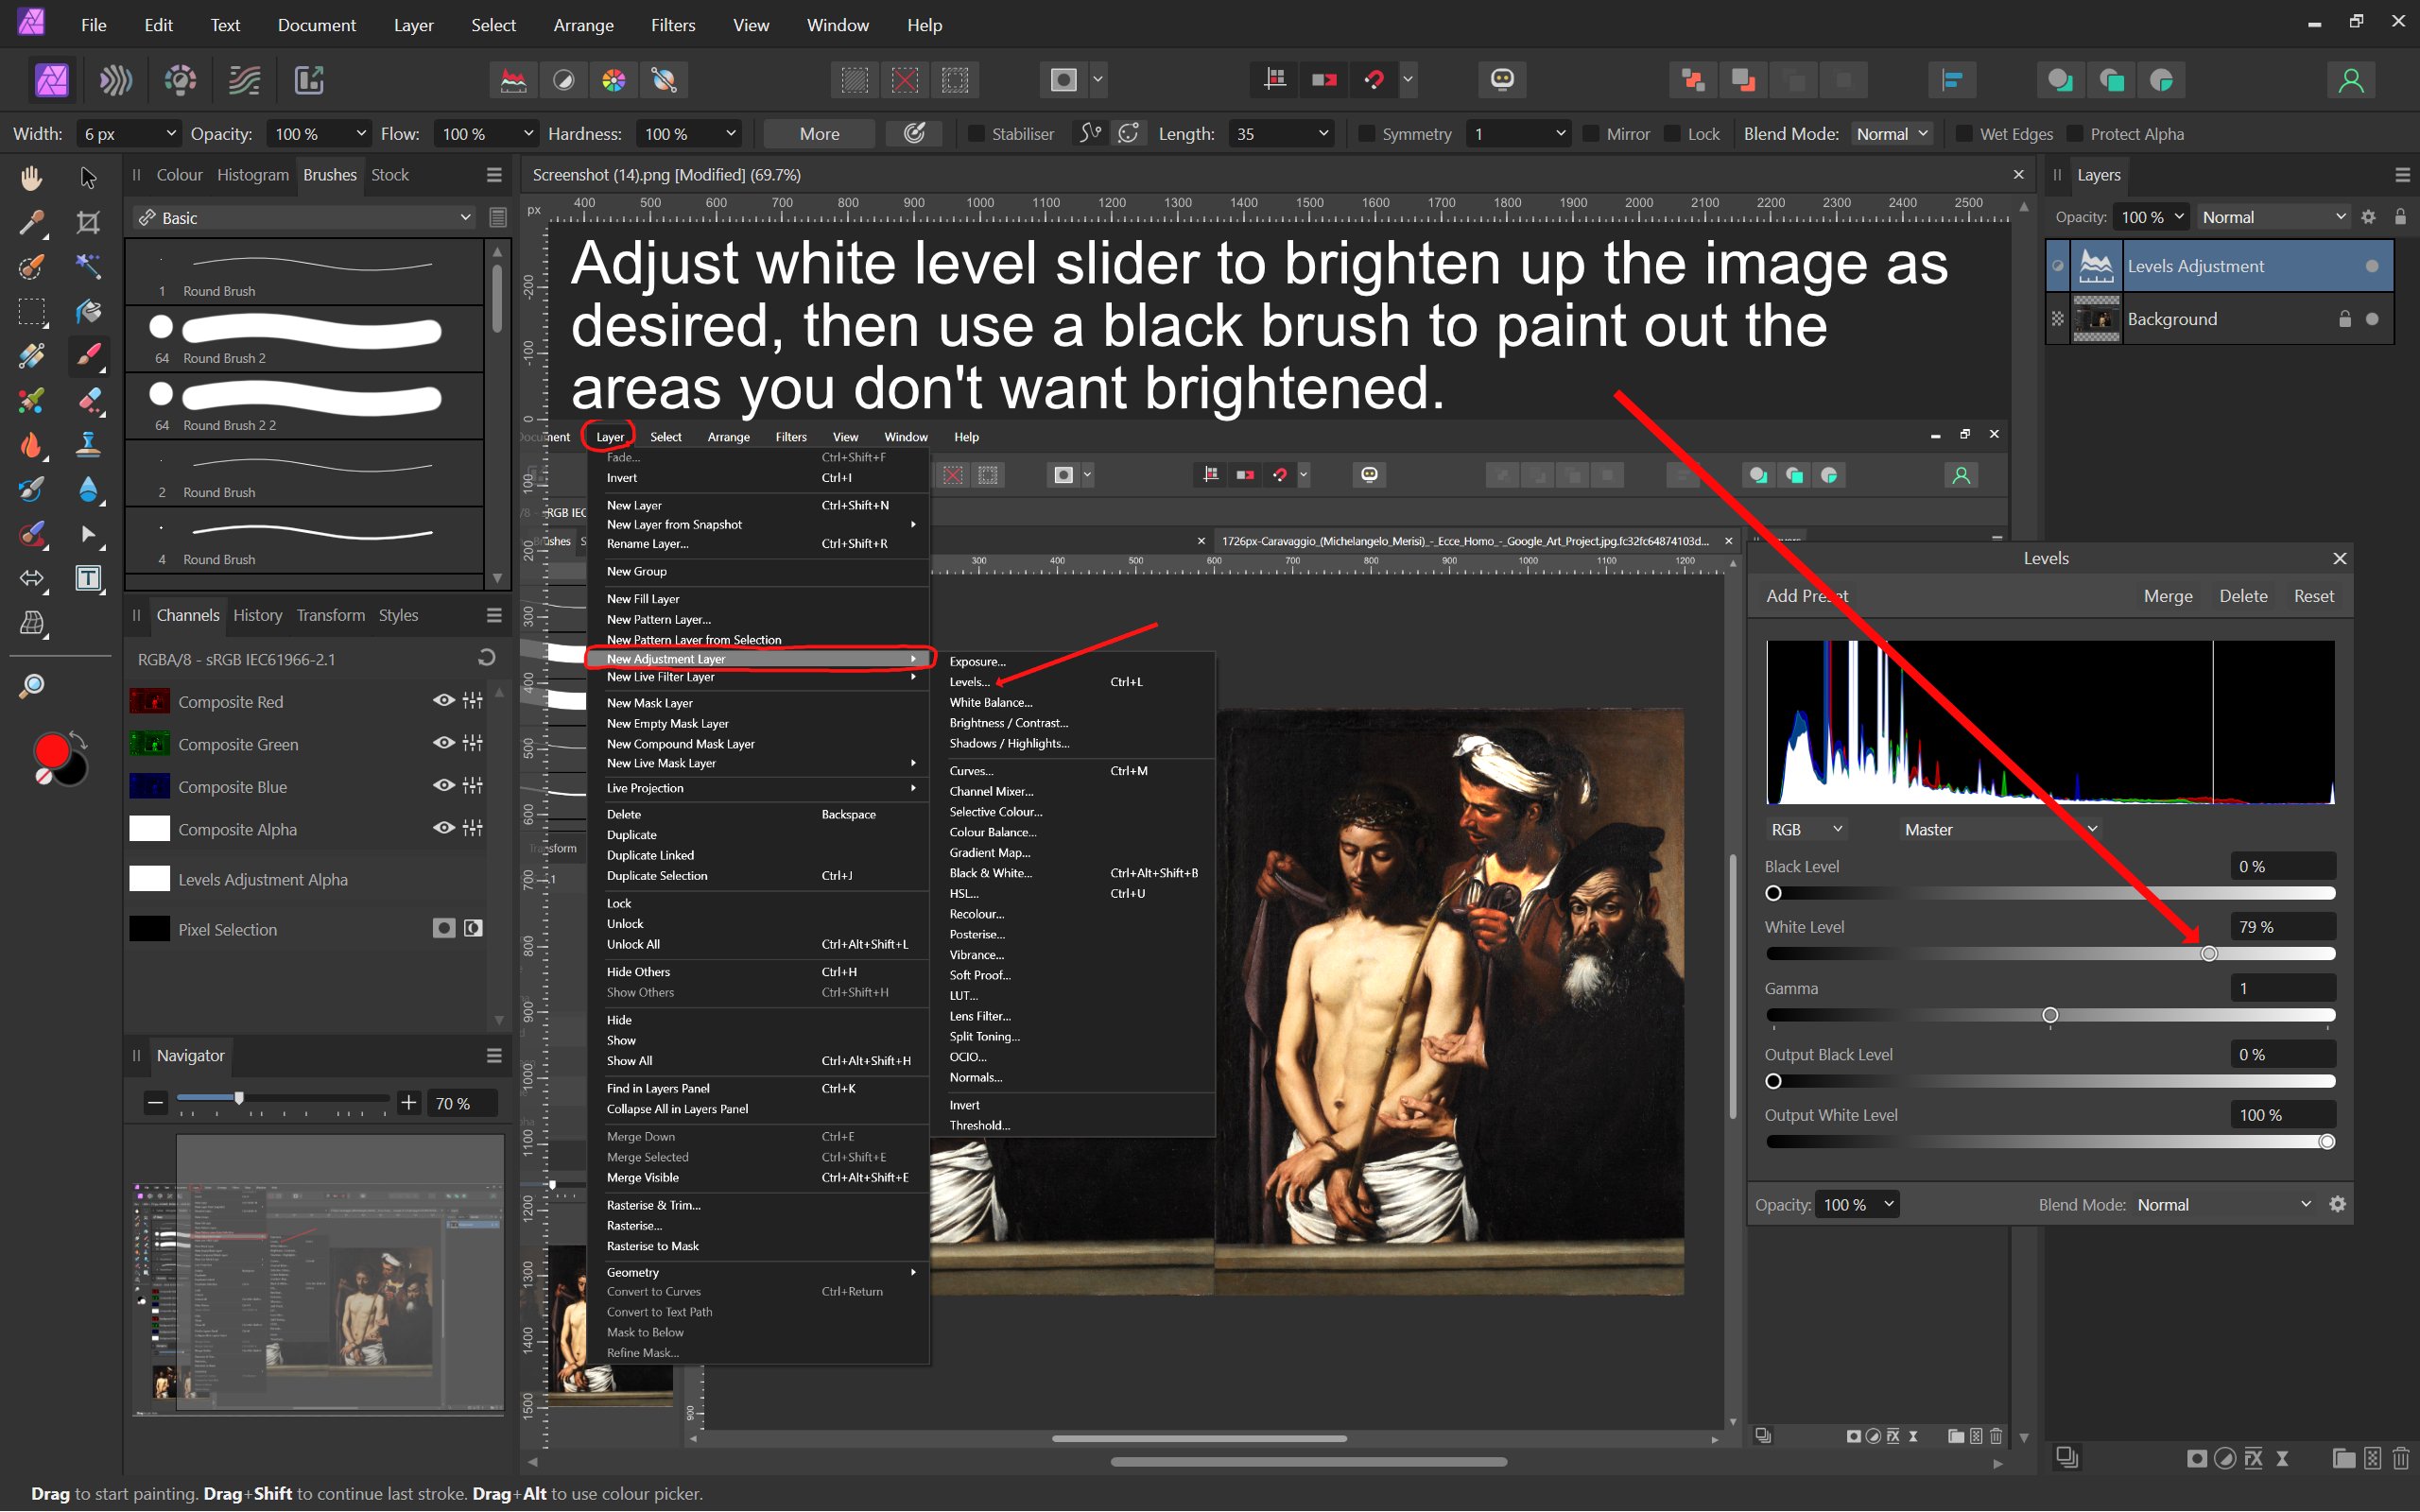
You need not use the erase brush.
Each adjustment layer has a built in mask.
To hide any adjustment use a black brush on the adjustment layer and paint it out.
-
4 hours ago, filoplume said:
I do this before I start a mask?
Oh - I followed the Affinity Revolution mask tutorial on youtube and she used a curves adjustment to adjust the brightness so I guess same thing as levels adjustment with white balance.
How would I do the other thing you said about a black brush to paint out the areas that I do not want touched?
Thanks
As I have already mentioned above, all adjustment layers come with their own built in masks so, once you have made an appropriate adjustment you need only paint out the undesired brightness on the rest of the picture. You need to make an adjustment first before you can mask parts out, otherwise there would be nothing to mask out!
1. Select adjustment layer from the layers tab.
2. Make adjustment.
3. With the adjustment layer selected in the layers panel - chooses a soft brush from the brush menu. Set the colour to black, then paint over the picture to hide the parts you don't want lit.
eezy-pezee.
-
24 minutes ago, filoplume said:
Speaking of Rome, sort of <g>. How did you do that? It looks great!
I am studying up on masking right now. I remember Affinity Revolution had a couple good videos on this.
Sorry - I don't get to do this stuff very often <s>
See picture below.
You can also use a brightness and contrast adjustment, or a curves adjustment to brighten up the picture, then as with the levels adjustment use a soft black brush to paint out the areas you don't want brightened.
Note: all adjustment layers come with their own mask - this makes it quick and simple to use a black brush without faffing about making new masks.
-
This is an "all roads lead to Rome" type of question in the sense that there are many ways to brighten up this picture.
This example I used a level adjustment then masked out the area so that the central figure is brighter.
-
-
-
Ah....another connecting theme.
Got it.
-
I knew the Peter Gabriel image was Pete himself, but boy, has he changed over the years. I really had to look real hard before the recognition penny dropped. 😉

_-_Ecce_Homo_-_Google_Art_Project.jpg.fc32fc64874103dd4c0242bae007562d.jpg.65e57bb8bf8b7d7e4419e423648b2070.jpg)


Command J, "Layer>Duplicate selection" doesn't work in version 2.4.2
in Affinity on Desktop Questions (macOS and Windows)
Posted
Command + J works fine for me, but if I were to try it with an image layer it would not work - it would copy the whole layer.
Try using a pixel layer - that should work.