cayenne
-
Posts
71 -
Joined
-
Last visited
Everything posted by cayenne
-
Thank you Mark and Stokerg!! The reason I posted this, is that my thread: https://forum.affinity.serif.com/index.php?/topic/122811-aps-equivalent-to-ps-smart-objectswith-raw-image-changes-after-edits-in-pixel-persona/ I"m getting. a lot of response, but so far, not enough to let me understand how working within AP that doesn't have the equivalent to smart objects....works. I had a couple questions, the main one was concerning bouncing back and forth between the pixel and develop persona. And at the end of the thread I added on how AP reacts to while in the Pixel persona....if you are needing to transform a image layer....do you lose resolution if in scale it up and down and back up again, etc. In PS, the smart object container addresses this problem. And as I understand it with AP no smart object is required, and so I was wondering how AP dealt with these two workflow scenarios. Thank you VERY much in advance if you guys might could take a look there at my questions and the responses so far. cayenne
-
Wow...definitely some advance terms and workflows I'll need to research and try to understand. But more in simple terms. If I bring in a RAW image to AP. I may do a tweak or two in Develop persona. I come into pixel persona.... I do some work there, and decide, you know...I need to bring the midtowns up more.... In PS, I could double click the image layer and it throws me back into RAW and I can do that, I close RAW and come back and the images is updated in my layer and you see the change propagate. Of course this is with limitations, etc...but in general I think you can see my question...of can I do that in AP similarly. At this point, it appears the answer is NO. ON a slight tangent from that....in PS with a smart object, if you while working with it with transform make it better or smaller and back and forth, you don't lose image quality. With Affinity Photo...is this also a capability....or do I lose resolution if while in the pixel layer when I'm transforming larger/smaller...while trying to decide and work with which is the best size etc. I"m generally wanting to know how Affinity Photo deals with these issues in general as that PS has you put things into a "smart object", and what I read about Affinity Photo is that it takes care of this behind the scenes and I'm trying to gauge the abilities and shortcomings so that I know best how to work within AP. I thank everyone for their contributions!! This is how I learn...and hoping this thread could be beneficial to others looking for similar answers. C
-
Thank you for your reply. But it isn't quite so much the bit depth...which I do like, and at anything but HDR, 16-bit is the usually high standard, I'm looking to keep the work flow as close to RAW as possible even with some pixel manipulations ( like compositing, filters, etc)....I'm looking for answers if AP can come as close as PS can with smart objects...in that after some/many pixel manipulations...that if you need to actually do RAW level edits to the file in there..that AP can handle those and update the pixel manipulations to accept those and update as required. I'm dropping Adobe PS and wanting to try to figure out if I can do some rather important things in AP that I can do in PS. I realize there are limitations on how far this can go, but I"m wanting to know if I can get and how I can get the same level in AP as I can get in PS. Thanks!! cayenne
-
Ok..thanks for the reply. I was hoping since Affinity doesn't seem to have on official support links/process....that they'd be chiming in MORE on most all posts in the forum, since that is where the site points to. Don't get me wrong, I TRULY appreciate help and suggestions from other users....but there are times that really require someone with inside knowledge of the product on how it actually works programmatically for some answers, and I don't see those very often on the forum. But thank you again for your reply. If nothing else, I'd have expected an Affinity employee to answer something exactly like this question. C
-
While I VERY much appreciate the great replies and answers from other users...I'm curious if actual Affinity employees...developers or staff that have in depth first hand knowledge of the product ever get on here and answer questions...expecially the tough ones that are concern how Affinity (Photo in my case) products function? I've searched their website and their support seems to ONLY point to the forums....so I don't see any way on the site to send in support questions directly to them....or open a case, etc. Anyone? Thank you, cayenne
-
Well, these images are from a Fuji GFX100....and I have it set to the highest image level...so, it is pretty high being a medium format 100mp image ( on a similar workflow to this question, original images is about 208mb, the focus stacked set of images using Helicon Focus RAW-to-DNG workflow, results in about 297-332mb images each.) Again, THANK you very much for your input!! If anyone else out there knows, more please chime in. cayenne
-
So, you're saying if I go back to the develop persona....I'll no longer have the wide gamut and leeway to make edits to the same extent I had with the RAW image that comes in? Thank you for the reply!! C
-
HI all, I've been trying to research Affinity PHoto's equivalent behavior to smart objects in PS. Let's say I have a couple of RAW images, in this case, DNG specifically. I bring them in and in the RAW personana I do a couple of adjustments and bring them into the pixel persona. I'm thinking similar how I"d bring them into PS as smart object which I can double click to go back and edit still in Adobe RAW....even after I've applied smart filters to them, etc. So, I'm bringing these into AP in a similar way, and I'm doing a little composite work and I notice on one of the images, that I need to bring up the shadows....if I go back into the RAW persona and make an adjustment, will it be reflected back in the pixel persona? I'm wanting to try to keep as MUCH in the RAW workflow as possible, I know there are limitations at some point with some adjustments...but can you do something similar to what I'm describing in AP? If the example I described with 2x images and the unknowns with what I'd be compositing is making the question too complicated for simple answers, let's just change it to one image coming in RAW...and doing a bit of work on it and then adjusting again the RAW part and having it reflected in the pixel persona.... Am I being clear in what I"m attempting to do? Thank you in advance, cayenne
-
Hello all, I've generally been working within the RGB 16 bit color format and the ProPhoto RGB color profile. I"m needing export to high quality jpeg, but the printer wants something like Adobe RGB. When I am in the export dialog and select jpg, I don't see the option there to change the color profile....what am I missing? Thank you in advance, cayenne
-
I meant the latter.... I can't post those images, but, I will try a different test focus stack, shot in the same setting and see if I can reproduce it, and if so, I'll post that. Thank you, C
-
Anyone? Anyone? Bueller?
-
Hi all, Yesterday I tried my first shot at doing a focus merge. The image had a couple of central images that were on top of plexiglass shot from above. The Plexiglas was on top of black cloth but the background didn't come out perfectly black, there were some light reflections on part of it. I had about 5 images. I brought them in for focus merge and the objects appeared to be pretty well merged, BUT....when I started to do a bit of clean up, trying to clone stamp or in paint brush...I noticed that what it copied over was much darker than the area I was on.... I checked for current and below layers, etc. Then I found that the upper part of the image, where it was lighter than the bottom was actually partially transparent!??! I put a full black layer underneath and sure enough it darkened up the transparent parts of the focus merged later. I could then inpaint and clone to my hearts delight. I next found that my image was NOT the same size as the images I brought in...it seemed the workspace as well as the image itself was cropped significantly from the size of the source images brought it. Is this normal for these to occur? Do I have something set wrong? I've done this in PS, etc...and the workspace is the same as the source images...sure when it has to align there may be parts of the image that are here and there and I usually have to manually crop a bit, do to changing the focus etc.....but I've never seen an application do this. And the crop was almost from 3:2 to 1:1 when the app did it...I went from rectangular to square almost. And I still can figure out why the resultant focus merge had semi-transparent parts? Thanks in advance, Cayenne
-
I found some videos and figured it out. I created a square document...white background. I then used my pen on my Wacom tablet to sign my name so that it fit in the square. I then saved the document out to a PNG file. I then went to the brush panel and first created a new category and renamed it Signatures. I then Selected New Intensity Brush (for B&W ones)....and selected the PNG image I'd made. I then went into the properties and made it larger (I need to play with this more)...no dynamics, etc. Anyway, it seems to mostly work, I had to use it to "sign' some PDF documents to send back out to someone, so I just signed the line with it and added a text field for date.... AP handles opening PDFs a lot different than PS does...had to figure how to add a new layer to each page and do the sig and date layers in there...and played with how to export one or all pages back out..I'm still in the dark exactly how that works but finally got it to work. I've created a full sig this way, but will likely do an Initial brush too for things that just need initialing. Anyway...doable, not as straight forward as PS, but hey, always fun to learn and figure out new things!! I also found the most of the time, it 'signs' nice and dark.....but on one set of PDF forms...it looked faded even though I made sure it was black color and full flow, hardness...etc. Anyway, I"ll keep playing with it, but just FYI how the basics work if anyone interested. cayenne
-
Hi all, Is there a way to create a brush with your signature? I used to have this a long time ago on PS, where I could use it when I opened a PDF file and just "stamp" it with my brush for my signature... Saves a lot of time printing documents, signing them and scanning them to send out.....easier to just open the PDF and "sign" it digitally... Thoughts? Is there a good tutorial for AP doing brushes like this? Thank you in advance, cayenne
-
Yessir, exactly!! The stack operators was a new concept for me, I'd never seen before coming over from PS. I was merely wanting to simply bring in a number of images and align them.....nothing more. That is a common operation from "the other side" and I was needing that here. Again THANK YOU for all your help on this. It's the simple things that are different that are often hard to get around...I know the concepts, but the implementation and getting around things like this that are "extra" that I'd not expect are sometimes walls you bang your head into. C
-
Ok the comes the closest to what I was hoping for....didn't know about option+command A to select all layers...that was the kicker. I hate to mention the "PS" application, but I was looking for what is commonly done there where you hold a key and click a layer (alt click on windows I think) and it makes all others but that invisible....and then you can re=visible (is that a word? Haha)....with same key and mouse click. Ok this will work for me, I just was looking now for a quick way to set only 1 layer visible....in this case the bottom most one and I can now easily build up from there. I love AP, but wow....there are some very hidden work arounds to very common operations in PS....thanks to ALL in the forum for such quick and great answers!!! Hopefully when I get more proficient, I can return the favor for others.....I also hope there gets to be more info out there on the web for these sorts of questions. Again, thank you!! cayenne
-
Ok...I'm trying....I"m on a Mac. I don't have the "alt' key...I have command, option and control....(although I'm using a windows style IBM buckling key keyboard, but the keys are mapped to OS X style).... Right now I have all layers visible. I"M trying to click on the bottom most layer...I tried holding command or even option while clicking the checkmark for visibility... NOW..I did just discover something...that if I hold the option key and click in the layer (not the check box for visibility) it does indeed show just that layer.... Lemme may rephrase the question. Is there a way...starting with al layers selected (check mark on the visible checkbox)....to uncheck the visible checkbox on all layers except the target one with a shortcut/mouse combo? Is there a way to set that visible checkbox back ON for all of them, if only 1 (or even a couple) are currently checked as visible? I'm close...thank you for the help!! cayenne
-
HI all, I have a document with about 20 layers....is there a shortcut or key combo with mouse click...to select one of the layers to keep visible and turn the others off and then a way to click it again and turn them all back visible again? Thank you in advance, cayenne
-
UNGROUP!!! That did it....THANK YOU!! Ok, I think I"m good to go, but wow, that was definitely not an intuitive set of steps, and I couldn't find the documented anywhere. And, what I"m doing isn't exactly a niche use case....this type of thing is used widely in real estate shoots and product shoots. Seems it might be a good thing to have an option added to the "Stacks" import screens, to select if you want it in a group or not. I've never seen a need for it to be first put into a group on initial creation of stacks, although after you've processed all, you might or might not want to, to do a group mask. While I'll study the current group mask that is generated...I don't quite know what to make of all the "stack operators"....they all seem to do something different, when what I would expect would be the normal blend modes. Again, I found a document on the stack operators and will study them, but if they are taking suggestions, I might ask if when creating stacks, if putting them into this group by default could be made optional. Thank you ALL for the response and help, I can move on now. I love Affinity Photo, but whew...these idiosyncrasies and hidden ways to fix them can certainly be challenging!! cayenne
-
Ok..I guess I"m looking for something similar that is very commonly done in PS. I need to bring in the images all at once, not have to open them one at a time....AND...I need to align them. This is pretty common to do, I know AP has it's own way of doing things at times and there is often a secret Mickey Mouse handshake thing you have to know to click or do to get it to work the way everyone is used to doing. I just know there's something here we're missing. I appreciate the advice so far....but I know there's got to be a way to do this VERY common task.... Thanks in advance, C
-
But doesn't that affect everything below it? I"m wanting to paint IN each individual layer as I need it...and each one will be blend mode usually...of lighten, but not necessarily. I don't want an over all mode, I want to address each layer separately..... Is there a way to get rid of that stack "group'....that might be simpler? C
-
Hi all, I've got a number of images I've brought in as a stack. I shot these with camera locked down, but I was using a strobe hand held on the object, like for a product shot...moving the light source around. I plan to start from the bottom up on the stack, and mask and brush in from each consecutive photo areas I like....highlight from this one, etc... But I don't know what this stack group is it puts on it and it seems to have a group blend mode that I don't want...did I bring the stack in wrong? I'm not used to this behavior...I need to bring in the stack of images, I need them aligned, but I need to be able to turn them all off...start at the bottom and layer each one on as needed with masks...generally on each one I'll use the lighten blend mode. Kinda like light painting..... Is there a different way to bring them in, of do I need to do something after I bring them in? Hope I'm clear on what I'm trying to do.... Thank you, Cayenne
-
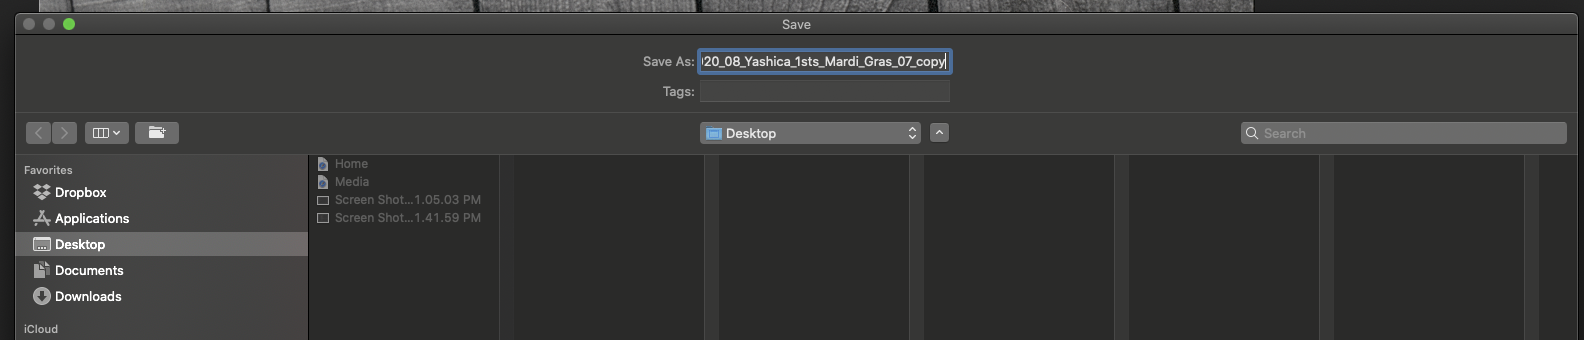
Ah thank you...THIS was what I was looking for...and even when told where I almost missed it. Why in the world is something like this turned OFF by default??? Anyway I found it and turned it off: However, that still did NOT do it....when I did a save as, I got: So...I went back to the first suggestion....and sure enough on my Finder Preferences....I had to turn ON the show filename extensions. It now dawns on me, that this is a new computer and I guess I had not turned it on yet....as that that is first thing I usually do with all new computers (win or Mac)....and guess I had not done it here yet, although in all other finder windows I could already see file extensions. UGH.... Anyway, thank you ALL for the suggestions, between these two settings, I got it working. Have a great day and STAY SAFE!!! C

-
Hi all, Is there a way in the dialogs for Export and even Save As...to have the filename show the extension? It just shows the filename, and I like to see the extension on all file saves I do on programs. Is there a way when you save as or export say...a TIFF file that on the save dialog where it shows the directory, etc..that at the top the filename ends with the .tiff extension in the dialog? I've tried looking in AP preferences, but I don't see anything like a toggle to show extensions.... Thank you in advance, cayenne
-
I'm sure this has been requested before but wanted to throw my support in on this. I did recently find that while in Brush mode, if I hit the Option (Mac) key and then dragging my cursor, it will bring up the color picker which has the larger magnifying circle and dot to select. Is there any way this could be made more to behaving like PS...where when you have the brush tool and hit the Option (Mac) . Alt (windows)...it instantly turns where your Brush is to a cross "+" type symbol and select immediately the color under that cursor.... When you are having to reconstruct an image, I find that VERY often I'm doing this to paint and sample quite rapidly back and forth to paint in and blend colors to maybe recreate areas in an image I'm try8ing to clean up. I usually finish by adding some fake noise to this to make it blend in.... But that quick click-sample-paint is a huge part of my workflow and I'm guessing I'm not alone in that. The click and then dragging, is not as intuitive, and when dragging you are moving away from the color you want to sample and have to move back to find it...and that magnification of the area, really hurts more than hinders when trying to rapidly grab colors fro the area..a simple cursor, whether it be a cross or arrow or dot or something makes this much easier, faster and intuitive. Anyway, if you all at Serif could give this some consideration as maybe an option to turn on (and leave the currently ways for those that like the 'new' way of color selection) this option, I think you'd find a LOT of people that would be happy to have this very familiar and highly useful capability. Thank you in advance, C