cayenne
-
Posts
71 -
Joined
-
Last visited
Everything posted by cayenne
-
Clip a noise layer to a group?
cayenne replied to cayenne's topic in Affinity on Desktop Questions (macOS and Windows)
Hello and thank you for the reply. Alright, you completely lost me on this one...never heard of a procedural texture filter. I don't see it under filters...? Can you give me some insight how and where to find and use this? It appears to somehow be able to do some coding within Affinity Photo 2....but I've never seen anything like that that is user accessible.... Thank you in advance, cayenne -
Clip a noise layer to a group?
cayenne replied to cayenne's topic in Affinity on Desktop Questions (macOS and Windows)
Ok, after playing with this some more...I may have it working, although not sure exactly how...again, I'm used to doing this in PS as described above. But I added the noise as a layer of the group where I had painted with a brush...in this examples colors.... And then I took the group itself and made it a clipping mask (is that the right term with Affinity) to the rectangle below, which would generally be the image I was trying to correct by painting things in/out....it seems to work...? I know Affinity can do pretty much ANYTHING PS can do...and I do this one often. But whew...it does somethings SO differently, it's hard to figure out the secret Mickey Mouse handshake you need to make it work. But I think this is close.
-
Clip a noise layer to a group?
cayenne replied to cayenne's topic in Affinity on Desktop Questions (macOS and Windows)
But...what he is demonstrating...isn't that exactly what I'm trying to do...with his HSL and halftone...clipped to that group of two objects he has...it is only affecting those areas...I believe that's essentially what I'm trying to do with noise. I notice it has been quite awhile since I brought this up...I'll fire up Affinity 2 and see if noise now works when used as a clipping mask to a group. cayenne -
Hello, I'm trying to emulate something I used to do all the time in PS. Basically at times cleaning up an image, I just open some layers and paint things out and in.... I then group those paint layers together in a group. Then when done, I need to add a bit of noise to where I painted to match it to the noise natively in the image. I usually create a fill layer of 50% gray. I apply the noise filter to get it to approx the same size noise that the regular image has. I then would clip this to that group of paint layers and I think the blend mode was "Overlay"....and by doing this, I'd be able to apply noise only to the areas that were painted which does a great job of hiding your tracks. I have Affinity Photo 2. I've created my noise layer, but for the life of me I cannot figure out how to "clip" it to the group that contains the paint layers. Can someone give me a quick idea what to do, or point me to some links? Thank you in advance, CC
-
Hello all, Ok, I've been away from Affinity a LONG time...and having to not only relearn my basics that came from PS days..but also with using Affinity Photo 2 tools which at times are a bit different..although the concepts are the same. Anyway, I'm working on an image and I want to use a curves adjustment tool with an elliptical mask to basically increase the highlights in a tiny part of the image. I checked and my colors are Black and White. I started with the curves layer and drug up the mids to lighten things up, and see where my mask was, etc. When I did the elliptical gradient...the mask did appear, however it wasn't want I expected with the mask being an elliptical white area fading quickly into black....it is apparently white fading into medium gray. For the life of me, I kept trying to figure why my entire image was being lightened...till I examined the mask isolated and it dawned on me that rather than black areas...it was grey....which would make sense that it would lighten fully in the small white area, but would still lighten everywhere else a bit where it was gray. I've attached a part of a screen shot to show the mask and my settings. I'm sure I'm missing something simple, but I can't seem to find what the deal is...I'm wanting to dodge and burn a lot of areas in my images....and need to figure this out. Thank you in advance, cayenne
-
Do you know offhand where on the file system (OSX) that AP keeps its brush files by default? Thank you in advance!!
-
Oops...update, I stand corrected. It appears that Affinity installed all #2 versions in parallel to the #1 versions...that surprises me, not sure why you'd want the old version? Anyway...in this case it might give me hope that the old signature brush is there. Anyone know where in AP1 it kept the default brushes? Thank you in advance,
-
Well, I believe the install of AP2 installed over the old AP1......so, not sure... Would the install have overwritten brushes there..custom ones? That doesn't sound right. Not sure where to look...this is on OSX....anyone know where AP1 might have kept my brush? I"m pretty sure I didn't create a special category for them, just kept it in the default brushes....
-
Hi all, I'm a bit of a noob, and it has been awhile since I used AP. I created a signature brush in AP1...and when I needed to "sign" a PDF document, I could open it up and use the brush to sign it. I used to always be able to find that brush. I've upgraded to AP2...and for the life of me I don't see my old sig. brush. Can someone help me know where to look in AP2? I've looked under the basic brushes where I thought I had put them....not there. Thank you in advance, C
-
THANK YOU!! OH man, I love Affinity Photo...but man, the dearth of information and documentation out there just kills me when trying to find out little things like this that stump you dead on a workflow. Thank you both again!! C Ps. Hey, is there a way to mark an issue "solved" so that others later might see that when referencing something?
-
Any suggestions? Thank you, C
-
Thank you!! That's a great help!! The red quick mask did disappear after I made a change to a slider...not intuitive, but it worked!! However, I've run into a new slight problem. The object I"m wanting to work with..is small...the moon in the distance. The red disappears, but the "marker" for the radial mask tool is there and obscures the moon that I"m wanting to see. Is there any way to make that disappear too? Thank you VERY much for your response and help!! cayenne
- 7 replies
-
- 1
-

-
- hdr
- tone mapping
- (and 1 more)
-
Hi there, When doing touchups or reconstruction on images, I would often in PS use the simple brush tool and quickly sample and paint in the image, by just using (on a Mac) Option+Click on the mouse or pen on table to quickly and very rapidly sample and paint, sample and paint..to blend and reconstruct areas in a picture. I know in Affinity Photo, it is almost that, but rather than just simply clicking where the pointer is, you have to click and drag which really slows things down. Is there a way to add an option to allow the brush tool to Option (or Alt on windows) click to select the color without having to also drag to emulate the efficient and quick way PS does it? This would go a LONG way to completing my migration into AP only, as that that is a technique I, and from what I've seen many others, use.... Look at starting about 9:20 here on this video from Phearn: How to Remove Anything from a Photo for an example of how quickly this can work when rapidly removing objects and replacing them by painting in. This is about the only thing I have on my Affinity Photo wish list at this time.... Thank you, cayenne
-
Hi all, I'm playing around with doing some various exposure HDR with AP and am in the Tone Mapping Persona. I have a spot (the moon actually) in an image and have outlined it with an elliptical mask....the trouble is, it is marked the mask like a typical quick mask with red...I cannot see under that red to be able to see what the adjustments are doing there. I've tried hitting the "m" button to see if that would turn the mask highlighting on/off....didn't work. Any suggestions out there as that I can't find much in the way of documentation or YT videos showing use of the mask on the Tone Mapping Persona.... Thank you in advance, cayenne
-
I saw something similar in a photo I was editing in affinity photo...subtle tearing lines in mine that wouldn't go away and appeared out of nowhere. I shut down AP, and restarted, and the image came up normal again.
-
Hello, I'm on a Mac Pro, running Catalina. I'm trying my first print from Affinity Photo. I've done my soft proofing, with my paper profile (a canon pro paper luster)...ready to print. I'm in the print dialog. My picture is black and white, I selected that. I'm trying to set the parameters, and following some tutorials. I'm looking in the dropdown that has Range and Scale, etc in it....looking for the option of Color Matching. This, from the tutorials I'm watching, is where you can select (on a Mac) the ColorSync option, and from there you can select your paper profile, I want the one I soft proofed from of course. However, in that drop down and all of them I've been looking for, I don't see the Color Matching option. I thought, perhaps it was due to selecting Black & White, I switched to color and still, no option for setting Color Matching or paper profiles. I'm on a Canon Pixma Pro-100 printer. Its been awhile, but I've printed and selected paper profiles before on this printer, just from another application (On1 RAW and Lightroom)...and on an older Mac. So, I know its possible to select for this printer, but I can't seem to find what I'm expecting to see in Affinity Photo, the latest version. Any suggestions? Thank you in advance, cayenne
-
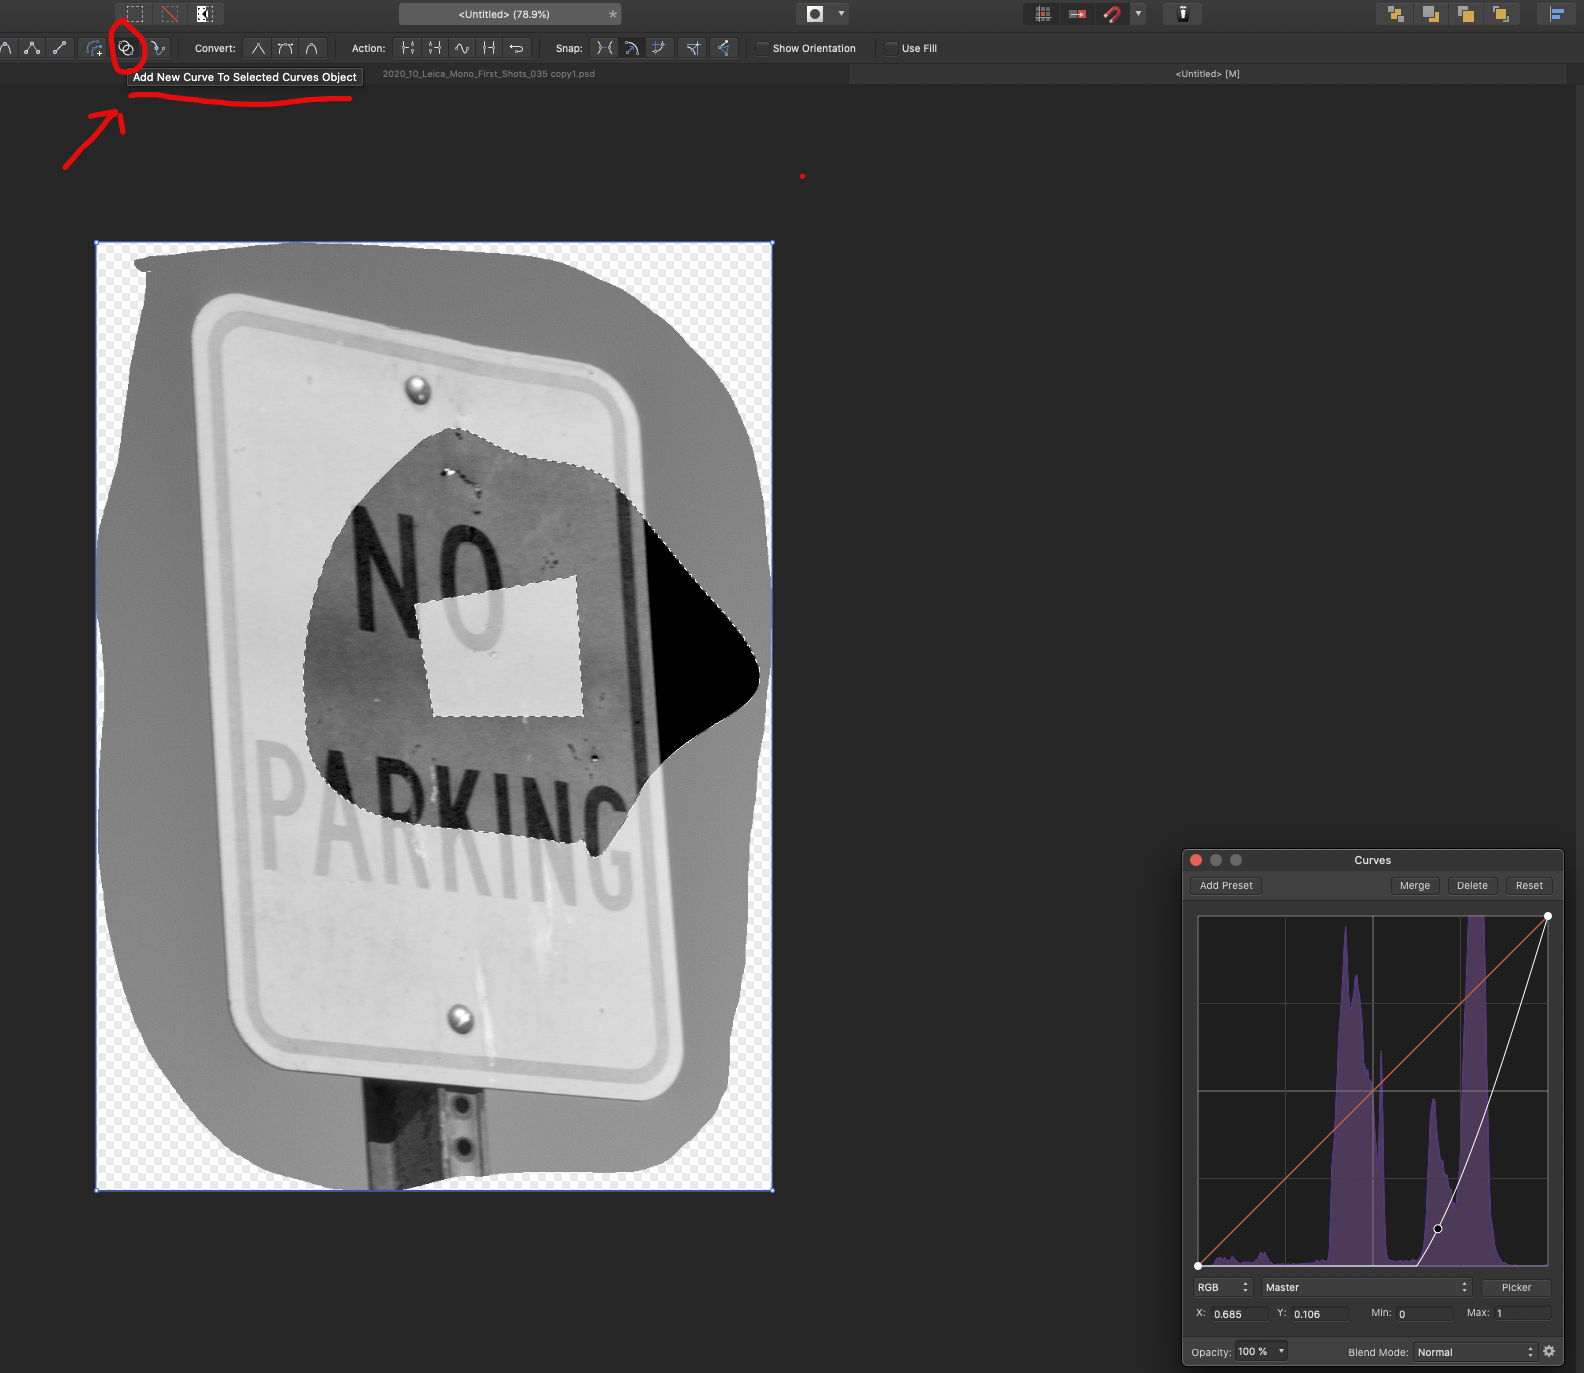
Thank you for the reply!! Very informative. As I'd mentioned above, I found a solution for this that works exactly as I'd wanted. Maybe this is a brand new oplion, as that no one had really mentioned it before in tutorials I"d seen but I stumbled across that button for the pen too: "Add New Curve To Selected Curves Object" Selecting that let me draw as many paths/curves as I desired on a single layer and let me select them all. With this I was able to select the outside band of the sign and each individual letter, and turn that all into a selection which I used on a Curves adjustment layer to darken it all. I found a video that also showed a way to actually save your paths/curves: YouTube Video work around for saving paths (curves). Its a bit of a kludge and a lot of hoops to jump through, but you use Assets as a way to save your paths. This can come in handy if you have spent a LOT of time creating a pretty intricate and accurate path with the pen tool....hoping Affinity implements a bit simpler way to save the paths. Anyway, thank you and EVERYONE for the help and response on this....I love AP, it just takes a bit of doing some times to figure how to do some things that you have done one way for ages with PS, but need to see how AP does it. I love learning, I just wish it was documented a bit better. Thank you everyone, hope this helps someone else out in the future!! cayenne
-
Ok had to update. VERY interesting, perhaps this is a NEW addition to Affinity Photo? When using the pen tool and looking for a suggestion I'd seen elsewhere to find a "subtract" button after drawing first path/curve....I found a button that when you over over it says: "Add New Curve To Selected Curves Object". I thought this might be something I could use and sure enough it allows you do "select the doughnut" like I was wanting to do. Here is a screen shot of just a quick test of two paths/curves, one within the other and selecting it and using a Curves adjustment layer to darken the area between the two curves. I've highlighted the button in red and you can see the hover hint. There is another button next to it, that appears to do a similar thing, but allow you to draw a path inside one that has already been turned into a selection. I would think maybe somewhere this should be documented, does Affinity have an up to date online user manual that describes every control? I'd think my searches would have picked this up if they did. ANYWAY....wanted to post this update here for reference in case someone else is looking how to do composite curves/paths with pen tool.
-
Yes, I suppose I could, but this technique I"m trying to use with the pen tool, is something I (and from what I can tell ) many other people use commonly....in this case it isn't just the letters, but also the stripe outside...what if this were a one way sign, and I'd need the arrow, etc.... The pen tool, IMHO, is the best way to make accurate selections...its something I"ve done for years in PS, and I just have to think other would be using this also in Affinity Photo, this really shouldn't be an edge case use case...? Again, I VERY much appreciate the input and suggestions so far....but I really really need to know how in AP that I can use the pen tool to do multiple paths/closed curves. on a single layer, so that I can make selections of all the areas enclosed by the paths (ie the interior of a doughnut type scenario) so that it could in one step be cut out, masked, color filled, or have something like a levels or curves adjustment type effect applied to that area. Thank you again in advance for all the help so far....still looking for the answer. cayenne
-
Thank you. I actually had tried the selection thing....in Capture One first, and since there is variability in the the destiny of that marking...I was using a luminance mask...it didn't select everything. I will try this in AP, but the reason I was trying to do it in AP...was to have the pen tool at my disposal to make sure I selected everything and basically could paint it fully. I've always felt the pen tool was the best way to go for things like this, where you have hard edges and can make sure to accurately select everything....again, I came from PS with the pen tool as my close, close friend....and I know I can do it in AP too, but just trying to figure out how the controls for the pen tool are different from the old way I knew. I can't imagine I"m the first one wanting to do something like this...but I"m just having a heck of a time finding an exact example of this type of use case, again of which I have to guess is fairly common. You selection DID look pretty accurate....and I will play with it....but I really want to learn how to do this in AP with the pen tool as that I will be wanting to do this exact type thing again and again...so, still looking for the "doughnuts" type example. Again, thank you VERY much for your help so far and the video samples are most helpful.... cayenne
-
That link was apparently a video to download, but QuickTime player wouldn't play it. Could you embed it on this thread like Garry P did here? Thank you, C
-
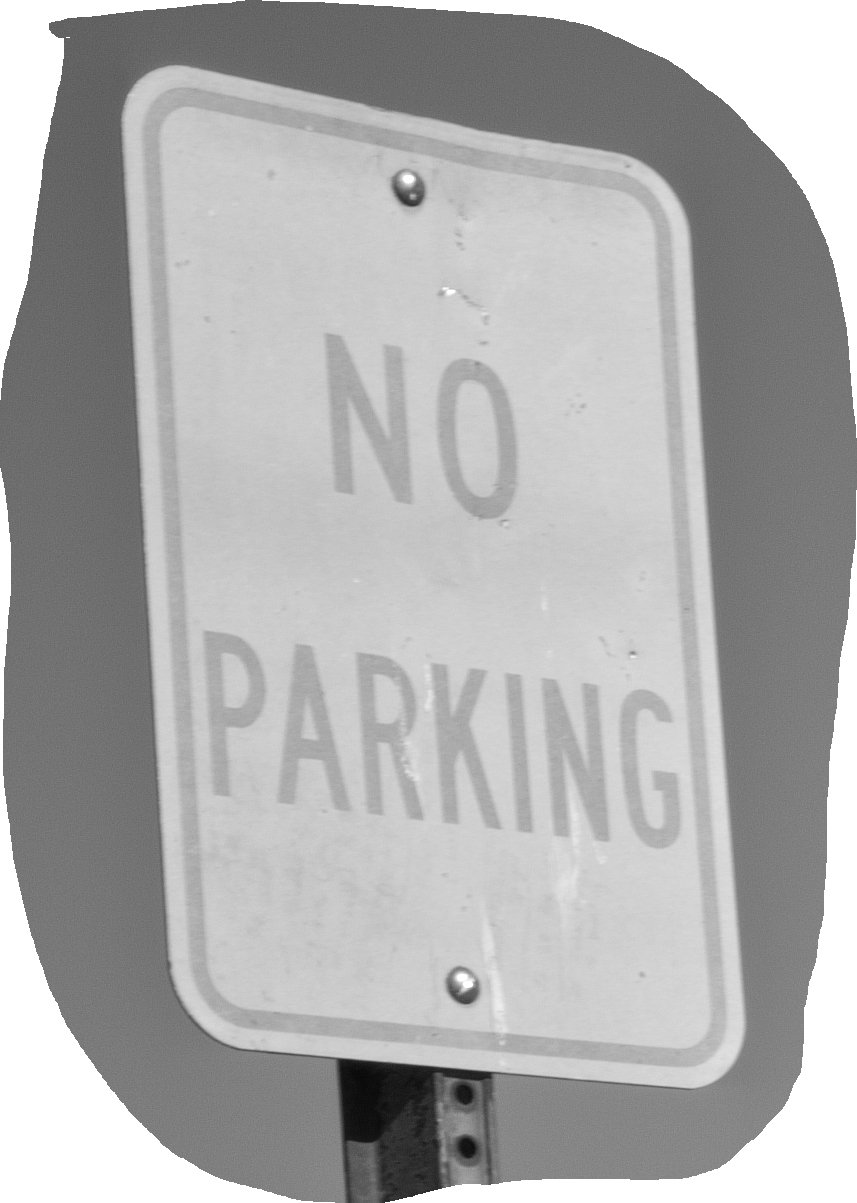
Following up to my last reply. I'm attaching a quick cutout I did of the sign. I want to select the outer band and all of the letters precisely with the pen tool...make them into one big selection so that I can fix the faded look of them....to match the rest of the image which is very contrasty and sharp....the sign is fairly small, but noticeable in the foreground of the whole image and I"d like to make the sign much easier to see and read at a glance. Thank you again for all the help so far!! C
-
Thank you very much!! That does appear to do what I"m looking to do...but wow, I'd never have thought of all those hoops to jump through to do this. I see where you said you need to fill the combined curves in order to make a selection out of them....I see you do it, but I"m confused on why this is a necessary step. This may work for me, the end result IS what I am wanting....it just seems to me that there should be possibly a more straightforward way to do this...but I'll try whatever works!! Thank you very much!! Has AP with latest upgrades given the ability to save a path yet? I know you can save selections which could work...so, maybe I could do this instead as that what I"m actually trying to use this for is to fix the outlines and letters on a street sign....outline the outer band around the sign and the individual letters on the sign....I'd like to be able to do this all as ONE selection, so that I can either paint in there all the same thing, or do the curves to darken the washed out text and lining on the sign to a consistent level... Lemme see if I can clip out the sign and post here for an example... Thank you VERY much for the video and help, this is definitely putting me on the path I need to be on (no pun intended, haha)... C
-
Hi all, I'm coming from using the Photoshop pen tool....and have been watching videos on YOuTube today and finding out the differences that were driving me mad with the AP pen tool. I like it, and love AP....but had to find where the key commands were that were different. At this point I'm a bit stuck. It appears that AP creates a new layer with every pen path you create....what I"m trying to do is select a shape, with an outer curve and an inner curve. Think like a doughnut...one curve for the outer and one for the inner that leads a hole. I want to make a selection like this....and then either fill or mostly likely do a curves adjustment on that area and play with the luminance (I"m selecting around an object in a picture but this is the best way I can think to describe it. I just know I"m missing something here basic but I can't put my finger on it. Can someone give me some hints, or point me towards a HowTo, or a tutorial or video showing this? I think I"m doing well on the basics of the AP pen tool, but this one is stumping me. Thank you in advance, cayenne
-
That's certainly interesting. I'd never known that PS did scanning....but even so, I think I'd still rather depend on a dedicated tool for scanning. I'm presuming scanning film negatives, and there are great tools like Silverfast that are great for scanning film negatives and color positive films (I use it)....tools like these allow you to get in there and "tune" your file before scanning so as to get the best you can from your film media...and do preliminary dust and scratch fixes, etc. If you're just looking at document scanning, well, even then, I'd think the dedicated tool would be best. Not that I have ANYTHING against added functionality of any tool...but in this case, I think its usually one of those cases where "jack of all trades" philosophy doesn't fit as well here as in other cases. Anyway, just my $0.02, cayenne