toltec
-
Posts
3,560 -
Joined
-
Last visited
Everything posted by toltec
-

Moving multiple layers at once
toltec replied to bringmedown's topic in Pre-V2 Archive of Affinity on iPad Questions
Well, I would call that grouping. You can open (or expand) the group to work on individual layers independently at any time, remove them from the group etc. The group/ungroup button is in the layers studio. The middle one that looks a bit like a jigsaw puzzle piece. -
Moving multiple layers at once
toltec replied to bringmedown's topic in Pre-V2 Archive of Affinity on iPad Questions
Not 100% sure what you are asking. You can select multiple layers by selecting one layer (layers studio), then two finger tap on another layer. That selects both layers and all layers in between. By link do you mean group? -
Set it to Alpha, click on Picker, click on the transparent area of the image and drag down. That sets a point on the Graph for you.

-
Erase white paper. Apply a Curves layer set to adjust Alpha. Use that to adjust the transparency to clear your residue. Copy and paste the Curves layer (and any other adjustment layers) into each one of the images. Tweak if needed. Only takes a few seconds for each image.
-
I’m a big Affinity/Serif fan but I agree with that. The trouble is, it’s ultimately bad for the company because the internet means their failures are broadcast to the whole world. Once a customer buys a competing app, they are unlikely ever to be a Serif customer. Serious bugs and user issues should be fixed within days (where feasible) not months. Disgruntled customer vote with their feet (or wallets). Look at how many Adobe customers have bought Affinity products due to their subscription model.
-
Export in Apple Photos
toltec replied to Bianchini Michel's topic in Pre-V2 Archive of Affinity on iPad Questions
If the RAW file is in Photos, you should have no trouble at all. If as @DM1says, your camera is supported. To Import the RAW file, tap on the + sign in the Affinity Photo app home screen and choose ‘Import from Photos’. To save it to Photos as a JPEG, go to the Document menu and tap Export. When the EXPORT panel appears Select JPEG, set the size, quality, filename etc and tap Share (bottom left corner) which will open this panel Tap ‘Save Image’ and that will save it directly to the Apple Photos app as a JPEG.
-
I subtracted the V, then subtracted the 'TIMETABLE' from that. I didn't convert any of the text into curves.
-
A few UI questions
toltec replied to msk's topic in Pre-V2 Archive of Affinity on Desktop Questions (macOS and Windows)
You can change the grey level in Edit > Preferences > User Interface by adjusting this slider There is a shortcut for Preferences Ctrl + , (comma) but not quite as slick as the Photoshop option.
-
To create and export slices. Here's a quick video.
-
I think it's something to do with 'mipmaps' which Affinity uses to render things more quickly. ? If you do a search on the forum, you will find out more.
-
Printer noise is also called Moire. It is basically the dots used in the print haltone process interfering with the scanner.. Use the special FFT Denoise filter to descreen it.
-
Yep, Dutchshader is FAST, he often beats me to it. Or maybe I'm just slow I don't know for sure, but I think it's something to do with all that cream Slagroom or something
-
Indeed. Those Dutch always were fast They often beat us at football too. Damn.
-
Hi @Ulysses It only makes a selection, it won’t fill it. Once you make an outline selection, you have a choice. Go back to the Pixel Persona and in the Layers Studio, tap the + and create a new Fill layer. It will be confined to the selection area only (your outline) Set it to any colour you want. Adjust the Opacity, add noise etc. Because it is a Fill Layer, you can adjust it at any time. Alternatively, for a cruder option, back in the Pixel Persona, select the Flood Fill tool, set the tolerance quite high and flood the inside of the outline. Do make sure it is a pixel layer, not an image layer if you use the Flood Fill Tool, or it fills the whole layer.
-
Damn. Us Brits will have to get faster if we are going to cope outside Europe .
-
Affinity software only ‘saves’ in Affinity format. You need to go File > Export, then you have lots of save formats to choose from. Select PDF then you will be able to set various quality options for printing, etc.
-
Convert text to outlines?
toltec replied to fandy's topic in Pre-V2 Archive of Affinity on iPad Questions
It depends slightly on if you are using Photo or Designer. In Photo, go to the Commands menu ... and Convert to Curves is in there in Designer, the menu is called the Edit menu ... and Convert to Curves is in there (second column). -
Sure. In the Selection Persona, make a selection, choose the Outline Tool and apply the width and alignment settings on the Context Toolbar Dont forget to tap the tick.
-
If they are separate documents, there is not much you can do. However, if you loaded each picture into one Affinity Photo document as a separate layer, you could use the Export Studio and export all the layers as slices. I assume many of them are the same size? You can set a folder on cloud storage as the output destination for the slices. Then it’s just a one click solution to output 20-40 photos (layers) at one time. There is a good Affinity tutorial video that shows this in action. https://affinity.serif.com/en-gb/tutorials/photo/ipad/video/288501904 Note: I just tried and it works fine but, Photo exports the whole layer as a slice. So if you cropped the photo, the bit outside the current canvas is included in the slice, albeit transparent. It would therefore be necessary to rasterise any (outside canvas) images first.
-
If you nest the adjustment layer by dragging it to this position it will only affect that layer (the parent layer). Note: The blue highlighter bar is not full width. A full width bar indicates the layer will move below, not nest.
-
I suggest you watch this video. Although it is about replacing sky, the same technique would work very well for your picture. The main difference being (obviously) that instead of inserting a new, blue sky, you Insert a plain black background. You can do it all on the iPad reasonably easily. If you can find all the tools. If not, just ask
-
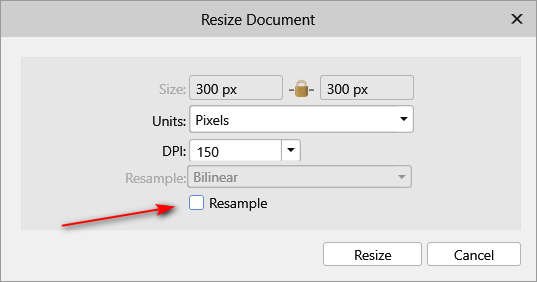
It depends on how you define "Size". The pixel quantity is the same, so the image size (resolution) is the same. If you look at the DPI setting, you will see that each image's DPI setting is different. The DPI setting doesn't really matter, although some programs do use that to physically size the picture when you drop it in to a page. e.g. If you created an Affinity Designer page, set at 300 DPI A 300 DPI image dropped in would be sized at 1 inch, the same image set to 150 DPI would be sized in at 2 inches. If you scaled the 150 DPI image down to 50% the end result (quality wise) would be the same because it then has the same number of pixels in an inch (300). P.S. You can change the pixel setting in Photo so they match. In Document > Resize Document change the DPI but untick Resample or it will change the resolution (pixel quantity).
-
Oh, yes, sorry, missed out the fact you have to press the Spacebar, then the Ctrl key (hold down both), then click drag. That should work with every tool. My bad At my age, I get a bit confused sometimes.
-
You can press the Ctrl key (Windows) and click drag to zoom in or out. It works for a mouse, should work for your pen too? Press Ctrl + Alt, draw a marquee, and it will zoom to that area. EDIT: Forget to mention that unless you have Zoom Tool selected, you have to press the Spacebar, then the Ctrl key (hold both down) then click drag. That should work with every tool.
-
It would be easier to do that with a single Pie shape. Then you get all the benefits of Affinity's dynamic shape editing. Set the Hole radius to make the hole in the centre, then you can drag the red handles to where you want. P.S. I love pie