toltec
-
Posts
3,560 -
Joined
-
Last visited
Everything posted by toltec
-
 I am not sure if you are talking about Photo or Designer ? For Photo, the easiest way is to create a Snapshot of the 'state' you want to return to, or more than one Snapshot. Then its a one click solution to return to it.
 -
I would use the Mesh Warp Tool, but that is a very tough image. Here is a quick attempt at it. It is not quite right in places but I'm not sure if I could get it much better without a lot of effort I'm afraid I don't know of any tutorials for that. Sorry. It just a matter of using the tool, double clicking on the image to set control nodes and moving them around It would probably be better with a bit of a cropping due to the tree on the right. Unless you really want the tree .

-
Pen Brushes Disappeared !!!
toltec replied to AleXanDréaR's topic in Pre-V2 Archive of Affinity on iPad Questions
Hi @AleXandreaR Try installing these. Exported from my copy of Designer. In the burger menu, choose Import. Pens.afbrushes -
I would have to strongly disagree with that. They are normally pretty good but they only work week days, and it is the weekend. And how do you know it is a basic issue?
-
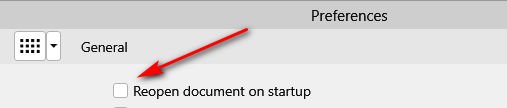
@wordjam Try launching Photo with the Ctrl key held down. Might be an idea to Restart your PC first. When the Clear User Data window appears, leave the first three options ticked, press Clear and see if that works.. If that works, check in Preferences > General. The issue is sometimes caused by Photo trying to open a corrupted document. Untick this if it is set.
-
Er, what extra steps ? I just selected the speedboat from the first image using the selection brush, pressed Copy (Ctrl + C) and pasted (Ctrl + V) it into the second image, selected it with the move tool then I can drag the handles to resize it however I want or just move it. What happens when you do that ?
-
Photo. Designer is much more about managing vector layers and pages with control over vector objects (assets and symbols) Photo has 95% of the drawing features and 200% of the image manipulation features. It also works much more like Photoshop, which you are used to.
-
Ho @Tangot2 As @Dan Csays, its just a matter of copying and pasting. There is a pretty good Serif video that shows this and how to blend the pasted object in. The subject is less 'mobile' than you are but the technique is the same. Hope it helps you
-
It can often be much easier if you set the view mode to Outline. Then you can only select objects by clicking on the lines, not the Fill. As for layers inside layers, you can set ‘Insert inside’, so that new layers you create will automatically be nested inside selected layers. Sub-layers if you like. All of these things can have keyboard shortcuts applied.
-
sI have tried every combination of tapping and pressing, dragging etc but I cannot get this to work. It's easy on the desktop version but instructions make no sense to me on the iPad (or are wrong). Has anybody managed with this? Help !
-
Latest versions
toltec replied to kernowbhoy's topic in Pre-V2 Archive of Affinity on Desktop Questions (macOS and Windows)
BTW 1.6.5.123 is the latest version of Photo -
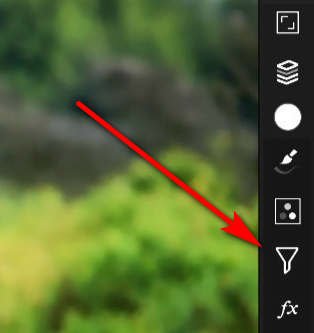
The Overlay Paint Tool is used to make selections. It works a bit like making pixel selections in the Photo Persona where you would paint an overlay on the image to target just that area to apply an adjustment to. Like an exposure adjustment. It is not meant to do anything permanent to the image on its own. As @v_kyrsuggests, you need to use the Photo Persona as there are no drawing tools in the Develop Persona, only adjustment tools.
-
Copy selection...
toltec replied to Phil_rose's topic in Pre-V2 Archive of Affinity on Desktop Questions (macOS and Windows)
What do you mean by a Global change? Apply a global adjustment? If you don't alter the selection area, or make a new one you can deselect then Select > Reselect will Reselect the last area you had selected. -
Copy selection...
toltec replied to Phil_rose's topic in Pre-V2 Archive of Affinity on Desktop Questions (macOS and Windows)
Er, well you do have to do something with the selection you copy. Otherwise it is just in the ether. I find the best option is to press Ctrl + J which puts the selection onto a new layer. You can then edit just that layer and merge it down, or not. -
PHOTO:choosing print rendering intent
toltec replied to keypix's topic in Feedback for Affinity Photo V1 on Desktop
This one ? -
Yes, but if you get lots of warnings, then there is the inevitable warning box where you have to agree to it (sometimes more than one) flashing up before your eyes every time. Have you never used Microsoft products? That really slows things down, so the 2 seconds becomes 4 seconds or 6 seconds every time Not at all productive when you are working on dozens of files No, like @R C-R I much prefer things the way they are. A bit of learning goes a long way and all sophisticated and powerful apps do need a bit of learning.
-
How to save photo edit as LUT or preset?
toltec replied to dansky's topic in Pre-V2 Archive of Affinity on iPad Questions
Hi @dansky If you look in the Document menu (top left, just after the arrow) there is an Export LUT option. There is a video (for the desktop version) but it should work the same. -
import / export layers
toltec replied to kamelelmallah's topic in Pre-V2 Archive of Affinity on iPad Questions
When you tap the Save option (menu below the image thumbnail) it should say ‘saving as xxxyourfile.afphoto. Which will be whatever name you give it and to wherever you set this in Preferences. ‘Default save location’. .afphoto is an Affinity file format and will have all the layers included. Does it say something else when you try? You could change the default save location to iCloud or if it saves to your iPad, you can find the file in the Files app and long-press on it, you will have the option to Move it or Share it. -
Affinity Photo (iOS) - Auto correct?
toltec replied to robertjan88's topic in Pre-V2 Archive of Affinity on iPad Questions
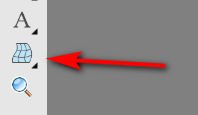
They are all there, in the Filters Studio
-
Remember what ?
-
At our age, I just hope we live long enough to see it
-
If it is easier for you, you can also double click inside the cropping rectangle.
-
You probably pressed the Tab key. Press it again and all will be revealed.
-
Set the number of sides to 6 No video.