rjvela82
-
Posts
138 -
Joined
-
Last visited
Everything posted by rjvela82
-
Mouse Indicator on Vertical Ruler Missing
rjvela82 replied to rjvela82's topic in [ARCHIVE] Publisher beta on macOS threads
Okay here's what happening...
-
Mouse Indicator on Vertical Ruler Missing
rjvela82 replied to rjvela82's topic in [ARCHIVE] Publisher beta on macOS threads
I'm not sure what happened but it came back... -
It's only showing on the top ruler.
-
Column configuration
rjvela82 replied to mschwerer's topic in Feedback for Affinity Publisher V1 on Desktop
Publisher is not going to do column guides at page level because you can only input text in a text frame. Consider making a grid with gutter spacing. -
Dedicated Width Tool
rjvela82 replied to Mauro Villaseñor's topic in Feedback for Affinity Designer V1 on Desktop
@Mauro Villaseñor You mean the Pressure options?
-
Okay yes that works. Thanks
-
Column configuration
rjvela82 replied to mschwerer's topic in Feedback for Affinity Publisher V1 on Desktop
-
Spacing in text is off
rjvela82 replied to someguy's topic in Feedback for Affinity Publisher V1 on Desktop
Put this in the Bug forum and add screenshots step by step.... or a sample file -
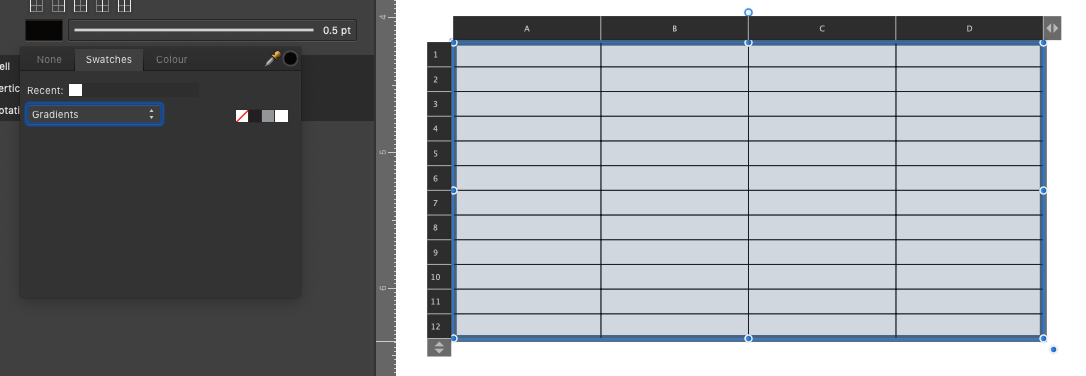
@carl123 Option 3 is an acceptable work-around but I also asked for changing the cell borders from one color to another. The problem is the Gradient Tool has no proper context available for the Cell Stroke. You can select the Table with the Gradient Tool, then in Context, choose Fill or Stroke, then if you choose Stroke, you can only select Text or Frame, so this means there is no option for table cells which could apply the gradients. Gradients do not even appear in Swatches when selecting cell borders because the gradient tool has not context option that can apply to them.
-
@carl123 I'm not asking for rows, to clarify I'm asking for row borders changing from one color to another, can you please how I can do that using the Table properties if no gradient option exists?
-
I wanted to create a table where the fringes of each row faded or changed to a different color.
-
Apple Color Emoji
rjvela82 replied to nautiloda's topic in [ARCHIVE] Publisher beta on macOS threads
Perhaps an asset collection should be put together and shared with the community. -
I could have sworn there was another setting for applying the origin on the ruler to be canvas or margin. If my mind is not playing tricks on me as it often does then the Grid and Snapping Axis settings should be dependent on that setting, or not - just thinking structurally.
-
I figured this was logged already. Tried creating a palette from this image and the results did not seem accurate...
-
@JDW You're Rendering speed my be set to Slowest (High Quality) in Preferences. See what the behavior is in Fastest. (PS. Fastest won't lower your quality if your machine is beefy)
-
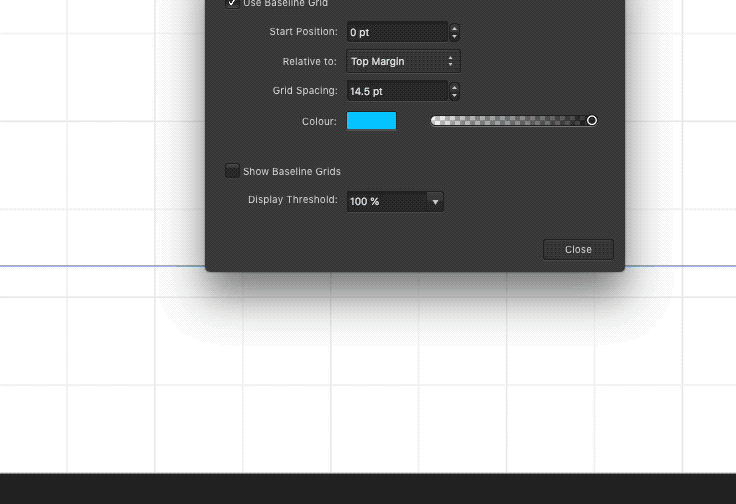
Show Baseline Grids Issue (145)
rjvela82 posted a topic in [ARCHIVE] Publisher beta on macOS threads
Both the flag and the dropdown seem problematic.
-
Enabling Baseline Grid Crashes Publisher
rjvela82 replied to ospear's topic in [ARCHIVE] Publisher beta on macOS threads
Not able to reproduce this on 145 mac. -
How many builds do you think we are before gold master?
-
Improve Gradient Panel **Beggarly**
rjvela82 replied to rjvela82's topic in Feedback for Affinity Designer V1 on Desktop
Thanks! And also thanks for tip on the gradient tool. -
This has been bugging me for a long time. The Gradient Panel's extreme edges cannot be deleted. My request is not to delete them, but to replace them with the next available color if it detects at least 1 node in addition to the opposite extreme node. This would work for both left and right extreme nodes. Let's consider the workflow as it is today: 1. A decision is made to replace Red with the color Purple. If the Gradient panel were smart enough to allow me to Delete red if it detects an existing color between itself and the left extreme, then it would automatically position purple as the New gradient at the far left. That's all it would take to accomplish my goal. However let's continue with the steps required to make this happen.... 2. When I switch to Purple. There is no immediate way for me to make the change. However using my brain, I think "let me try to use the color picker over the purple note to get the color" -- No, the color picker only works with elements in the workspace. This means that I have to take the unwieldy step to position my current workspace so that I'm able to get the color. This involves possibly zooming and moving scrollbars (which automatically close the Gradient panel), so I have to repeat Step 2 from the beginning once I have the color in sight. After which I have to then spend time trying to get the exact color from the element. Granted, I do not need to take these steps because all I need to do is acquire the RGB value from purple and type into Red. I get that but I'm trying to cut corners and I'm demonstrating how these simple changes could improve usability. 3. So now its time to get the color. But Oh wait, I'm in color wheel which I prefer using especially in experimental occasions. I need to take further steps to change the Color tool. 4. I have changed the color tool to get the values. At this point I have to remember the values or write them down. 5. I have finally applied the same color values to the extreme left. 6. I can now Delete the old purple. GOD FORBID I CHANGE MY MIND AGAIN. I am using all caps light heartedly, but in my head that's the volume I use and it just chokes me out. I just don't want to bother experimenting finding good color schemes when I have to deal with this workflow. I have presumed for a long time, "I can't be the only one suffering with this thing, surely someone has already complained about it and they will enhance" but I can't wait anymore so I posted today. One final note, Copy on the Right extreme should work. There should be no reason it shouldn't. Just insert an extra node between itself and the next node at 50%. Why is that crazy enough to not be working already?
-
Can´t arrange pages
rjvela82 replied to mschwerer's topic in Feedback for Affinity Publisher V1 on Desktop
I also couldnt reproduce any bug when I tried to move pages. -
Table of Contents UI Bug
rjvela82 replied to rjvela82's topic in [ARCHIVE] Publisher beta on macOS threads
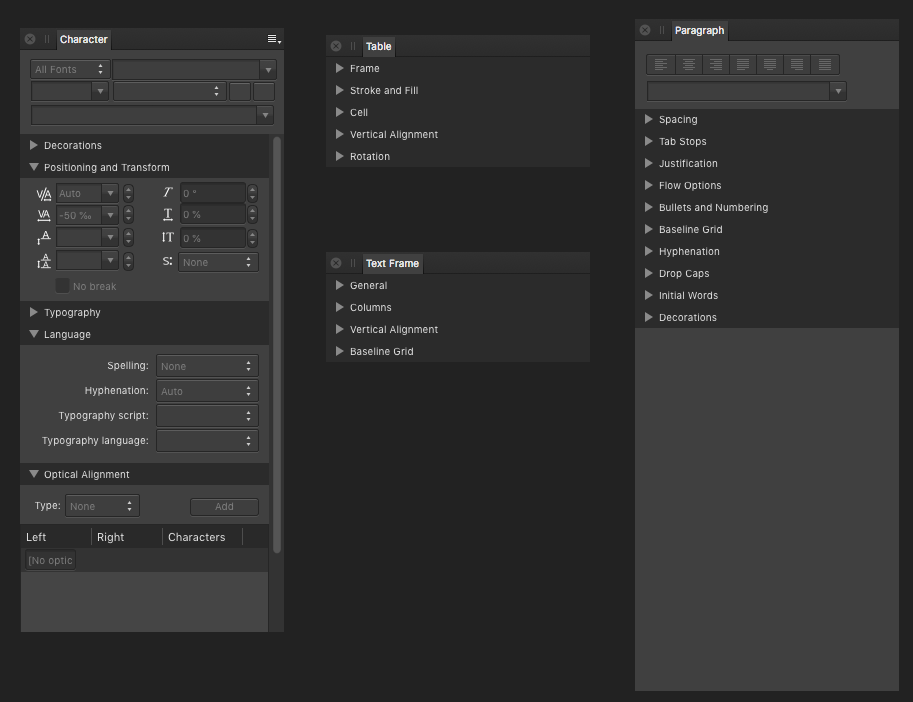
Okay I reproduced it. Collapse either the Table or Text Frame Panel, and drag the TOC into one of these and the bug will happen. After restarting the app I noticed, there was nothing wrong with the TOC. Then I remembered... I recently reported here that these two panels (Table and Text Frame) are not scrollable and they should be since its a jarring experience in the workspace when opening and collapsing the accordions. I figured let me try to drag the TOC into these panels. Sure enough it happened. As you can see, dragging the TOC back out by itself doesn't fix the UI bug. You have to restart Publisher for it to fix itself.
-
Double clicking anywhere in the light grey areas of this studio will cause the app to crash. I've went ahead and tried to reproduce with similar areas in other studio panels and could not get another crash.
-
I just realized that these panels are the same ones I referenced in a similar post here:
-
Hey @MEB Speaking of confusing menus. I noticed the Table and Text Frame panels are not scrollable. In other words when collapsing the accordions they shrink the panel size. This causes alot of erratic changes to my workspace. Can you please submit to dev to make them scrollable like Character and Paragraph panels which stay in place no matter what accordions I open or close.