Rob123456789
-
Posts
64 -
Joined
-
Last visited
Everything posted by Rob123456789
-
Hi. I already own Affinity Photo and Designer, but wondered if its possible to purchase it as a gift for someone else, and ideally before the 14th when the discout/offer expires. Is it possible to buy it now somehow and give the person a download code at Christmas?
-
Communication and Secrecy at Serif
Rob123456789 replied to Corgi's topic in Feedback for the Affinity V2 Suite of Products
Roadmaps are useful to me. If I know software developers are planning on adding features important to me, I'll invest in learning that software, knowing that it'll come soon, and make-do with opensource alternatives for things like vector trace or envelope distort while I wait, before moving my entire workflow in to Affinity. If a feature I want isn't on the road-map, it makes me question why would I waste time learning that software when I can spend my time learning and mastering software that does what I need it to. -
On Windows, can I download and install V2 Photo and Designer to evaluate them whilst still having V1 installed? If not, will my preferences be remembered for V1 if I have to uninstall it and then revert back to it?
-
Cheers for the explanation - I didn't realise that Artboards behaved this way
-
I have never used artboards, all my documents consist of shapes that are drawn on layers in the main document area. When I create an artboard with the artboard tool, I can draw it over my document, or I can draw it outside of the existing document and shapes. After drawing it, it appears as a separate 'artboard' layer in the layers panel. I decided I didn't want to use the artboard, so I right clicked it in the layers panel and choose 'delete'. After deleting the empty artboard, my entire document disappears from view and the window area goes grey, except for a white rectangle where the deleted artboard use to be and the contents that overlapped with it. My layers are still there in the layers panel, as I only deleted the empty 'artboard' layer, and I can select them with the arrow tool, but this only shows their outline. The only way to get out of this situation is to close my document without saving changes. This problem occurs both when my Renderer is set to WARP, or my GPU (RTX 2080Ti) garden design.afdesign

-
Please consider allowing the positive direction of the horizontal and vertical rulers to be swapped independently. For example when you start with a canvas and the ruler origin is in the top left corner, the horizontal ruler is positive going to the right, and the vertical ruler is positive going down. Now consider that you move the origin to the bottom left of the canvas, it would be handy to have the vertical ruler show positive values going upwards instead of downwards. Similar to when you plot a graph with X and Y coordinates; the positive axis go to the right and up, and the negative axis go down and to the left.
-
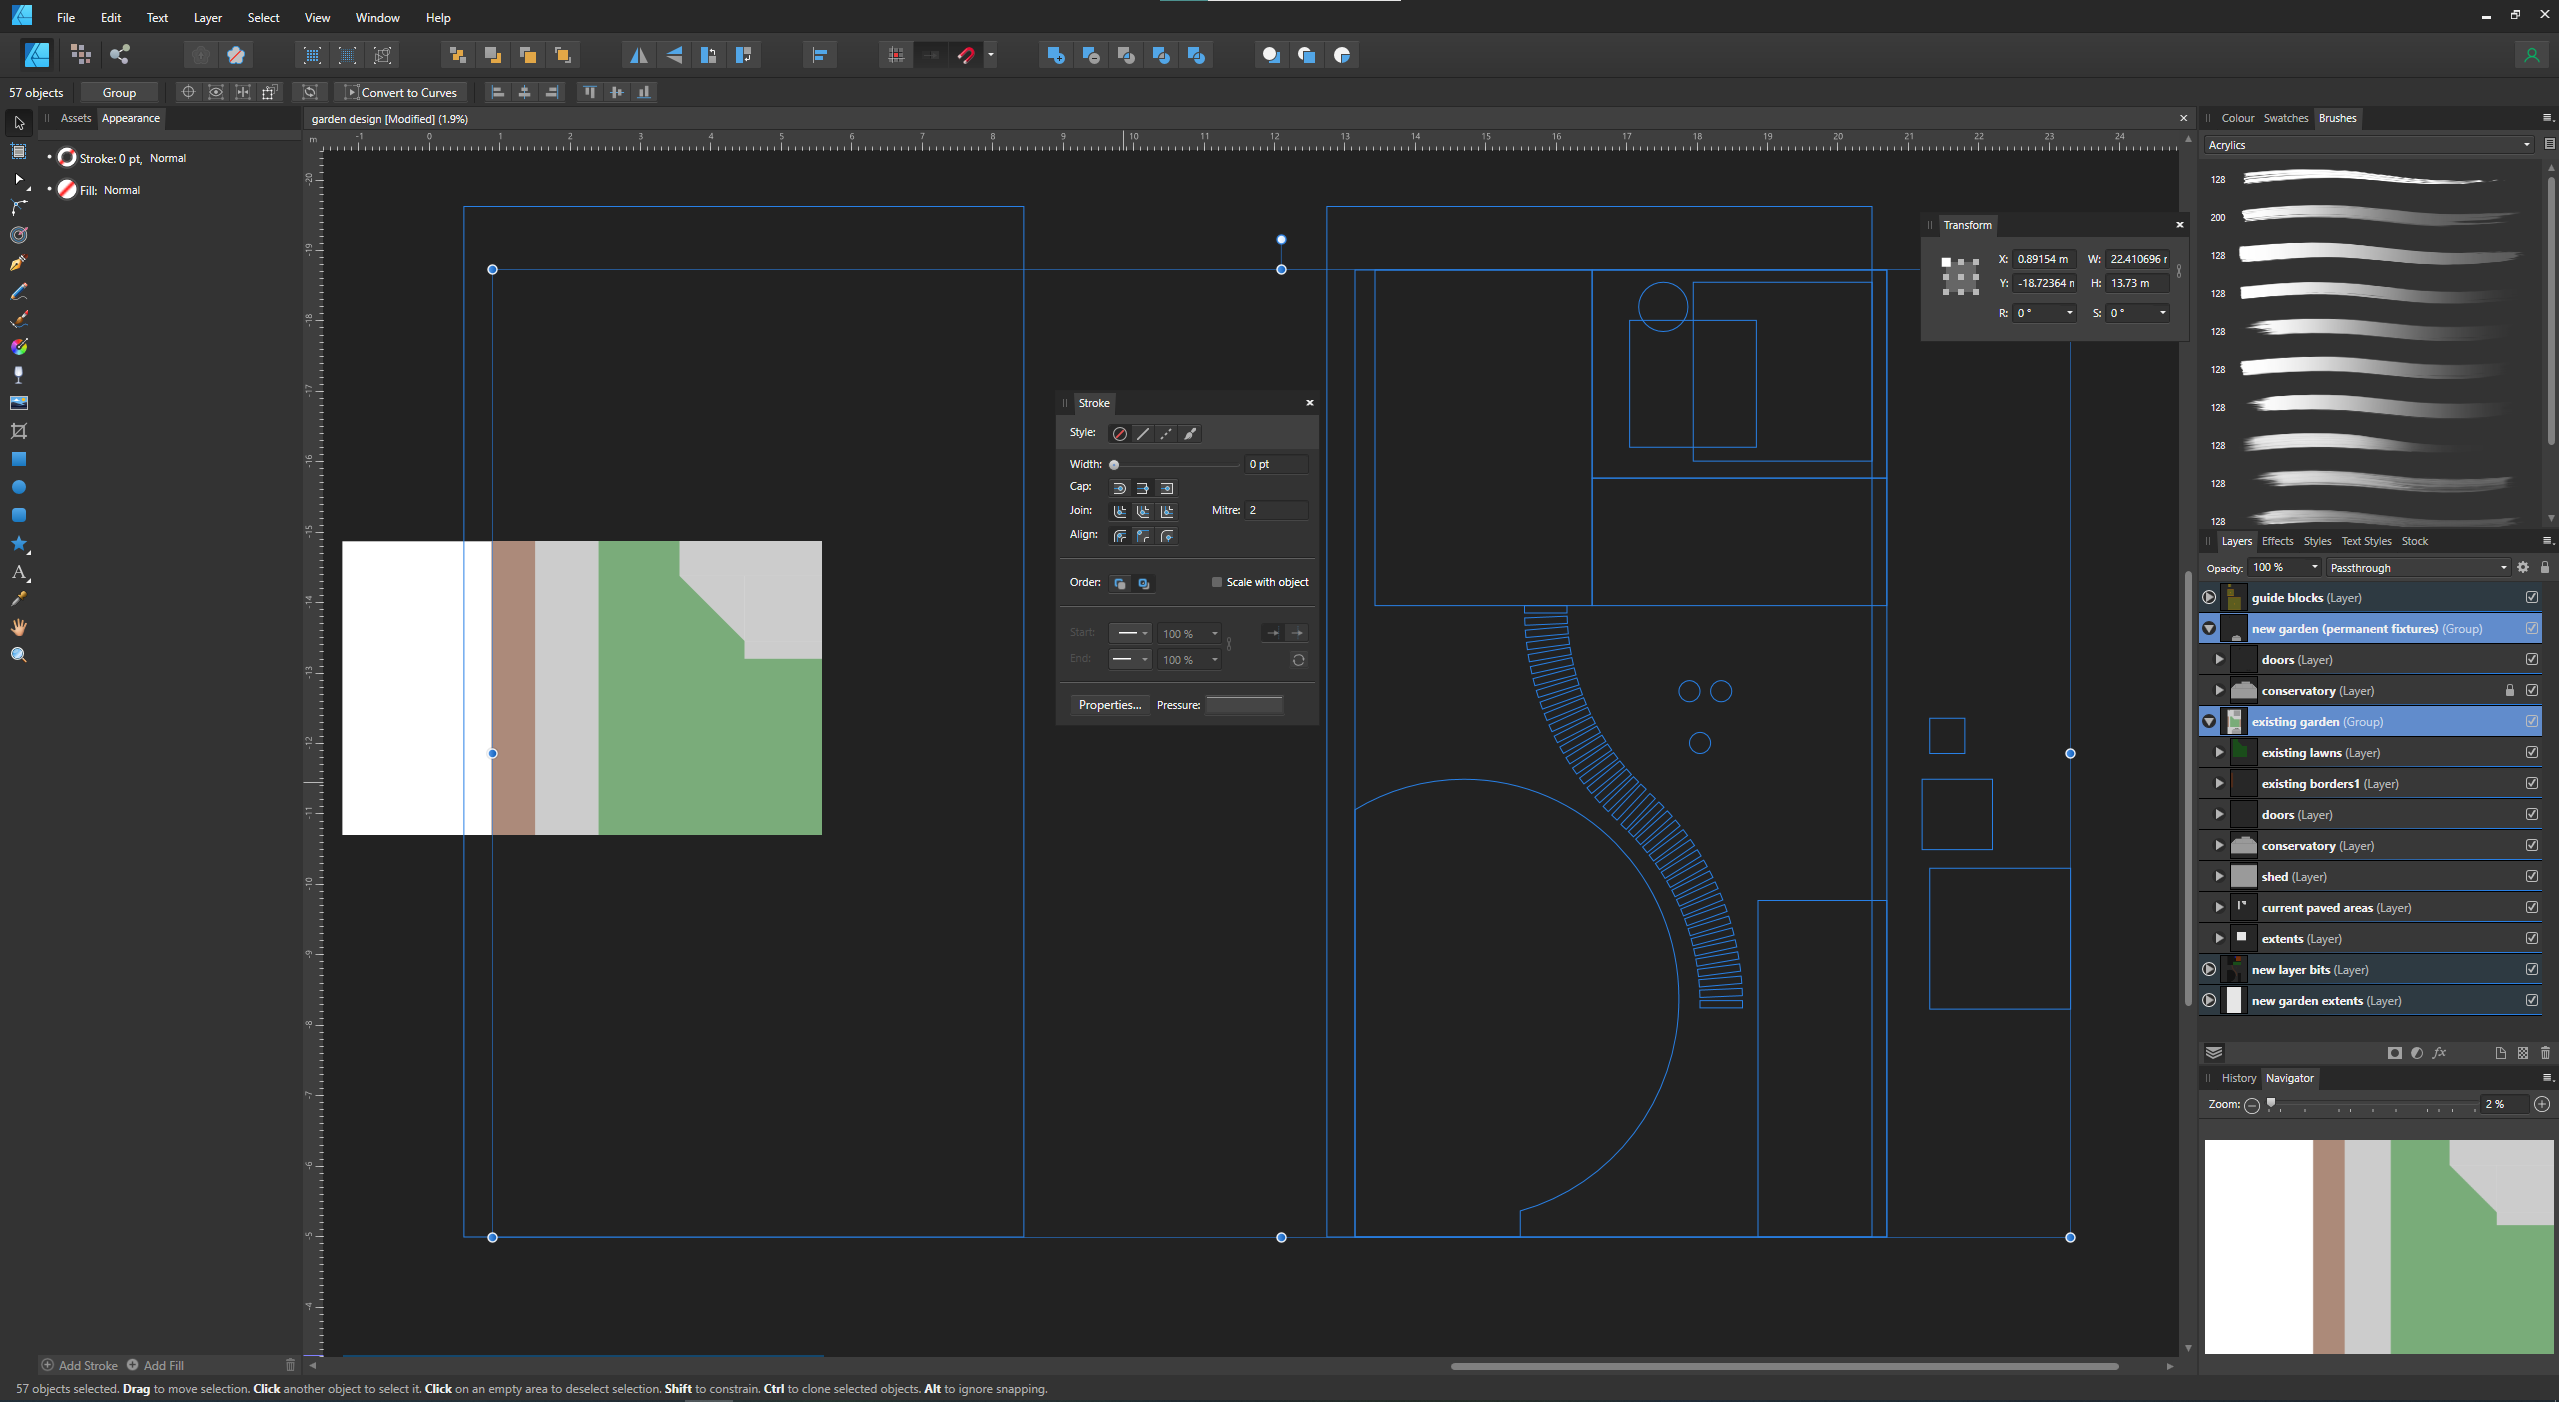
I want to use Designer to design a layout for my garden. The garden is about 8 meters wide by 15 meters long. Is there any problems with creating a document so big? I am not planning on exporting it to a raster image - and can leave the default resolution at 72ppi. Would it be better to set my document to 8 x 15 cm and just divide all my measurements by 100? So that 1m becomes 1cm in the document? I just don't want to get so far in and find that performance becomes sluggish.
-
Both Photo and Designer (I don't use Publisher to check) have a new "My Account" button that allows you to view and manage your purchases. As an example, with Photo 1.9 I can log in with my account in and see the new free resources, and all previous ones I purchased: - 20 Fog Overlays by Paper Farms - 20 Rain Overlas by Paper Farms etc... I downloaded all of them using the "My Account" feature in Photo. Now, when I switch to the "My Account" feature from Designer, they are not listed as installed, instead I have to download them a second time. (1) Where are the assets stored once downloaded? There is no mention within the window, and I cannot find them by browsing to C:\Program Files\Affinity\... (2) Are the assets stored separately, as opposed to a 'shared' resource? Or is this a bug in the "My account" window
-
Hi Cayenne. As John mentions just after your post - these programs provide a means to 'hook' in to the scanner functionality by using TWAIN or WIA drivers. For example in Photoshop you go to File > Import > WIA... and then it calls up the scanner driver/interface, you perform your san and it imports in to Photoshop as a new canvas. At this point the file is not saved, but you can edit it (if required) and then save or export it as desired. I'm sure it isn't THAT much effort to provide this, especially given the fact that their legacy product Serif PhotoPlus has the ability to do it via File>Import>Acquire.
-
That is incredibly disappointing to hear that this isn't a consideration. Most other software including The GIMP, Corel Paint Shop Pro, and Photoshop all provide this functionality.
-
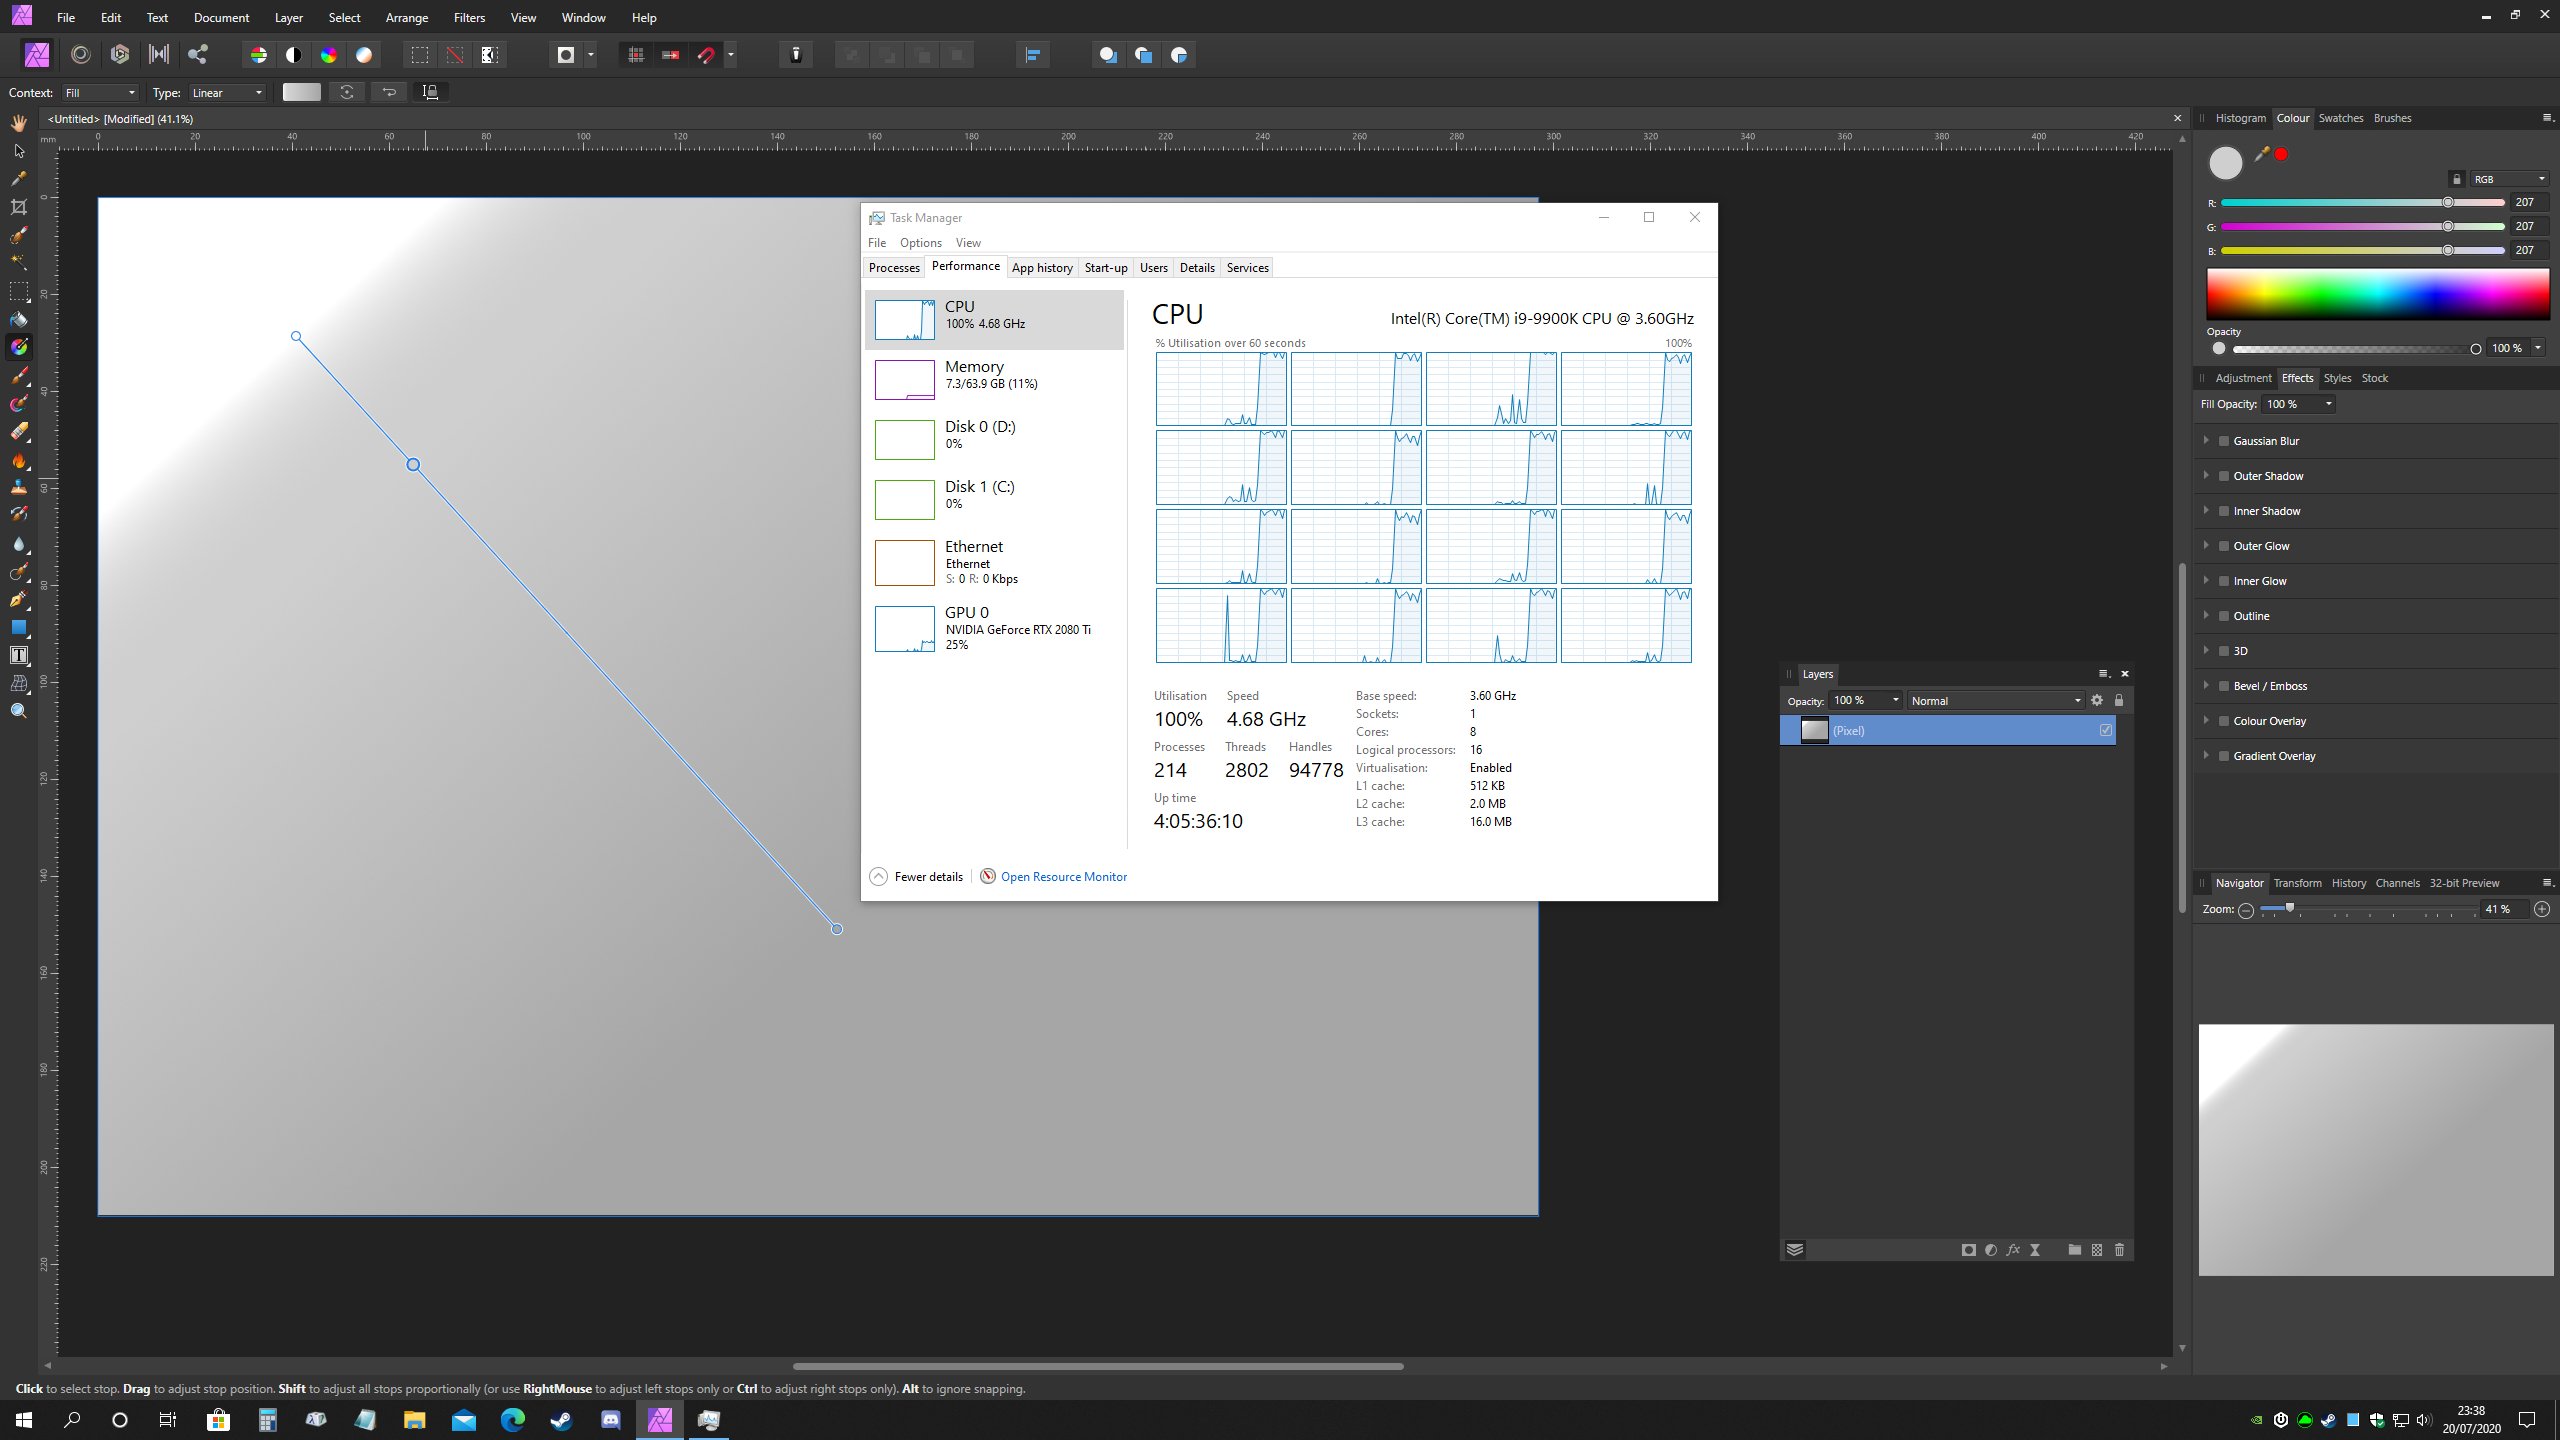
I tried some of the suggestions on the link, unfortunately they did not help, the CPU still jumps to 100% usage regardless of: * Setting Ram usage to max, or lower than half (32 gb) - no difference in performance * Setting the display to "WARP" performance was worse. *Changing view quality down to Nearest Neighbour - no difference in performance
-
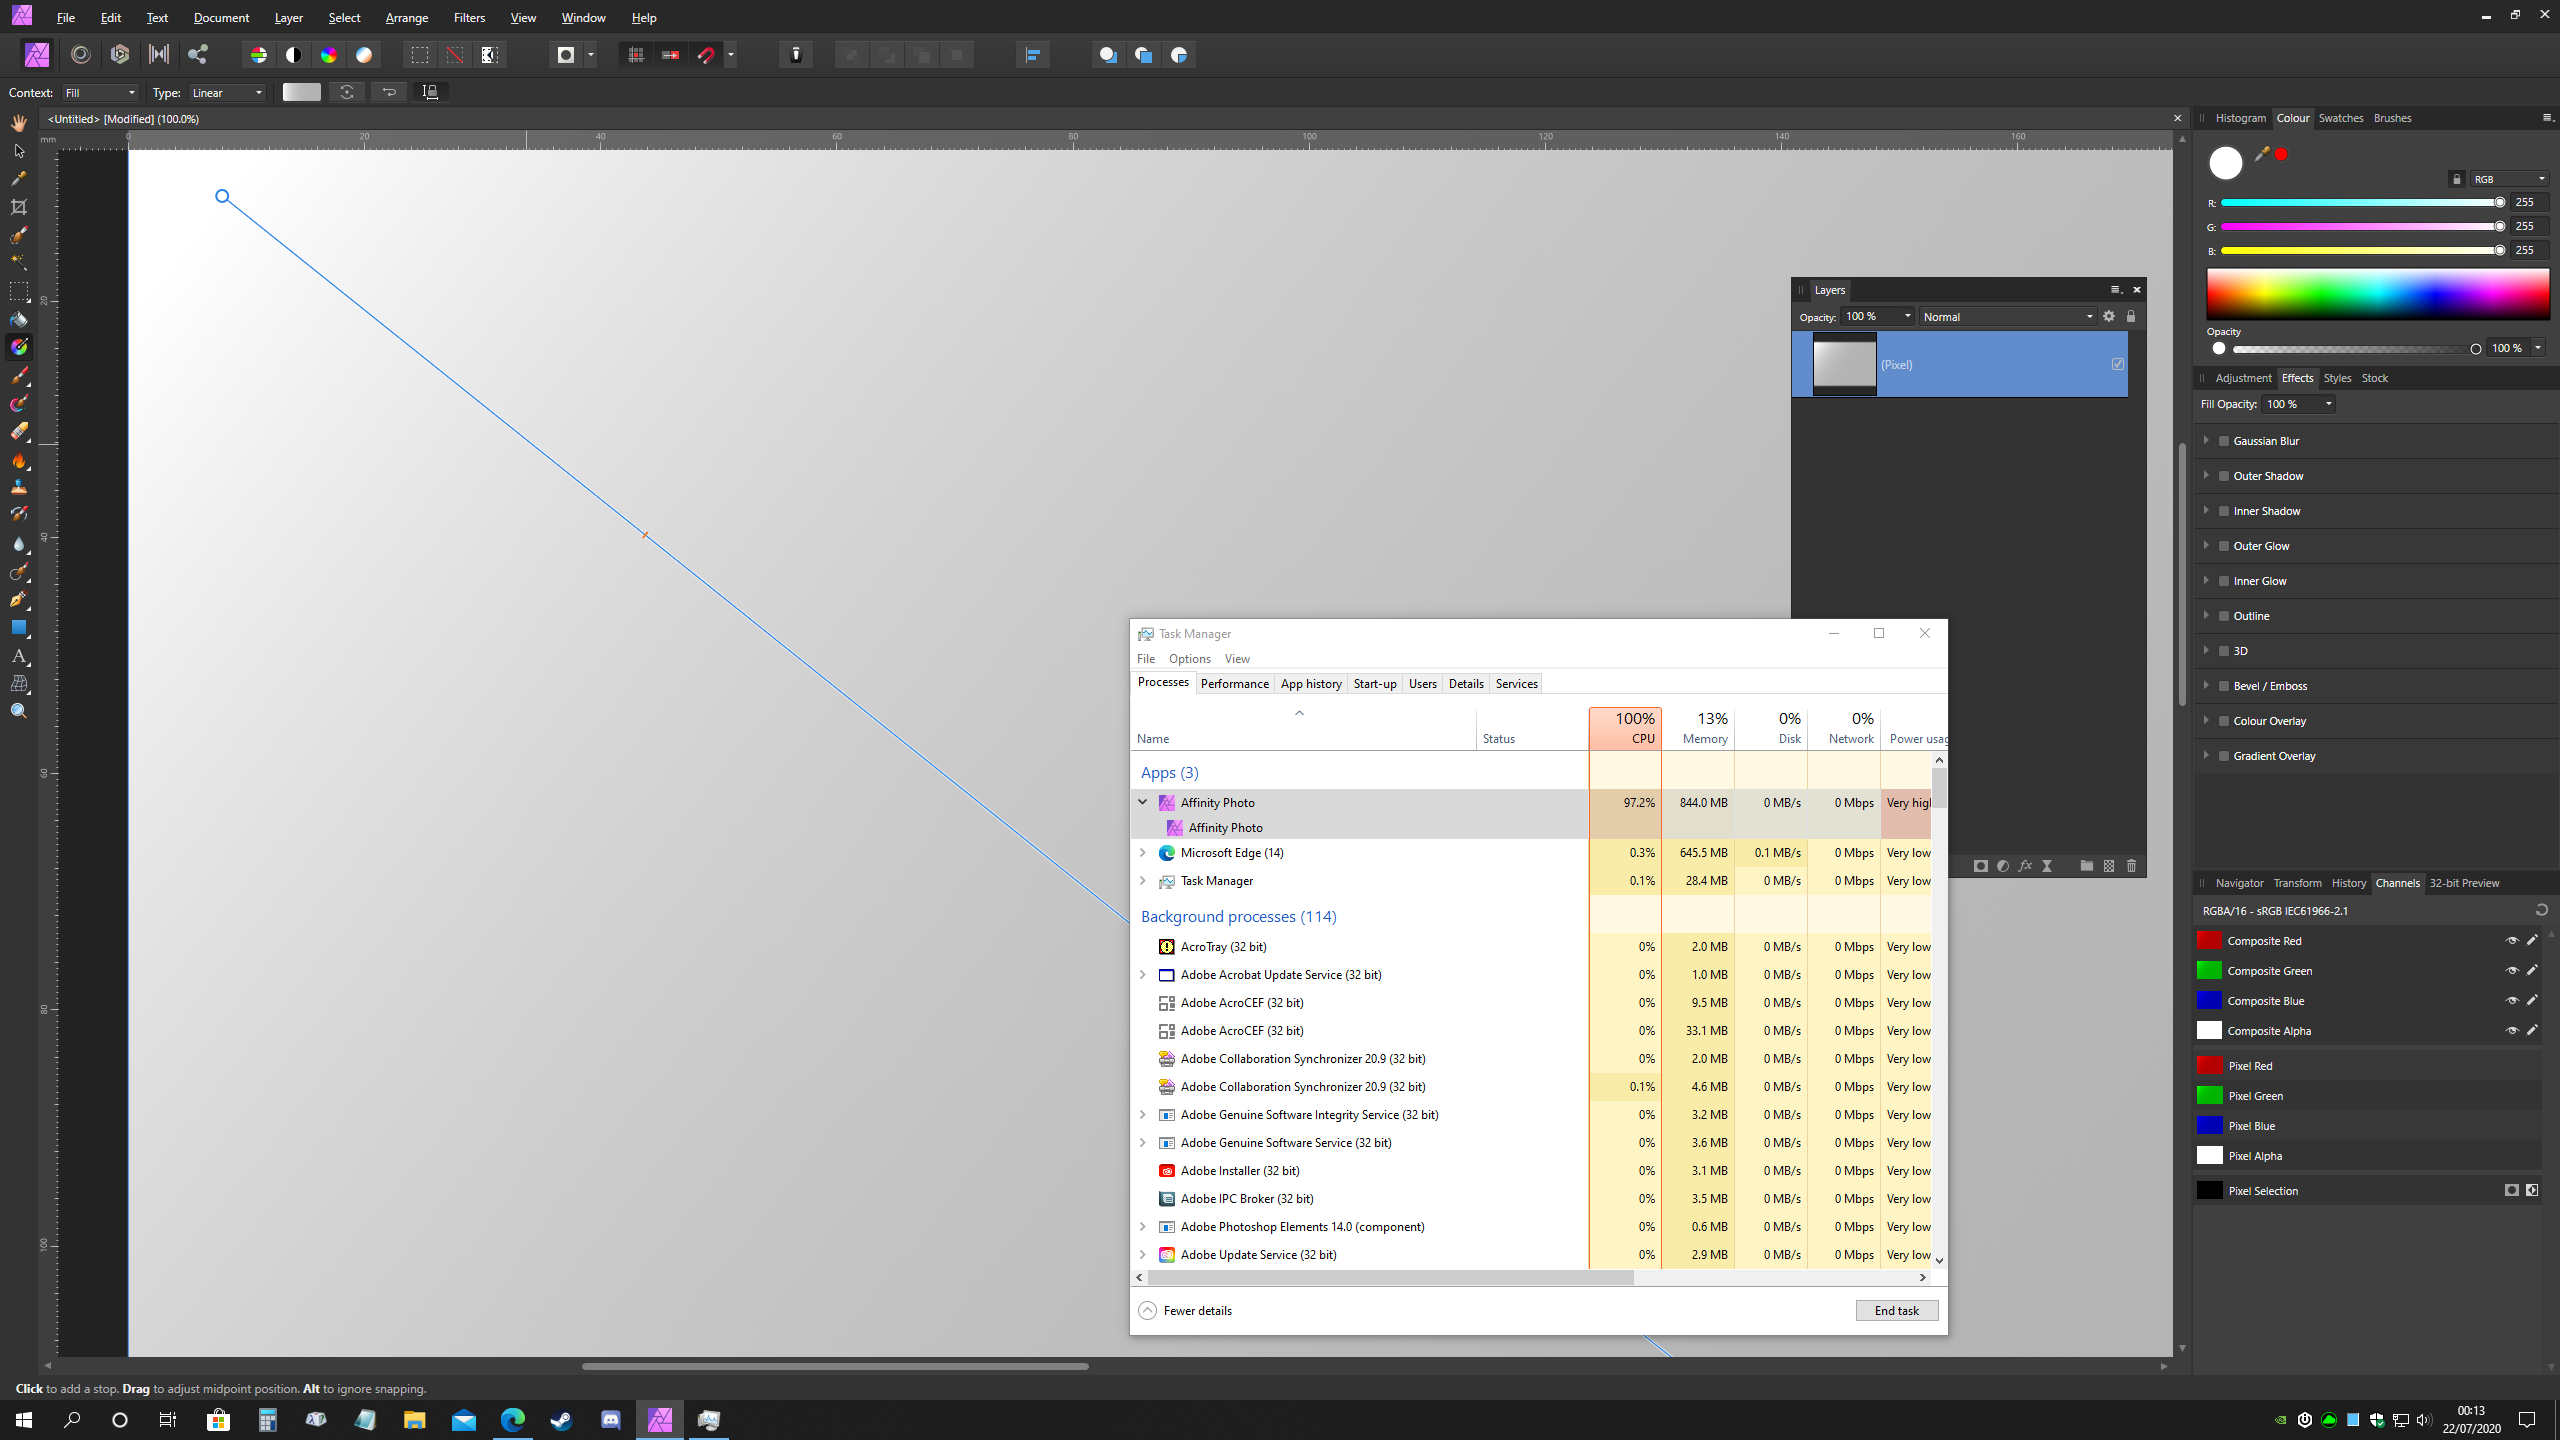
...and here is a screenshot showing Task Manager which shows it's Affinity Photo taking over 97% of the CPU, and 'high power usage'. I have the most up-to-date drivers for my GPU, and Windows Update says it's up-to-date (no updates available). Malwarebytes didn't find anything, and neither did Windows Defender. It's definitely Affinity Photo as this screenshot shows - and as soon as I stop dragging the gradient mid point and let go of the mouse the CPU usage drops to less than 3%. Then if I drag it again the CPU spikes to 100%. Even My browser with 14 tabs open in the background is only using 0.3%.
-
Hello here is the screenshot of preferences.
-
I've noticed that I am getting 100% CPU usage on seemingly basic tasks in Affinity Photo. Take this as an example (screenshot below with task manager open - notice the spike in CPU which is when I click and hold on the mid point of the gradient to adjust it). (1) Create a new document that is: A4 size, 300dpi, 16-bit RGB (2) Create a single pixel layer (3) Use the linear gradient tool to draw a gradient on the document that goes from white to any other colour (4) drag the handle that controls the mid-point of the gradient While holding down the mouse button and dragging the mid-point slowly from one end to the other, my CPU shoots up to 100% of all 16 cores, and case fans ramp up to full speed (which is pretty loud, and what caused me to notice the 'issue' - other programs rarely use all the CPU to 100%, and certainly not all 16 cores) I'm confused why this is happening, is it normal? Does anyone else get this? I already have GPU acceleration enabled so not sure why such a seemingly basic task is getting put on to the CPU and hogging all of the CPU? My PC specs are: Windows 10 64-bit Intel i9-9900k (8 cores, 16 threads) 64Gb DDR4 3200MHz ram nVidia RTX 2080 ti (11GB VRAM) Samsung 970 1GB m.2 nVME (Windows and Affinity Photo installed on here) Seagate Barracuda 2TB SSD (Used to save documents and photos)
-
White line at the very bottom of document
Rob123456789 replied to bia lyssa's topic in V1 Bugs found on Windows
I am unable to replicate this. I tried starting from a new "Letter" sized document 11 inches by 8.5 inches at 300 dpi. I drew a rectangle and snapped the edges to the edges of the document bounds. When exporting to PNG I do not get the line. Suggestions: (1) Try adjust the snap settings in the toolbar at the top to see if they make a difference - check if "force pixel alignment" is on, and "move by whole pixels". (2) If you are looking at your PNG file in Affinity Photo - there is a display bug where it does not draw the edges of the image correctly depending on the 'zoom' level. Try zooming in to make sure it is still there and not a display bug. (3) Upload the file here so others can take a look at the file to see if they can figure out the issue -
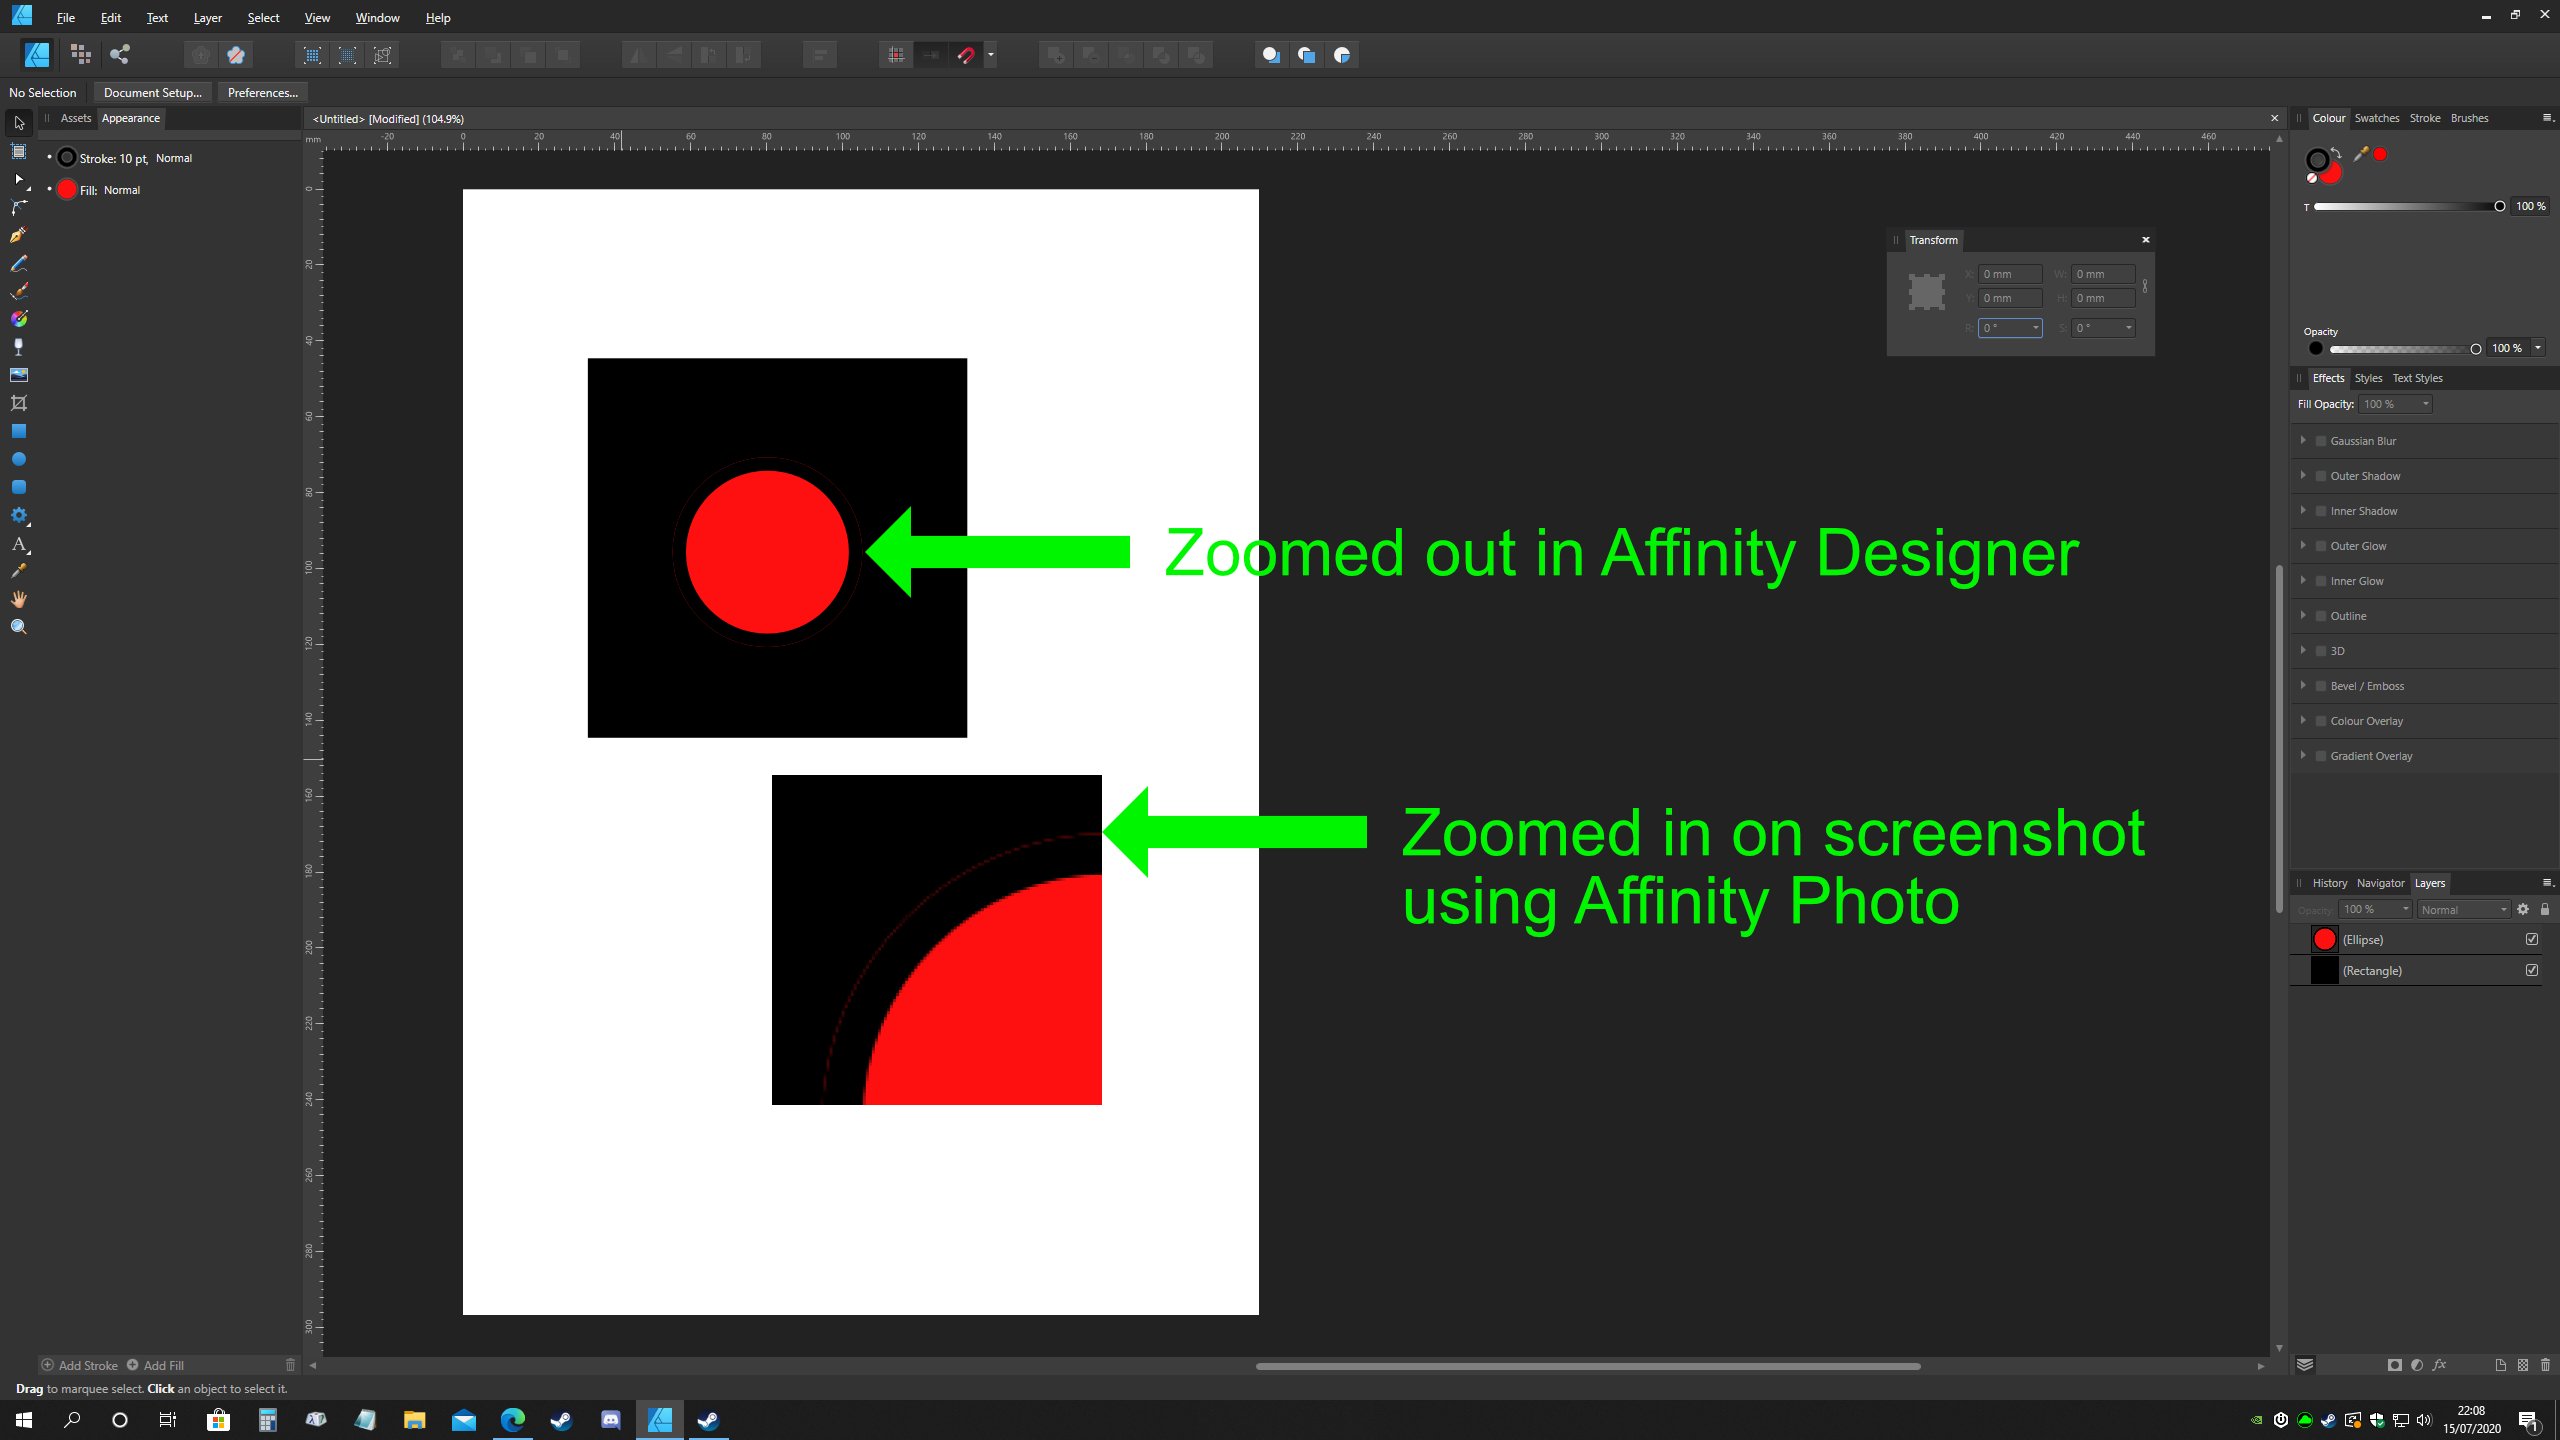
Strokes that are aligned to the inside of shapes/paths allow the shape fill to extend beyond them, instead of having the exact same edge. To replicate this bug in Affinity Designer 1.8.3.641 on Windows 10... (1) Create a new A4 document with white background (not transparent) (2) Use the rectangle tool and create a rectangle 100mm by 100mm anywhere on the document. (3) Fill the rectangle with black, no stroke is necessary for this (4) Now use the ellipse tool and create a circle 50mm by 50mm, filled with red, and place it on top of the black square and roughly in the centre (5) Give the circle a black stroke 10 points thick (6) Align the stroke on the circle to the 'inside' There is the problem. The red background fill extends beyond the stroke by what looks like 1 pixel on screen. Zoom in and it stays the same with - it just always shows the background fill a tiny bit outside of the stroke area. This appears to be some kind of anti-aliasing problem, where the edges of the background fill are calculated differently to the edges of the stroke.
-
I have downloaded the free "iconic templates" for designer, but every file that I open comes up with warning about missing fonts. After a few seconds the warning dissappears. 1) How can I check/view the names of all missing fonts in the files that I open once the warning message dissappears? 2) If anyone from Affinity is reading this, or anyone who also downloaded the examples - where can I buy / download the missing fonts from?
-
This does exactly what I was after, thank you. Nice gif / screen capture too - that was a very helpful demo!
-
In Affinity Designer 1.7.1 - I have used "Print Screen" on they keyboard to capture my desktop, then pasted the image in to my document. I've used the 'vector crop' tool to isolate just the portion I want. Now how to I discard the cropped areas? What I mean is, Affinity 'remembers' the entire image so that if I want to change the crop area it hasn't lost the original complete pasted image. I want to force it to forget these extra unwanted pixels so that it takes up less file size. Is this possible?
-
Sneak peeks for 1.7
Rob123456789 replied to Ben's topic in Feedback for the V1 Affinity Suite of Products
Any update on these features? Also, the video links no longer work. -
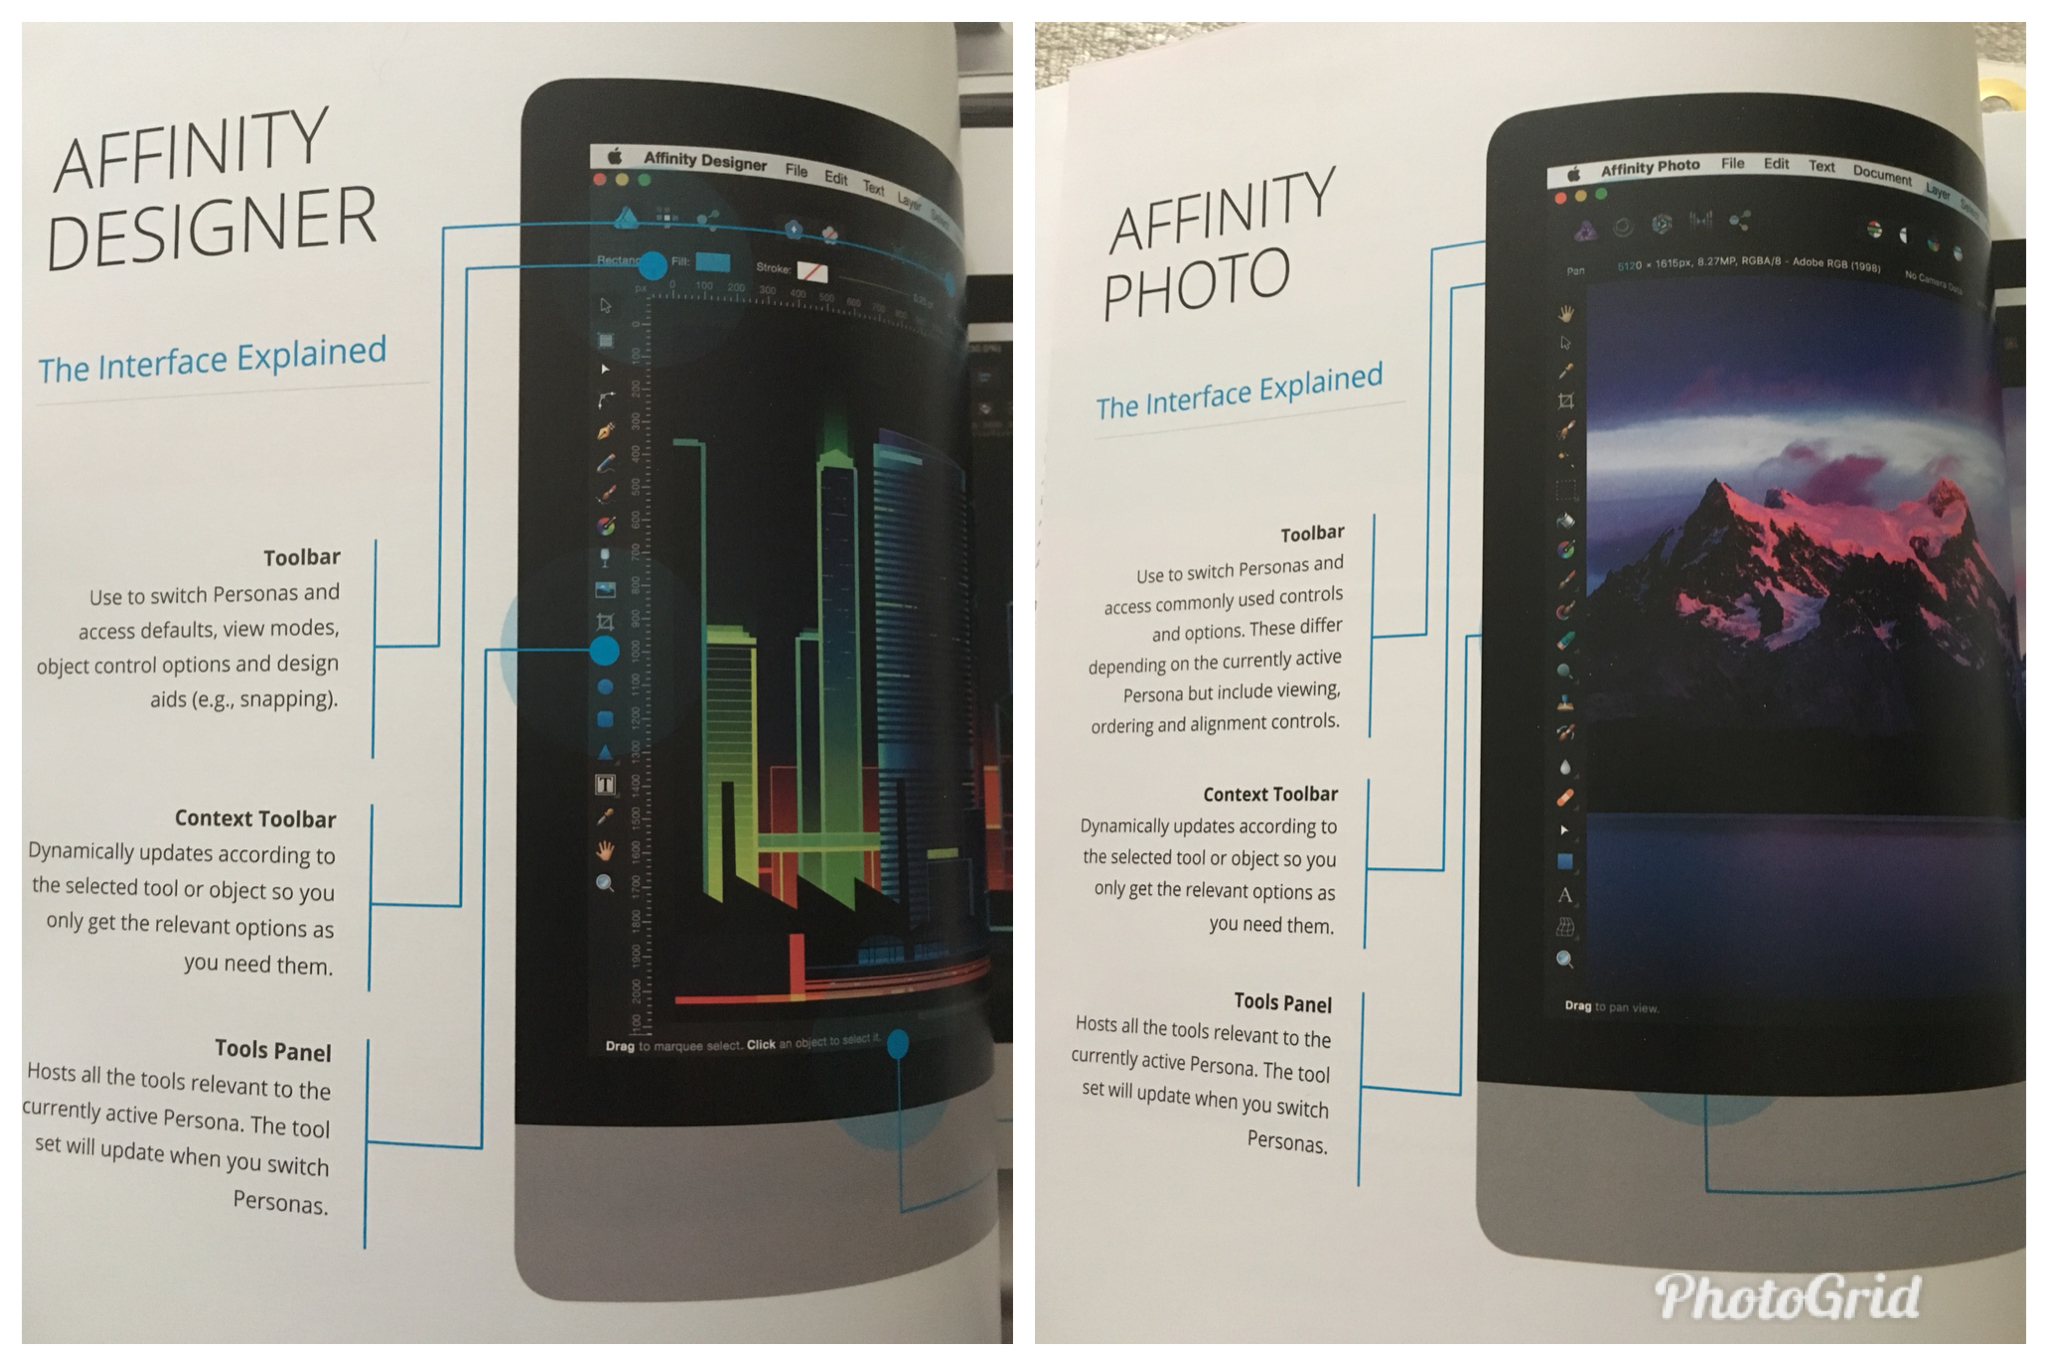
Photo Workbook Print Qualty
Rob123456789 posted a topic in Customer Service, Accounts and Purchasing
Anyone else have a print quality with their Affinity Photo Workbook? I have both Designer and Photo one and noticed that all the diagrams in the Photo version, where there should be a blue line/arrow pointing out specific parts of the interface, it dissappears as if the blank ink has overprinted it. The Designer workbook (left) does not have this problem).
-
I'd also like to know as I currently use a 1080p monitor and am looking to either a 4k screen or a multiple monitor setup. Yorkshire Lad - what screen size if your monitor? e.g. 28 inch? Could the interface be too small because of the physical size of the screen?
-
Please don’t do it as another persona. Personas are a really jarring experience and having to switch to a new layout just to use a specific tool is frustrating. Why can’t it just be done so that it works in the currently selected layer? If I want to trace multiple layers I can merge them first. Much more intuitive.
-
Circles, Lines and Tangents
Rob123456789 replied to Rob123456789's topic in Older Feedback & Suggestion Posts
TANGENT: A straight line or plane that touches a curve or curved surface at a point, but if extended does not cross it at that point. -
I do love Designer and Photo and I am now looking for more precision so with that in mind please look at the accuracy of your program - with regards to the following: 1) When using the pen tool and snapping to a curve, if I zoom in using the super zooming ability of Designer, at a high enough zoom level the snapped node is actually not touching the curve at all. 2) Please allow me to specify more than 1 decimal place on all text and paragraphs properties I.e. leaning, font size, kerning, character spacing... when designing text to fit an exact area, it is very useful to bring back a single word orphan/widow by adjusting by 0.000001 without having to stretch the text box and distort the text. It may sound extreme but this kind of accuracy can be useful. You should definitely consider this on your up coming Publisher / InDesign alternative. 3) Allow us to snap to the ‘notches’ on the rulers like in Photoshop when you hold shift 4) Allow us to choose which rotation angles to snap to when using the rotation tools. An option in the preferences window to manage it would be great :-)