rusty5
-
Posts
44 -
Joined
-
Last visited
Everything posted by rusty5
-
Clip to Canvas in Affinity Photo
rusty5 replied to rusty5's topic in Feedback for Affinity Photo V1 on Desktop
I already spend most of my time in Designer and Publisher. The only reason I created a post in the "Feature Requests & Suggestions" section is to encourage the folks at Serif to consider providing the same functionality to Photo that already exists in their other two companion apps : ) -
Clip to Canvas in Affinity Photo
rusty5 replied to rusty5's topic in Feedback for Affinity Photo V1 on Desktop
I'm not sure I would agree (but acknowledge a high probabllity that I could be wrong). I'm guessing most often a document is started with a very specific size or resolution in mind. The mere fact that Photo allows you to Clip Canvas or Unclip Canvas suggests to me that the Document and the Canvas are two distinct entities. Personally I like to play with objects moving them in and out of a picture, therefore it would be nice to be able to see those objects on the canvas while also working on the document. However, I'll be the first to admit I'm not a professional image editor so my work flow may be a bit unique. Bottom line, I'd still like to see Clip to Canvas implemented into Photo the same way it's set up in Designer and Publisher : ) -
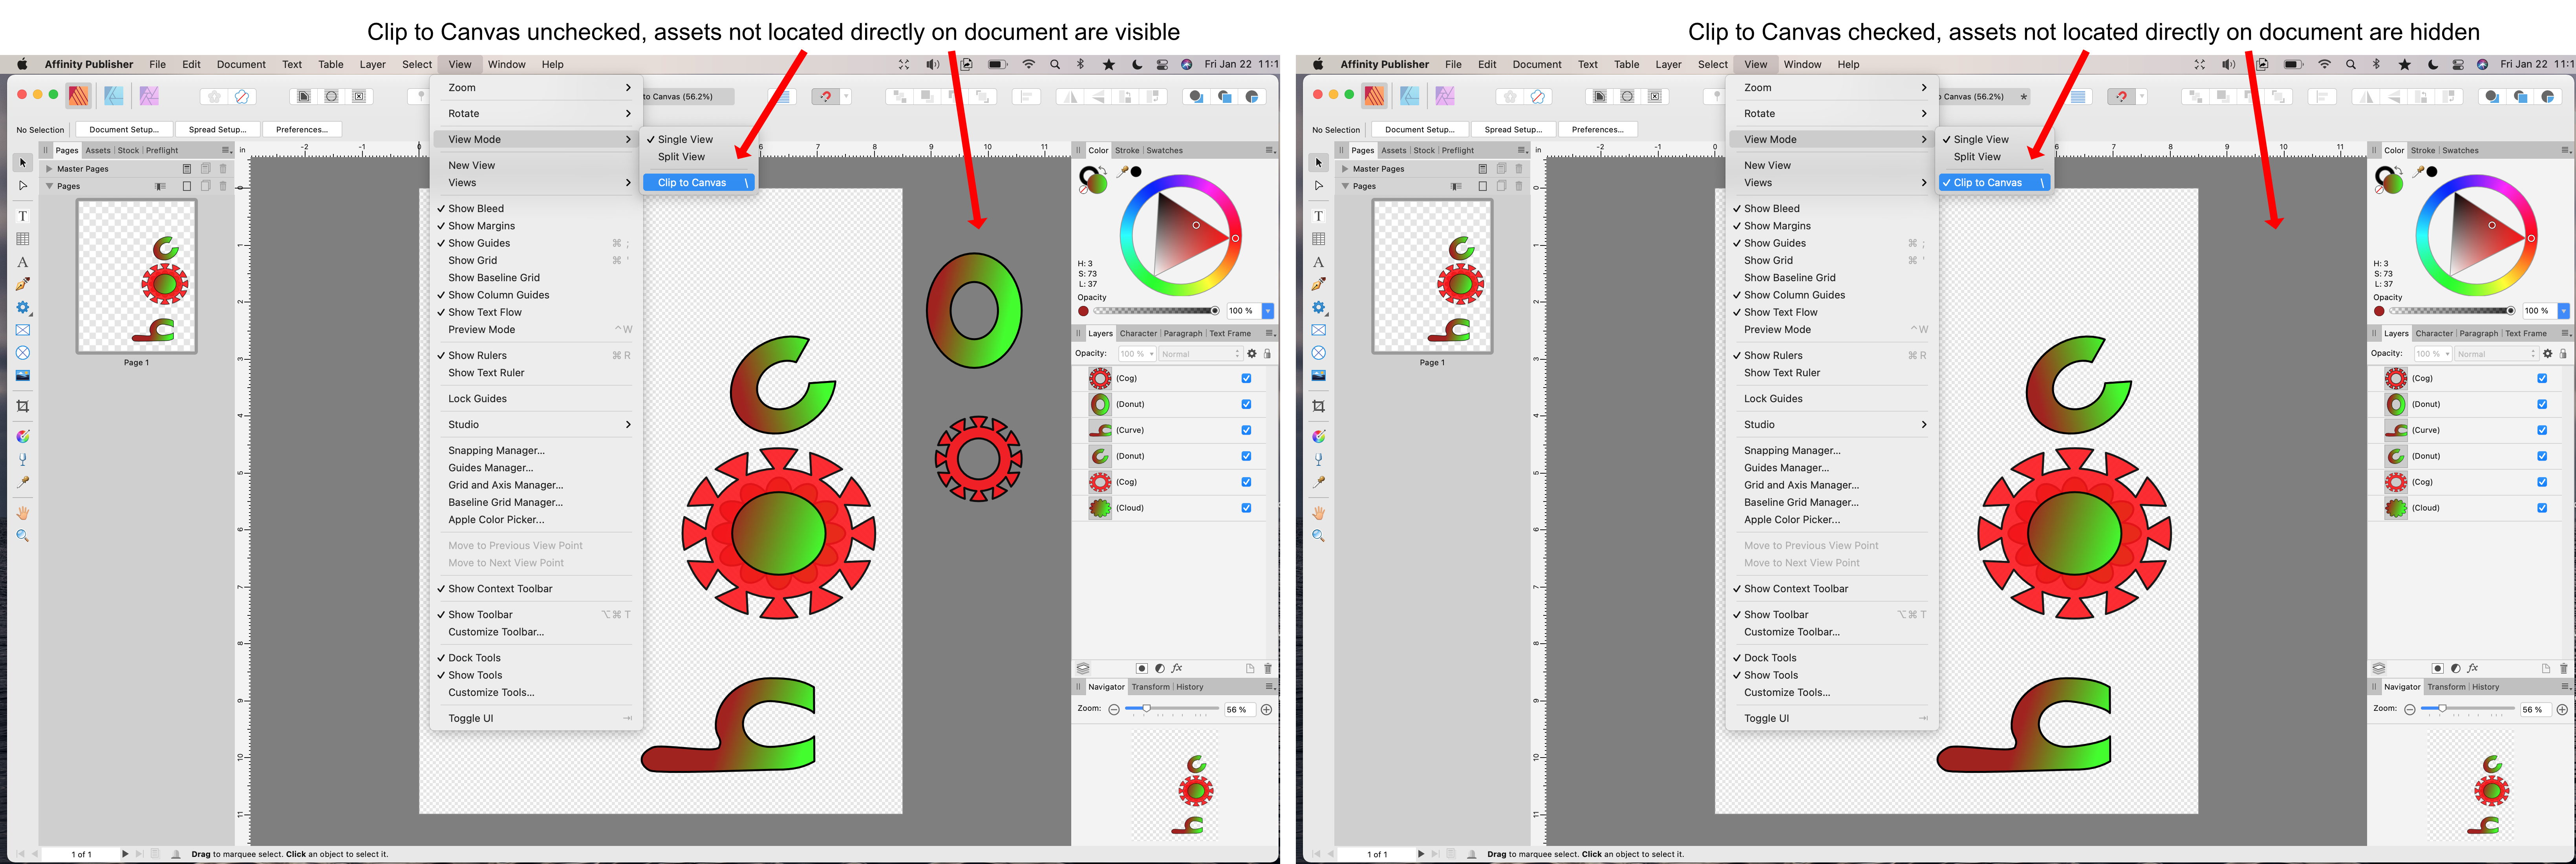
Clip to Canvas is a very useful feature found in the View menu (View Mode). Clip to Canvas allows the user to see or hide assets that are on the canvas, but are not placed in the current document layout. Clip to Canvas works fundamentally the same on both Affinity Designer and Publisher. However this same functionality does not exist in Affinity Photo. My initial thought is why, and beyond that, can this feature be brought over to Affinity Photo? It just seems like it would be a good fit for Photo as well.

-
Are you working on a Mac or PC? Do you experience this kind of lag in any of the other Affinity programs? Just being curious.
-
Width & Height window format
rusty5 replied to rusty5's topic in Feedback for the V1 Affinity Suite of Products
An excellent suggestion, however a more useful solution (for down the road) might be to add the unit button to the Transform panel so that regardless as to the location of the Transform panel, the unit selection button is always right there and readily available 😊
-
Width & Height window format
rusty5 replied to rusty5's topic in Feedback for the V1 Affinity Suite of Products
In my workflow I often want to check and see what my design in pixels would look like if I were working in a different unit of measurement. So when I'm adjusting the object size in the size boxes in the lower right corner of the screen and then must travel to the upper left corner of the screen to change units and then travel back to the lower right corner, this does not feel quick to me : ) And yes you can enter alternate units in the size field, but the current unit stays the same. Not helpful if you need to see the results in a different unit value. Indeed it doesn't take up as much space, however if the user needs to make a small value change (example 342.75 px to 342.76 px), you click in the cell, the entire value is highlighted, you click the right arrow on your keyboard to go to the end of the cell, then you delete three spaces just to get rid of the unit designation, just to get to the digits to make the change. Just seems like it could be simpler if the measurement units were shown outside the cell. Still amazing programs that I do very much enjoy : ) -
Tint slider added into CMYK color panel
rusty5 replied to rusty5's topic in Feedback for the V1 Affinity Suite of Products
I don't use Indesign so I don't know what that might look like. And I'm only a casual user of the Affinity programs, but I have to say I like the way color is handled, but then again I have very little to compare it to : ) -
Width & Height window format
rusty5 posted a topic in Feedback for the V1 Affinity Suite of Products
Suggestion: Some software programs place the width and height measurement unit name outside the measurement size boxes. This makes selecting and changing sizes easier and clicking on the unit name is also used to change the measurement between different units of measurement. I've attached a short video to show how this is set up. Could this be a possible future option for Affinity? Width Height measurement window.mp4 -
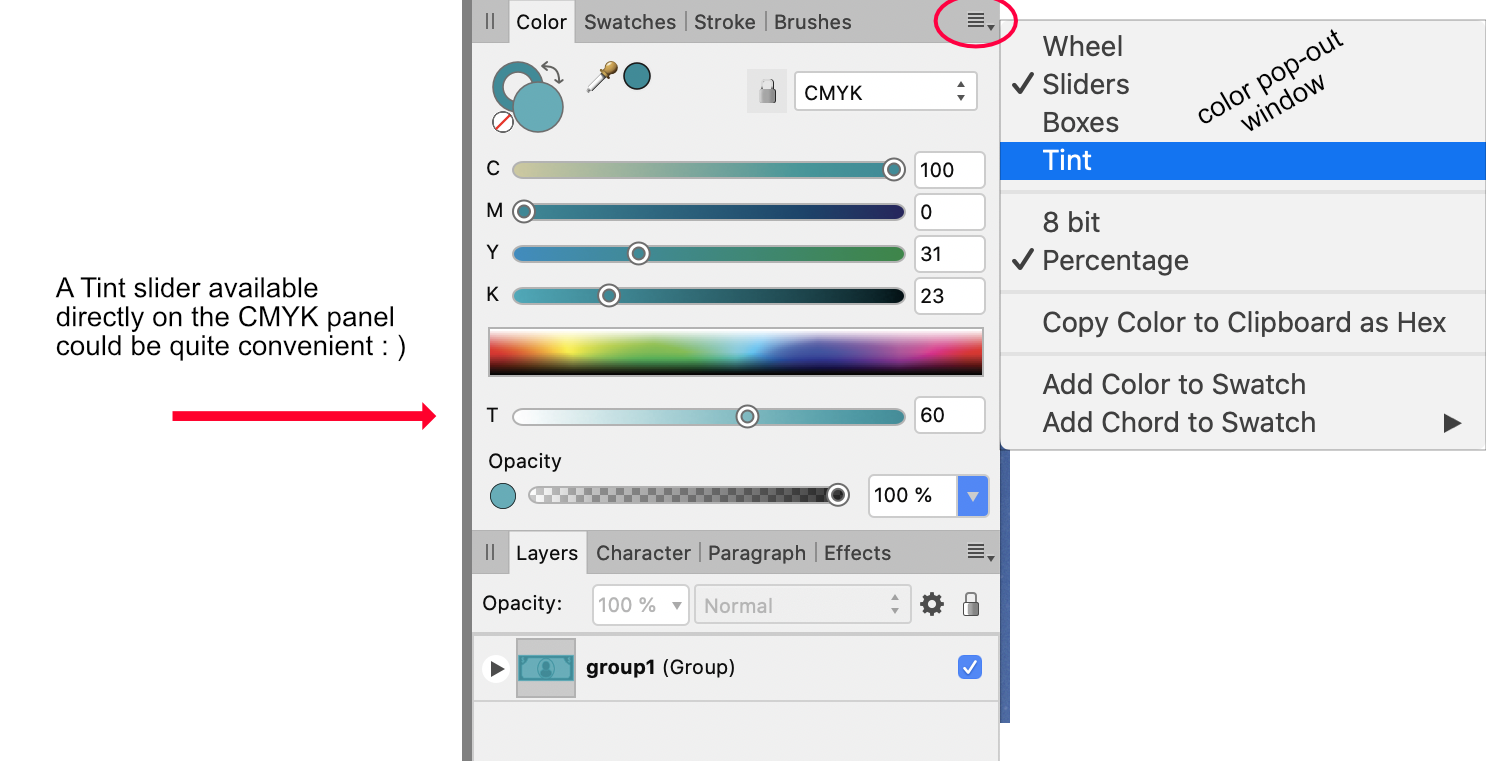
Just a suggestion, it would be nice to have access to the Tint slider directly in the CMYK color window. Currently when Tint is opened that window replaces the CMYK window. Placing both together could be useful.
-
Affinity Publisher 1.8 crashes when changing fonts
rusty5 replied to hays's topic in V1 Bugs found on macOS
Are you working on a Mac or PC? What version of the OS are you running on your specific platform? -
In the Window menu do you have Separated Mode checked? If so, Uncheck Separated Mode. On my Mac Preflight does not appear in the Studio list if Separated Mode is turned on.
-
To get your Master Page working again you might try the following: In the Page 1 Layers menu RIGHT click on the Master layer and change “Edit Frame Content” to “Edit Linked”. Click on the layer "Text & Logo", and CUT it out of the layers menu. Now move from Page 1 to the Master Pages page (double click the Master Pages page to bring it forward) and PASTE "Text & Logo" to the Master Page Layer. Do the same thing for Linen. Do this one more time with R2019. See what happens …
-
Text Styles Current Formatting window
rusty5 replied to rusty5's topic in [ARCHIVE] Publisher beta on macOS threads
I typically set my display size to 1680x1050 (center image), but tried the default setting (first image) and well as all the other available display setting. I could see no difference in the Text Styles dialogue box. I have Publisher's Font UI size set to Default (third image). This is certainly not a big issue, it just challenges my sense of order : )
-
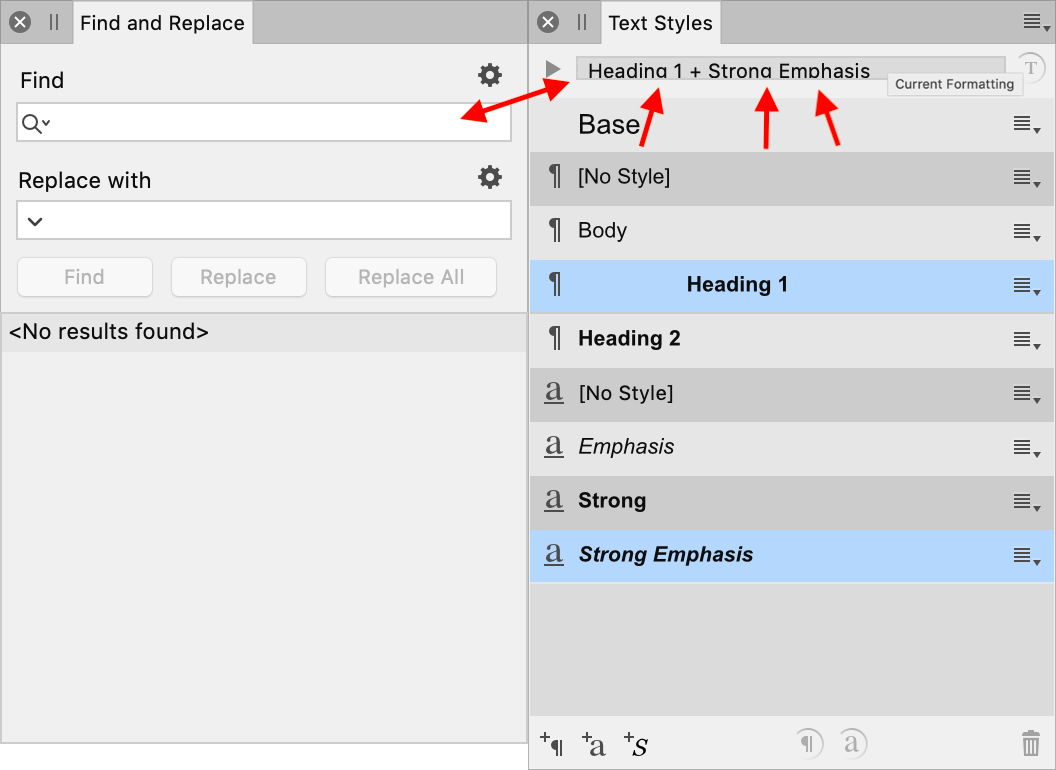
In the Text Styles dialogue box, the "Current Formatting" window at the top of the box appears to be smaller that any other text box I've seen in Publisher. Preview text is actually cropped off as shown in the screenshot below. Just curious, is this by design, or should this window be the same size as all other text boxes?
-
I have seen some strange behavior with Affinity Publisher and Apple's iCloud. In some versions of the beta an Affinity Publisher folder appears aloneside the Designer and Photo folders in iCloud, in some versions it does not appear at all. In the last few versions the Affinity Publisher folder is there, it's just invisible. If I move from a standard Mac view to show invisible files, the Publisher folder appears and is accessible. If I go back to a normal view, that folder disappears, although the contents are available from an open file dialogue box. The attached video shows an iCloud folder going from a normal view to showing invisible files. Affinity Publisher invisible folder.mp4
-
Convert to Picture Frame - Remove Picture Frame
rusty5 replied to rusty5's topic in [ARCHIVE] Publisher beta on macOS threads
I haven't been trying to create anything to involved, just learning the program. So in this case, all I was attempting to do is discard the frame, leaving the picture in tact. Essentially returning to the original state before converting to a picture frame. -
Convert to Picture Frame - Remove Picture Frame
rusty5 replied to rusty5's topic in [ARCHIVE] Publisher beta on macOS threads
-
Mac Publisher beta #292 I've been exploring Publishers handling of images. I created a test page, added an image and selected Convert to Picture Frame. This worked as expected. I decide I no longer wanted the picture frame so went back to the contextual menu to look for a "Remove Picture Frame" option, which does not appear to be an option. So out of curiosity I selected Convert to Text Frame, which crashes Publisher every time. My questions: Does an option to "Remove Picture Fame" make sense? And shouldn't "Convert to Text Frame" be grayed out? Is there ever a time when a Picture Frame would be converted to a Text Frame? Just being curious. Convert to Picture Frame.mp4
-
Problems exporting output
rusty5 replied to garfybeds's topic in [ARCHIVE] Publisher beta on macOS threads
Uncheck the layer marked "FreeVector-Tank-Front-View" and then export. See what happens. -
Navigating page to page using keyboard
rusty5 replied to SteveP110's topic in [ARCHIVE] Publisher beta on macOS threads
On a Mac, it's Command and Page up only if you have an extended keyboard. For those without an extended keyboard the keys are fn+Command+ up or down arrow.
-
Blank doubles of Studio panels in .249
rusty5 replied to Old Bruce's topic in [ARCHIVE] Publisher beta on macOS threads
I have encounter a similar issue. Text Frame Ghost.mp4 -
Navigating page to page using keyboard
rusty5 replied to SteveP110's topic in [ARCHIVE] Publisher beta on macOS threads
The screenshot below shows the default page navigation settings for Affinity Publisher on the Mac, the Command key plus the up and down arrows. Unfortunately the Command and Arrow keys in combination do not work on a laptop. However, using fn and Command in combination with the arrow keys will invoke page to page navigation.
-
I've been playing with Text Wrap for awhile and here's what I've encountered on my Mac running Publisher beta 249. I can get the margin sizes to do absolutely nothing, as mentioned by RenWaller, and I can get them to move away from an image as one would expect (mostly). It appears to me that Affinity has an odd implementation of selection buttons on some dialogue boxes. When I click on a selection box in Text Wrap a highlight border in that box turns blue. Oddly, if I click on another selection box it turns blue as well. It appears to me that the selection options are working more like check boxes (multiple items can be selected ) and not like a radio button (one and only one option is selected) as I would expect to happen. So, to get the boxes to work for me, I check then uncheck the various Text Wrap options until I think everything is clear, and then select the options that I want. This has worked so far. Obviously not a long term solution : ) Affinity_Text_Wrap.mp4
-
I tried this on a Mac laptop and it works as expected. However the first time I tried find, I couldn't find the find dialogue box. Turns out it was hiding on the left side panel with Pages and Assets. So I would also recommend going to the View menu, slide down to Studio and then slide over and down to Reset Studio and give it one more try.
-
Navigating page to page using keyboard
rusty5 replied to SteveP110's topic in [ARCHIVE] Publisher beta on macOS threads
If you have a Mac laptop, try using the fn key and the Command key in combination, then hitting the up and down arrows. This should scroll from page to page, or if there are facing pages, from spread to spread.