GarryP
-
Posts
11,040 -
Joined
-
Last visited
Everything posted by GarryP
-

Enquiry on Knife Tool
GarryP replied to cks's topic in Affinity on Desktop Questions (macOS and Windows)
Welcome to the forums @OMGJeepGirl That would be nice but, in the meantime, you can ‘do it the other way round’ with the Knife Tool and Vector Flood Fill Tool – see attached video. 2023-12-04 09-11-31.mp4 -
Inserting video into Affinity Publisher
GarryP replied to Furry's topic in Affinity on Desktop Questions (macOS and Windows)
You can’t; none of the Affinity applications have video-related functionalities. -
Twist warping question
GarryP replied to 80sTherapy's topic in Affinity on Desktop Questions (macOS and Windows)
-
Cropping problem
GarryP replied to Silvernel's topic in Affinity on Desktop Questions (macOS and Windows)
Even with minimal Snapping options set it seems to always snap for me – see attached video. Would you be able to give us a full-screen screenshot where we can see your Layers Panel and Snapping options? Note: Designer and Publisher are the other two Affinity applications. It’s best to tell us which you are using as they have different functionalities and some functionalities work differently in each. 2023-12-03 13-38-23.mp4 -
Cropping problem
GarryP replied to Silvernel's topic in Affinity on Desktop Questions (macOS and Windows)
Welcome to the forums @Silvernel Assuming that you are talking about the Crop Tool in Photo – the Crop Tool works differently in Designer and Publisher – there’s no way that I know of to restrain the crop to within the original image. However, if you have Snapping ON the Crop Tool should (in most cases) snap to the edges of the image which should make it easier for you to stop ‘going over the edge’. -
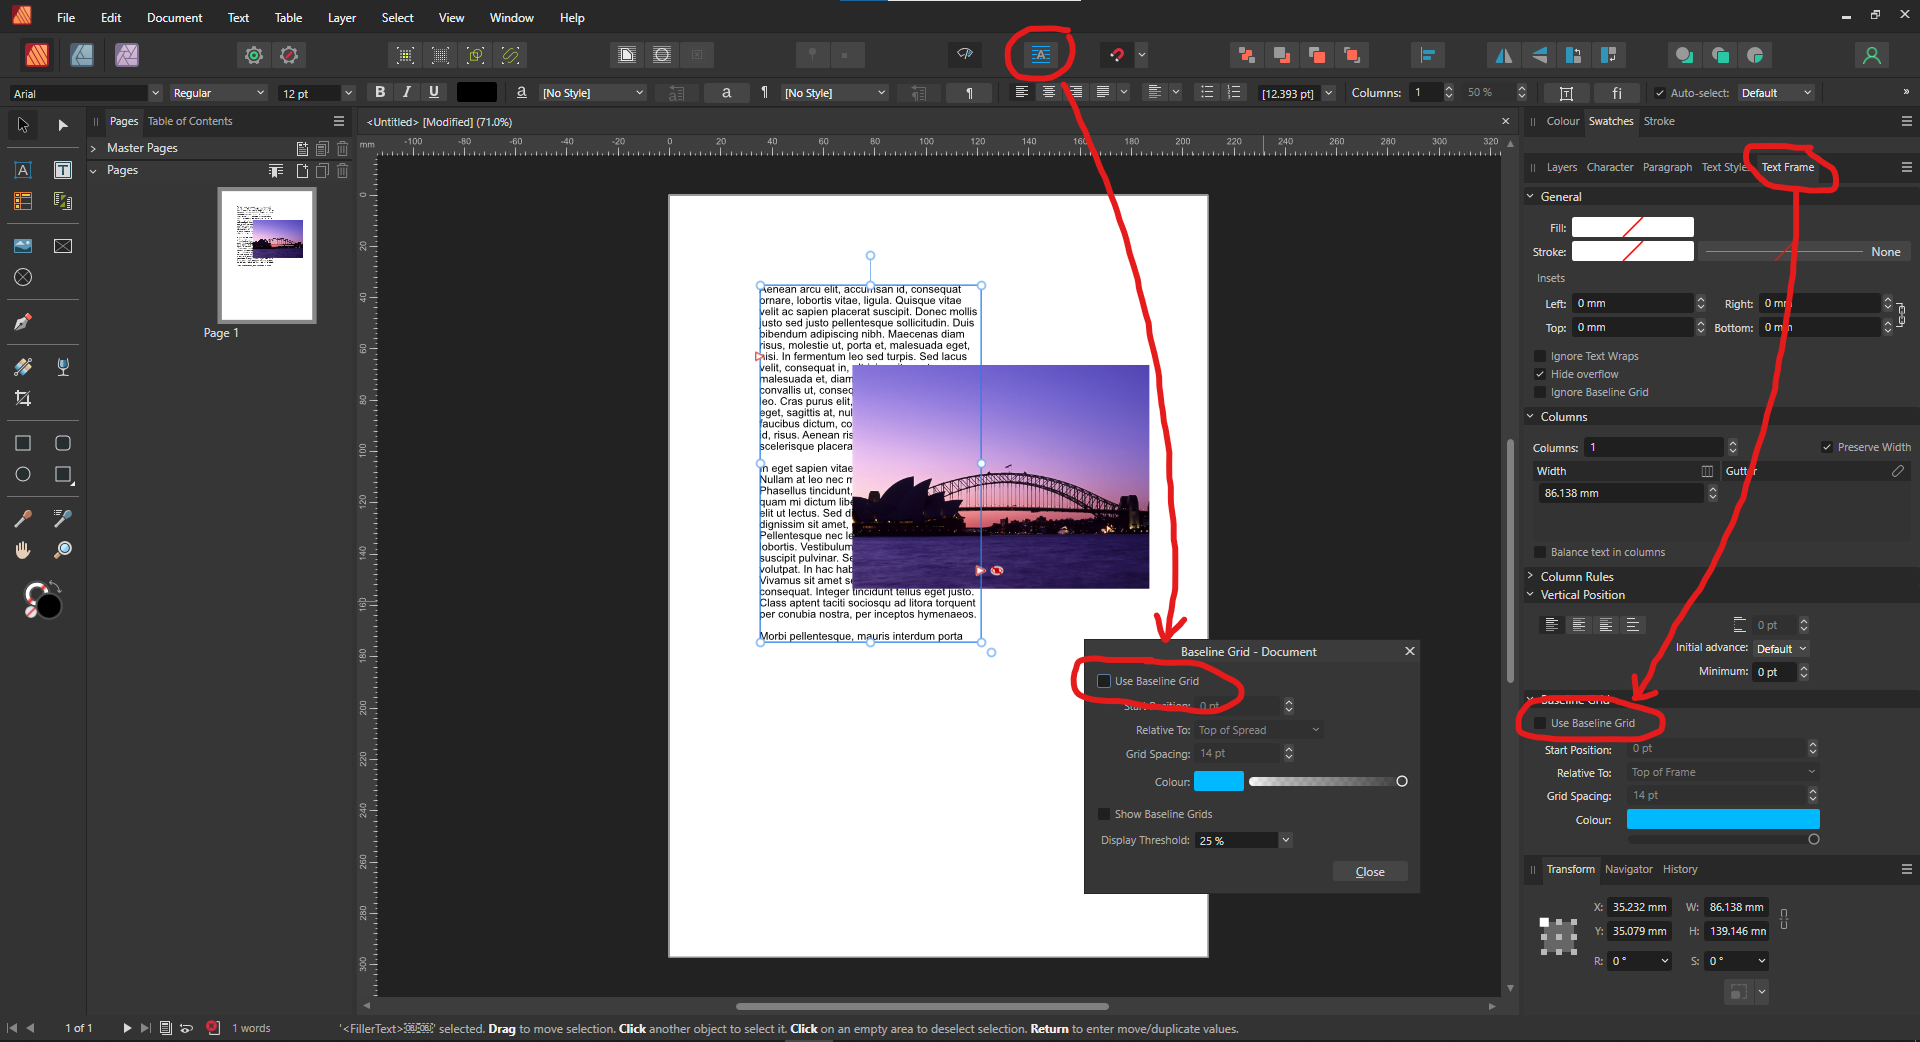
Publisher uses baseline grid even though it is disabled.
GarryP replied to RainerH's topic in V2 Bugs found on Windows
Are you sure that both the document baseline grid and the text frame baseline grid are switched off? See attached image where they are both off.
-
Document Setup
GarryP replied to Eddy-2's topic in Affinity on Desktop Questions (macOS and Windows)
Thanks for the extra information. I haven’t upgraded to 2.3 yet but I tried your workflow, as far as I could (my preset set-up may be different to yours), and it seems to work fine for me in 2.2.1 (on Windows 10). Hopefully someone who has upgraded will come along and try it. If the document size on the canvas isn’t the same as what the user sets it to be then I would say that was a decently-sized problem. An easily-fixed problem, but a problem nonetheless. -
Concentric Circles
GarryP replied to Transrobotism's topic in Feedback for the Affinity V2 Suite of Products
How would you “change the ends [of a circle] to be rounded, angular, pointed, etc.”? Circles don’t have “ends” as far as I’m aware, unless I missed a recent memo. Can you give one or more visual examples of what you would like to make? P.S. If you are a Windows user you might be interested in this little app which, among other things, allows you to easily create concentric circles: -
Document Setup
GarryP replied to Eddy-2's topic in Affinity on Desktop Questions (macOS and Windows)
I don’t understand where/how you are observing this issue. You say you are in the Document Setup Dialog, and there is a problem which is rectified only when you zoom in/out, but the Document Setup Dialog doesn’t allow for zooming. I can’t tell whether the problem is in the Document Setup Dialog – maybe with values not changing properly? – or after you have closed that Dialog and the display is wrong, or both, or something else. Can you give a more precise workflow for reproducing the problem? -
Hyperlink clickable area
GarryP replied to George86's topic in Affinity on Desktop Questions (macOS and Windows)
I think I understand it a bit more now thanks, but I don’t think what you want to do is possible without the manual work as mentioned earlier. And as far as I know, it’s not possible to create pinned shapes automatically. -
Selected area not the same when I tried to export
GarryP replied to Lisan Al Gaib's topic in V2 Bugs found on Windows
Yes, you’re right, I missed the half-hidden scrollbar on the right. Silly me. -
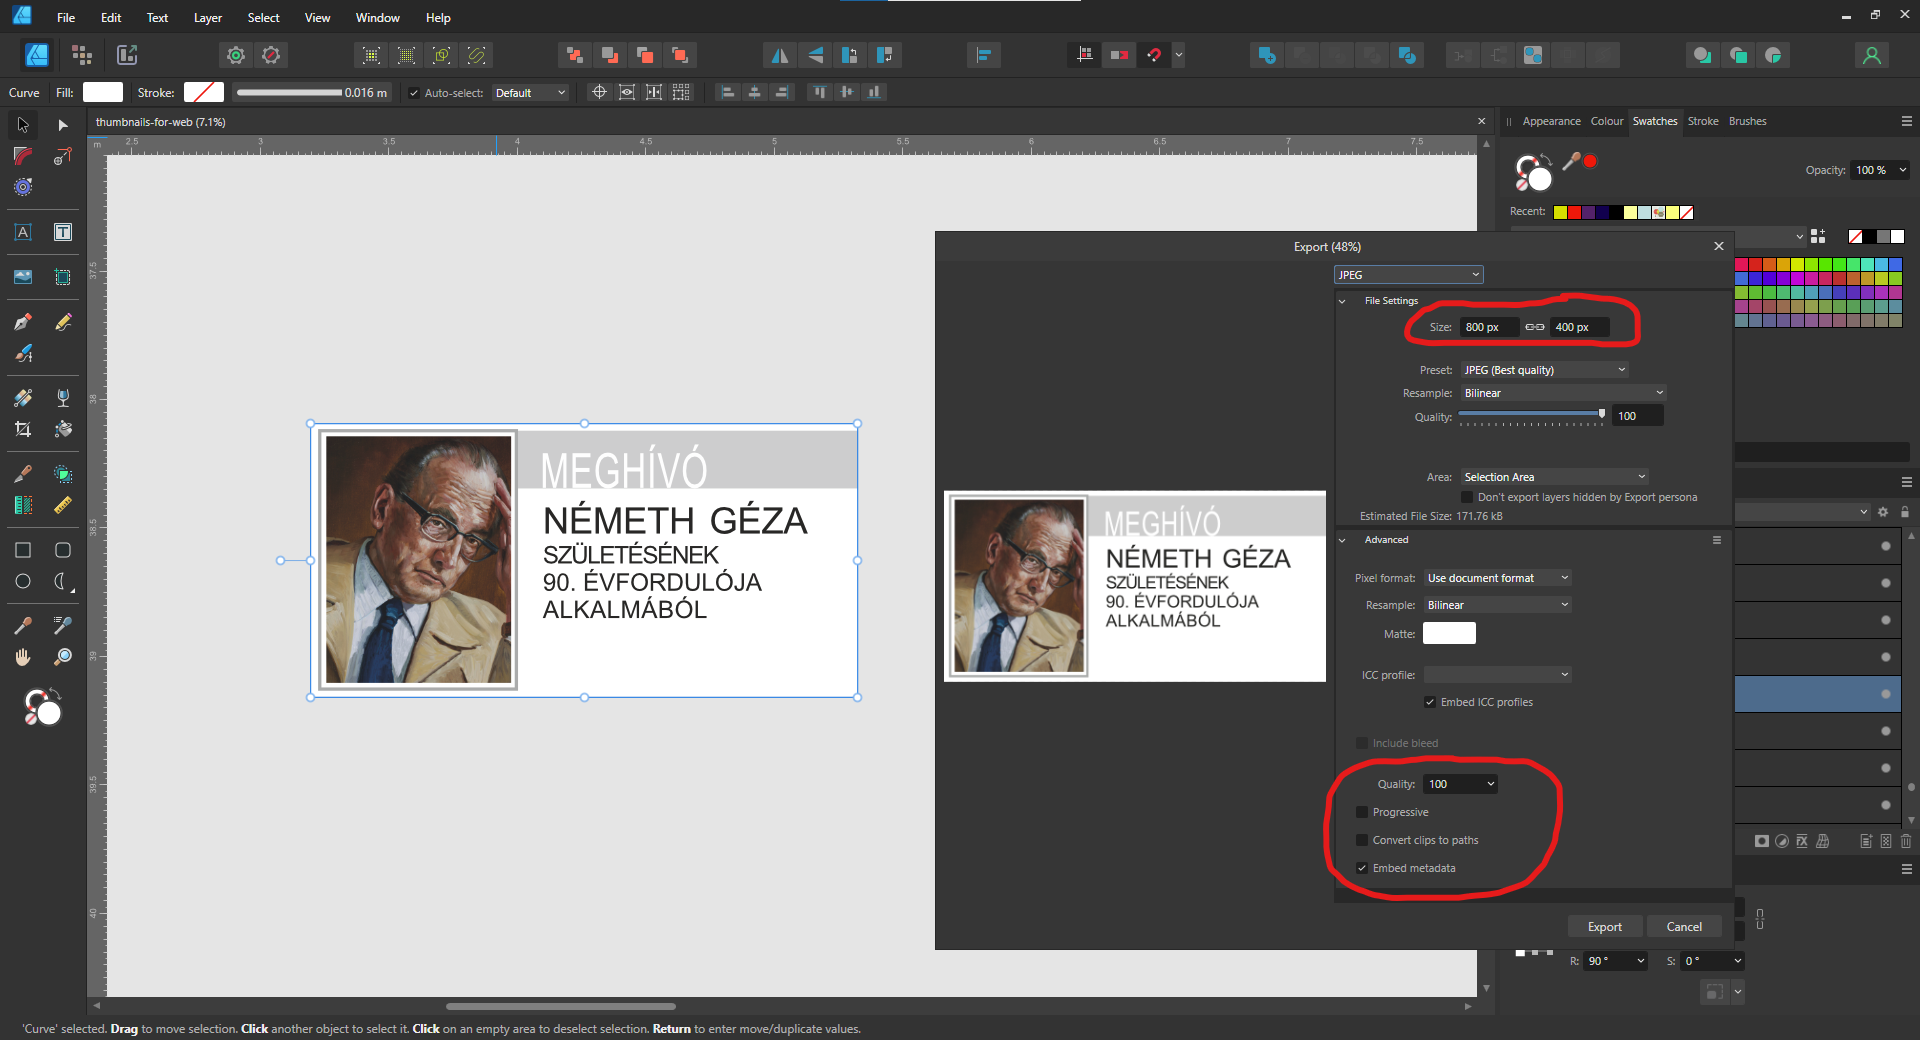
Selected area not the same when I tried to export
GarryP replied to Lisan Al Gaib's topic in V2 Bugs found on Windows
When I first open your document in Designer and go straight to export, setting the Area to “Selection Area” I get the same 'problem' preview and export as you. However, if I de-select what’s selected, then select the white background rectangle, and then go back to the Export Dialog (still with Area set to “Selection Area”) I don’t get the extra white space. But, when I drag-select the area containing the layers you want to export I get the same problem as originally. I don’t know why this should be at the moment – could it be because the white rectangle is rotated by 90 degrees? (I’m still wondering why you have different JPEG export options to me.) -
Selected area not the same when I tried to export
GarryP replied to Lisan Al Gaib's topic in V2 Bugs found on Windows
Thanks for the document. As asked in my previous post: What do you get when you actually export? Is there a reason why everything is so large? For example, a lot of your artboards are the equivalent of over 2 metres wide. I just tried to export as you did and the preview looks okay to me – see attached image. However, I notice that I have different export options to you – see bottom of Export Dialog. Which Affinity application are you exporting from? I notice that the selection you are exporting isn’t in an Artboard so I’m wondering if that has something to do with the problem you are seeing.
-
Selected area not the same when I tried to export
GarryP replied to Lisan Al Gaib's topic in V2 Bugs found on Windows
When you export, do you get the expected area or the area shown in the preview? Can you give us a full-screen screenshot where we can see the selected layer visible in the Layers Panel and where we can also see the Transform Panel? Would it be possible for you to share the document? -
As mentioned in that other thread, when the problem is fixed the “Serif Info Bot” will make a post in that thread. If you want to know when the problem is fixed you can “Follow” that thread. There’s no need to create a new thread to ask about another thread, just post in that thread to keep everything about the same issue in the same thread.
-
Welcome to the forums @BLEGAY Please see the linked thread below about using the legacy applications. A moderator will probably close this thread.
- 1 reply
-
- 1
-

-
Not as far as I know, but I’d be interested to know otherwise.
-
Hyperlink clickable area
GarryP replied to George86's topic in Affinity on Desktop Questions (macOS and Windows)
Sorry but I don’t understand most of what you have written in your last post. If you can word it in a way that makes it clearer to me then I might be able to help further. -
flattening jpeg/pdf
GarryP replied to *mark's topic in Affinity on Desktop Questions (macOS and Windows)
Thanks for confirming that as a solution. -
ADAMSKI Effect in Affinity Photo V2
GarryP replied to I. Lavi's topic in Affinity on Desktop Questions (macOS and Windows)
As far as I understand what that quoted phrase means, it does, as has been shown, unless you have something specific that you want to do which hasn’t already been covered. I’ve tried a few experiments and, apart from my own clumsy masking, it seems to work quite well with different effects without too much work, and I’m neither a photographer nor an artist – see video. 2023-12-01 14-38-06.mp4 -
flattening jpeg/pdf
GarryP replied to *mark's topic in Affinity on Desktop Questions (macOS and Windows)
The Outline Effect puts an outline around any non-transparent pixels. If your image has transparent pixels then the Outline Effect will put an outline around the things that aren’t transparent. You may need to add a background before flattening so that the background becomes part of the image. If that doesn’t explain things enough, can you upload a copy of the document – not a screenshot – so we can look at it? -
ADAMSKI Effect in Affinity Photo V2
GarryP replied to I. Lavi's topic in Affinity on Desktop Questions (macOS and Windows)
That video shows, from what I have skipped through, pretty much the steps I outlined above, except for some Photoshop-specific things which I have given alternatives for. If there’s something specific that you would like to know about please give me a time-frame in the video which tells me where to look so I don’t have to watch the whole thing through. (In the video I don’t see the image of the beach you gave so I’m still not sure that it has two different blurs in it.) -
ADAMSKI Effect in Affinity Photo V2
GarryP replied to I. Lavi's topic in Affinity on Desktop Questions (macOS and Windows)
Are you sure that two different blur directions have been used? If so, how can you tell? Either way, you can add two Motion Blur Live Filters, one for horizontal and one for vertical, but I don’t know how well that will work in practice. -
Hyperlink clickable area
GarryP replied to George86's topic in Affinity on Desktop Questions (macOS and Windows)
I’m not sure if (1) is possible without manually adding pinned (Float) shapes to the text and then adding the hyperlinks to the shapes (I've not tried this myself so I don't know how well that would work, if at all). For (2), once you add a hyperlink a new Hyperlink Character Style is added which can be changed via the Text Styles Panel. -
After update to 2.3: My curves are gone
GarryP replied to Guenter Diel's topic in V2 Bugs found on Windows
Can you tell us how you updated the application? Did you open the application and press “Install” when given the pop-up about the update being available? Or did you use menu “Help → Check for updates” and press “Install” when given the pop-up about the update being available? Or did you uninstall the application and then download/install the new version? And, if so, did you download from the same place with the same installation type – EXE/MSIX/MSI – which was installed previously? Or something else?