keepcarlson
-
Posts
15 -
Joined
-
Last visited
-
Thank you - I have used Designer as well - the worry is that only a portion of the dxf seems to be loaded; equivalent to Publisher.
-
Ah I did not realize that was a possibility. Attached is the .dxf if you are able to check for me! 884A - WATER AS-BUILTS 2000.dxf
-
Thank you I just tried all of them and none of them worked either. As with AP, parts were missing. Plus I have about 100+ files so I was hoping to find a solution that does not have an added cost associated with it (I already have the Affinity v2 Suite).
-
No, can you recommend one?
-
Hello - I am opening a CAD .dxf file in Publisher v2. It imports very nicely, however a portion of the .dxf does not appear. In the attached file "cvs_southcounty_trail_fromQGIS.pdf", there is a portion to the very left which is "far away" - I supposed you could call it an inset for lack of a better term. To make this .pdf I opened the file in a software program called QGIS. This program is not however, including all the marginalia (title, scale bar, etc) which is very important. The attached file "cvs_southcounty_trail_fromPublisher.pdf" includes the marginalia (title, scale bar, etc.), but does not bring in the portion that is way to the left (the inset). I have tried all the different settings available when I open the .dxf in Publisher (Apply drawing scale on and off, remove hidden items on and off, display entity handles on and off, display all pages, single page, model) but none of them work to pull in the inset portion of the dxf. I do not have access to a CAD program so have no way to change the .dxf itself I just need to get the .dxf converted, in full, to a .pdf. Any help is much appreciated! Thank you. cvs_southcounty_trail_fromPublisher.pdf cvs_southcounty_trail_fromQGIS.pdf
-
Thank you so much Ron P. and Dwright! Very much appreciate your responses. I watched the video and tried it first and it worked perfectly!!! Since it worked, I did not try Gimp. Thank you again for helping me!
-
Hello! I have multiple 3”x5” .jpgs. 100’s of them in fact. For each one I need to place either a text box or another jpg in the bottom right coroner. More or less a “watermark”, or stamp if you will, although it needs to be 100% opaque and highly visible. I am hoping to find a way to automate placing the watermark/stamp so I don’t have to place it manually on each jpg and export. I tried to use a macro followed by a batch job. I brought in about 50 of the .jpgs as a layer stack, and placed the watermark at the top. I turned layer visibility off for all but the watermark at the top. Sadly once I started to record the macro, it would not let me record turning on the visibility of a layer. Can anyone advise on a workflow that might allow me to accomplish this automation? I have Affinity Photo, Designer, and Publisher. I do not have Photoshop (and can’t afford it). Perhaps someone knows of an open source product that will do this? Gimp, Inkscape? I also tinker with python if there is a library for this type of thing? Thank you!
-
Thank you so much! This is extremely helpful! (PS I did do a search on this topic but nothing came up, so I am very happy to have the links). This will really save me some time! Thank you again.
-
Hello and thank you in advance for any suggestions. Bit of a newbie here. I have all three desktop programs (photo, designer, publisher). I have a single tif image which is a collage of 9 other images.....a scanned photo album page which had nine individual photos at 3" x 5" each. My current workflow is to use the rectangle selection tool to select one of the 9 pictures, apply a mask, and export the selected area to a separate tif (with a separate name). Then create a new rectangle selection over the second picture, export the selected area, etc. This workflow requires that I do this process 9 separate times for each photo in the collage. I have lots of these collages so I am hoping to find a different way. I tried making a macro but it won't allow me to record the final step of exporting the selected area. Is there any workflow that would allow me to for example, create a vector "grid" that I can place over the .tif and "cut out" each picture with one click of a button? Or anything else to reduce the steps involved? Thank you! lc
-
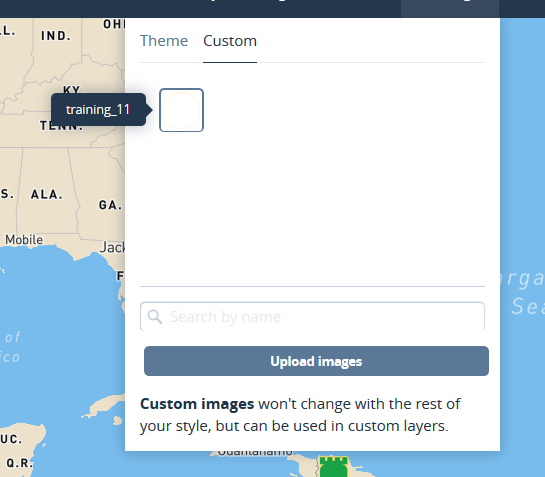
Thank you so much for helping! I went back to my afdesign document. Selected all the white elements, converted to curves, added their geometries so they are now one element. Still upon exporting to .svg (uncheck viewbox) it loads.....but it is "blank". training.afdesign training_11.svg

-
I have created a simple design which I hope to use in mapbox as an icon. mapbox requires svg. I export my design to svg but when I load into mapbox, the fill colors are not there. the icon is "there" in my custom styles list but the colors do not appear at all. I have tried multiple different settings on the AD Export More options from the svg export tab (making sure to check Use hex colors, flatten, etc) , but they all have the same result when brought into mapbox. Mapbox has troubleshooting for Illustrator and other problems here - https://docs.mapbox.com/help/troubleshooting/studio-svg-upload-errors/#common-issues I cannot find the equivalent settings for what is suggested for Illustrator in Designer. I also tried to understand the svg file by changing the .svg to .txt and examining it in notepad. I checked the various tags against support / unsupported elements, and I cannot see any problems (admittedly I am not a web designer however) I can see the .svg in both firefox and chrome. Thank you for any help. Windows 10, AD 1.8.2 training.afdesign training_7_unchecksetviewbox.svg
-
 Clara Montseny reacted to a post in a topic:
How to make a text link to a url with AD?
Clara Montseny reacted to a post in a topic:
How to make a text link to a url with AD?
-
firstdefence reacted to a post in a topic:
Outline Layer Effect
-
Perfect thank you! I forgot I to mention I am using Designer..... I had not made a rectangle...I was using the Layer Effects on the layer to make the outline. But now I have a Style and successfully applied it. This will save me a ton of time. And the Paste FX works too. Two options - Thanks again!
-
I have a very simple layer effect - a 4 pixel outline - that I would like to apply to multiple individual layers. Is there a workflow to save a layer effect so that it can be applied over and over again? I thought it might be a style, but I can't seem to save the layer effect as a style. And I don't see anything that allows me to copy / paste a layer effect. Thank you.
-
These don't seem to work with Windows version? I unzip, but importing generates an error. Am I doing something wrong?