thisleenoble
-
Posts
31 -
Joined
-
Last visited
Everything posted by thisleenoble
-
Isometric/Cube grid plane switching
thisleenoble replied to thisleenoble's topic in V1 Bugs found on macOS
This would be brilliant. I hope it can make it into a point release. Thanks. -
Isometric/Cube grid plane switching
thisleenoble replied to thisleenoble's topic in V1 Bugs found on macOS
Your grid is a perfect isometric grid so the skew values are identical for all three planes. For a minute there I had hope that I'd missed something. You gave me the hope! -
Isometric/Cube grid plane switching
thisleenoble replied to thisleenoble's topic in V1 Bugs found on macOS
To anthropomorphise the shapes a little bit more, the shapes must have some knowledge of their dimensions were they to be presented in two dimensions. Taking a basic square and moving it onto to top plane it is skewed and rotated to fit the plane but the bounding box is also presented "in-plane". If you click the "Rotate clockwise in plane" button the dimensions W and H are effectively transposed so the intrinsic dimensions are maintained. Perhaps flipping a shape from one plane to another in the way I described will never be how it's supposed to work, although I'd argue that it makes complete sense and it misses out the intermediate stage of returning the shape to the flat view which would be a more convoluted way to migrate shapes from one plane to another. Even if the shapes don't in themselves retain the flat dimensions, they have to be calculable from the apparent dimensions, angle, skew, plane and grid settings. -
I have previously filed an overlapping feature request but after consideration I actually think this is a bug in the Isometric/Cube grid implementation which if it were to be fixed would do wonders for the usability of this amazing feature. The attached video demonstrates. 1) Draw three identical squares int he flat view. 2) Move each square in turn to the Top, Side and Front planes, bring them together and you get a facsimile of a cube. 3) Now move one of those faces to a different plane by highlighting and clicking "Fit to plane" in the Isometric studio palette and you'll find the apparent dimensions change. This action should retain the intrinsic dimensions of the original flat shape, enabling the user to flip objects between the planes. Returning them to the 2D view would also be desirable as the application "knows" the original dimensions it seems like this should be possible. Cube-Bug.mov
-
Perspective grids
thisleenoble replied to thisleenoble's topic in Feedback for Affinity Designer V1 on Desktop
You know, if you could just add a button to revert a shape back to 2D projection that would go a long way to providing this facility in a workable way for small projects. Indeed, perhaps just option-clicking on the "Fit to Plane" button could reverse the process. You could squeeze that into a point update no? Once it's possible to revert shapes back to 2D it would be possible to change the grid cube and fit back to the new planes. Sure, repetitive work if you have a lot of objects but so, so powerful. Do it! Do it now! -
The information has to be there in some form, it's there in preview and I tried opening a PDF in Gimp as well, and that rendered those objects at full resolution, although not layered so effectively useless. I hope your engineers can address this from your end. Cheers.
-
I don't mind them being rasterised, by the way, but if you could rasterise them as a much higher resolution that would be optimal
-
Thanks, the file is on its way. Are you aware of any guidance I can give the designer that'll stop this happening?
-
Is there anything I can do about the appalling quality of raster images embedded in a PDF that I'm opening in Designer? The PDF in Preview clearly has high quality photographic elements, but when I open the PDF in Designer these are reduced to very VERY low quality, like as if they were icon previews that have been blown up. It's possible that there's something different with these PDFs as I've not encountered similar issues with PDFs from the same provider. It might be that there's something that needs amending in your PDF import code. Unfortunately I am unable to provide copies of the files on a public forum but I can tell you that the files were generated through Adobe XD. They have embedded several PS images within their XD document and exported the result as PDF but clearly Preview has no problem with the format and happily displays full quality images, but Designer can't handle it. I've tried just opening a single page in case it's a resources issue but that appears not to be the case. I might be able to forward a copy of the PDF in question to your team directly if requested. Cheers, Lee
-
I realise that this, if it were remotely possible, would be way down the list of priorities but it might be an eventual necessity for me. I'm used to receiving "flats" produced in Illustrator and can happily open ai, or pdf (and photoshop) files directly in Designer and start exporting layers directly into my projects. The design house we work with is experimenting with Adobe XD as it helps them to demonstrate UX to their clients and the most recent project I built was primarily put together in XD. The experience for me has been awful. Some assets (Photoshop embeds apparently) come out horribly pixelated and can't be used. I have to ask for those assets to be supplied separately which destroys my established workflow. The experience has been so bad [for me] that we might have no choice but to migrate to an Adobe only workflow [waah! I don't wanna! I'm into Designer now]. I sat with the designer to see if we could figure out a way around the issues. XD files couldn't even be opened in Photoshop or Illustrator and there was a distinct lack of export options when it came to embedded images. So, if you could just do a better job than Adobe have with their insider knowledge of file formats used by their own software that would be grand. Cheers.
- 1 reply
-
- 1
-

-
Perspective grids
thisleenoble replied to thisleenoble's topic in Feedback for Affinity Designer V1 on Desktop
I've had a further thought on this, and I think I might have guessed where you're heading with the solution for the perspective transform. Ok, so I was playing with an isometric-ish grid and moving flat objects onto grid planes. The next logical step, for me, is to be able to move objects from one plane to another, switching from front to side. I mean the objects clearly have current knowledge of which plane they are in so that the regular transform handles conform to that plane, the point being it "knows" it's real dimensions if it were face on, so despite the fact there's no way to return an object to the flat face-on plane, it doesn't seem that much of a stretch to be able to do so. Then once you can freely move objects from flat view to any plane and back again this gives you far more control if you wanted to change the underlying grid. For example, say you start with a straight isometric view and build out some objects, and latterly decide you want a lower perspective, you can change the grid but you're stuffed when it comes to migrating your objects to the new grid. However, if they have a reference size described in the flat view, those objects could be transformed through that flat view and back into the newly defined grid planes. Combined with the ability to "pinch" the grid cube to create non-parallel 3D grids you'd effectively be able to change the perspective on any 3D construction (with obvious certain limits). This would be the type of thing that I see fitting under the umbrella of "wanting to do the right thing and not just copy how other software works (i.e. the perspective/warping tool)". -
When playing around with new Beta versions, I stumbled into the cube grid setup. Oh wow, this is a very nice adaptation of the previously available isometric (only) grid so we're no longer limited to 30° lines and can still construct objects in any pseudo-3d grid we like. It seems like a very small step now (although I bet it's not) to add a bit of pinching to those cube definitions to facilitate the construction of perspective grids. Is there any possibility of that making it onto the roadmap?
-
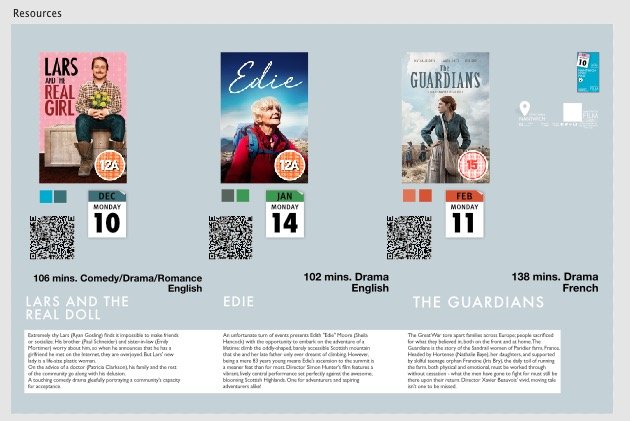
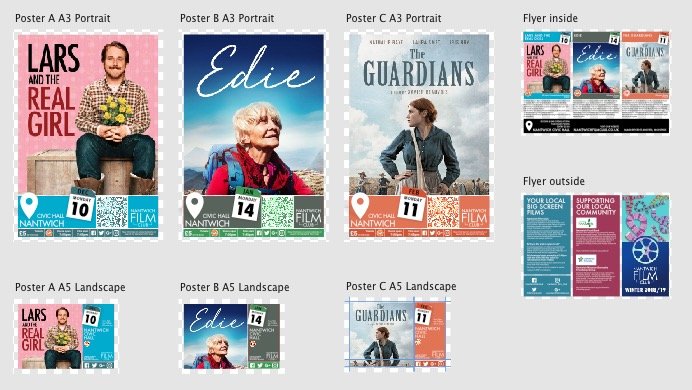
I've found numerous topics on the subject of adding a mail merge feature to Publisher but couldn't see anything relating to Designer. Appreciating that Publisher might be the best place for it, I can't help thinking it would be an enormous benefit in Designer. I've been producing flyers and posters for a local film club for years. I had templates set up in Pages and each quarter I would have to place the images, change the dates, print to PDF. convert to image, crop, zoom etc. I made it as efficient as I could in that program and it took a lot of initial effort to create the starting templates, so the thought of doing it all over again put me off for a while. This weekend I finally re-did the whole thing in Designer. Symbols are used throughout for the film posters and dates and QR codes and colours. I now have an artboard called Resources that contains all the base elements and compiled symbols: Then the other artboards contain separately the portrait and landscape posters as well as the quarterly season flyer: All I have to do is modify the resources, drop new images into place and change the dates in the calendar, tick or untick the correct layer for the BBFC film rating, drop in a monochrome QR code and it's all done. I can hit one button to export all the posters and flyer and differently sized image slices for social media. What used to be in seven separate documents with a heavy post-process can now be done in literally minutes (hopefully - I'll find out next quarter). However, I would LOVE the ability to have document variables. Variables that can be used in ANY input. Obvious initial examples would be for the film titles and dates. Also applicable to product ingredient lists and allergy warnings in other layouts. The colours used for each panel could also be document variables. At the moment I've just used a pair of squares swatches that are repeated as symbols and stretched to cover the spaces in the final layouts. Being able to define the colour in the palette dialog as [%COL_A%] and the accent as [%ACC_A%] would mean I could just change those variables in the document properties and have the whole theme change. There are loads of places where I could do this rather than have to use symbols and I think it's worth your consideration.

-
Clearly I didn't notice the difference between an image layer and a pixel layer. Having performed the rasterize operation I'm still not entirely sure why there is a distinction between them or what the distinction is. Why would I want an (image) layer over a (Pixel layer)? Anyway, at least there's now an answer for why inpaint is sometimes not available.
-
Just in order to potentially save somebody else from this frustration, I too have found the Inpaint option to be greyed out for reasons I have not been able to determine. When this happens neither the inpainting brush or selecting the area and choosing Inpaint form the Edit menu will work. Replies to this and other topics do not seem to acknowledge that this happens at all, instead implying that the user is doing something wrong. Well, I've finally been able to replicate the problem and found a solution that seems to work to re-enable the inpainting functionality. 1. Right-click and copy an image from your browser window, then switch to Affinity Photo and choose File > New from clipboard. 2. Use the brush selection tool to selection tool to isolate an element you wish to remove. 3. Open the Edit menu and Inpaint is greyed out. Alt-backspace doesn't work. 4. Select All. 5. Choose Edit > Matte... and click ok on the dialog box 6. Reselect the element you wish to obliterate. 7. Edit > Inpaint is now enabled. Whether this is a bug or not I don't know. I don't really know what Matte is doing in this instance so I'm happy to be enlightened on that front, but hopefully those looking for why inpainting doesn't work will be helped.
-
I would really appreciate being able to get just the raw the colour definitions out of Affinity products so I can paste them into code. If I were to right-click on the any of the inkwells a drop down menu would appear with: Copy as... RGB Values RGB Hex HSV Values CMYK Values The result would be comma separated values on the clipboard e.g. "232, 124, 45" that I can then paste between brackets in a stylesheet or in some javascript. If it were possible (which I'm sure it is), the contextual menu on a gradient would offer to copy as a full CSS gradient, SVG linear gradient definition or HTML canvas gradient (I'm sure there are other formats people would appreciate). I know there are online tools that will do this, but if I've already got a gradient set up in AP, I don't want to have to re-create it on a website somewhere.
-
What's coming in Affinity Photo 1.5
thisleenoble replied to Timber's topic in [ARCHIVE] Photo beta on macOS threads
Is this the ability to transform an object using the perspective or mesh warp took and have it NOT turn into a pixel layer? Because THAT is the one thing I'm waiting for that would enable me to dump both Inkscape and XQuartz entirely. Currently I resort to blowing up objects to gigantic sizes, performing transforms and then opening each layer in Inkscape and tracing back into a path, saving out to SVG and dropping back to AP. This would save so much time (if that's what it is). -
Ahh, at least I understand the logic now. The option key makes no difference. I'm just so used to expecting to hold down a modifier key to retain aspect ratio that I hadn't considered it wouldn't be necessary. I'll probably leave it on the default setting and see if I can re-train my brain to not use a modifier key for pixel layers. Thanks.
-
As the title suggests, I find the resizing modifier keys inconsistent in both applications. Example: Open Designer Choose a primitive shape and hold down the shift key as you place it on the canvas so it has an aspect ratio of 1:1 Now grab one of the corner handles and shift-drag to resize your object and it retains that aspect. Select Layer -> Rasterize Grab a corner handle of the object and shift-resize it Undo because that's not what you expect to happen Re-grab the corner handle and hold down option instead and it retains aspect ratio. Now grab a side handle and try the same thing. Option has no effect, shift retains aspect ratio. Is this an error? Or is there some internal logic that I'm not appreciating? Or is there some obscure setting that means this is only affecting me?
-
I am adding support for SVG sprites to one of my website frameworks. I'm loving the fact that in AD I can export all the individual icons as SVG in situ from the designs supplied, rather than having to assemble them in their own separate document. Being able to select each layer, create a slice and then adjust that slice's dimensions if I need to is fantastic. The end result is I get a lot of separate SVG icons. Then I expended a lot of energy installing Node, Grunt, SVGO, you name it in order to do the following: Optimise the SVG files Create an SVG sprite Copy all the individual icons into the sprite as symbols I realised it would have been SO much easier if AD (or AP) offered the ability to export selected slices as a sprite. I thought that might be what the Continuous checkbox did, but alas, no. For reference, my starting point for this was this page: https://24ways.org/2014/an-overview-of-svg-sprite-creation-techniques/, the section beginning HTML INLINE SVG SPRITES (specifically the latter section dealing with external sprite. It would also be advantageous to me if the style="fill:#HEXCOL" could optionally be dropped on each element on export as it prevents styling the elements with CSS. Thanks for making a great app even greater.
-
As far as I am able to tell, this facility is only accessible via the contextual menu on an object. My understanding of the intent for a contextual menu is it should only present options which are also accessible via the normal menu hierarchy. I have been unable to locate it there and it doesn't appear to be listed anywhere in the shortcut preferences either. Maybe just a simple omission but it would be handy.
-
I did immediately find the option to assign a shortcut and did so after I posted :wub: , but I'm not seeing this threshold. Using pinch gestures to zoom in/out it is VERY easy to rotate a tiny amount. Repeatedly.
-
+1 for this. Additionally, I'm getting worn out by the number of times I'm accidentally rotating the canvas by a couple of pixels. Rotation snapping (toggle option?) would probably prevent that from happening. At the very least it needs a keyboard shortcut to get back to 0° to save revisiting the View menu.
-
Is it possible to create new brushes from an existing object in vector mode? There's a button to create a new brush but all I ever get is a thick line and seemingly no way to edit it. Pretty sure the answer is no, I did ask on Twitter and it seems to be the case, however I don't know if it's supposed to work or not. They asked me to ask on here anyway. Cheers.