

ncJohn
-
Posts
166 -
Joined
-
Last visited
Posts posted by ncJohn
-
-
9 hours ago, carl123 said:
I think you will find you have more of your document selected than you think you have
Using Select Sampled Colour was not the best way to approach this problem, just use the Selection Brush on the Nostrils area you want to change then make your adjustments by whatever method gives the best results for you
I think the fact that the adjustment layers affected virtually the entire image shows that more was selected than just the nostrils; but the dashed selection line was only around the nostrils.
I tried several times using the Selection Brush on only the nostrils but I wasn't happy with my selections. (I wanted only the red, but all of the red.) So I decided to let the program make the selection for me.
I'm going to try your suggestion of making a new image from the selections.
Thanks
-
9 hours ago, toltec said:
I was also wondering how you got the weird light halo around the lips?
That's the really weird part! That "halo" is what the skin color is supposed to be; it's where I used the Selection Brush to subtract the lips. (Because the selection I ended up with was actually nostrils, lips, and hair and I only wanted nostrils.) So the halo is where the adjustment layers didn't affect the image. That's why I say the adjustments affected more than the selected areas.
-
Thanks for the suggestion of the sponge tool. I'll take a look at that.
-
1 hour ago, toltec said:
Select the areas you want, then apply an adjustment layer (HSL in this case). It will only apply to the selected area.
I tried very hard to explain that this is exactly what I did. My steps 1-5 were making the selection, after which I used the adjustment layers. The adjustments affect most of the image, not just the selections.
There's not much to see in the layers panel. Here it is.
Again: "Merge visible" so I'm working on only one layer, followed by selections on the merged layer, then adjustment layers.

-
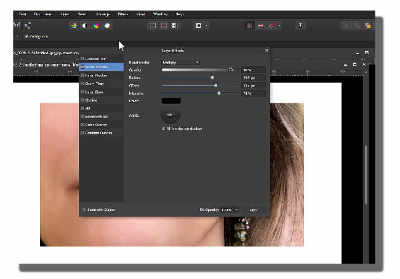
It seems I don't really understand selections (or how to make them). In this photo, I wanted to eliminate the red inside the nostrils so I wanted to select just that red-ish area and then use adjustments such as HSL to lighten or eliminate the red. It seemed to work okay except that after I had only the desired areas selected, my adjustment layers were affecting other parts of the image. For this screenshot, I used an extreme amount of levels adjustment so the effect is easy to see. My intent was for the levels adjustment to effect only the selected area in the nostrils but it darkened virtually everything except the area immediately around the lips. This is how I did this:
1. Layer> "merge visible" to create a clean top layer.
2. Use color picker to select a tiny spot of red in the nostril.
3. Select>Select Sampled Color...
This resulted in most of the image being selected since it's practically all some sort of red.
4. Adjusted the selection tolerance until the desired part of the nostrils was selected. At this point the lips and hair were also selected.
5. At this point I tried to use the Selection Brush to subtract the lips and hair, but I found that, in fact, actually everything was selected except the nostrils, lips, and hair. So I used Select>Invert Pixel Selection. Then I used the brush to subtract the lips and hair.
So now I had only the red part of the nostrils selected and I used HSL and Levels to change the extreme red, but I found the adjustment affects extending way beyond the selected part of the nostrils. The weirdest thing, to me, is that even when I used the Selection Brush to subtract virtually the whole image except the nostrils, the adjustment layer effect still extended way past the selections.
I guess this is a long-winded way to ask, "Why are my adjustments affecting more than my selections?"
-
4 minutes ago, toltec said:
turn the Radius down
Okay, i see that.
Thanks
-
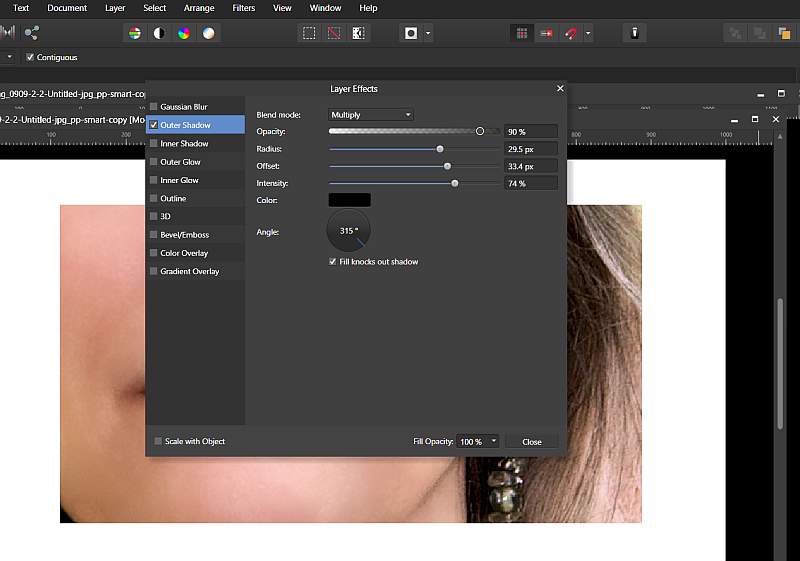
Another question: The picture has square corners. Can I make the shadow have square corners?
-
-
Just now, toltec said:
The picture must be on a layer
I don't understand. How can the picture not be on a layer? it's a pixel layer.
-
1 minute ago, toltec said:
Yes, but is the picture the edge of the image ?
It puts it round the edge. If the white is part of the image, it wont work.
The white is extended canvas which I filled with white.
-
It is a nice shadow under the "layer effects" window.
But I was hoping for more.
-
-
On 6/16/2017 at 1:42 PM, Alfred said:
Go to the Effects panel, expand the Outer Shadow section and press the 'Offset Tool' button. Drag on the canvas to create the shadow and adjust it visually, or use the Offset controls to adjust it numerically.
I've tried this over and over, with no result. I've tried light canvas with dark shadow, and vice versa. Also tried with the "transparent" canvas with no color. Never any result on the image or canvas. The pixel layer has the little fx to show that something is applied, but it doesn't show on the image. I'm using v 1.5.2.69 on Windows 8.1.
Suggestions, please.
-
No, that's not it. It was 2 pictures of the same girl (same original picture, 2 different treatments).
Thanks anyway.
-
Today I saw something about a tutorial for using AP on an ipad; I saw it briefly and meant to come back to it and now can't find it. I think it was an email but if it was it's gone. It had 2 striking photos of a young woman and promised to show how they had been created.
Can anyone tell me how to find this?
Thanks
-
Thank you MEB
Your reply prompted me to explore the Snapshot function, which I've not used before, and I find that I can in fact create a new document from the initial Snapshot, using the 'New document from snapshot button', so that solves my problem.
Having a little trouble posting tonight; keep ending up with duplicate posts and can't find a way to delete them. Sorry.
-
Another way it to copy all layers from a document, then go to menu File ▸ New From Clipboard.
-
Thank you MEB
Your reply prompted me to explore the Snapshot function, which I've not used before, and I find that I can in fact create a new document from the initial Snapshot, using the 'New document from snapshot button', so that solves my problem.
In PS I used File>duplicate often and your method seems like it would be more elegant than copying all the layers, but I am unable to find the "New document from snapshot button". Can you tell me where that is?
Thanks
-
If you use swatches, you have a black and a white colour permanently on display to click on with your pet mouse ;)
Ah! Wonderful! Thank you! :)
-
I added a shortcut to 'Set Fill to 50% Gray' and another shortcut to 'New Fill Layer'.
So, now with a combination of two shortcuts I get a new layer and I fill it with 50% gray.
The difference is that with edit fill you have a pixel layer.
Where did you find "Set fill to 50% gray"?
-
In Affinity Photo in the Keyboard Shortcuts section of the Preferences dialog, leave the first dropdown selection at the default 'Photo', scroll down to 'Miscellaneous' in the second dropdown list and then scroll a little way down the list of shortcuts to find 'Set Fill to Black and White'. Click in the box on the right-hand side, type your preferred shortcut key (with or without modifiers) and then press the 'Close' button.
Oh lord; I hate keyboard shortcuts. I'm a "mouse person," not a "keyboard person." In fact, my keyboard stays tucked up under the desktop when I'm editing. It seems like it would be so easy to put a tiny little icon near the color picker.
But thank you for the info.
-
This would be a whole lot easier if I knew what this thing is called but I don't so...
On PS and the like, next to the little squares that let you set the foreground and background colors, there is a little icon with 2 fixed squares, one black and one white. You click on this to set the foreground/background to black/white. I assume AP has this ability but I sure can't find it.
Can someone please enlighten me?
Thanks
-
Looks like I found the problem: a little thing called FastPictureViewer. It was installed in the first Win8 system before AP, and I installed it in the second system after AP was working and before it stopped working. I uninstalled it from both systems and now AP seems to be fine.
Thanks for your help.
-
6c129ec4-4987-4736-8db3-4bab3d348380.dmp
663b8b54-5506-4053-946c-b32e280c769c.dmp
cdae3e4f-7ad0-48d9-97d1-fbcc3be04846.dmp
I installed a different download of AP Trial onto another Windows 8 system. it ran fine for a day then gave me the crash reporter when I tried to start it. I'm attaching three crash reports.


adjustments affecting more than selection
in Pre-V2 Archive of Affinity on Desktop Questions (macOS and Windows)
Posted
OOOOOOhhhhhhhh!!!!! That explains so much! Okay, thanks a lot.