shojtsy
-
Posts
194 -
Joined
-
Last visited
Everything posted by shojtsy
-
In Blend Options for an image in RGB, I can only choose Master, Red, Green and Blue to control blending. However in Curves I can work with LAB channels even if the main colorspace is not LAB. It would be very good to be able to choose LAB channels in Blend Options the same way. Color channels of LAB are fantastic to isolate an effect or adjustment to certain objects / areas of the image in a dynamic non-destructive way that masks can't reproduce.
-
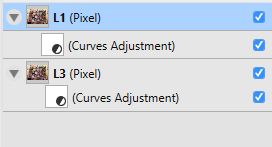
In the layers panel there should be more obvious visual distinction between a layer being in the child layer and the clipping mask position of an other layer. Please see screenshot below. It is hard to spot the difference of a slightly different indentation. Some differentiating icon before the layer icon would help.

-
AP Color Range Selection (HSL....)
shojtsy replied to fotojindra's topic in Older Feedback & Suggestion Posts
+1 -
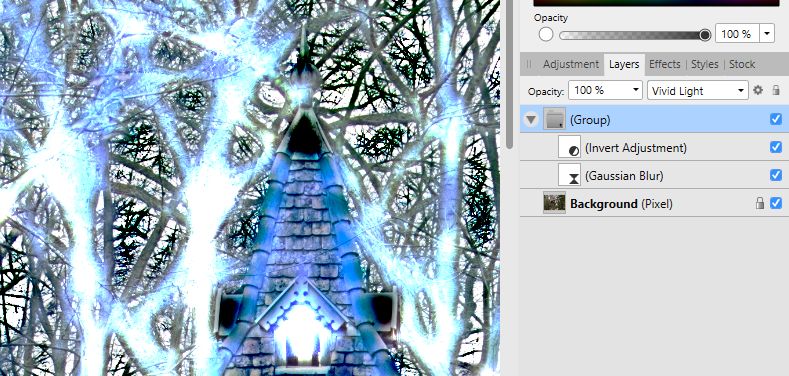
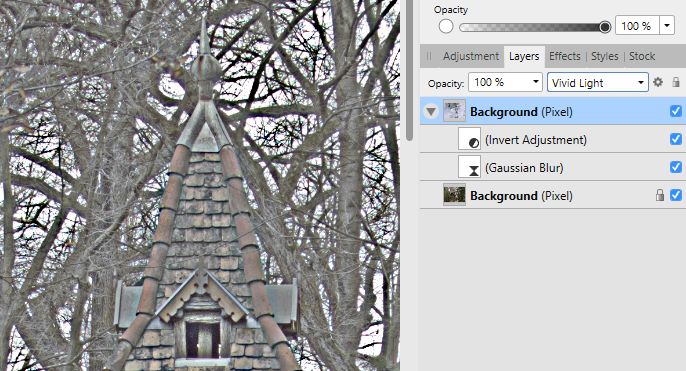
In AP you can achieve a pencil sketch effect by taking your layer stack, 1) Desaturate with an adjustment layer. I use Channel mixer, and Grey output channel. 2) Layer/Merge Visible 3) Nest a new Invert adjustment within the new pixel layer 4) Also nest a new Live Gaussian Blur layer within the new pixel layer, radius around 1.6 5) Set the blend mode of the new pixel layer to Color Dodge See attachment for result. This also work if your layer stack already included various live adjustments. However this removes the ability to further edit the adjustments in the below layer stack because they have already been "rasterized" into the merged layer as well. More precisely their further modifications will not be reflected in the end result as if they have been done before the pencil sketch effect. Is there a way to achieve the same effect (blending math) and still be able to edit the preexisting adjustment layers and have them affect the result in the same way as if they have been modified before creating the pencil sketch effect?
-
More precisely in my first post I had a Pixel layer with two adjustments as child layers to have both affect the duplicate layer BEFORE blending with the identical original layer. Sorry that I need to repeat myself. Pixel layer duplication or merging visible layers are steps that have no place in a non-destructive workflow. In reality I have a stack of multiple live adjustment layers already below the adjustment I am trying to achieve. If I need to merge into a new pixel layer the result of the existing layers in order to proceed with my desired adjustment on top of it, I loose the ability to later adjust the live adjustments in those below layers and have an effect on the result, therefore that layer merging is a destructive step. It makes a "permanent, unalterable change". I see the same issue with pixel layer duplication, but if that is debated, could we please concentrate on the necessity of merging visible layers being undesirable if there are multiple adjustments already? You said earlier that I should not merge then. But that is also what I want. Not merge, and still get the same effect what I now seem to be able to only get with merging. Blending of an adjustment surely means to take the original layer once, modify it (upper red arrow), take the original layer again (lower red arrow) and the modified layer and apply some math in which both the original layer and the modified copy of it are used. Normal 100% uses a blending math which ignores the original layer, but my question was about using other blending modes. I did read the help before asking questions here. But is is way too short and ambiguous. I still don't see how the blending modes of two adjustment layers and the one blending mode of the layer group they are in are together contributing to the resulting calculation. I had a logical expectation as to what calculation this should be doing, but it is not doing that according to the screenshots in post 1. It would be enlightening to be told what this setup does instead of what it does not do.
-
I would like to achieve the visual effect I get with case C below, but non-destructively. I was attempting to do D, with using blend mode on a layer group containing two adjustments, but it seems to do something completely different (my first post). This is not expected as A and B are visually identical (my second post). Also if Blend mode on a layer group containing adjustment layers only is not doing D then please explain what it does. If it does D, why does it look different than C?
-
Passthrough meant the default layer group blending mode called "Passthrough". It applies the filters on everything below the layer group and then only uses the result instead of some blending. However the question is what if the layer group blending mode is not set to "Passthough"? If they would be applied on everything below the layer group then the results of that would be visually identical to copying a merged layer of everything below into this group, and applying the adjustment on them. But they are not visually identical as shown in the screenshots in my first post.
-
Let me give a more obvious example first. Assume you have several layers already with adjustments, etc. You would like to apply some adjustment on top of these. If you are forced to merge all visible layers into a new pixel layers in order to be able to apply your adjustment, you remove the ability to return to your earlier adjustments, readjust them and have the change affect the result as if you would have made them originally, as their earlier setting is already frozen into the merged pixel layer. This is already undesirable and would explain a need for avoiding the pixel layer duplication for the purpose of an adjustment (which is my goal). Now, for the specific example of having only a single pixel layer originally, and duplicating it to reach some visual effect, I still consider it a destructive workflow, as further modifications to your original pixel layer are not automatically transferred the copy of it, and will not be reflected in the end result as if you had made them on the pixel layer before applying the effect. This ability to return to the source material, do some edits and have it reflected in the already adjusted result is a key benefit of having live filters in the first place, so I would not like to lose it. Returning to the original issue: What happens when you have a layer group containing only adjustment layers and no pixel layers, and you apply it with a blend mode other than passthrough? What are the adjustments applied on if there are no pixel layers in the group? I would consider the only logical behavior to be to apply the adjustments on top of the layer stack below (as if passthrough) and then take the result, and blend it together with the image that is produced by the layers below the group. If this is how it would work, then the same result is expected if I merge the below layers into a duplicate, put that into the layer group and apply the adjustments on top of that, blending the result with the layers below the group. However the experiment shows different results (first post in thread)
-
What I meant is that I would like to have a live workflow, where I can return to any step, modify and have the effect of the modification dynamically applied on the final image as if I would have done that modification it originally. This excludes using pixel layer duplication or merge visible into new layer, because those "crystalize" the state of my earlier modification, and I can no longer easily return to them and readjust, so I would like to avoid doing any pixel layer duplication or merging to a new pixel layer. With this mindset, you can understand that it is more desirable for example to achieve the effect of a single Invert adjustment with Hard Light blend mode by having a standalone adjustment layer, instead of a duplicate pixel layer with the adjustment applied locally to it, and then the result blended with the original with Hard Light. However when using not one, but two adjustments and asking to blend the result with the original image, I seem to be forced to the destructive workflow and create a copy of the pixel layer. Since it is possible to avoid the pixel layer duplication for a single adjustment, and still have the same effect, I would expect that it should be possible for the combination of two adjustments.
-
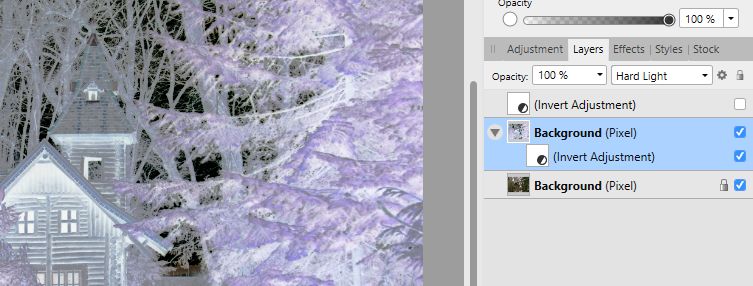
I am duplicating the background layer. It is static in the sense that the copy of the background is not updated when I am updating the background. I would like to achieve the same visual effect as the background copy solution but still be able to edit the background layer and it's changes reflected in the adjustment layers as well. The way adjustment layers are blended when they are standing alone and have some blend mode is that they apply the adjustment to the original image (1), then take the original image again (2) and blend it together with the result of the adjustment. Which is just the same as making a copy of the pixel layer, apply the adjustment to it, and then blend it with the original pixel layer. I demonstrate this with the two screenshots below. In the first image I duplicated the pixel layer, applied an Invert adjustment, with Normal mode on the adjustment and Hard Light on the pixel layer. The second screenshot shows that this is the same as having an adjustment layer only with Hard Light on the adjustment itself. However this have the benefit of being a live adjustment and correctly responding to further edits of the background layer. I would like to do this but not with one adjustment layer, but composition of multiple. I described what happens when a standalone adjustment layer is applied with a blend mode, which acts as if applied to the copy of the underlying layer. Please help me understand what happens when a group of two adjustment layers are applied with a blend mode.
-
Bump
-
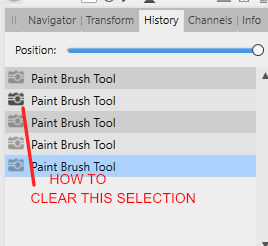
When using the undo brush in AP 1.6 by default it paints the original state of the image. I can modify this by clicking on the camera icon in the history panel next to one of the earlier states. After painting with one state selected in history panel, I would like to again paint to the original state, as if no camera icon would be selected. But there doesn't seem to be a way to clear the camera icon from history panel. I can only move it to other states, but then there is no way to undo-brush to the original state.
-
Any idea on this?
-
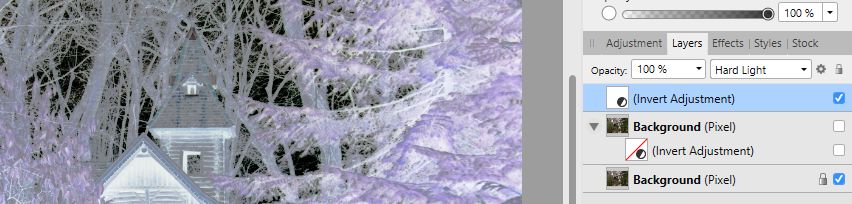
One can set the blend mode on an adjustment layer to for example Darken, and this results in the original layer and the live adjustment of it being blend together with Darken. Same for live filter layers. However I would like to take a series of adjustments and live filters, do all of them in a sequence on a pixel layer and then take the resulting adjusted image and blend with the original using some blend mode like Darken. Or for example take a blur layer, an invert layer and then apply the composition of these two with Vivid light blending to the original. The only way I can achieve visually what I am looking for is to duplicate the pixel layer, put the adjustments & filters on it and set a blend mode on it. However the layer duplication step makes the result a static filter, which no longer reflects changes in the original pixel layer. I was expecting that putting just the live filter and the adjustment layer into a layer group and then setting blend mode on the layer group achieves this non-destructively, but layer groups doesn't seem to work like this. Look at the screenshots, my expectation is to see the same image in the two cases. Is there some way to achieve this non-destructively?
-
Shadows & Highlights in Raw
shojtsy replied to IndigoMoon's topic in [ARCHIVE] Photo beta on Windows threads
Same here -
I am also very much interested in getting a fix for this. I can't replace LR without a working shadows/highlights adjustment. Happy to see that others are also noticing the issue.
-
Steps to reproduce: 1) Have a pixel background layer. 2) Create adjustment layer with a very visible Levels adjustment, such as heavy lightening 3) Nest a Live Gaussian blur filter layer with high radius as child of the adjustment layer. Intended purpose is to blur the embedded mask of the adjustment layer. 4) Activate the adjustment layer, switch tool to a large paintbrush, black color to erase from the mask of the adjustment layer. 5) Move the mouse over the layer without pressing the mouse button, and observe a trail left over by the preview of the brush 6) You can clean up the view by disable and then enable the adjustment layer. Please see attached screenshot
-
What is the process to have an existing entry in lensfun changed? I have Olympus Stylus 1. It is mentioned in the database, however I am not happy with the lens correction. It significantly differs from what the camera itself does in jpegs. The correction applied by LR on raw files matches exactly that of the in-camera jpegs.
-
I have the same request. Please make the shadows/highlight adjustment in develop recover detail like in many raw processors instead of producing a washed out gray which is unusable. The filter in photo persona can no longer work with the raw data, so it is inferior in any case. I am forced to continue using LR on raw files to have proper shadow/highlight recovery.
-
Hi jhoy, Reset helped, thank you. One of the bewildering things, that made it harder to see what the problem is, is that the developer assistant settings window works unexpectedly: the tone curve setting is immediately applied while the assistant windows is still open, but the lens correction setting is only applied on newly opened images.
-
Hello, I have Olympus Stylus 1, with the firmware upgrade, which makes it self-identify as "Stylus 1,1s" I have Affinity Photo 1.5.2.69 on Win10, which AFAIK includes lensfun 0.3.2 database, which supports Stylus 1, and even seems to have an entry for the identification after firmware upgrade. However AF does not apply any lens correction. I do have it enabled in assistant. Please see attached a raw file and the same jpg from camera for reference. Is there something I can do to fix this? Other Stylus 1 users, does it work for you? P5193577.ZIP
-
I use Affinity Photo 1.5.1.54 on Win 10/64. AP has several non-destructive methods to desaturate a color image and keep luminocity information only. 1) You can have a black Fill Layer with Saturation blend mode 2) You can have a HSL Adjustment layer with saturation completely pulled down 3) You can have Gradient Map adjustment with a Black-to-white gradient 4) You can view the Luminocity channel if the image is in LAB mode And all 4 (!) have a different idea of what luminocity of a pixel is and results in a different black-and-white image. To top it off, there is a fifth place with yet another luminocity calculation, and that is Color Balance filter with "Preserve Luminocity". The way that allegedly "preserves" luminocity does not agree with any of the other 4 listed luminocity conversions and you can see the desaturated image changing if you have a Color Balance filter with one of the desaturation filters on top, and you move the color balance sliders. All this seems pretty ad-hoc to me. Is this justified? Wouldn't using the same calculations help with consistency of results? What formulas are being used for luminocity calculation in these? luminocity_chaos.afphoto
-
Thanks Bart, Wouldn't such a BW adjustment be more useful/natural which defaults to the desaturated image, and applies changes relative to that? At least as an alternative setting? It would be more in line to how most of the adjustment layers work, the default setting making no change. Because the current one seems like a quite arbitrary mix of those channels with a result not resembling the original image. Cheers
-
Hi, I use AP 1.5.1.54 on Win10/64 on RGBA/16 image. I am trying to use a technique I have seen in one of the tutorial videos (I forgot which): creating a BW adjustment layer, and setting it's blend mode to luminosity. This should allow me to adjust the luminosity of each color range separately. However I have noticed that the default BW adjustment layer, with all sliders on 100, have quite different luminosity than the original image. I have expected the above described layer to be of no visible effect, but it significantly brightens the image. I am doing something wrong? Wouldn't it be a reasonable expectation for the default BW adjustment to have the same luminosity on all pixels as the original image?
-
Hi Please implement feature to view and paint on displacement map of live displacement filter, and bump map of live lightning. This would make them much more usable. Also, imagine getting an afphoto file with one of these filters in it from somebody else. How do you continue editing it, if you don't have direct access to the contents of these filters?