
dreikelvin
-
Posts
18 -
Joined
-
Last visited
Posts posted by dreikelvin
-
-
I tried following a few of the demonstrations from the "What's new in..." videos of Affinity 2 and came across this weird behavior:
When I choose to place multiple photos inside of a rectangle, it only works for one rectangle. All the other rectangles are not being touched and the photo inserts inbetween the layers.
In addition to that, the panel that shows the to-be-placed phptos always disappears when I go into the layers panel to select my layer. It also does not help to pin it via the pin icon on the top right. The whole placement panel acts really weird and I would hope this can be improved on the ipad?
Thanks in advance!
-
OK so forgive me, but I just went and tried to align some outlined half circle elements and even with magnet function on, it wouldn't work really as smoothly as I wanted it to be. I can align most shapes, but the red one only snaps in vertically, but not horizontally, causing the two anchor points to be not precisely aligned.
I know I could rebuild this shape later but for some of us, the process of creating something is a little different. 😅
 alignment.afdesign
-
On 6/20/2021 at 6:55 PM, Hangman said:
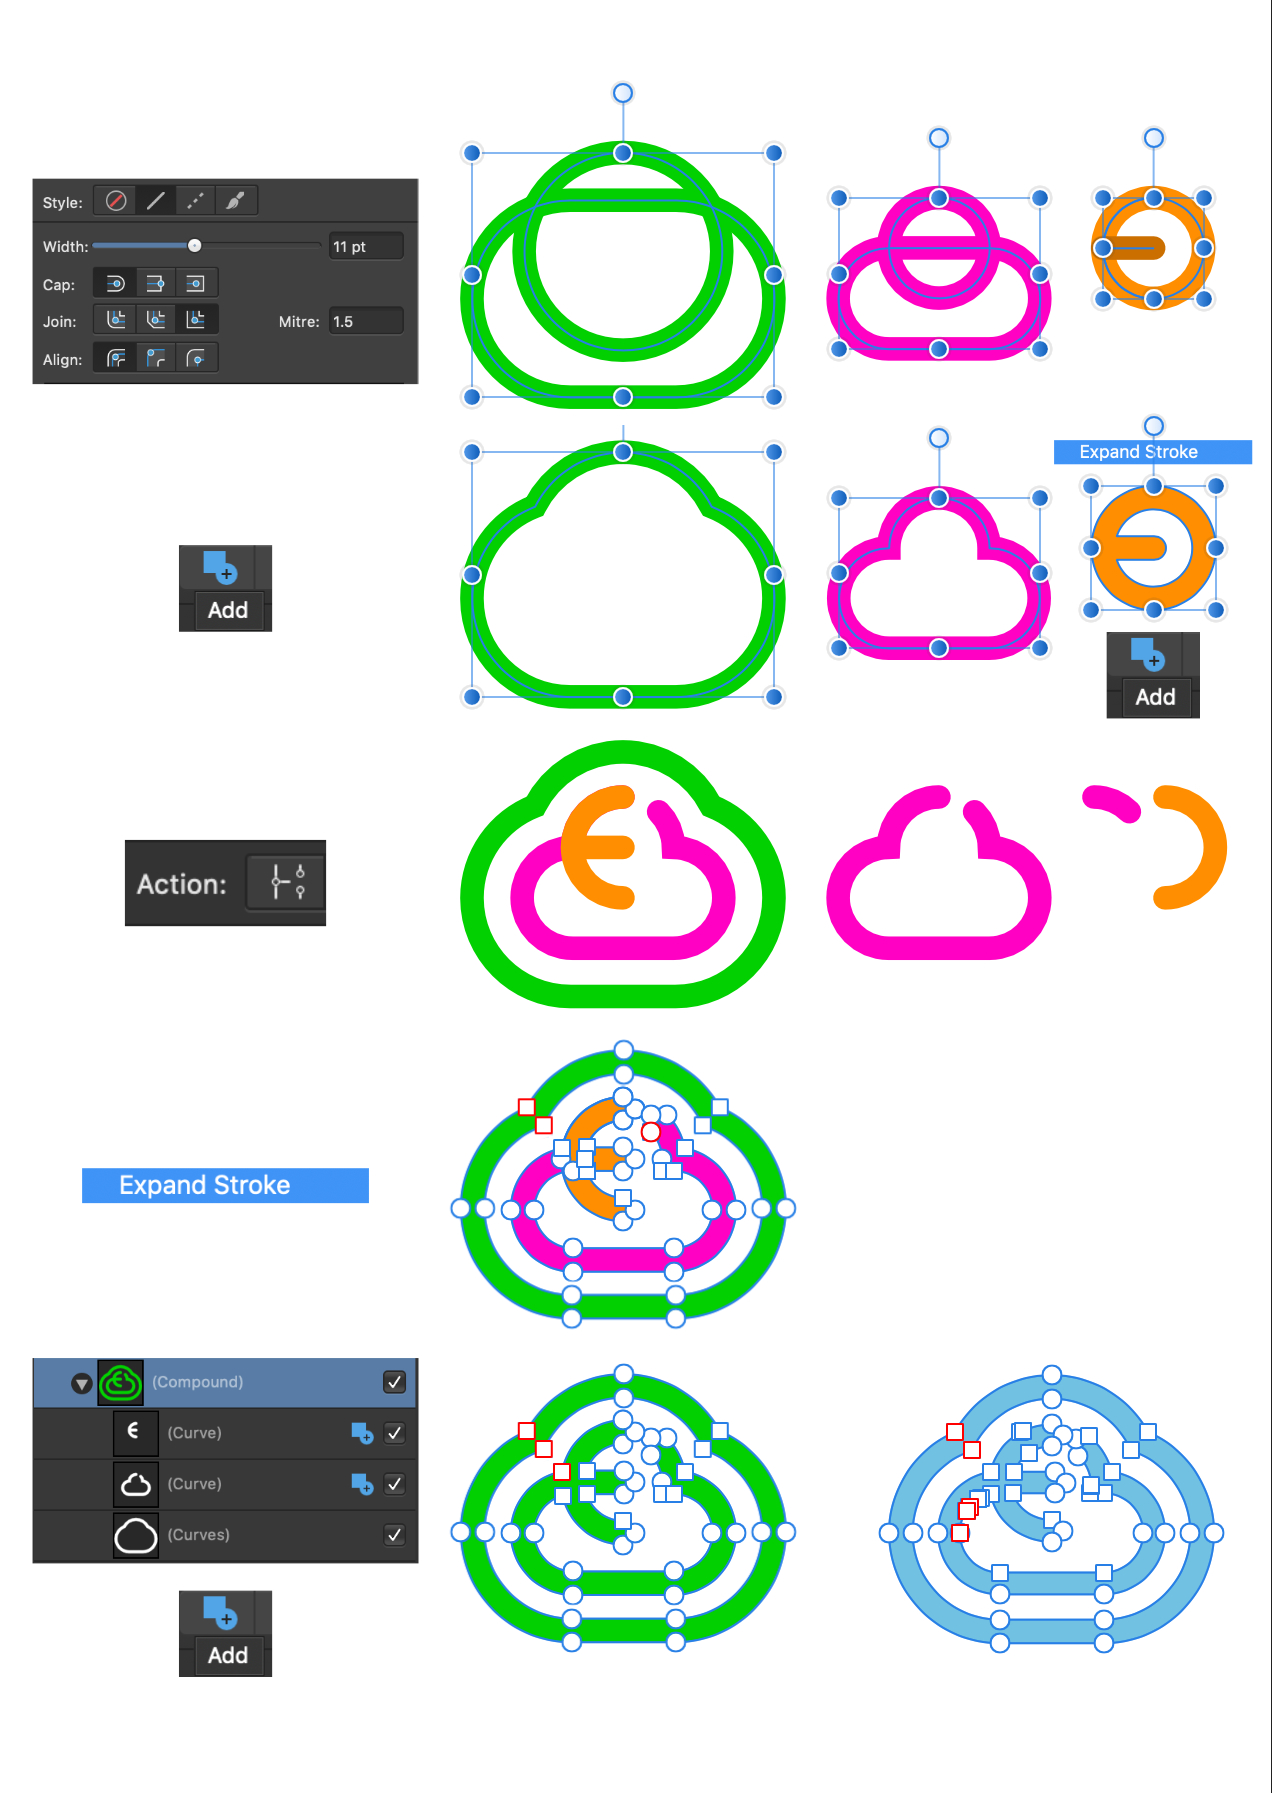
Precision seems to be key when creating the initial graphic to avoid introducing extraneous nodes... A good example of this is when using the Corner Radius slider for the Rounded Rectangle tool. Applying the slider manually and setting the value to 50% can be a bit hit and miss resulting in any value between 49.5% and 50.5% being rounded to 50%. The issue here though is for any slider value actually below 50.0% but rounded up to 50.0%. When the Rounded Rectangle is converted to a Curve you end up with two Sharp Nodes instead of a single Bézier node... (see graphic).
Any slider value above 50% then rounded to 50.0% or typing the value in manually as 50% and things appear as expected, resulting in a Bézier node.
The same is also true when positioning elements that you later intend to apply Boolean Operations too. So for example when the centre of the circle isn't perfectly vertically aligned with the Rounded Rectangle's upper border vertical centre then once merged using the Add Boolean Operation you end up with additional nodes...
versus when perfectly aligned, just a single node once the Boolean Operation is applied...
If creating the Cloud Logo, these are the steps I would follow ensuring perfect positioning of each element throughout resulting in a cleaner finished graphic without the extraneous nodes...
This then results in a clean outline when the stroke is applied and expanded...
wow, thanks for this advanced insight. in all those years primarily using adobe illustrator and corel draw to create my logos, I would never have thought about going the extra mile and deep-checking all my nodes and how accurately the shapes are formed. I started off with just outlines half circles and puzzled them together until I had this shape. It is better to re-build the logo from scratch, once you have the basic idea.
I would still be super thankful if you guys ever plan to implement some cleanup tools. especially when dealing with complexer shapes and traced artwork, I think this would come in really handy.
anyways, this just opened my eyes a little more and I will try to be more careful when working with pieces of shapes, thanks! -
Blend Tool Equivalent Needed. +1
-
1 hour ago, sebasnieb said:
This is happening to me as well.
Actually with similar shapes some are expanded correctly others are not, as the Image bellow
yeah that looks like what I am also getting besides me being just lazy and not checking for leftover artifacts.
looks like one of these things is an actual problem and the devs are already looking into it. at least I hope so 🤞
-
8 hours ago, Dazmondo77 said:
Almost got exited, saw 'Distorted' and 'Vector' and immediately thought """VECTOR DISTORTIONS""" --- about flippin' time ----- then read the post -----
I'm still searching for the metaphysical functions hidden in the settings...I'll keep you posted 🤖
-
Thanks for this, indeed the vector shape was created by combining a variety of circular shapes with the addition function in combination with shapes that come from expanded strokes themselves. I wasn't expecting this to happen. Never occurred to me I had to zoom in on a node point that I assume is just a single point ... only to discover even more node points.
") I remember when I used Illustrator a decade ago, I could simplify a shape using a panel that had a slider and other "clean up" functions. Does this exist for Affinity Designer?
I remember when I used Illustrator a decade ago, I could simplify a shape using a panel that had a slider and other "clean up" functions. Does this exist for Affinity Designer?
-
Hi there, as requested in this Twitter thread:
https://twitter.com/dreikelvin/status/1405452747101638660
I am posting my vector file for further investigation of this problem.Thanks again!
-
hi there,
another problem I came across is the editing of masks. want to make a layer partially visible by simply filling it black first and then drawing into the mask using a brush. using the combination shift-F5 only seems to work for normal layers, but not for masks. is there some kind of "mask mode" that I have to enter?
thanks again,
robert
-
found it, thanks!
-
Hi there,
I've been testing affinity photo for 3 months now. had to stop for some time because of buggy behavior of previous versions. Since I am editing photos on a daily basis using photoshop, I cannot afford much distraction or slowing down of my regular editing workflow. So I test the app here and there. It still takes me twice the amount of time to edit a picture using Affinity photo compared to photoshop.
This is not about the quality of this app. I have high regard in it and I hope to replace all my adobe products with these programs in the near future! I am sure my workflow will become faster the more frequently I use this app.
One thing that came up today was the existence of a filter that somewhat mimics photoshops "median" functionality. I sometimes have a shape that I want to smoothen a little. I do that with the median filter.
How can this be achieved?
-
hi there, first of all, the release version number doesn't seem to be the same as mentioned in this thread (see attached picture)ok nevermind it works now ;)
second, I tried exporting to svg today and it merges down everything into one layer. I read that one of the previous versions could do that?
-
thanks, this will be very useful :)
once this software is out of beta, you will have a buyer!
-
hi there,
I am amazed about the beautiful UI and the ease of use of this new app :)
is there a way to set the opacity of the active layer by keyboard shortcuts? e.g. in photoshop you simply use the numberpad for this.
thanks,
rob


Warp mesh producing artifacts and glitching out
in V2 Bugs found on iPad
Posted
When you apply a warp mesh on a grouped vector layer and have a go at some warping, after a while, the shape will glitch out and produce weird artifacts. I am using an iPad Pro M2 with 16GB RAM
Has anyone experienced a similar thing?