Raff
-
Posts
72 -
Joined
-
Last visited
Everything posted by Raff
-

Curves and layers.
Raff replied to Raff's topic in Pre-V2 Archive of Affinity on Desktop Questions (macOS and Windows)
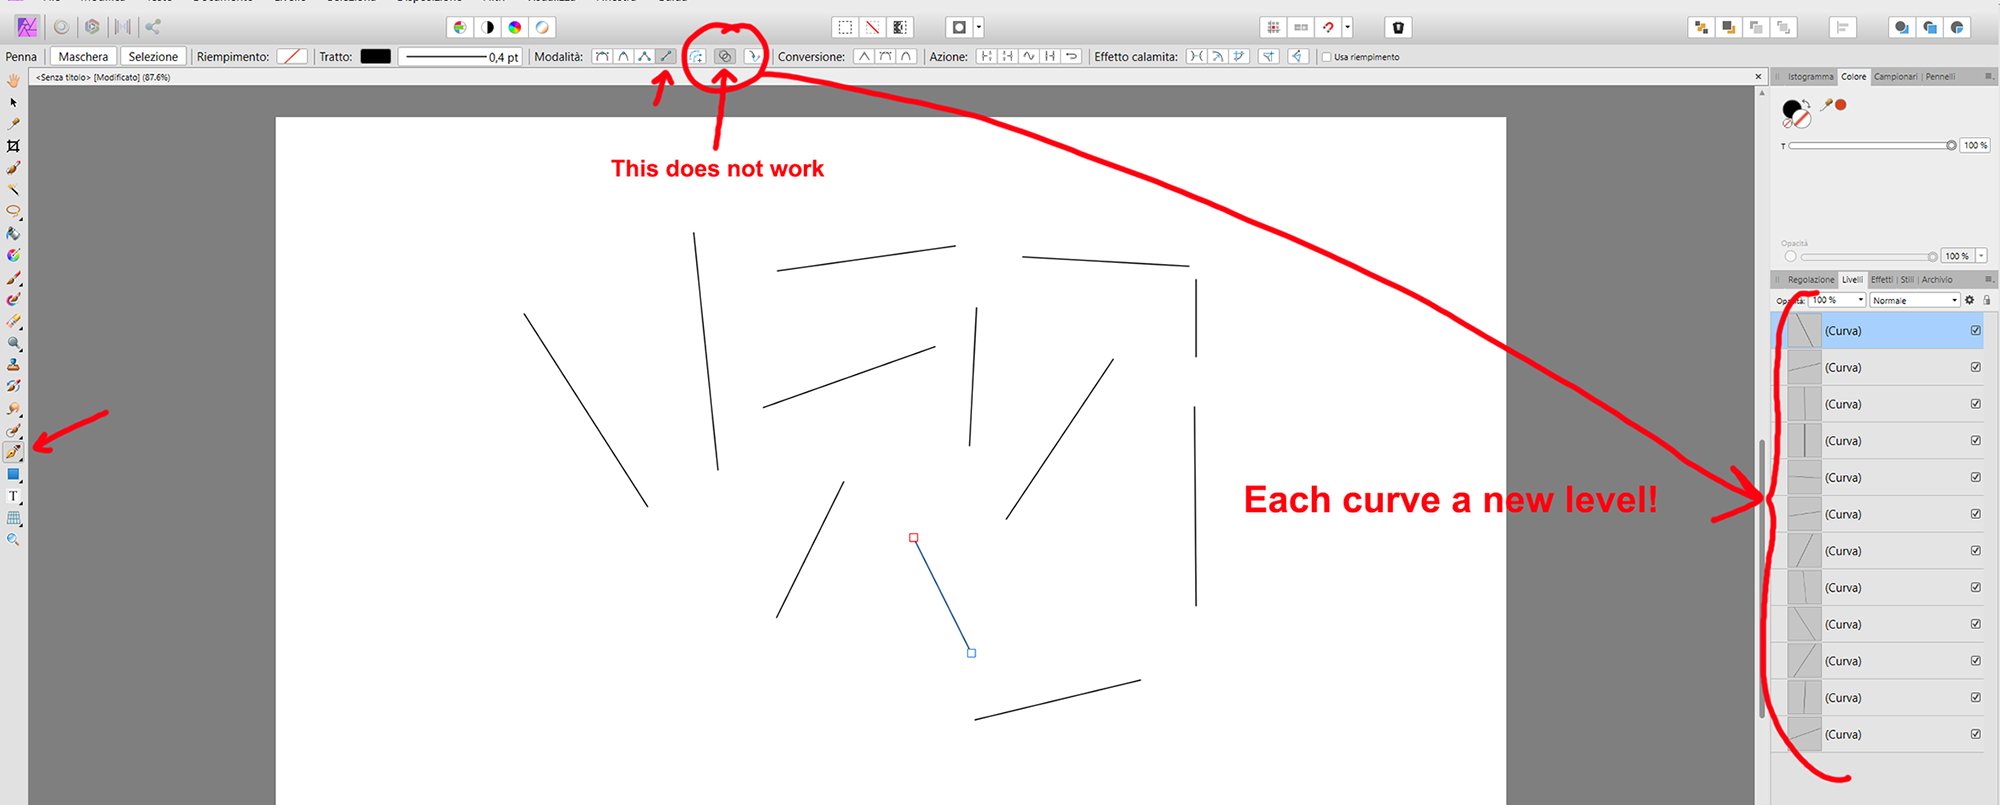
Thanks walt. it works! I didn't know that using "esc" you could create curves and single lines. -
Affinity Photo. Windows 10 - 64 bit I have to draw many lines to make a drawing. I selected the "pen" tool with the "lines" modality and the "Add new curve to the selected object" option, which should cause all curves drawn after to end on one level. Does not work. Each curve I draw creates a new level, and I find myself having to manually "compact" all the layers one by one. Any suggestions? Thanks! I enclose an example screen.

-
If anyone is interested, I got the solution from XP-PEN. Uncheck the "Windows Ink" option in the display control panel. It works!
-
Thanks firstedefence. Sorry, I didn't specify that I work with Windows 10 Pro 64 bit. I installed the latest driver from the xp-pen site
-
I've had the XP-PEN 15.6 Pro display for 2 days. I'm trying to work with Affinity Photo. In general it seems to me that is fine, but I found a problem. When I use the brush without the stabilizer, while drawing instead of showing the drawing point with the circle of the brush, the arrow-shaped cursor remains visible, which is annoying. The arrow disappears only if I press and hold the right button while drawing. I would not like, however, that by using it very much, the right button would be ruined. If I set the stabilizer, the cursor remains with the circle shape of the brush even without pressing the right button. Has anyone experienced this particular problem? Thanks if there's a solution that I can't find by myself.
-
I need this too. Does it still exist?
-
Fill with pattern
Raff replied to Raff's topic in Pre-V2 Archive of Affinity on Desktop Questions (macOS and Windows)
Ok, I'll do some tests! -
Fill with pattern
Raff replied to Raff's topic in Pre-V2 Archive of Affinity on Desktop Questions (macOS and Windows)
I tried duplicating the level with only the selection, but it does not work! It makes a black fill ... Instead it works if I apply the fill at the basic level. -
Fill with pattern
Raff replied to Raff's topic in Pre-V2 Archive of Affinity on Desktop Questions (macOS and Windows)
Thanks Toltec! It is not exactly what I hoped, but I will try to adapt it to my needs. -
Inpainting
Raff replied to Dempsey@doodle's topic in Pre-V2 Archive of Affinity on Desktop Questions (macOS and Windows)
I do not know if that's what you need, but an "Impainting" (which I do not know what it is! ) Is in the "fill" command
-
Fill with pattern
Raff replied to Raff's topic in Pre-V2 Archive of Affinity on Desktop Questions (macOS and Windows)
Thanks Bri-Toon, but I forgot to mention that I'm using Affinity Photo, and I do not find the bitmap option in the fill command...
-
I miss this filling function, or at least I can not find it if there exists! I need to fill in selected areas with a "pattern", a bit like you can do with CAD programs. In Photoshop it exists in the "fill" function. I attach a screen. Does this possibility exist in Affinity? Thank you!
-
Cropping
Raff replied to debbru's topic in Pre-V2 Archive of Affinity on Desktop Questions (macOS and Windows)
Perhaps because I was focused on the problem. -
Cropping
Raff replied to debbru's topic in Pre-V2 Archive of Affinity on Desktop Questions (macOS and Windows)
Thanks to you too, owenr. This is a simplified version of the system indicated by Toltec, working directly on the image without importing it into a new file. -
Cropping
Raff replied to debbru's topic in Pre-V2 Archive of Affinity on Desktop Questions (macOS and Windows)
Sorry, I'm not a native English speaker, I'm Italian, and my terms are not perfect. -
Cropping
Raff replied to debbru's topic in Pre-V2 Archive of Affinity on Desktop Questions (macOS and Windows)
Perhaps the term "crop" is not correct, but it is the operation I do with Photoshop. And it's not a copy, because I cut a portion of the image and take it to its original size. In practice it is a proportional magnification. The DIMENSION is the original, not the final image. -
Upgrade Affinity?
Raff replied to Raff's topic in Pre-V2 Archive of Affinity on Desktop Questions (macOS and Windows)
Photo. Thanks John -
I have the version 1.6.4.104, is there an update? And if so, where? Thanks for your help!
-
Cropping
Raff replied to debbru's topic in Pre-V2 Archive of Affinity on Desktop Questions (macOS and Windows)
Done. It works! Thanks -
Cropping
Raff replied to debbru's topic in Pre-V2 Archive of Affinity on Desktop Questions (macOS and Windows)
Thanks! I'll try!" -
Cropping
Raff replied to debbru's topic in Pre-V2 Archive of Affinity on Desktop Questions (macOS and Windows)
Thank You, toltec, maybe could you describe a little your procedure? And it works for the "proportional" crops too? -
Cropping
Raff replied to debbru's topic in Pre-V2 Archive of Affinity on Desktop Questions (macOS and Windows)
Yes, maybe there are more way to obtain this result. The crop system of Photoshop is easy, fast, and visually controllable in real time. In the same way the "proportional" crop. In photoshop it works, in Affinity no. I'm trying Affinity to see if I can totally replace it in place of Photoshop, both as functions available, but also as "usability". And there are some things that still make me doubtful. -
Cropping
Raff replied to debbru's topic in Pre-V2 Archive of Affinity on Desktop Questions (macOS and Windows)
1. I don't want a SMALLER section, I want a crop with the SAME dimension of the original! 2. I wish to can make a proportional crop using the mouse or the tablet pen, not a calculator!
-
Cropping
Raff replied to debbru's topic in Pre-V2 Archive of Affinity on Desktop Questions (macOS and Windows)
Same problem. I need to crop an image maintaining the ORIGINAL ZISES AND PROPROTIONS of the original. How??? I created a preset with the specifical dimensions in pixels, but: 1. How to make a crop keeping the DIMENSIONS and PROPORTIONS of the original file? In Photoshop I use "Original size" and I can also make a crop of a very small portion of the image, but the result will have the same size and proportion of the original. In Affinity I can not do it in any way! The crop does not maintain the dimensions I specified, it reduces the image. 2. How to maintain the proportions of the original? In Photoshop using the shift key the crop keeps them, in Affinity I do not find this possibility, the crop is "free", it changes both the width and the height of the image arbitrarily.
-
Same problem with Wacom Intuos 3 in Affinity Photo. Only one document opened, setted all the pressure controls in the "more" tab, clicked on the icon of pressure, but there is no variation of the brush dimension. I tried with many brushes, base, painting etc.