

Signguy
-
Posts
223 -
Joined
-
Last visited
Posts posted by Signguy
-
-
-
I got on a sign cutting forum the other day were people were talking about Windows 7, Adobe, and their cutting software. Most everyone agreed that they did not want to upgrade to Windows 10 because they are finally happy with how seldom there software crashes under Windows 7. There computers were only crashing a few times a day now. LOL. I can't believe anyone would be happy with that. I for one am extremely happy that Affinity Designer is Mac only.
-
I'm not seeing this as a priority for Affinity as it is not on their roadmap. I'm sure the Roland users would like a plug-in too. You will just have to stick with the export/import process for now.
-
That's understandable. You could add the colour palette as an Application Palette on both machines while I investigate further - this seems to work OK.
Which OS are you using?
10.3.3 Yosemite. Yes, I can confirm that it seems to work when set as an Application Palette but not as a system palette. I can't ask for more than that. I'm happy that at least I can re-import my palette as an application palette and it will work. That was the difference between the two computers even though the snapshots don't show it. Thanks for your help!
-
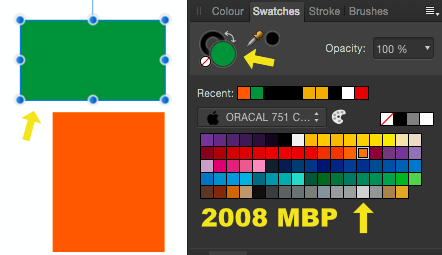
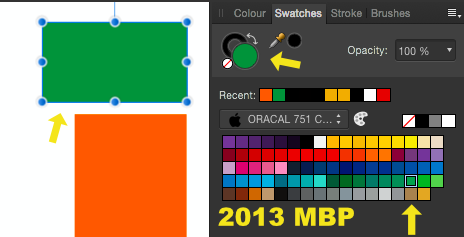
I'm getting the same result as your 2008 MBP. Which ever System Palette I use, it doesn't reflect the colour of the currently selected object. However, If I use an Application or Document palette, the correct colour is selected.
Did you import the colour palette directly into AD on both machines? Perhaps you could reset AD on your 2013 MBP to see if it stops working ;)
Yes, color palette was directly imported. I'm a little afraid to reset the newer MBP since it's working on that one. It does work on the native palettes on both machines but I find it odd that it doesn't work on imported palettes on one of my machines.
-
I have 2008 15" MBP and a 2015 13" MBP. Both running same OS and same version of AD.
When I click on an object in my document, one laptop will highlight it's color in the color palette but the other one will not. The color does show up in the small color wheel next to the color picker icon on both. Do I have a setting turned off somewhere?
I have reset the 2008 MBP using Control key upon startup.

-
If you are using the Beta version, you can go to the Export persona Export Options panel, select an SVG preset, switch on Export text as curves, then click on the menu in the top-right corner and Create Preset. This preset should then be available in File > Export, and it should remember which preset you last used.
Thank you! Your team has thought of everything. :-)
-
When Exporting to SVG, I need to turn on the option to "Export text to curves for font independence". This is the only way I can export/import into my sign cutting software.
Is there a way to have this set as a default without me having to click the checkbox every time I export one of my documents or can AD remember the last export options?
-
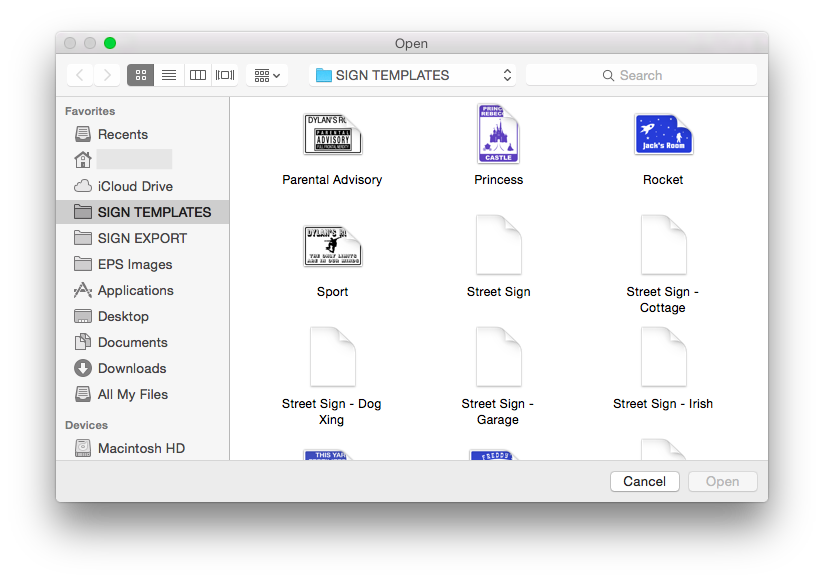
I have a problem with file preview in finder. Other files are working. Is just mine?
I'm having same issue as well. I do not have any of the Beta's installed. Deleted MAS Version and reinstalled. Still no thumbnail previews. :(
Edit: I installed the latest Beta and thumbnail previews work now. Guess I will need to keep both on my system until the MAS version is updated down the road. I've discovered that this can happen when you install some of the betas and then remove them.
It's all good though because the Betas are just too irresistible and it's hard to not want to play around with the new features. :D
Edit X2: If you feel courageous enough you can also try to rebuild the LaunchServices Database on OS X. If your like me and you install the Betas and then delete them, this kind of thing can happen.
Open Terminal and type the following:
/System/Library/Frameworks/CoreServices.framework/Frameworks/LaunchServices.framework/Support/lsregister -kill -r -domain local -domain system -domain user
This worked for me after I deleted the beta.
-
Actually, you really shouldn't take the easy road. You can learn how to create amazing drawing and shapes in Affinity Designer. Check out this free resource (Affinity Review #1) and watch the videos toward the end and you will be creating arcs in no time.
-
Also, sometimes I'll open an old file and not know if I had already converted text to outlines... so it's not only needed for exporting files, but while the file is open, to check if it's editable text or curves...
I agree with you ronnyb on this one. It's difficult to know if you have already converted editable text to curves or not and the view doesn't help to make that determination. I always have to save my document as editable text before I convert to curves so that way the next time I need to change something, I can easily do it without having to remember the point size and font name. Or, I have to duplicate all my text fields and hide them before converting to curves so I at least have something that I can edit the next time.
-
I agree with leaving it the way it is. It's nice to see the outlines especially for vinyl cutting. Having a solid font wouldn't allow me to see overlapping fonts or other issues as stated above. It works great in my production environment so I would have to disagree with ronnyb on this one. If you wanted to incorporate an option(checkbox) to display fonts as outlines in outline view then I'd be OK with that but I need to be able to keep the outline mode the way it is.
Outline mode should be exactly what it is... An outline.
-
If Designer can run on a 2008 Macbook Pro and an iPad, I really don't think you will have ANY issues with it running on the newest Macbook. I need USB ports for my vinyl cutter and external drive so I opted for a new MBPro instead.
-
The above selection works but it's nearly impossible to make sure that your curves are the same when doing it that way. I have a different approach for you.
1. Grab the trapezoid tool and draw your shape.
2. Convert it to curves.
3. With the node tool, grab on ONE of the vertical walls and curve it to your desired shape.
4. Now, duplicate the entire thing using command J and flip it horizontally.
5. Select both shapes and then click on the intersect boolean.
This approach will ensure that both horizontal curves are the same.
-
I've had issues with the divide boolean function as well. It used to work in earlier versions but I've had to change the way I do things.
Try this: Select your left and right leaf and then click on the intersect boolean. Copy that new shape to your clipboard using Command C. Next, undo the intersect boolean using the history feature or simply by pressing Command Z. Next, select all your objects and add them. This will give you your shape without any of those lines or gaps. Next past your clipboard object into your document using Command V. Now you can subtract that shape from your main object and you will have the desired look that your after.
-
command + is zoom in and command - is zoom out. Always has been when using any Mac app. I wouldn't want this behavior to change. Why change the default Mac behavior? If someone is used to the way Illustrator works then use illustrator! I would want the Affinity UI to match the default UI behavior to keep things in sync.
-1 vote to switch between documents using command +. Control tab works just fine in either windowed or full screen mode. Don't complicate things just for the benefit of the AI users out there.
-
For the life of me, I can't figure out how to change ambient or light source color using 3D effects. I thought you just clicked on the color boxes. At least that is what the help file shows but it's not working. MAS v1.2.
Edit: Just noticed that none of the color boxes work in Effects panel.
Edit: I had to reset settings using command option on startup. Colors are now working.
-
Sounds like you are going to want to create a document with a transparent background and then learn how to create a compound object. You will want the shapes to be subtracted from the compound. There is a good video here that will explain how to do it. You can then export that as a PNG file and the overlay will do what you want. It's real easy once you do it and I use this ALL the time.
-
I feel that your decision to go Mac only is spot on. It's funny how so many people want all that Affinity has to offer on their PC. If they only realized the limitations of their choice of operating systems, they would understand why this is Mac only in the first place.
If you want the benefits that a Bugatti has to offer, you don't buy a Ford Fusion and get mad that Bugatti doesn't make an engine for your Ford. I use Windoze, Linux and OS X operating systems. They all offer one benefit over the other in certain areas. Serif made their choice and decided to capitalize on all the features that it's chosen operating system has to offer. Was it to fill a niche or to capitalize on the the OS's benefits and abilities? Obviously that question has already been answered. They have designed a super responsive program that will be(and apparently is) the envy of the competition.
Keep up the great work Serif and if you as a user really want the benefits of the Affinity product line, get a Mac and be happy.
- MacGueurle, peter and Gear maker
-
 3
3
-
I deleted the Beta and then re-installed. Now the file icons show up again. So it must have something to do with file type association. Some how they must have been changed. Strange that you need to delete the app and re-install.
-
I'm not sure what I did to change the behavior of Affinity Designer Beta but now when I save a document, it's thumbnail does not show me a preview of the documents contents. What did I do and how do I fix it?
-
I know that there will be additional work done in the future with nodes and such. Would it be possible to have an option to count the number of nodes in a selection or even the entire image?
-
FYI
Issue with file export. When you export a selection as an EPS file and you select to save the selection without background, The file saves OK but the thumbnail for it appears small and off centered. It's difficult to see the preview of it in the finder like this. However, when saving the selection with background, it works OK.
-
Are there any plans to reduce the number of nodes on a path? Many items have hundreds of nodes when you expand stroke and other various modifications. When I try to cut the objects with my cutter, it tries to cut from node to node resulting in extremely slow cutting process.


Moving a masked image within a vector mask
in Pre-V2 Archive of Affinity on Desktop Questions (macOS and Windows)
Posted
Using the past inside method, you can convert the shape to curves, then select the node tool and then select all nodes of your shape by hitting Command + A, then you can grab a single node and move your entire shape without affecting the image. The shape and the image can be adjusted independently. If you want to resize the shape, you need to select the node tool and all the nodes and then you can use the transform tool in lower right to change the size of the shape. You can make sure the aspect stays the same by clicking on the aspect icon on the right that looks like an 8. It would be nice if you could use the mouse scroll to change the shape size like you can with a font size.
Resize Shape.mov