
.png.aa66cd33eb10f6ec8236f57526c0c4b1.png)
GregParris
-
Posts
24 -
Joined
-
Last visited
Posts posted by GregParris
-
-
43 minutes ago, DesignMeister said:
Greg,
Once you have imported your LUT, you can simply click on the plus icon on the menu bar which appears at the bottom of the screen, the simply give it a name and it will then permanently appear in the list of LUTs, showing a preview box.
Hope that helps.
Hey DesignMeister!
Thanks for the tip! I do have a question (And I freely admit that I'm only 1 cup of coffee in, so my synapses aren't quite firing at the required rate yet) After I load a LUT, give it a name and save it, the LUT icon in the adjustments browser takes on the appearance of the image, which is great! But...where did Affinity save that preset? If I now delete that adjustment layer and try to implement that same process again... I don't see the 'Preset' I just made.
Ideally (and again, I'm just spitballing here) I'm looking for a rapid, visually representative way, of previewing a LUT's potential affect on my image. Something viable when your LUT options are in the 100s.
Blackmagic has recently (thank goodness) implemented a version of this in Resolve 15. Theo from Miesner Media does a quick walkthrough of it below. What I like about their implementation is the LUT icons give you a 'Default' representation of the LUT's colour feel on a human skin tone, and yet you still have the ability to replace that default icon with an image from you project, or revert back to the default with a button click. Granted, I'm aware that we're talking DaVinci Resolve -VS- an iPad app, but hey, a man can dream.
Capture One Pro 11's implementation is also very useful (And fast!). I use it daily:
-
Hey Folks!
LOVE the product! I tried a forum search and didn't see anything, so forgive me if it's been requested already, but can we can get an option to preview LUTs before applying?
As is, implementing a LUT (eg. from cloud storage) just gives me a file name to choose and apply. If I don't like it, I have to redo the process (And try to remember the list of obscure filenames that I've previously tried!) I have no idea what 'Portra 160' looks like, nor if it's going to fit with my image. But if I can see it, I'll know if it works or not.
Maybe a similar implementation to LUT's as in Capture One? Where you hover over a LUT name and it's visually applied to the image, then you can either scroll to another option and the image updates in real time, or you can click the selection to finalise the application. Obviously, it would require remapping 'clicks' to touches, or multiple touches or whatever, but I leave that up to you wizards!
Thanks!
-
Me again.
Second Crop Tool Feature Request: 'Reset'
I just noticed that if I want my original image back (Post Crop), I kinda have to manually drag out a huge crop area (way bigger that whatever I have on-screen). Implement that, then go back to the crop tool, and resize my transparent canvas to the image boundaries of the now visible previously cropped out area. A simple 'Reset Crop', or 'Revert to Original' would be handy to have.
Thanks!
-
1 minute ago, pixelcoder said:
Hey, sounds like a Feature request. Would be nice to have I understand. Automatic feautures is something I miss sometimes like applying a develope preset to multiple photos. But then again that might be in the pipe for an DAM •wink
")
As for Instagram I use the build in crop from the Instagram app itself, it became quite powerful over the last years. So you see the crop right away and can change it. If I want absolute no Test posts on my feed, I use a second account just for that, so I can judge if i like it or not.
cheers,
lutz
Fair enough
I actually ended up moving the Affinity file over to my Mac Pro (via iCloud) as there was a stronger image candidate from the shoot that I decided to use. The real joy was being able to just swap out the background layer and quickly adjust a couple masks to get to a finished product instead of having to start the process all over again. (Also, where in heaven's name is the 'Solo' layer option on the Desktop version?)
10 points for Affinity Photo's cross-platform files!
My one gripe would be the inability to have multiple documents open on the iPad version. That way I could move images back & forth like I tend to do on desktop platforms. My apologies if this already exists, but I don't remember it being mentioned, so I'm kinda guessing that functionality doesn't exist? (I shall now Google it, like I should have from the start)
As for multiple Instagram accounts, I was toying with the idea of a test account up to yesterday. I may have to revisit that option
-
Hey Affinity Folks!
I have a couple of questions/requests with regards to the crop tool:
Is there any way to have it remember the last used settings? Also, can we get a couple of standard crop presets to choose from? (16:9/4:3/Square/etc). And maybe and option to have it not float outside the canvas area? (toggle-able preferably
)
Usage scenario: I'm editing a photo for instagram (I know, I know) and I'd like my image to have a square crop. So after I choose 'Custom' under ratio, input my arbitrary identical numbers (4x4), then decide on my crop area and approve it.... I change my mind. It should be a little more to the left.
So now I have to reselect the tool, reselect 'Custom', re-input the crop dimensions, try not to accidentally hit anything other than the tiny crop handles (if not I have manually redraw and reposition the crop area from scratch) then nudge the image around to my newly preferred crop area.
But now it should be a little higher. So I go through these steps again.
And again.
It gets a tad tedious
Thanks!
-
1 hour ago, GregParris said:
I'm encountering all kinds of issues related to exporting files.
Basically after the file has 'Generated for export' and I hit 'Ok', it gets stuck at a white screen. This has happened with TFF, and JPEG exports.
It seems somewhat random too. Sometimes it goes to the expected 'Choose where to export screen', and sometimes it just freezes on a blank white screen (requiring a hard close and restart). The good news is that the files retain all changes, so I just try again, but it is frustrating.
This is cross-posted in the last Beta, as I wasn't sure where to put it (I first encountered the behaviour there, but then noticed and installed the release candidate, but the behaviour is still present).
At the moment, I'm on attempt #4 to export a JPEG from a 16bit RGB TIFF.
I am THRILLED to report that upgrading to iOS 11.3 Beta 2 has fixed this issue. Exports now work as expected
-
1 minute ago, Andrew Tang said:
Are you using iOS 11.3 beta?
Hey Andrew!
I most certainly am.
-
4 minutes ago, MEB said:
Hi GregParris,
Do you have other programs running on the background on the iPad?
Hey MEB!
I do! Safari, Mail, & Apple News.
My current workaround is to use the 'Share' feature and just save to images. That seems to work every time.
I tried again after closing everything else, still no joy.
-
I'm encountering all kinds of issues related to exporting files.
Basically after the file has 'Generated for export' and I hit 'Ok', it gets stuck at a white screen. This has happened with TFF, and JPEG exports.
It seems somewhat random too. Sometimes it goes to the expected 'Choose where to export screen', and sometimes it just freezes on a blank white screen (requiring a hard close and restart). The good news is that the files retain all changes, so I just try again, but it is frustrating.
This is cross-posted in the last Beta, as I wasn't sure where to put it (I first encountered the behaviour there, but then noticed and installed the release candidate, but the behaviour is still present).
At the moment, I'm on attempt #4 to export a JPEG from a 16bit RGB TIFF.
-
I'm encountering all kinds of issues related to exporting files.
Basically after the file has 'Generated for export' and I hit 'Ok', it gets stuck at a white screen. This has happened with TFF, and JPEG exports.
It seems somewhat random too. Sometimes it goes to the expected 'Choose where to export screen', and sometimes it just freezes on a blank white screen (requiring a hard close and restart). The good news is that the files retain all changes, so I just try again, but it is frustrating.
This behaviour is also present in Release Candidate 1
-
Hello all!
Question regarding working with masks: Is there any way to display the mask area while drawing? Or to have the masked area displayed with the same type of clarity associated with the 'Refine Masks' tool (without having to actively use the refine mask tool).
A good example would be the implementation of masks in Capture One Pro. You can turn the highlight mode, 'on' 'off' or 'display only when drawing'
Or am I'm simply overlooking an obvious toggle somewhere?
-
2 hours ago, DM1 said:
If you put the pencil on the spot you want to use as the source, then touch hold the screen and let go, does the pencil now have the desired source spot? From your description it sounds like it should. If so, this may be a more accurate way to select clone source.
Unfortunately it exhibits the same behaviour. The source spot will become 'unglued' and move to the pencil point (although it certainly IS a more precise way of working, so thanks!)
-
On 26/12/2017 at 11:55 AM, ReO2 said:
I’ve not seen this reported. On the latest Beta the cloning and healing brush have some erratic behavior. After the click and hold that point won’t stay in place but it follows the pen tool. I went back to the regular build and reloaded the beta with same results...
Thank goodness it's not just me. I'm having the same issue as well. Granted, I noticed it while using the healing brush tool.
Basically, after you set your source area for a healing operation, the crosshairs icon signifying the 'set source area' peramater jumps to wherever the apple pencil is placed. So instead of performing a healing operation, you've now accidentally reset your source area to the blemish spot. And it occurs quite sporadically. Sometimes (almost never) it works as expected, sometimes (mostly) I have to set, and reset the source area 3-5 times before it 'stays put'.
-
56 minutes ago, Bri-Toon said:
It's okay. We don't expect you to change your whole settings. What I said was only a suggestion and to point something out. Matt suggested something different, so maybe I gave the wrong advice. My fault.
Hey Bri!
I actually meant Matt's suggestion with the 'Region' itself was still 'US'.
I certainly didn't mean to belittle or dismiss your helpful suggestion! (Thanks!)
As a whole, I guess I'm just looking for a simple (and obvious) button to change the 'In Program' spell checker to difference languages. Like in Illustrator. Or InDesign.
It seems like a handy feature to have. In the immediacy I'd like 'Colour' to have a 'u' without the spell checker feeding into my 'poor spelling' insecurities. My bar is set low!
-
50 minutes ago, MattP said:
It still does say Region: United States, plus as I said you need to try this in a new document. Is it still broken?
Hey Matt!
I was under the (potentially incorrect) impression that region doesn't impact language, just things like currency, temperature, time, etc (like Alfred mentioned)
25 minutes ago, Alfred said:Doesn't the Region setting only affect things like the date format and the currency symbol, not the spoll chacker?
I tried it under a new document, but still getting a red squiggle
Just thinking out loud here, but if I have to change my entire system settings just for a working spell checker?....Well, that's not ideal. I'm not trying to be difficult here! Far from it, just pointing out that's not a particularly elegant solution. Granted, I couldn't code my way out of a box, so my opinion is moot at best.
-
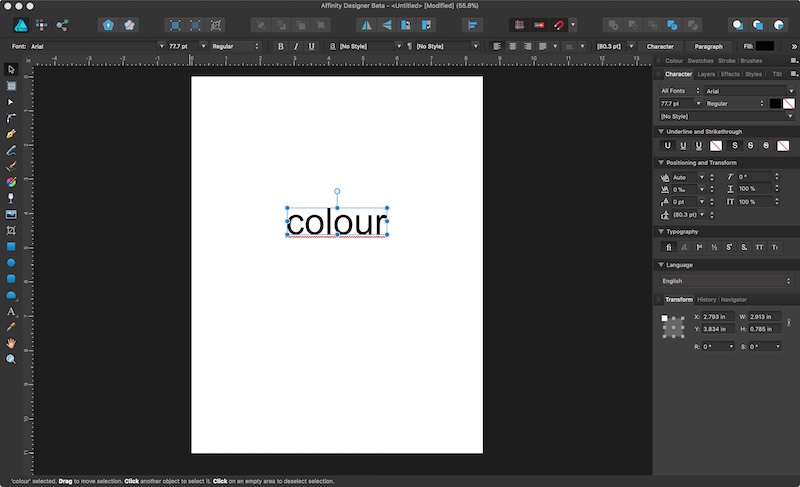
1 hour ago, MattP said:
Is 'colour' incorrectly underlined in a new document after you have chosen UK English as your system default? Here's a shot of mine:
Thanks!
Matt
Hey Matt!
Yep! 'Colour' is incorrectly underlined. Images below (System language and Affinity Character language visable)
-
6 hours ago, MattP said:
Each document has its own locale for the dictionary. The default locale for a new document is your current system language. I suspect that your system language must be set to US, if not then we have a bug to look into, but I do not have the same behaviour as you (I'm obviously set to UK)
You were ABSOLUTELY correct! My system level preferred language was set to US (which I promptly changed to UK).
Yet... 'Colour' is still red-squiggled as incorrect.
Which brings me to my other point (question?): Affinity Designer's System Preferences have distinct language options for 'English' and 'English (United States)', whereas the 'In document' character panel just has a singular 'English' option. Wouldn't it be more intuitive to also extent that Dual-English option to the character panel as well? As on the off-chance this 'Colour' fiasco isn't a bug, this seems like a fairly painful way to perform a simple regional language switch.
-
11 hours ago, MEB said:
Hi GregParris,
Welcome to Affinity Forums
The spell checker is controlled by the Language dropdown on the bottom of the Character panel (menu View ▸ Studio ▸ Character).
Select the text object, change the dropdown to the desired language (each text object can have its own language) and it should fix the issue.
Hey MEB!
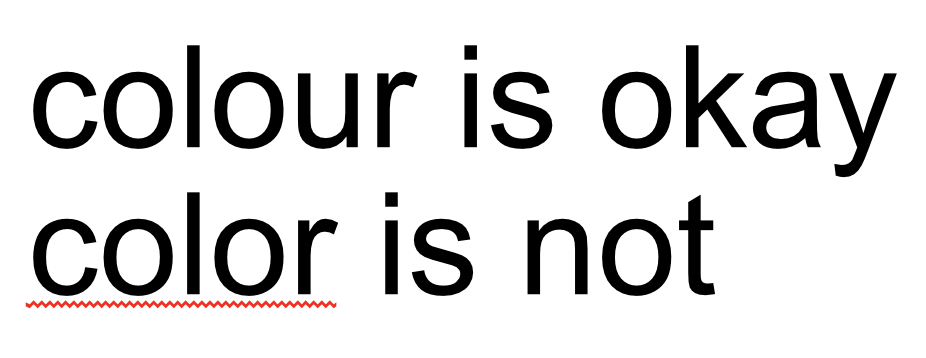
No such luck. 'Colour' remains red-squiggled as incorrect, whereas if I change it to 'Color', it gets a pass.
I've also tried this with other words like 'Accessorise/Accessorize' and gotten the same result. It always defaults to American spelling (Which is funny, as you guys are a UK company
)
-
Hey Affinity Folks,
Noticed some odd behaviour. It appears that when switching languages from 'Default' to 'English', the spell checker still utilizes the 'English (United States)' dictonary (Eg. When switched to 'English', 'Colour' is highlighted as wrong, whereas 'Color' is deemed correct).
I'm probably the worst person in the world to try and pin this one down, as my spelling is atrocious, but by golly colour has 'u'
-
2 hours ago, Sean P said:
Thanks for the file! I've reproduced it here and it looks like it happens with the Helvetica fonts (I originally used Arial when trying earlier). It looks like all characters are 2 after what they should be! I'll get this passed onto development. In the meantime you can click 'More' and from the 'Embed Fonts' dropdown change it from 'Uncommon Fonts' to 'All Fonts'.
Hope that helps in the meantime!Thanks Sean! It really didn't affect the workflow (I just exported with a different preset), but I thought it best to have the bug squashed
Thanks again!
-
4 hours ago, Sean P said:
Hi GregParris,
Would you be able to attach the file you are exporting please? I've just tried this on a new document and I cannot reproduce.Hey Sean!
Not a problem at all. It's actually a 21 page (Artboard) document, but only 3 pages exhibit this odd behaviour. As such, I've split off the offending pages into a separate document for you (They still exhibit the odd behaviour). Thanks for the assist!
Greg.
-
Hey Folks! I'm getting a wonky text output with the PDF export preset 'For Web' (all dpi choices) . The rest of the presets seem fine.
I ran into this bug in 1.6 beta 11 (literally, this morning) and it seems to be here as well in beta 12. Attached is an example of the garbled text output.
Thanks!

")

.jpeg.bf3e41d89c554765240890a9995cacc4.jpeg)
.jpeg.ac6921003210cd9ab29efa038349f876.jpeg)
LUT Browser
in Feedback for Affinity Photo V1 on iPad
Posted
Odds are I'm just doing it wrong. (I'm going to blame my low coffee levels). I'm on the 12" iPad Pro, so it should be just fine.
I'll take another look. Thanks!