ch22
-
Posts
83 -
Joined
-
Last visited
Everything posted by ch22
-
 Version 2 certainly is a huge improvement to working from RAW files, but there are still many points to be resolved or, at the very least, improved. Below is a short list (probably not exhaustive), ranging from clear-cut bugs to more debatable questions of software ergonomics. Its items are not listed in order of importance. 1. The Highlights adjustment remains very poor (in fact, it's been a persistent weakness of the whole Affinity Photo from the start). 2. The clipping alerts for blacks (blue) and partial clipping (yellow) are not reliable. This is all the more surprising as it works well when you open Develop Persona on a pixel layer, but not on a RAW file. 3. In the online manual, the notion of "clipped (mid-)tone" is not sufficiently explained. In this way any fully saturated tones would be clipped tones. I'd have preferred to be spoken for black, white or partially clipped pixels. 4. The online manual claims that once the Develop Persona output mode has been chosen, it cannot be changed. On the contrary, it seems to me that a file with a linked raw layer can always be transformed into a file with an embedded raw layer. 5. It would be nice to be able to rename lines in the Snapshots and Overlays panels. 6. The Show Overlay option should be an option in the Overlays panel rather than in the Brush and Gradient tools. 7. The same set of adjustments cannot be applied to several raw files at once. At most, you can create setting configurations on a first image and then manually apply these configurations to subsequent images, one by one. It would have been nice to automate the procedure with a kind of batch processing. 8. In the layer panel, the RAW layer lines should have an identifier (i.e. the pictogram to the left of the thumbnail). 9. The Colour Range and Tonal Range selection menus do not work on a RAW layer.
 -
OK. That will be all for me on this issue. It's not very serious (we can live with it), but it would be better to solve it. I submit another bug of the same barrel, but rather Windows than Mac —a little anyway_, at https://forum.affinity.serif.com/index.php?/topic/186882-affinity-photo-is-show-others-menu-buggy/
-
I am afraid there is an issue in the command Show Others in the Layer menu. Please open the enclosed TIFF picture; it is made of 5 pixel layers, each with a single horizontal color band. Select the middle layer (blue), open the Layer Menu and choose Hide Others. Only the blue band is left. Now, reopen the menu and choose Show Others. The whole picture should be displayed again but it does not always. I made two trials with Windows machines (including laptop of mine under Windows 11) and it does not (the two bottom layers are missing). Under MacOS, I met the same surprise with my personal computer (Mac Pro, BigSur OS) but another attempt with a Mac Mini under Monterey OS was correct. bug-test.tif

-
Hum! My Console app seems in a better mood today or I messed up yesterday. Anyway, here are the 3 requested files. Also, I upgraded to 2.1 and it didn't change anything for me. Affinity Photo 2 Affinity Store_2023-05-20-181631_Gromac2.crash
-
Thank you for considering my message To clarify, on your Mac does the crash occur independently of if Method 1 (Clipping Mask to thumbnail/'Mask to below) or Method 2 (Nesting as a child layer/move inside) are used? I am not sure to exactly understand. Your Method 1 yields what I call 1st type child while your Method 2 yields a 2nd type child. The crash occurs when the child-parent group is folded. Then only the 1st type is visible and the only possible click and drag move is a conversion attempt from 1st type to 2nd and it always crashes I prepared a short video showing what I do, at https://oitregor.com/divers/AP2e/bug.mp4 (2mn30sec, 29 Mo) Based on your screenshot i'm guessing so, but can this crash occur on any file/set of layers when either of these two actions are performed or is it file specific? It is not file specific. My video shows two different occurrences Could you provide a few recent crash reports after encountering this? I've linked the FAQ below which details how to find these. Unfortunately, my Console application is not compatible with my OS ("Vérifiez auprès du développeur que Console.app fonctionne avec cette version de macOS"). I prepared a copy of the bug report prepared for Apple in https://oitregor.com/divers/AP2e/Bug_report.docx and I hope it will be convenient for you
-
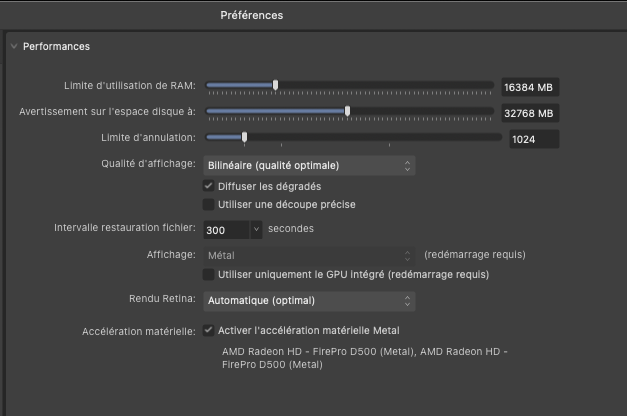
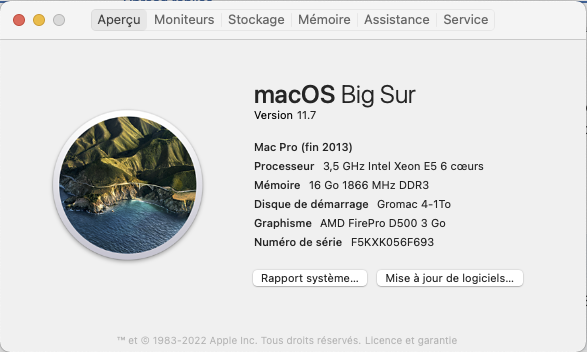
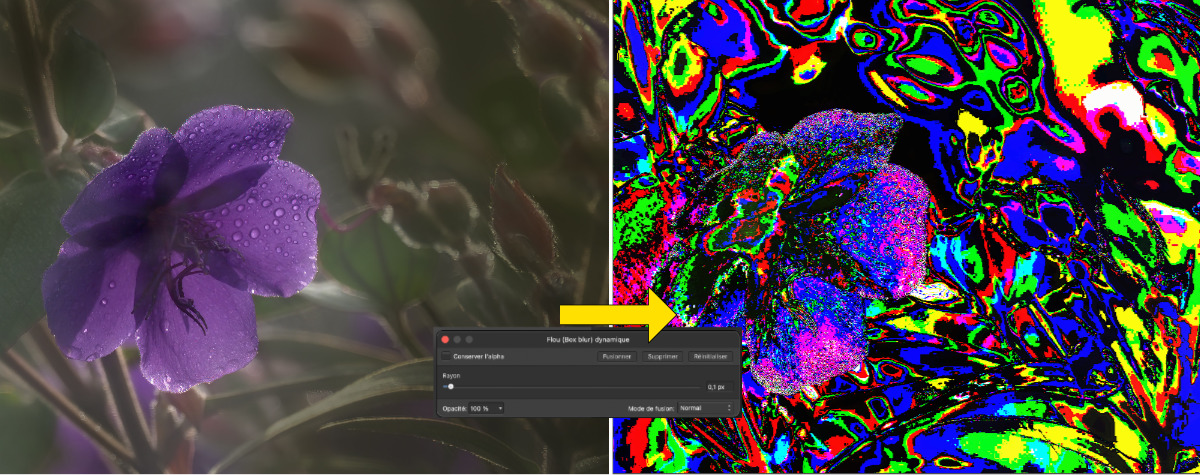
There are two ways to create child layers in Affinity Photo, but I couldn't find anything about this point in the online help. I therefore do not know the official vocabulary (if it exists) to distinguish the two types from each other and this makes uneasy to discuss it. So I begin with explaining how to get these two types. For this I start from an image with 3 ordinary layers, a background, a delimited pixel layer which will become the parent layer and a top layer which will become the child layer. Then : (1) The 1st type children are created by right-clicking on the upper layer and choosing "Mask to below". If this layer is an adjustment or a filter, you can also create this type of child directly with the buttons of the layer palette or with the items of the Layer menu (2) The 2nd type children are created by selecting the upper layer and then calling the menu "Arrange > Move inside" You can also transform the top layer into one or the other kind of children with the appropriate click and drag. You can also transform a 1st type child into a 2nd type with the click and drag shown below, starting from a folded parent-child group and moving the child layer thumbnail horizontally to the right This works fine on my Windows laptop, but this always makes Affinity Photo to crash on my Mac, regardless of the child layer (adjustment, filter, pixel layer). I tried in Preferences > Performance to cancel all hardware acceleration (see below screenshot), but this still crashes. I am working with a Mac Pro (under BigSur OS) with a AMD FirePro D500 3 Go video card
-
Smarter input boxes for width and height?
ch22 replied to ch22's topic in Feedback for the Affinity V2 Suite of Products
Sorry ! I messed up my message. What I meant is below : Changing the size of an image so that it fits within a predefined W x H rectangle is a common problem, which Affinity Photo does not know how to answer. However, it would suffice, in the dialog of the "Resize document" function, to write the expression * min(W/w,H/h) in the width and height boxes : Currently, unless I'm mistaken, the input boxes for width and height recognize the document variables w and h only in the Transform pane for the Move function. They do not recognize them in the Resize, Crop, and Export dialogs. Why not teach them all? Another issue is that the max() and min() functions don't seem to work in expressions — at least I cannot run them. However, this is not too serious insofar as we can find an equivalent for them, min(a,b) = b + (a-b) * roundup((b-a)/(b+a)) but it would obviously be more convenient to have these two functions at disposal. -
Changing the size of an image so that it fits within a predefined W x H rectangle is a common problem, which Affinity Photo does not know how to answer. However, it would suffice, in the dialog of the "Resize document" function, to write the following expression in the width and height boxes: *(W/w + (H/h-W/w) * max(W/w,H/h)) Currently, unless I'm mistaken, the input boxes for width and height recognize the document variables w and h only in the Transform pane for the Move function. They do not recognize them in the Resize, Crop, and Export dialogs. Why not teach them all? Another issue is that the max() and min() functions don't seem to work in expressions — at least I cannot run them. However, this is not too serious insofar as we can find an equivalent for them, max(a,b) = a + (b-a) * roundup((b-a)/(b+a)) but it would obviously be more convenient to have these two functions at disposal
-
Thanks In my experiments, I'm careful not to drag any non-transparent pixels from the source layer off the canvas with the Move Tool, and I find that Rasterize works just as well as Rasterize and Trim. I'm afraid that using the Move tool will create something else, in the very canvas.
-
@NotMyFault : thank you for your analysis. For the title, I made it deliberately provocative to get attention. I had observed an illogical behavior and I was looking for a suspect: I offered a misinterpretation of w and h because these two variables are poorly documented in the available online help. For example, in the online manual (the link you provide), w and h are really presented as width and height of the document, not of the layer. Besides, there is no clear definition for the various terms proposed such as “document” or “spread”. Anyway, the issue does not come from a misunderstanding of document variables w and h. Similar anomalies can be observed with much simpler equations such as x=300+(x-300)/a and y=200+(y-200)/a (homothety with respect to point (300,200), of ratio ‘a’) as soon as the Move tool has been used on the layer, even for a simple move without deformation. These anomalies can be avoided if the displaced part is set into a selection before moving it or, following your advice, by rasterizing the layer before applying to it the Equations filter. Incidentally, where did you find this need for rasterizing so as not fooling the Equations filter? I never heard of that before. A subsidiary question: what is different between a pixel layer and the same layer processed with the Move tool and which would disappear in the rasterizing operation?
-
The point is not to accommodate with the behaviour of my macro (I gave a way for that), it is that this behaviour is not acceptable. I built my process only to put it in evidence. Maybe I misunderstood something —in this case, please explain! I join the video record you asked for. odd_behaviour.mp4
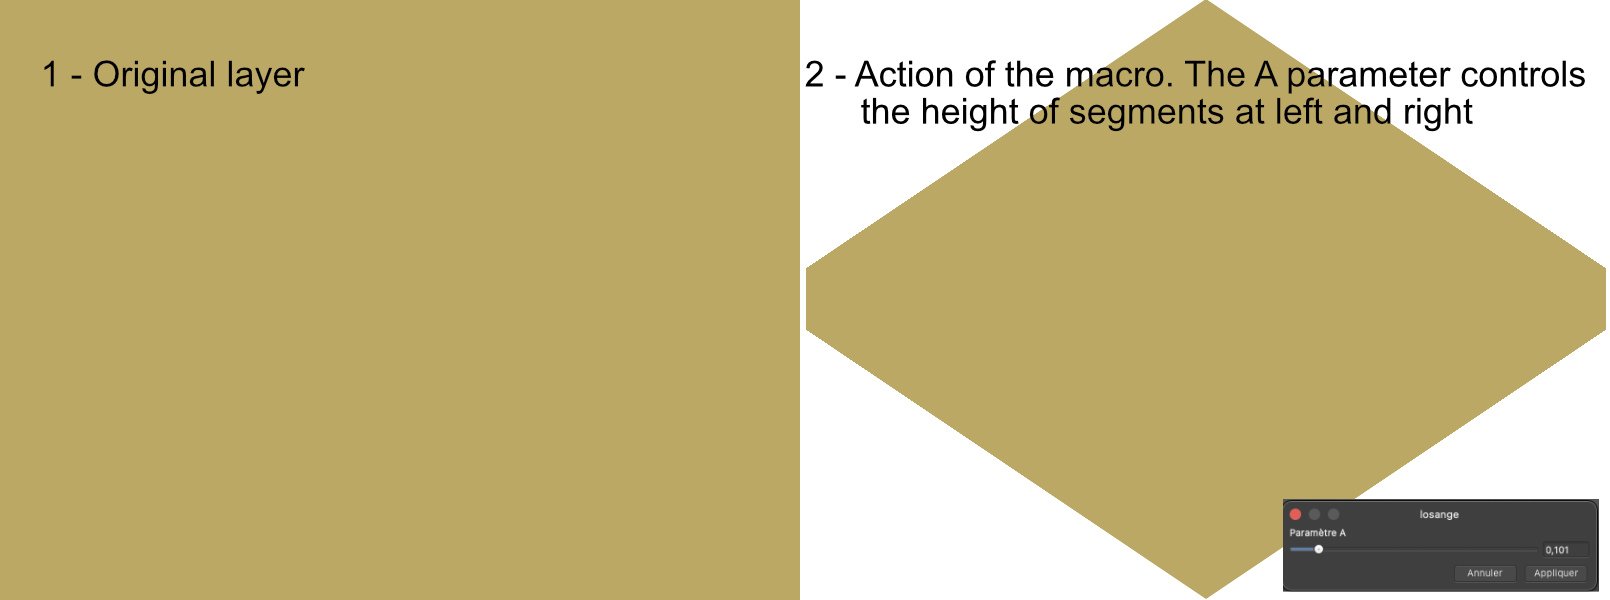
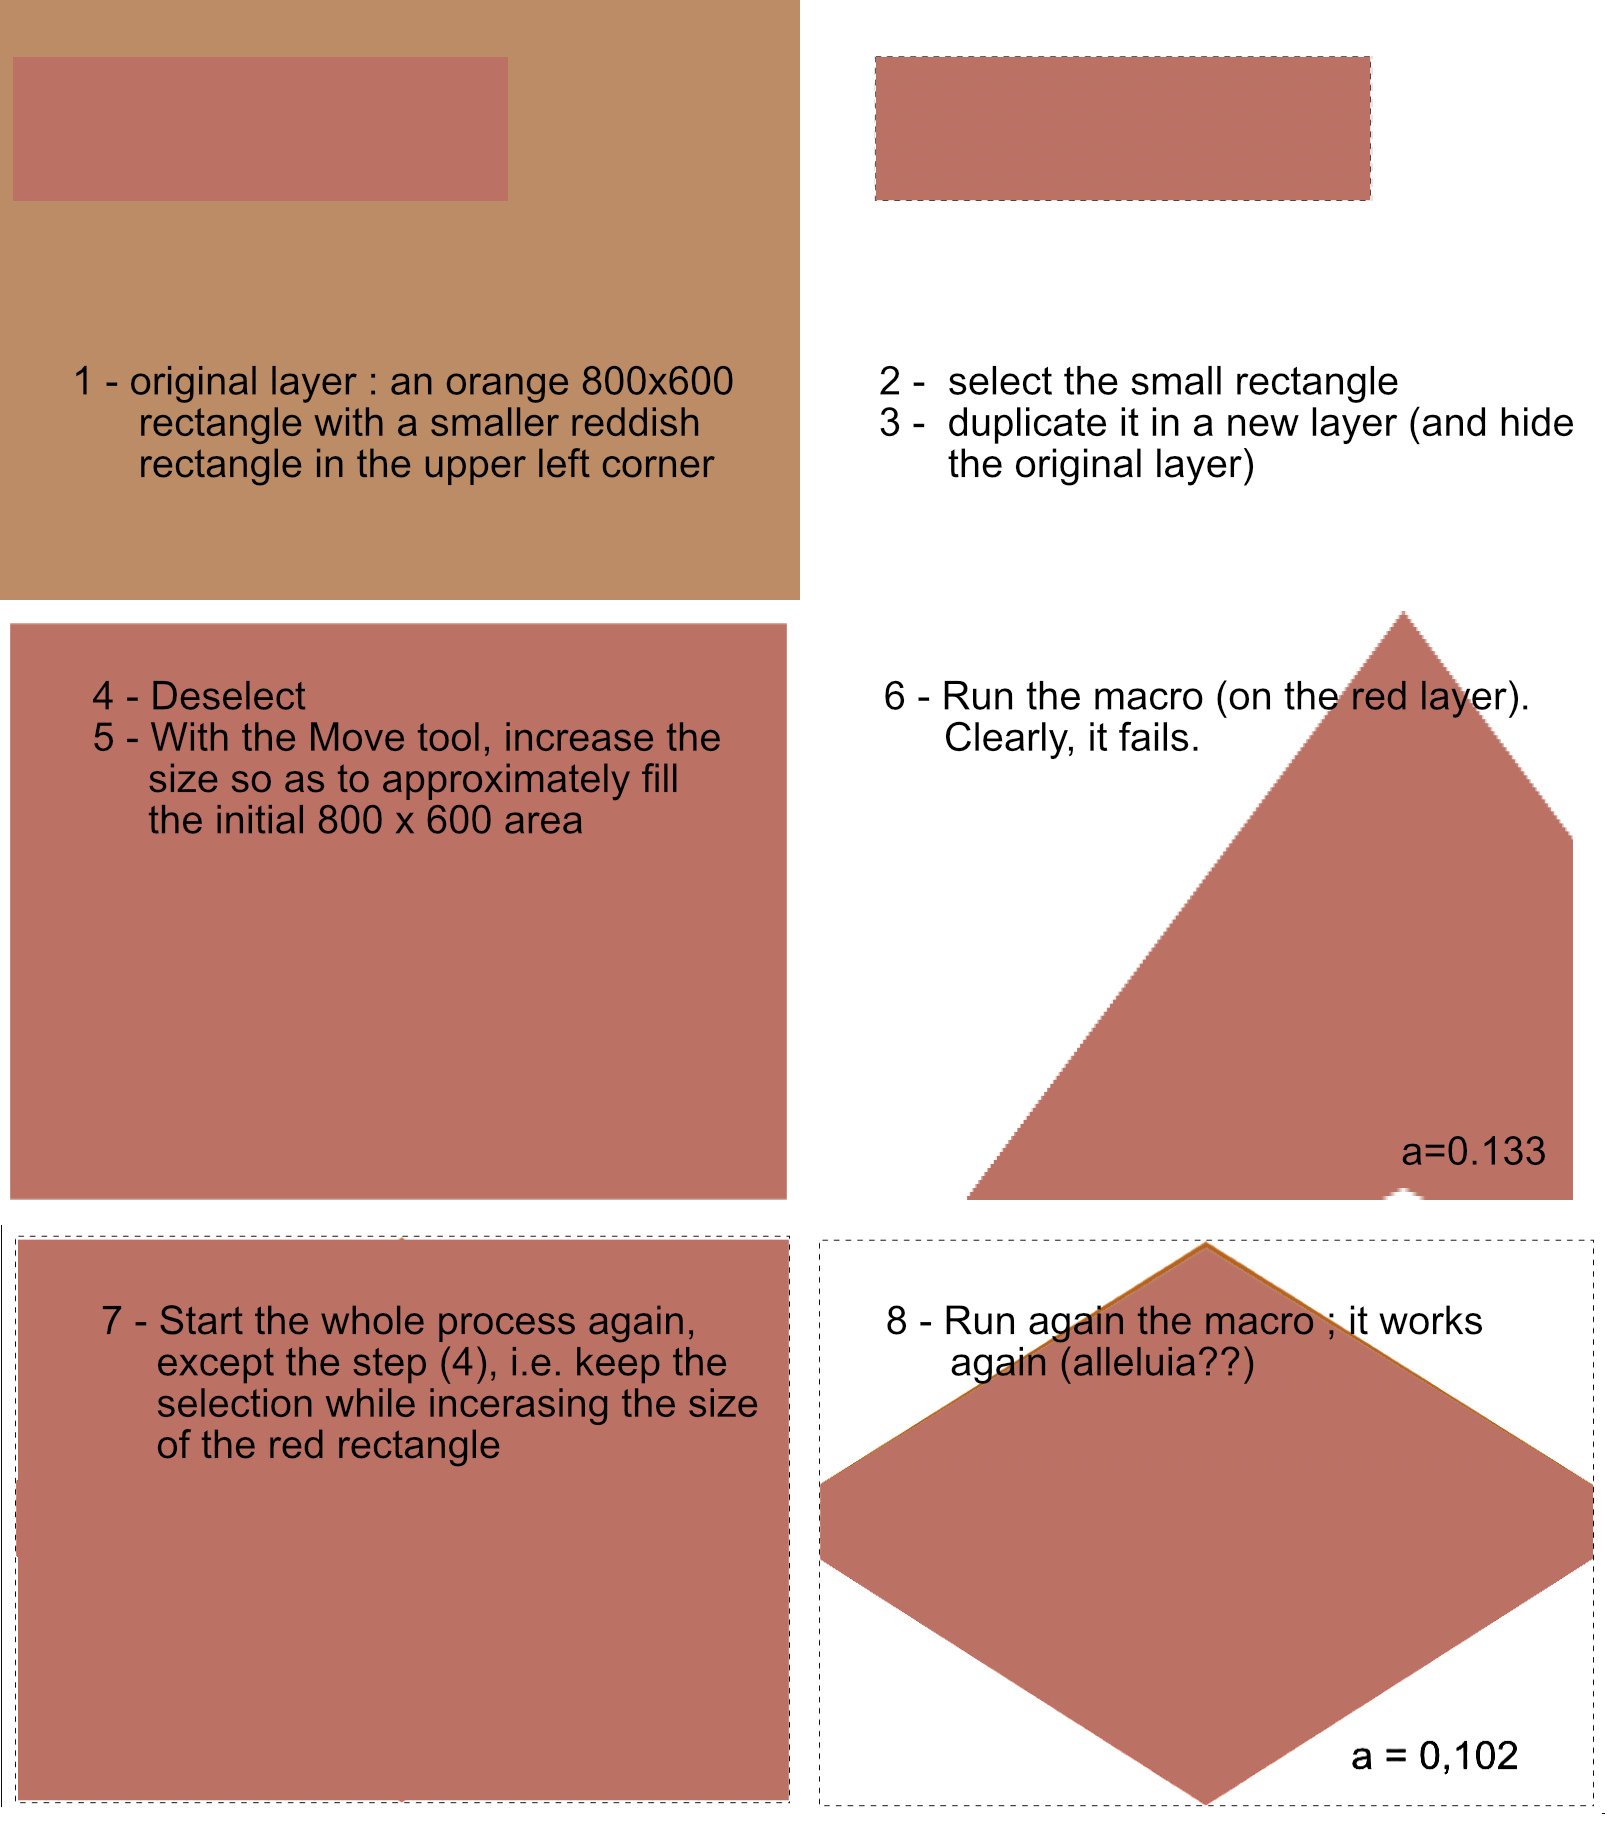
-
I recently wrote formulas for the Equations filter that map the initial rectangle of a pixel layer into a truncated diamond inscribed in this rectangle x=x y= h/2+(y-h/2)/(1-(1-a)*abs(1-2*x/w)) where ‘a’ is a glider-controlled variable between 0 and 1 (perfect diamond for a=0 and no distortion for a=1) To save time in experimentations, I made a macro of it, at http://www.oitregor.com/numeric/affinity_photo/divers/losange.afmacro (to be imported within Macro panel). It generally works as expected, as shown below: However it sometimes fails. I specially met up against this issue after using the Move tool. In the following picture, I prepared a detailed, simple process to show what can happen —and a possible way to avoid it. I would be happy to understand what occurs, whether it is a bug somewhere in Affinity Photo or a misunderstanding of mine.
-
Thank you for answering My OS is Big Sur. Things became worse with the new version 10.4 concerning the shortcut for masking the application. With 10.3, I was able to change it to ALT K. This is no longer possible with the new version and the shortcut for "Afficher la selection de pixels" remains stuck to CMD H, whatever I can attempt in the Preferences
-
I have a problem with the keyboard shortcuts in Affinity Photo in French language since I switched from the Apple Store version to the Serif version (i) There is a conflict between the shortcuts assigned by default to the menu "Hide application" and "View> Show pixel selection", both to CMD H (ii) I cannot cancel or modify the shortcut for "Show pixel selection". It remains stuck at CMD H and I had to change the shortcut to hide the application. I was able to switch to ALT H, but it's still pretty boring. This problem vanishes if I revert to Apple Store version 1.10.1 but it goes back when I revert to Serif version (1.10.3). There is no point in trying to save the shortcuts from the Apple Store version and reload them in the Serif version. This problem appears for the French language, but not for the English language. Out of curiosity, I watched what is happening in the Italian language. Luckily, the CMD H shortcut to hide the application is preserved, but there is still a problem with the shortcut assigned to "Show pixel selection", which is already assigned elsewhere (CMD W), but there we can change it. Happy Italians! (I haven't watched for other languages)
-
v10.1 : Bug in Divide blend mode and Shortcut issues
ch22 replied to ch22's topic in V1 Bugs found on macOS
I was aware of the recipe. I tried, once again. Unsuccessfully again... In principle, all this work can be done directly from the Preferences. Alas, this fails too. The shortcut for this menu 'Afficher sélection pixels' resists to all this cleaning attempts -
v10.1 : Bug in Divide blend mode and Shortcut issues
ch22 replied to ch22's topic in V1 Bugs found on macOS
@Pauls, you are right, I cannot explain why I did not see it yesterday. Unfortunately, the story does not end there. The input box for 'Afficher la selection de pixels' (in French, because the issue concerns the French menu) seems inoperant. Whatever I put in this box, the shortcut for this menu remains frozen to CMD H. Far more annoying, I cannot recover this CMD H for hiding the application @NotMyFault: thank you, I am not the only one with this kind of problem, little recomfort! Divide_bug.mp4 @all other guys: in fact, I meet up against two different bugs connected with the Divide blend mode. I prepared a short video to show how they look (1) when a layer is divided by its own copy, some pixels with fully saturated colors do not appear white (2) when one applies a box blur live filter on a pixel layer, a lot of fancy colors appear for small radius (other blurs are also affected, but less severely. Depending on the options in the Preferences for performance, I observe one of these two bugs, but never the two at the same time. -
v10.1 : Bug in Divide blend mode and Shortcut issues
ch22 replied to ch22's topic in V1 Bugs found on macOS
Thank you for your trials. For Walt.Farell, I join the afphoto file (including history) of my attempt. I did not obtain exactly the same result, but it remains anormal. Concerning my hardware, my video card is an AMD FirePro D500 (Metal Family : Pris en charge, Metal GPUFamily macOS 2). The metal acceleration is activated in my Preferences bug_divide.afphoto -
Sorry for the delay. I can no longer upload to your dropbox, but if you are still interested, you can get the file at http://www.oitregor.com/divers/boxblur_divide_bug.afphoto. The bug does no longer appear with the 10.1 version directly downloaded from Serif website... but I met up against another one ( ) boxblur_divide_bug.afphoto
-
I noticed various bugs in the French version of AP 10.1 which I just bought directly from the Serif site. I am working under MacOS 11.5 1 - Bug in Divide blend mode In principle, any layer divided by its own copy should give white everywhere, even for pure black pixels. The following screenshot shows very different results. It displays the effect of a double gradient Red-Black-Green (colors everywhere fully saturated) divided by itself. Seemingly, white is recovered everywhere if we add blue component, i.e. when none of the colors is fully saturated. 2 - Keyboard shortcut issues These issues only affect the French version (not the English version). The system CMD H shortcut should hide the application itself, but it does not because it has been also assigned to the "Show pixel selection" menu. Unfortunately, we cannot resolve the conflict by assigning another shortcut to this menu because it no longer appears in the Preferences lists for shortcuts None of these issues existed in version 10.1 distributed by the Apple Store. In return, there were other bugs in the Divide blend mode 🙂
-
I met up against a spectacular bug when applying a Box Blur live filter (in Divide blending mode) to a RVB pixel layer. I had discovered this bug in version 1.10.0 (MacOS and Windows), but soon after I tried beta version 1.10.0.251 and found that the bug was gone. So I said to myself that it was already fixed and that I just had to wait for the next official version. But 1.10.1 came, I tried it, and I saw the bug was still there —at least with MacOS. I tried to see if the topic had already been discussed but I couldn't find anything so I am sending this message. I had prepared a detailed report, but I left it in French (sorry!). Things are a bit more complicated than the previous presentation, because this bug combines with a display artifact that I think is inevitable when the scale factor is not 100%. The bug itself apparently affects all blur filters, but much less dramatically than the Box Blur. Au départ, j’ai voulu reprendre une vieille recette pour transformer une photo en dessin au crayon, à savoir dupliquer la photo, inverser la copie, la mettre dans le mode de fusion Densité Couleur – (l’affichage devient tout blanc) et appliquer un flou gaussien à l’une de des deux copies. Généralement, on passe ensuite en N&B en désaturant complètement et on obtient une version au crayon de l’image de départ ; il ne reste plus qu’à ajuster le rayon de flou pour obtenir le rendu désiré. En principe, on devrait obtenir le même résultat en désactivant le réglage d’inversion et en remplaçant le mode de fusion Densité Couleur – par le mode Diviser. Ce n’est apparemment pas le cas, et en plus le résultat change quand on zoome sur l’image, ce qui fait deux effets désagréables. Pour bien voir ce dernier effet, on peut fusionner toute l’image dans un nouveau calque, et là, surprise, on n’a pas le même affichage, sauf si on zoome à 100 %. En fait, je ne suis pas trop surpris de cette dépendance avec le facteur d’échelle car je l’ai déjà rencontrée plusieurs fois. Je l’attribue à un artefact de la construction de l’affichage, une sorte de moirage, quand l’image contient plusieurs calques avec différents modes de fusion. Mon hypothèse est que ce qu’on voit sur l’écran ne résulterait pas d’un calcul complet de l’image avant de la réduire aux dimensions de l’écran, mais qu’on ferait cette réduction calque par calque avant de prendre en compte les modes de fusion ; autrement dit, il n’y a qu’à 100% qu’on voit réellement ce qu’il y a dans l’image, et si on veut l’examiner avec un facteur d’échelle plus petit, il faut tout fusionner dans un nouveau calque. Mais il y a autre chose. Même à 100% d’échelle, on n’obtient pas le même résultat qu’avec le mode Densité Couleur - du moins tant qu’on conserve le calque de flou. Il faut le fusionner, et là, on va bien retrouver la même chose, mais c’est l’impossibilité de voir l’image définitive pendant qu’on fait le réglage, et c’est aussi un renoncement aux méthodes non-destructives pour le travail sur les images. Il semble donc y avoir une sorte d’incompatibilité entre le mode Diviser et le calque de flou. Les choses vont devenir encore plus spectaculaires quand on passera du flou gaussien au box blur. Lorsque le rayon est très petit, on va passer par un vrai feu d’artifice sur les couleurs primaires et secondaires, totalement inattendu et passablement suspect, à nouveau avec un affichage dépendant du facteur d’échelle. Enfin, là encore, on ne retrouvera le résultat attendu, c.à.d. quelque chose de voisin du flou gaussien pour la même valeur du rayon, que si on fusionne le filtre avec son calque parent.
-
Hello When enhancing a layer, one can check that identical results can be obtained by (i) Adding a high-pass filter in linear light blend mode (ii) Or adding an unsharp mask filter (in normal blend mode) with a gain factor of 1 and a radius curiously threefold larger than the high-pass radius (for instance, 10 px for the high-pass filter and 30 px for the unsharp mask) The same comparison performed with a well-known competitor software (somewhat more expensive) cannot lead to the same exact identity because of different definitions for the high-pass filter, but one can look for the best agreement when varying the gain and the radius in the unsharp mask. Then, the best radius is not exactly that of high-pass filter, but it remains close to it. I wonder whether the radius scale read in the unsharp mask dialog box of AP is not threefold too large. Obviously, this does not prevent the good operation of unsharp masking in AP
-
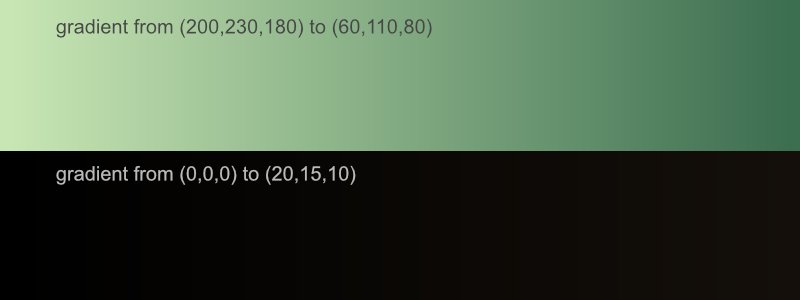
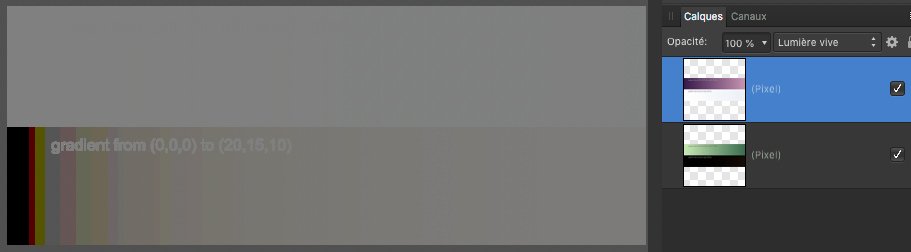
Hello I am currently writing tutorials about blending modes (for instance, see http://www.oitregor.com/numeric/affinity_photo/ouvre2_tutoAP.html?8e —french only, sorry) and I met up against odd behaviour with vivid light mode. Roughly speaking, duplicating a layer, inverting the copy and putting it in vivid light mode should result into a 50% grey display, except possibly for black pixels which lead to a division by 0 —unless Affinity Photo does not follow the common formulae for this mode. I tried the experiment with the following picture Il is made of two gradients, the upper one involving mid-range tones, neither too clear nor too dark while the lower gradient involves darker tones, near black, but not only pure black. After the process (duplicating, inverting, vivid light mode) I obtained tones far from the expected 50% grey for the lower gradient, as shown below : Same result in MacOS and Windows. Any explanation, if any ? Thank you
-
I'm not sure how DR evaluated in the equation? This is not a real equation, but a kind of pseudo-code. DR is the previous DR in the right hand side and the new one in the left side. For instance, the product blend mode would be obtained with DR=DR*SR (to be understood as DR_new=DR_previous*SR). Only the right hand side is to be entered into the AP box roundup(0.5-0.3*SR-0.59*SB-0.11*SB) Should that be 0.59*SG? Of course. I suffered from many mistakes in the process, I corrected a lot of them directly in the AP box and I did not always reported these corrections in my text processor... and unfortunately I used this text version to prepare my post. Sorry! Actually, I did not dare to directly deal with color pictures. I began the work with grey pictures, where the code is far simpler. Not that simple to get it right the first time, but I succeeded fast enough to be reasonably confident to tackle the color case. Now, I want to emphasize that my misadventures are not at all a condemnation of this Apply Image menu. Simply, in case of complex equations, better to have a true text editor at hand with a compatible copy and paste function!
-
First, thanks to dmstraker and Cecil for their encouragements. As for the English conversion... sorry, but that's another story ! Now, returning to the dmstraker's experiments with the Apply Image menu, I tried too. And incredibly —but VERY painfully— I succeeded in emulating the Contrast Negate blend mode. The issue is that equations to be entered are fairly long (see below) so that entering them by hand without errors is nearly impossible. You must prepare these equations on a separate text editor and then copy and paste them into the right box in Affinity Photo. Using word processors (such as Word or Text Edit) is a poor idea as the pasted formulas are not understood when they are too long — I suspect they are ruined by undesirable hidden formatting characters. Better to use a true text editor ; unfortunately, I use a very old one (AlphaX), and the copy and paste from it to AP does not run ! Eventually, I mixed parts of copy and paste with parts of manual typing, and finally I reached the holy Graal, I mean the identity between the blend mode and its emulation... The pseudo-code for the equations to be entered is as follows : DR=(1-DR) * SEL + DR * (1 – SEL) ; DG=(1-DG) * SEL + DG * (1 – SEL) ; DB=(1-DB) * SEL + DB * (1 – SEL) where SEL is the logical expression ((SL<0.5) AND (DL<0.5)) OR ((SL>0.5) AND (DL>0.5)) , where SL and DL stand for the luminosities (lumas) in the source and target layers, that is SL=0.3*SR+0.59*SB+0.11*SB and DL=0.3*DR+0.59*DB+0.11*DB. Then, as pointed by dmstraker, replace the conditional expressions such as (SL<0.5) or (SL>0.5) by numerical evaluations roundup(0.5-SL) or roundup(SL-0.5), then replace AND operator with a mere product , and OR with a mere addition (this is valid in this special case). We thus get DR= (1-DR) * ( roundup(0.5-0.3*SR-0.59*SB-0.11*SB)*roundup(0.5-0.3*DR-0.59*DB-0.11*DB) +roundup(0.3*SR+0.59*SB+0.11*SB -0.5)*roundup(0.3*DR+0.59*DB+0.11*DB -0.5)) + DR * (1 – ( roundup(0.5-0.3*SR-0.59*SB-0.11*SB)*roundup(0.5-0.3*DR-0.59*DB-0.11*DB) +roundup(0.3*SR+0.59*SB+0.11*SB -0.5)*roundup(0.3*DR+0.59*DB+0.11*DB -0.5))) and similarly for green and blue components. These are the real formulas to be entered into AP If you get to this point and AP is not grumbling about your formulas, congratulations! You should have reproduced the result of the Contrast Negate blend mode!
-
Indeed, the macro results only in the invert adjustment through the selection about luma comparisons (this can be seen in the video). Its purpose was simply to give the same display as the investigated blend mode, without modifying the RGB components of the layer; additionally, the selection can be recovered for any other fanciful operation you could imagine on this layer. My current version is 1.7.3 Let me some time to consider your formulas —so far, I never walked through this menu in my exploration of Affinity Photo (my personal project consists in in-depth explanations of the software for French photographers through a set of video tutorials, french speaking, of course! The job is not ended. See http://www.oitregor.com/numeric/affinity_photo/contenu.html )