svobodavid
Members-
Posts
10 -
Joined
-
Last visited
Recent Profile Visitors
334 profile views
-
I'm failing to reproduce your suggestion. I need a single photo to span over the width of all five panels. Then there's some other graphics. But every time I export the panel (either as an artboard or as selection area), as long as they are of panel's exact size (to get the crop marks right), they never show any bleed).
-
Thanks Old Bruce for trying to help. Unfortunately this method won't work -- if you check, the final panels have no bleed beyond crop-marks. Also I think that adjusting five canvases (target_size+bleed) over five artboards (target_size) is quite difficult -- because of the bleed. Unless I must be doing something wrong.
-
I think I nailed it in the meawhile: I used rectangle of the exact panel size exported as "selection area" (no bleed, no crop marks) reimported back to AD sole panel exported whole design with bleed and crop marks The only worry with this setup is the quality of the reimported photos -- but maybe this can be somehow solved when I just "link" pictures and not embed them?
-
Trying to follow and clarify: - what is the size of Artboard1 (2, 3)? Is it the exact size of the panel? (733 mm x 2225 mm?) - why do you have two rectangles in each Artboard and what is their size? (like in Artboard1 --> yellow and purple). I'm asking as the overal design will consist of one large photo that will span across all panels. I wish there's an easier way to achieve that. I can imagine using faux crop marks (set directly in the design at the correct panel boundaries) and just draw empty rectangle of the size 739 mm x 2231 mm (adding 3 mm extra on each side) and then export "selection area" without bleed and crop marks.
-
Thank you. Currently I've been trying to achieve that in AD (but I have all Affinity apps just in case). I tried to replicate your suggestion, but failed with it. So you suggest to create an Artboard for each panel (733 mm x 2555 mm) and lay them side by side? When create the content this way though, it's bit difficult as I need to move everything outside of Artboards in order to see it. But even then, when I export the artboard as PDF (with preset "PDP Press ready", as otherwise the bleed is not ticked), I won't get the desired result: the graphic stretched beyond the crop marks. Or maybe I didn't get it:)
-
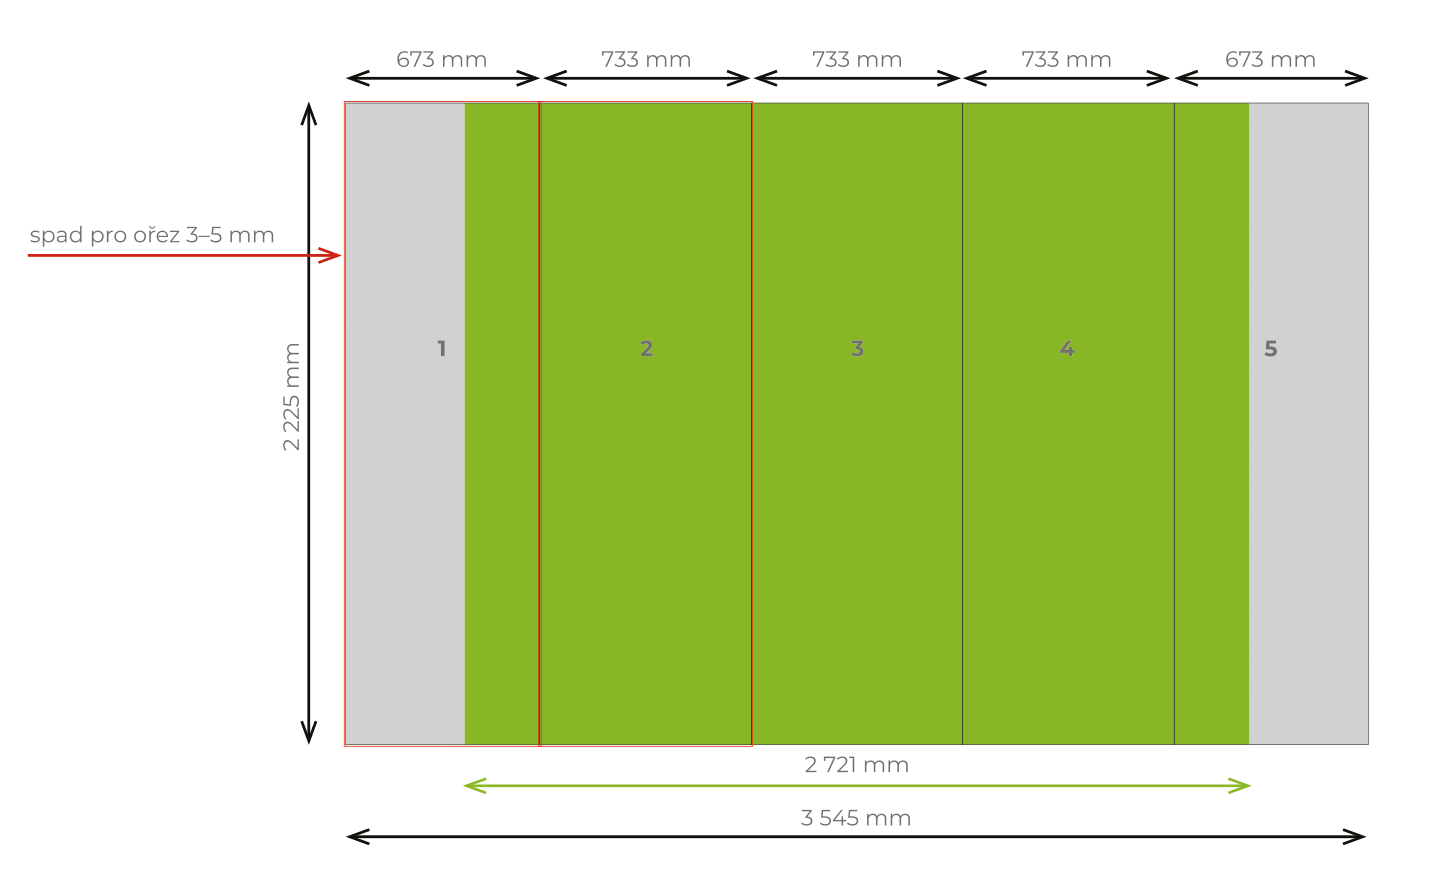
Hi, I wonder if you have any solution to this printer requirement: In order to create a stand (wall), the printer requires split the design into five panels. That wouldn't be the issue as I can export just selected area. But the other requirement is that each panel must have 3 mm bleed -- and this is what I'm failing to solve. I can export PDF for print with selected "Bleed" and "crop marks", but these won't create any bleed (the area after crop marks stays empty). Attached picture shows the required sizes. The green area is just showing the visible part, but the panel sizes that I have to deliver are: 773 mm x 2225 mm (resp. 673 mm x 2225 mm) The red border shows the required 3 mm bleed from each side. Thank you for *any* help.
-
sorry for the delay -- didn't receive notification on this post and had to run other projects meanwhile. No, I didn't run DIFF on these (no idea how to do it). Here're official requirements on Canva website. I guess some of the steps refer to AI, but regardless of export I try in Designer, I never get editable colors in Canva :(
-
got lost... - I have SVG file that, when imported to Canva.com project, has editable color (within Canva). - When I open that SVG in Designer (with an intention to do some tweaks) and export it (without changing anything) to SVG, then when importing it to Canva, it looks ok, but suddenly the color is not editable. - I have absolutely no idea what I'm doing wrong - or if any of the export setting is not right (I tried so many combination without any effect). Attached files: test-vctr.svg ... original file that I'm importing to Designer (and it works as it is within Canva -- possible to change color) test-aff.svg ... exported above file (without any action) from Designer to SVG (when imported to Canva, color cannot be changed). I know I'm discussing another online tool (Canva) here, but in general it's the export process within Designer that is causing "some" change in the workflow. Anyone? thank you test-aff.svg test-vctr.svg

