jmoren
-
Posts
49 -
Joined
-
Last visited
Everything posted by jmoren
-
PSD Mockup with smart objects: layer effects (fx) not imported
jmoren replied to jmoren's topic in V1 Bugs found on Windows
Great, I'll check it when available. -
Hello, thanks for answering. I forgot to enable 'Notify' for this thread , sorry. No, the images are local and embedded. I have upgraded to v.1.8, and re-saved the file, It still happens, but a lesser extent.
-
Hello. Any updates on this topic ? I understand that Affinity team can't just replicate every feature of PS, but some support to import layer styles & PAT files would be great. Regards.
-
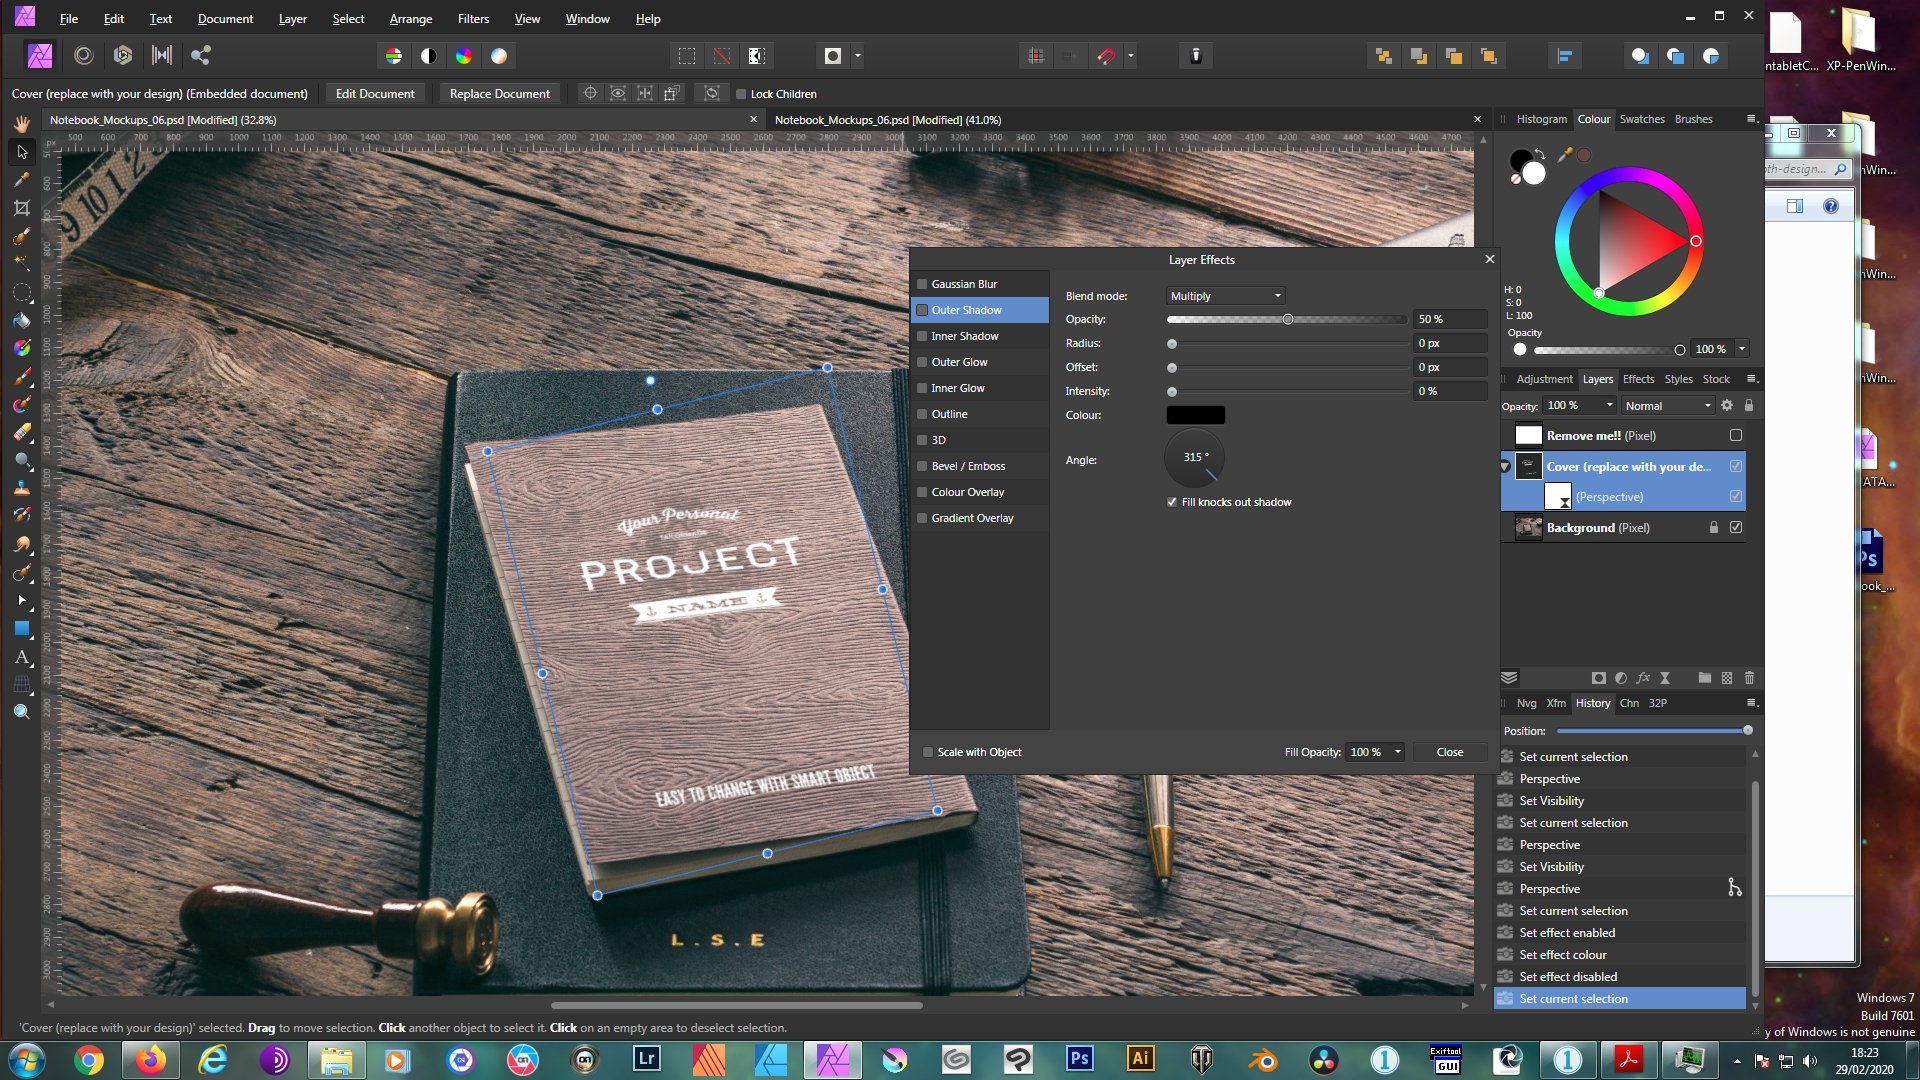
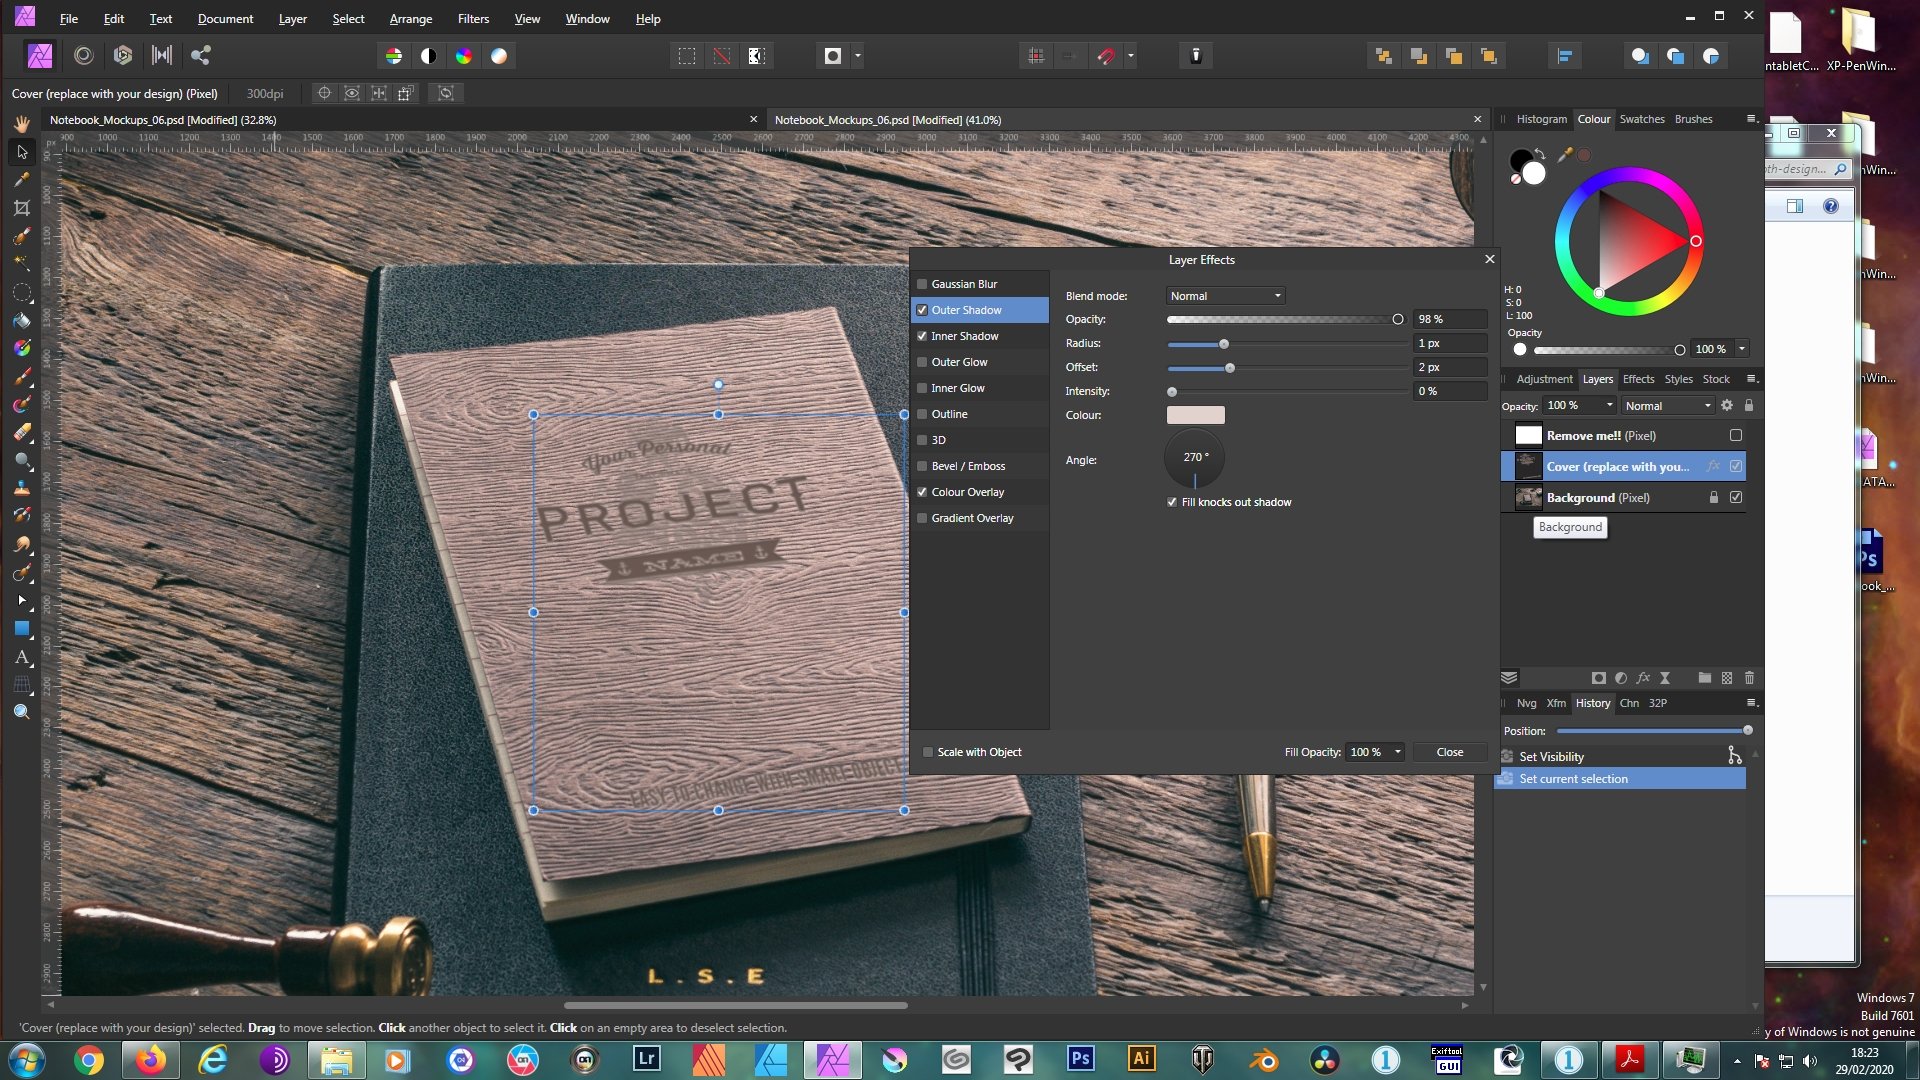
Hello. I've been looking at the new 1.8 version. I have Photo, Designer and Publisher, so it'll take a bit to review all the improvements. But I was interested in testing the PSD embedded support, because I have several PSD mockups that can be used now. I faced a problem when I was testing one of such mockups. I noticed that, if I import the mockup without setting the support for smart objects, the embedded file is imported as a rendered layer, but it keeps the original PS layer fx. Here is a pic ilustrating my point: But if I set the support for smart objects in APhoto, then I get a embedded file, but the layer effects are missing. Here you have the same file imported with smart objects enabled. Is it a bug, or am i missing something ? Thanks for reading.

-
Hello, I made a simple page design for printing 8 small images on an A4 page. I added some guides for cutting and some text on every image. Every image are put into an image frame. I load the same image on every image frame. I created a total of 5 pages like this. Once everything seems correct i saved the Publisher file. The problem comes now when I open the project again. So randomly, some images are not rendered correctly, I just see a blurry image. To fix this, I have to replace the image on the frames affected, and then I save the file again. The problem is that, everytime I open the file I get the same issue, some images at random places are not rendered correctly. How can I fix that file ? Maybe the file is corrupted some way? Sometimes, the file is opened correctly, but most of the time I get the issue. Regards.
-
Hello, This trick was helpful for me. A brief tutorial about the correct use of the 'Edit in plane' could be useful. So now, how can I find info about the new construction mode? Is there a tutorial in some place. Thanks. Regards. [EDIT] I found the help guide and now I have a better idea of how to use this mode. Great!
-
Offset path / contours tool in Desginer
jmoren replied to Malauch's topic in Feedback for Affinity Designer V1 on Desktop
+1 -
Has been fixed on Beta 1.6.5.123. Now you have a way to measure, in mm, the distance between two points in a image, finally! Great! But, I forgot to say, that only Photo has the Info panel, so this feature works only in Affinity Photo.
-
Affinity Photo Customer Beta - 1.6.5.123
jmoren replied to Mark Ingram's topic in [ARCHIVE] Photo beta on Windows threads
Great!, my bug is fixed, downloading... tested and working. -
Passed to development! Great customer service
-
Ok, I think that W H D only in pixels is a bug, so they should be shown in the same unit as X,Y position.
-
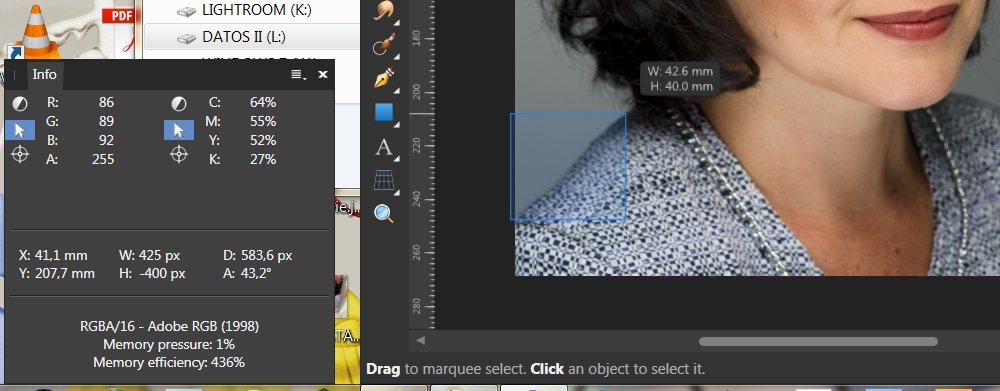
Hello, Just doing other things I have 'discovered' that there is a tool that can solve my problem: the info panel. Yes, if I just change the ruler to measure in mm (or your favorite unit) and use the info panel, you can see the X and Y values live on the info panel that gives you your position in mm (or any other measure). Then I noticed that I have also the W:, H:, D: and A: that usually are empty. Ok, so now just select the V tool, click on a starting point and drag to make a selection box, you will see that, over your cursor the W (width) and H (heigh) values just appear on your selection box, in mm (if you are into your canvas you don't see any selection box). On the info panel the W: and H: values also appear but in px, and also the D (diagonal) and A (angle) also appear. This is a really valuable info, because if I create a selection box starting on point A and ending on point B, the D(iagonal) is just the distance between such points. Also I have the angle of the diagonal (A:). The only problem is that, on the panel info, W H and D appear on px, not in mm (or the selected mesaure for the ruler). How can I change the info panel so the W H D values appear on the correct measuring unit? For me, the tool I need is implemented yet, I just need to see the values on the correct unit. Notice the atached image, I drew a box, starting from the outside of my image, so you can see the box, width and height on the main window, also you can see X Y (in mm) W H D (in px) and A(ngle) on the info panel. If I select a box inside the image I can't see any selection box on the main window, but I still see X Y W H D A on the info panel. So, for me, the D(iagonal) is the most interesting data, it's just the distance between two points BUT is measured in pixels, I need to mesaure in mm. SO => how can I set up the info panel, so the W H D is measured in mm? C'mon Affinity team..., just add it in a future release, all the work is done... Regards, Javier.
- 73 replies
-
- 1
-

-
- designer
- measurement
- (and 3 more)
-
Hello, There is an update for Nik Plugins. I installed and made a quick tests with Color Efex & Vivezza. => Origin photo aRGB 16-bit, converted to sRGB on Photo: * Color Efex OK at 100%, colors off other zoom levels * Viveza colors at 100%, even worse at other zoom levels => Origin photo aRGB 8-bit, converted to sRGB on Photo: * Color Efex OK * Viveza shows a bit more contrasty image AP & Nik Plugins aren't still working fine. bit depth and colorspace are causing issues. Regards.
-
It's me again, more checkings mostly with the Viveza plugin: On AP I have the Adobe RGB as the default color space, Relative colorimetic rendering, convert opened files to working space and warn. A. I open a sRGB file The file is converted to aRGB, so I convert the profile to sRGB again, load the plugin and the colors seem ok, any zoom level. B. I open an aRGB file I convert the file to sRGB, load the plugin, colors seem more or less OK, but the image is a bit more contrasty, sharper and saturated. I didn't made any adjustment. The navigator doesn't show correct colors. If I choose to apply the plugin, nothing happens in AP. So the image is show near on Viveza, but not 100%. If I load Color Efex and delete all the conversions, the colors, tone, etc, seems correct. C. I open a Prophoto file The file is converted to aRGB, then I convert the file to sRGB (two conversions), load the plugin, same as B., more contrasty, sharper and saturated. Good on Color Efex. If I configure AP with sRGB as default color space, automatic conversions etc. A. To me is exactly the same B. & C. At minimum zoom level, the colors are off, but at 33%, 50% and 100% are OK. Colors on Viveza navigator are off. Color Efex is OK. Regards.
-
My apologizes Pedro. I checked the workaround with Adobe RBG because it is what I use, and I assumed that the same worked for Prophoto, but I was wrong, Viveza show wrong colors with prophoto as origin color space, no matter if you convert to sRGB. I'm going to try again, maybe there is a workaround for prophoto. I usually set my color space to Adobe RGB in AP. Regards.
-
Fortgot to say, I'm using AP 1.6.4.104 and the trial version of Nik plugins downloaded from the DXO page. Windows 7 64 bit Ultimate SP1. Regards.
-
I have re-checked all the (DxO) plugins. The key is to work only in sRGB color space. If your document have this ICC profile, then all the plugins seem to work, not need to zoom at 100%. The problem is that all the plugins assign sRGB profile to the image, regardless of the correct color space. If you have an image loaded on AP with aRGB or Prophoto ICC and then assign the sRGB profile manually in AP, you will see the same 'decoloration' (because the wrong color space) than the Nik Plugin. Same problems happens with ACDSee Ultimate, so the problem is on the plugin. With a sample (sRGB) image loaded on AP I checked all the plugins and all seemed to work OK, correct colors, etc. Is it so costly/difficult to handle the correct color space ? An workaround, if you are editing an image with adobe or prophoto profile can be: * Document -> convert ICC profile... select sRGB profile * load the plugin and put all your effects * re-convert your document to adobe/prophoto color space again. The problem with the above workaround is that you will lost color information by converting back and forward everytime you need to use a Nik Plugin, not ideal, really. Regards.
-
I really would like these plugins to work with AP. I use LR 4.4 (never upgrade to 5 or 6), DAM and basic edition. If the pic needs more editing then I export to TIFF or PSD and continue in AP. Sometimes I need to add a touch with an effect (Glow, sunshine... this kind of thigs). I can quickly add it with ON1 but, then I have three applications, I want to simplify. My idea was to use the Nik plugins from AP and get similar effects to ON1. So... we'll have to wait
-
Hello, You are not alone. I use the aRGB color space in my workflow and, when I send and image to Color/Viveza/etc everything seems washed out... colour, tones... it's useless for me, sorry. I remember that, with the old version and some plugins you could see the correct colours zooming at 100%, but now it doesn't work, so for me, it's worse.
-
Hello, my vote for the measure tool. I just need the most basic tool, to measure the distance from two points on canvas. I've seen several workarounds to meause the distance between two points, but the best is to have a tool that could measure distante from point A and point B. Just click/select point A, then point B, get the measure in pixels, inches, centimeters, etc ... done. Angle measuring could be good to have too. Regards.
- 73 replies
-
- 1
-
-
- designer
- measurement
- (and 3 more)
-
Hello, I downloaded this beta (1.6.4.104), but I also noticed that my (no beta) designer shows me that there is a new version available, with the same version number than the beta... Is this correct ? Maybe I'm missing something related to the versioning and relationship between beta and non-beta versions. Regards.
-
Thanks, it's not a bad workaround. Let's hope they could include this feature in future releases.
-
+1 I'm on the same boat. After an hour (not a day, but only an hour) using several brushes, I have no idea how to find which brush I used for a specific stroke. I ca see the properties, but not the name of the brush I used. Regards.
-
Affinity Photo Customer Beta - 1.6.3.96
jmoren replied to Mark Ingram's topic in [ARCHIVE] Photo beta on Windows threads
Hi, Thanks to the development team for the good work. I just downloaded last beta versions of Designer & Photo to check if the wacom lag/jaggy lines issue has been solved. But still not solved on this version :(. I'll keep waiting ... -
GeForce GT 730, sorry !!