BiffBrown
-
Posts
82 -
Joined
-
Last visited
Everything posted by BiffBrown
-
I've printed a couple of images out, using Soft Proofing, with no problems. I think the pathname in version 1.8.6 has been changed. I'm not sure why you're have problems, Christhephoto. I'm wondering: have you got "Gamut Check" selected? The greyed out areas (that are out of gamut) may print grey unless corrected. Have a look at this legacy video from Affinity: https://player.vimeo.com/video/152413642/ It may be for an older version Affinity Photo, but it's still relevant (i.e. it still works). I wish they'd hurry up and update all the tutorial videos. Hope it all works out. Biff
-
And another thing (sorry, but I keep looking) The Colour Profiles seem to be stored in /Users/Me/Library/Containers/Affinity Photo/Data/Library/Application Support/profiles (at least that is where my previous post put the ones I imported). Biff
-
HA! Solved. Possibly. You'll need an open document (image). In Photo Persona - File -> Import ICC Profile. Navigate to the required profile(s) and select it (them). Maybe only one at a time. Biff
-
I've managed to get around the problem (temporarily) by copying the Soft Proof from one document to another - but this only works if I'm using the same profile (and therefore the same paper). If I need to change paper .... Biff
-

4K Photo video into Affintity Photo
BiffBrown replied to alansheath's topic in Older Feedback & Suggestion Posts
I'd like to "Bump" this topic - I've started using a Panasonic G7. Can I extract the JPEG frames from a 4K video? Cheers, Biff -
Your Affinity 2020 wishlist
BiffBrown replied to AITCH's topic in Feedback for Affinity Photo V1 on Desktop
I would like an Affinity DAM, damn it!! -
Exactly the same as me. I did work around this vey extending Smadell's Luminosity Selection Macro's after I had figured out the maths. I took them down to Lights 6, Darks 6 and Midtones 6. In theory these selections should be the same as the more "traditional" method.
-
You could try DFine from the Nik Collection, although I'm not sure the 'free' version is available anymore. It can be accessed as a plug-in from Affinity Photo (instructions are somewhere in the forums ...) Biff
-
Affinity mirror trick/s
BiffBrown replied to ianrb's topic in Tutorials (Staff and Customer Created Tutorials)
In the land of the Eucalyptus, I guess it makes some sense. Three quarters of all forests in Australia are Eucalyptus - there are some 810 recognised species. If you see a tree in Australia, chances are it's a Eucalyptus, even if it doesn't look like one. -
I suspect Mark is trying to do what I'm attempting: a Macro for making Luminosity Masks (Lights, Darks & Midtone). I can't rename the Spare Channels from within the Macro. So I would like to "bump" this request. Biff
-
I had this 'problem' on my MacBook with version 1.6 and it seems to have carried over into 1.7. Not a major problem, but ..... I use the Trackpad on the Macbook, and normally this behaves like a Mouse: the two modifier keys ('control' and 'option') acting as left and right mouse buttons (Mac Mice tend not to have these buttons anyway - these modifier keys are used). However, in the Channels Panel, these modifier keys don't work - I need to attach a mouse with left and right mouse buttons!! Seems to be only place this happens. Regards, Alex
-
Lensfun Fun
BiffBrown replied to BiffBrown's topic in Pre-V2 Archive of Affinity on Desktop Questions (macOS and Windows)
Thanks for the replies, guys. As Woodkopf said, it was the James Ritson video (it is available on YouTube as well). In that video, James drags (or copies) the entire mil-sony.xml file to the Affinity Lens Profile Folder. In may case, I used the mil-sayang.xml file, which contains the correction data for both the Samyang f3.5 7.5mm Fish-eye and Samyang f/2.0 12mm NCS CS lenses (amongst others). As I said, only the correction profile for the Fish-eye seems to be recognised. Cheers, Biff -
Affinity Photo (Desktop/Laptop) 1.7. I've downloaded the Lensfun database from Github (as explained in the YouTube tutorial video). I'm using a Samyang f/2.0 12mm NCS CS lens on a Panasonic G6. The lens is manual, but I'm using Exif Editor to add the lens data to the RAW file. Affinity Photo seems to recognise this, as the lens name appears in the EXIF data. However, no lens correction is applied (lens not recognised!). I have applied the exact same process when using my Samyang f3.5 7.5mm Fish-eye lens, and this is recognised for lens correction. I'm out of ideas! Regards, Biff
-
Affinity Photo for MacOS - 1.7.0
BiffBrown replied to Patrick Connor's topic in News and Information
In App Store, go to 'Updates'. If it isn't showing, use Command-R (Cmd-R) and the Updates will update. Should be there by now. -
Perking up a sunset
BiffBrown replied to dmstraker's topic in Tutorials (Staff and Customer Created Tutorials)
Useful technique. Thank you. -
I think you can use Linear Light in Affinity Photo to create the same effect as Grain Merge in GIMP. Not sure, but I also think that Pin Light will simulate GIMP's Grain Extract. Biff
-
Great Tutorial. Thanks. Biff
-
Hello, People. Don't forget the Help files: these are very extensive and detailed. Don't know why Affinity haven't published them (maybe as a downloadable PDF)?? Biff PS: there's a hint in there somewhere.
-
Thanks, R C-R. Guess I should have checked the Tutorial Videos first. Panic set in, I suppose. Foolish Biff
-
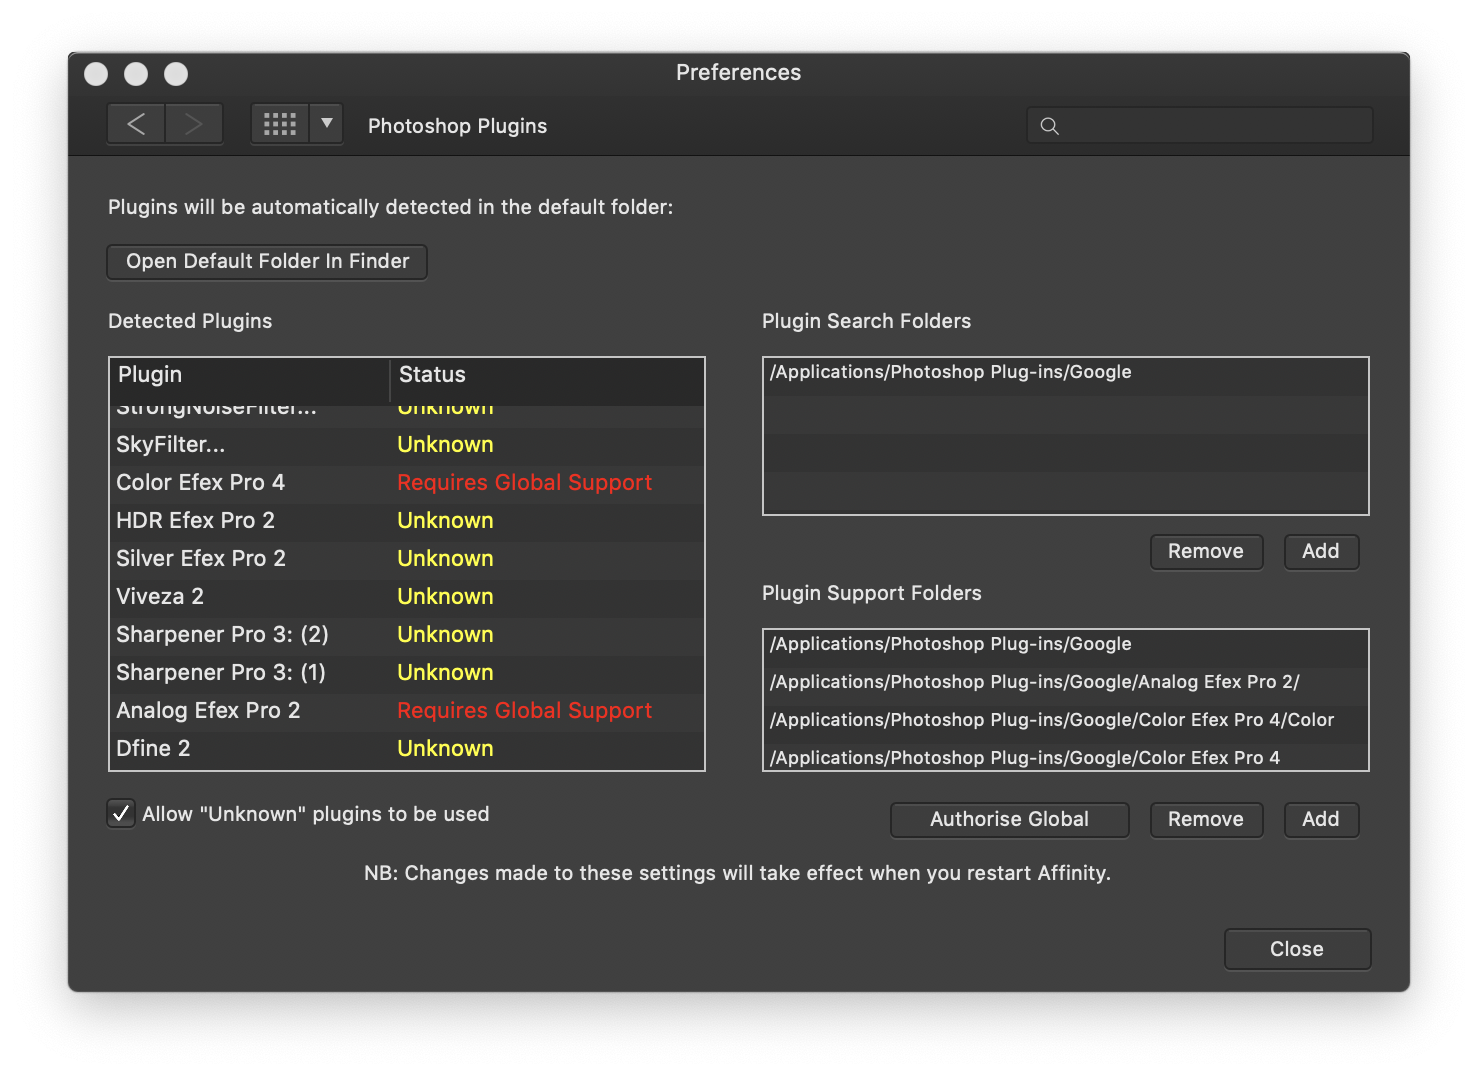
Hello. I recently updated my Mac OS to Mojave (10.14.4). I have now found that I can't access Nik Color Efex or Analog Efex, although I had no problems with 10.13 (High Sierra?). As shown in the attached screen-shot of the Affinity Photo Preferences dialog, both these plug-ins require "Global Support". I have, as can be seen, tried a few variations using the "Authorise Global" button, but to no avail. Any help? Cheers, Alex

-
Well, there's a novel idea. Hope they do well. Biff
-
Nice macro. Imported fine. Changed the Gausian Blur to a Median Blur. A bit different, perhaps. Biff
-
NIK Collection
BiffBrown replied to HRP's topic in Pre-V2 Archive of Affinity on Desktop Questions (macOS and Windows)
Hi. I got the same response when I transferred the files from my old MacBook to a new one. However, I had kept the downloaded installation files, so I deleted the NIK files and ran the installer. All was well. Biff -
Sorry to butt-in here, but have you tried converting your RAW files to DNG? I think Adobe's DNG converter is a free download, and is updated on a regular basis. Regards, Biff
-
Request: Linear Burn Layer Blending
BiffBrown replied to tele-pet's topic in Older Feedback & Suggestion Posts
Can I bump this?- 5 replies
-
- 1
-

-
- feature request
- linear burn
- (and 1 more)