Adam_D
-
Posts
25 -
Joined
-
Last visited
Everything posted by Adam_D
-
 You're my hero! That works on my end too. I had been seeing Designer sometimes behaving properly and almost came back here to say it seemed to resolve itself, only some time later to then hear my fans whirring up and, lo! there was Designer again churning CPU cycles. I couldn't figure out why it sometimes behaved itself, but it must be this exact workaround. I'll live with it for now, thank you!
 -
Nvidia drivers haven't had an update in about a month - they've been up-to-date for quite some time. And maybe it's worth noting, this is only Designer. I also can open Affinity Photo and Publisher (all at the same time) and only Designer is being a jerk with my CPU.

-
definitely not normal - I've been using V1 Affinity software for years now and never saw anything like this. I did check other system resources and there is no internet traffic ... nothing I can identify as the culprit. I often need to leave it open for hours during work and my computer is strong enough that, even with CPU being chewed up by Designer, I get by fine enough but I've seen it do this long enough to know it's not going to just stop when it finished something. It doesn't appear to be doing anything at all. Just crunching ghost number problems. Maybe I'll try a re-install.
-
This advice doesn't make a lick of sense to me. Having a browser open (any browser) shouldn't cause an idle Affinity Designer to be actively using 30% CPU. I have a robust machine, and am accustomed to running many heavy programs concurrently. Just for giggles, I closed all my other programs and, yeah, Designer is still inexplicably using thirty-something percent CPU.
-
I hate it. What is the program even doing? It just likes to hear my laptop fans whirring?
-
Even if I have no file open, when Affinity Designer 2.0 is open on my Windows 11 machine it is using substantial CPU resources. Here is my resource monitor when Designer was doing nothing at all. And yet using 33% of my CPU. Is this a known issue? Is there a fix or something I can do to troubleshoot it?
-
Designer will only rasterize gradients that the SVG format cannot render properly, such as elliptical or conical gradients. Sometimes, after some shape modifcations or copy/paste-ing styles, a regular linear or radial gradient can get transformed into a funny state that may also lead to it being rasterized. before exporting to Svg, check your gradients that they are all linear or radial and it'll be fine.
-
booklet printing
Adam_D replied to floortester's topic in Feedback for Affinity Publisher V1 on Desktop
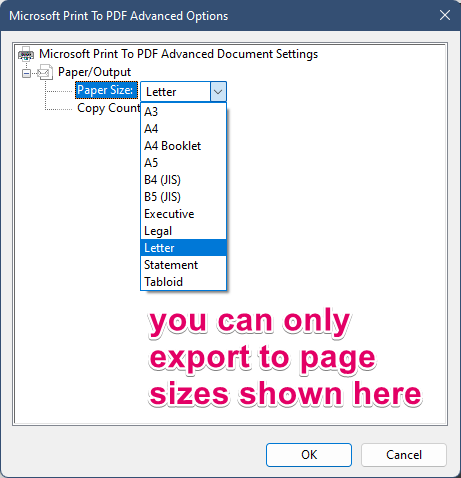
I need to prepare a booklet. The standard export options do not provide for booklet, only the 'print to pdf' function. My client is making a lot of revisions to this document so it's quite crucial that I can remain flexible with my pages and their ordering and then export to a file where the pages are in the printer spread for a booklet - I'm not about to manually generate the crop marks and bleed/margins and such. Affinity can and should do that work for me - it simply doesn't play nicely with Windows for non-standard paper sizes. On a Mac I don't think there's any issue here. If you need to export to a non-standard size paper, you simply set the paper size in the Affinity print dialog. However, in Windows, you're only able to 'print to pdf' using Microsoft's default page sizes
-
booklet printing
Adam_D replied to floortester's topic in Feedback for Affinity Publisher V1 on Desktop
I recently had to figure out how to prepare a booklet pdf for professional printing, and in Windows ohmygorsh it is a pain the neck! With the bleed and crop marks, the paper size I needed to export to was non-standard (442mm x 319mm). However, with the print-to-pdf function you are stuck with only the paper sizes available in the Windows default paper options. It doesn't matter if I specify a custom paper size in Affinity Publisher, it won't work and weird cropping business happens and the back page doesn't display next to the front page as it should. It's just useless. What needed to happen was I needed to determine exactly how big my paper size needed to be to accommodate my printer bleed and crop marks, and then generate a new default paper size in Windows. This involves digging into the Registry (which I hate doing) and identifying a system file which you need to backup and then edit in notepad, being mindful to run notepad as an administrator. But to you also need to convert your mm units by multiplying by 1,800 for some reason ... then you need to make another edit in a part of the windows system settings that I've never accessed before, except this time you use typical metric units. I got it wrong about 10 times before I got it quite right. But now I can prepare my booklet for the printer properly. For anyone else needing the nitty gritty details, here's the info about how you add a new custom paper size for Windows: https://franklinheath.co.uk/2015/08/29/custom-page-sizes-for-microsoft-print-to-pdf/ and a video demonstrating it: -
that's the solution I was looking for, thank you! This was extremely frustrating to me today. I don't often use the text frame box in designer, but having to do so today, I'm really baffled - why is there an editable option like 'Text Frame background' without the tool in Designer to edit that option? That's extremely odd.
-
Non destructive Mesh Warp Tool
Adam_D replied to Dedi's topic in Feedback for Affinity Photo V1 on Desktop
Thanks, John! That is certainly useful to have in my toolkit! The request for non-destructive mesh warps is still high on my wishlist - there are so many more instances than could be covered by this (or similar) macros that I still turn to Photoshop to accomplish and the more that I can accomplish in Affinity Photo, the happier I am ☺️ -
Non destructive Mesh Warp Tool
Adam_D replied to Dedi's topic in Feedback for Affinity Photo V1 on Desktop
This feature, yes! With the recently vastly improved support for Photoshop smart objects, this is the last piece of what's needed for a lot of my workflow - non-destructive mesh warps. The attached .jpeg shows the difference between what photoshop allows me to do in mocking up a label application on a round object (slight curves to follow shape of object) vs what imports into Affinity photo (stretched, flat shape with no curvature distortion unless I first rasterize it).
-
Trace filter
Adam_D replied to adrianmardari's topic in Feedback for Affinity Designer V1 on Desktop
yes, that makes sense. Maybe fde was just not recognizing that I circled back from the main subject of the thread (image trace) to the secondary subject of the OP (data merge) when he said "this really belongs in Designer" -
Trace filter
Adam_D replied to adrianmardari's topic in Feedback for Affinity Designer V1 on Desktop
data merge really belongs in Designer? -
Trace filter
Adam_D replied to adrianmardari's topic in Feedback for Affinity Designer V1 on Desktop
I use Inkscape when I need to trace something, and just import the results to designer. Given the amazing value of Affinity software, I have no qualms with this solution. Admittedly, I don't rely heavily on image tracing but I have trouble imagining it should be a deal breaker. Can't speak to 'data merge' re: Publisher. Is that a crucial function for layout software? -
Yes, as fde said, I just took a screen shot and placed some new icons atop that. made a couple icons from scratch and pulled others from the free icons at https://www.iconfinder.com/ I really don't mean to suggest using these icons, just wanted to have a quick look at the Designer UI after flattening out the icons I feel look too dated. You can have a look at the designer file I made if you care to - it's attached. designer icons.afdesign
-
It's not a small request, I know, but I'd love to see the UI receive a little more love - such as more options regarding padding on toolbars. CorelDraw I recall being awesome at allowing you to refine this. But mostly I'd love to see the cartoony icons abandoned. Flatten them out and simplify them. I did a quick mockup that I would call far from ideal, but I'd happily use these over the existing icons, which just look too cute and dated for my tastes. It's not really too many icons either - I rather like most of the top-bar icons, but the basic tools like the pen, hand (I may be overly sensitive, but it particularly bugs me that its coloring is race-specific), magnifying glass, etc don't feel like they belong in modern, professional design software.
-
yes, that works fine. I still want default behavior to avoid zooming in to my image. I will fairly often open a large number of low res images at once. For instance, editing the photos to be included in an email. And to go to each one and need to apply even a simple keyboard command is just annoying - someone at some point settled on the behavior to always fill the workspace with any image opened, or edited, and it doesn't make sense to do this even for very small image. I'd still like my feature request to be considered.
-
as a web designer, I frequently work with images that are much smaller than my monitor size. So it is quite annoying in Photo that on opening (or after certain kinds of edits) the zoom of the image is always defaulted to whatever size fills my workspace. This means small images are a mess of pixels. I'd really appreciate the option to default the zoom to 100% for smaller images and fill workspace for larger images.
-
perfect - thank you so much!
-
clearly, what I want to do can be done in Designer - it's part of the promo video for the software. But I remain at a loss as to how one does this. I don't need a full video tutorial - just a bulleted list of the essential steps would suffice. Pretty please :)
-
I have been looking for some time now for an explanation for what's going on in the few seconds of the Designer 1.5 video here: http://www.youtube.com/watch?v=ybPzM1NO9lc&t=1m8s can someone point me to how this kind of thing is done? It's a sort of real-world-object design mockup I do kinda frequently in photoshop using 'smart object's and would love to figure out how this works in Designer or Affinity Photo but so far I'm at a loss.
-
Text are not exported as text during PSD export.
Adam_D replied to Zunaid's topic in Older Feedback & Suggestion Posts
Indeed - this proved an unpleasant surprise to me today. Mocking up a website in Designer and will need to hand off to my programmers as a psd file with editable text. This missing feature is a big disappointment. And given how highly Affinity touts the interoperability with photoshop/illustrator it really blindsided me. I don't regret my purchases of photo and designer at all! Great software and I look forward to needing CC programs less in the future. But I don't like that I now need to recreate my design in photoshop. -
Anyone know of a workflow in Affinity photo that would facilitate making isometric, extruded rendering of otherwise flat objects, such as accomplished with this kind of photoshop action?