fernandolins86
-
Posts
168 -
Joined
-
Last visited
Everything posted by fernandolins86
-
The font is very small for a card. I suppose this is about the size of a business card or a little larger? I would suggest increasing the font size and maybe cropping the image up to her face?
-

affinity designer The King's Hat
fernandolins86 replied to houseofdeadleg's topic in Share your work
Cute, love the typography! -
Hi, I couldn't find this information, but can I have the stable (public) and the beta versions installed at the same time and switch between them? I'm trying to find out if some of the issues I reported were fixed but the last changelog says "Over 200 fixes" which isn't of much help... Update: Sucessfully installed Beta along with public stable version!
-
Would like to know too
-
+1, need this too!
-
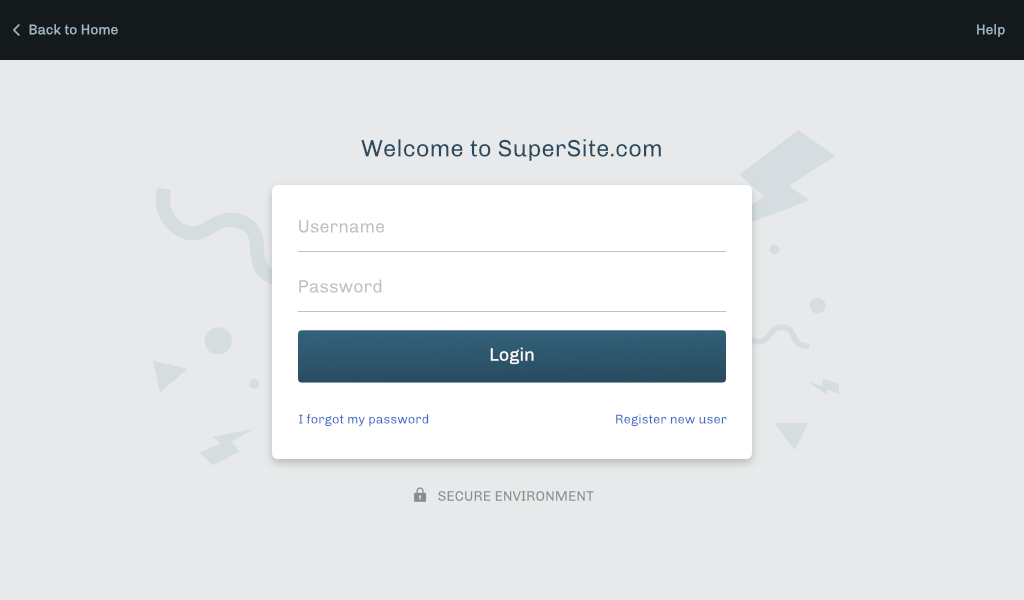
Hello, I made these login pages templates in my spare time. They're for Affinity Designer. Maybe it will be useful to someone. You will need the free "Chivo" font from Google Fonts to edit the file - https://fonts.google.com/specimen/Chivo Enjoy! Login Template FernandoLins.zip

- 2 replies
-
- 4
-

-
- website
- affinity designer
- (and 5 more)
-
Perfect pixel-align bounds
fernandolins86 replied to WaveF's topic in Older Feedback & Suggestion Posts
This is a huge flaw in AD and needs to be fixed soon. It makes working on pixel-perfect projects and UI design a royal pain. -
Retain initial shapes after boolian
fernandolins86 replied to Crionis's topic in Older Feedback & Suggestion Posts
This should be in the tooltips for the buttons too :) E.g. "Subtract (Hold Alt to maintain shapes)" -
Do we really need two pointer tools?
fernandolins86 replied to ket's topic in Older Feedback & Suggestion Posts
Technically, if you are altering one tool by using a key (ALT) you are using two tools - or two forms of the same tool. There isn't a difference really. You just don't have to keep holding ALT to access the features, you switch and go. -
Alfred's solutions seem to only work on the Layers panel, I got no results in the Artboard itself. Anytime CTRL is involved I get the last possible child of the selection, even inside symbols.
-
Thanks Alfred, I'll try it out today
-
Hello, When I CTRL+Click in Designer (Windows) it always selects the deepest level in the hierarchy, so if I have a rectangle inside a symbol inside a group and ctrl+click it, it will select the rectangle. Is there a way to set the depth of this selection, so that it doesn't select the "insides" of symbols, or only selects up to the first child of a group? Thanks, Fernando
-
Bootstrap 4 Grid Template for Affinity Designer
fernandolins86 replied to arechsteiner's topic in Resources
Thank you so much!- 10 replies
-
- 1
-
-
- bootstrap 4
- bootstrap
- (and 4 more)
-
affinity designer Android App Mockup
fernandolins86 replied to Wifestealer's topic in Share your work
You're just getting started, you'll be a pro in no time :) -
affinity designer Android App Mockup
fernandolins86 replied to Wifestealer's topic in Share your work
Well, you tell me :P Your mockup has both "Hibernate" and "Disable" button, "Enable" being the off state of "Disable". -
affinity designer Android App Mockup
fernandolins86 replied to Wifestealer's topic in Share your work
Yeah, or something like these... On the second one the icons work as on/off switches, the one with the moon (which I used to represent "Hibernate") is currently off therefore it is lighter.
-
affinity designer Android App Mockup
fernandolins86 replied to Wifestealer's topic in Share your work
That's better, however the Hibernate and Disable text don't look like buttons. Here are some suggestions: Make them buttons :P Add a third column after the amount of downloaded/uploaded data with an icon button to disable and an icon button to hibernate (they should be toggable)Downloaded - 300kb - [O] [X] Make the blocks taller and add two rows: "Enabled" and an on/off switch, and "Hibernating" and an on/off switch. The text should be on the far left and the switches on the far right of the card. -
Also, Adobe Illustrator (.ai) can and most frequently will contain vector data, Sketch (.sketch), Corel Draw (.cdr) and more recently Photoshop files (.psd) will too. Please note that even though Adobe Illustrator and Corel Draw are mainly vector software, just like Affinity Designer their file formats can contain raster objects (like images that were imported into them). Similarly, Photoshop is a mainly raster tool, but you can design vector shapes in it. The formats I just mentioned are DOCUMENT formats, which means that they will be editable by the software that created them. The formats Alfred talked about are referred to as DISTRIBUTION formats, which means that they can be exported by hundreds of software and they're by general rule not editable. SVG being a sort of open-source format for vectors makes them pretty much editable in most vector software. PDF and EPS can also be imported to a vector app and edited if there are no restrictions imposed by who created them. If you want to be absolutely sure that you will be able to edit your work please by all means always keep the original document safe - in AD's case this is the .afdesign file.
-
affinity designer Android App Mockup
fernandolins86 replied to Wifestealer's topic in Share your work
Ah, can you noitce the improvement already? Following the guidelines is always the way to go. Now redesign the 2nd and 4th screens with lists and cards as Google suggests in the Material Design guidelines and you'll see a huge jump in design quality. -
[ADe] Contour setting for effects
fernandolins86 posted a topic in Older Feedback & Suggestion Posts
I've been trying to recreate some older work in AD but I'm deeply missing the Contour setting for shadows and glows. I couldn't find anything similar reading the Help topics. This would be analog to the Photoshop feature where you can specify a graph for how the intensity of the effect changes over its spread. This is a picture from an old PS version just to illustrate the setting.
-
The split screen is available on Windows too (comma key). Also, if you focus on any side of the split and change the view mode at the top toolbar it will keep it that way. So you can do Vector / Pixels or Pixels / Outlines or Vector / Retina Pixels... you get the idea.
-
Basically when we say "vector", as @gdenby explained, we're talking about graphics that can be scaled to any size without affecting the quality of the artwork because evey time you move, scale or rotate it, the software will re-calculate that shape and draw it again on the screen. So unlike "Bitmap" (or, "Raster") software, instead of drawing a shape by filling pixels with colors, a vector software creates a mathematical equation to represent that object through points with X and Y coordinates. In raster software, if you try to scale that object, it will have to scale the pixel data which will cause the object to loose sharpness, becoming blurry and distorted. In vector software, if you try to scale that object, it will "move" the points around according to the scale command and then connect them back so you have the same shape at a larger size. Only then it will create a pixel representation of the object. It pretty much "re-draws" the shapes instead of "zooming in", which is what a raster software would do, in very basic terms. This is easy to understand by, in AD, in the Pixel Persona, using the Elliptical Marquee tool to draw a circle. Let's say, 40x40 pixels. Now fill it with color, if you select it and use the transform handles to scale it to say 800x800, you will see it is not perfectly round, there are jagged edges. These edges are the original pixels that now you have scaled. However if you do the same in the Vector Persona using the Elliptic Tool, no matter how much you stretch the circle it will not show jagged edges because you are not scaling pixels, you're scaling the points that make up the instructions to build that circle. Makes sense?
-
I'm not saying you're lazy at all. You can use the Help menu to read the manual and search for the tools you have doubts about. Or, you could search for "Noise Affinity Designer" in Youtube and find this tutorial - https://www.youtube.com/watch?v=NM6N9zyAXvI Or this one about brushes, textures, and color blending modes which are used for the gas clouds in the PS tutorial - https://www.youtube.com/watch?v=AlX6_MWE56Q (this one also shows the FX layer panel where you can find the Blur effect) As I said, "noise", "texture", "brushes" are tools and methods of doing things that are present in most design tools. If you're unfamiliar with Affinity Designer take some time to watch tutorials about it so you can learn where the features are. Then when you watch the Photoshop tutorials you'll already know where to find those features :)
- 8 replies
-
- 1
-
-
- starry sky
- night sky
- (and 4 more)
-
You can either do it by painting it with brushes or making vector stars and duplicating them many, many times then using vector shapes with layer effects (outer glow, inner glow) and overlay mode to make the glas clouds. The thing about any graphic design tool is that you understand the concept (the method) and not memorize the steps to replicate it, so that even if you watch a PS tutorial you can use the method in your AD work.