user_0815
-
Posts
242 -
Joined
-
Last visited
Everything posted by user_0815
-
I've been working with the magic mouse since it came out and find it better than other mice. I don't have any issues with unintended movements as you describe it. Do you mean that there is a movement when you click? From my point of view it would be worth giving it a try because it improved my editing workflow being able to scroll in any direction without modifier key. If you prefer to zoom by scrolling, that's not possible with this mouse as MEB said.
-
Füllung ist im Menü "Bearbeiten" > "Füllung..." (F5) oder mit Primär/Sekundärfarbe füllen. (Mac) Für die letzteren beiden ist kein Tastatur-Kurzbefehl festgelegt, den müsste man wahrscheinlich selbst festlegen. Umrandung ist im Menü "Auswählen" ganz unten "Umrandung". ---------------------- EN Fill is in the menu Edit > Fill... (Mac) there is no keyboard shortcut by default afaik. Contour around the selection is in the menu Select way down the second last. (I don't know the english translation for that menu item.)
-
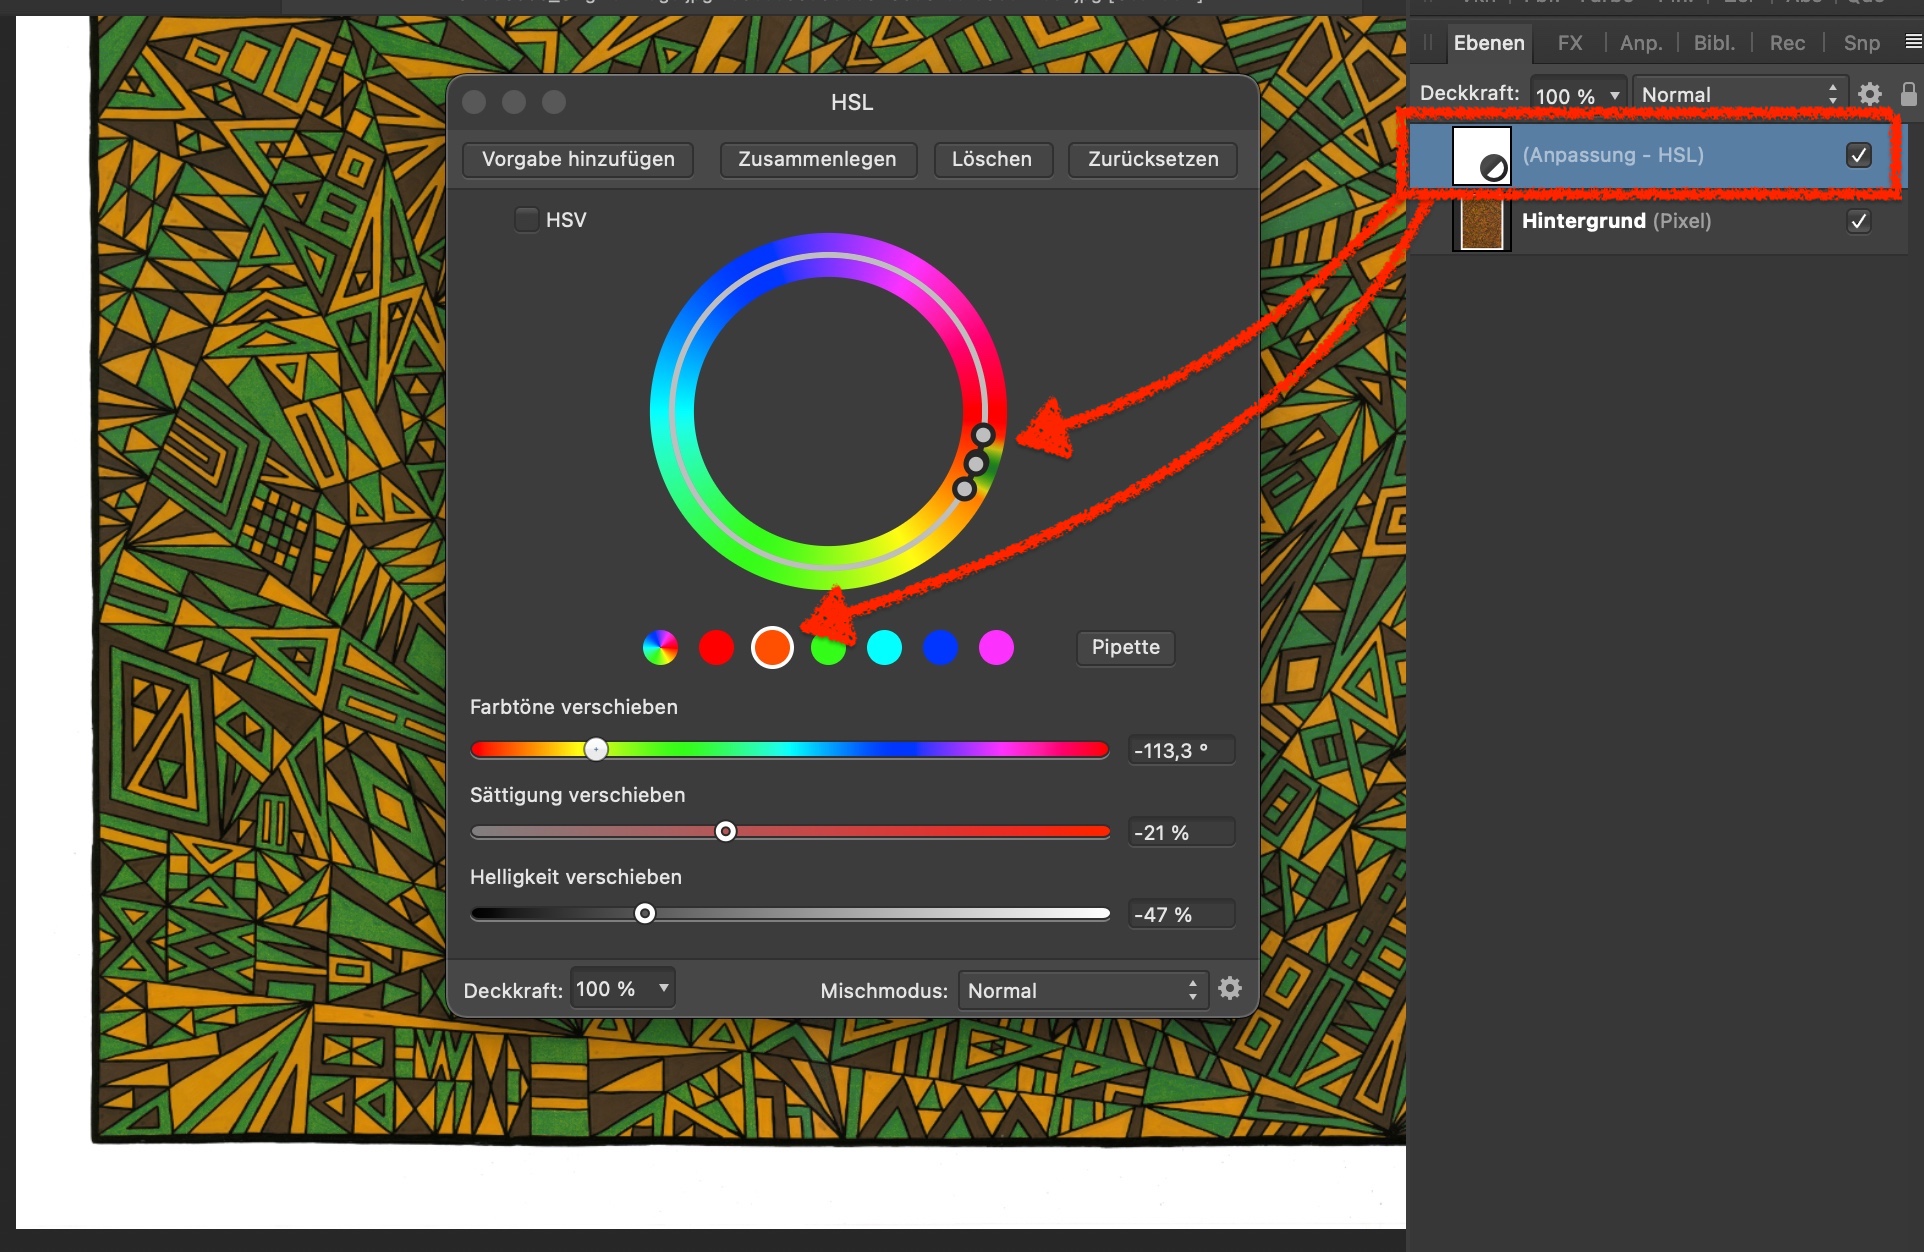
Garrys approach is intersting, I didn't know that this tool was colour aware. My approach would be to use the HSL tool and target the colour you want to change. You can target a very specific colour by moving those round handles on the colour wheel. You'll have to narrow it way down because the orange is very close to the yellow. I have pushed the handles as close as possible. The yellow is still affected very slightly. Perhaps it still meets your expectation. 1. Open a HSL adjustment layer 2. Click on one of the colours and make a random extreme adjustment, for example brightness all up (to see on what colour it is applied) 3. Push the handles form both ends all the way together. 4. Now grab one of the outer handles to move the target colour until it changes just that colour you want to change. HSL.mov

-
Tldr; the text is a bit too small on iPhone. It's rather hard to read. When rotating to horizontal, the lines get longer but front size remains small. The text size is not adjustable via the dynamic text size adjustment which can be set in the system settings app.
-
A selection can be moved if you are (or switch to) the rectangular or elliptical selection tool. Keyboard shortcut L. Just drag the selection. With the move tool, the selection will also drag the underlying pixel content (instead of moving just the selection itself).
-
Making a cut-out
user_0815 replied to jasd's topic in Pre-V2 Archive of Affinity on Desktop Questions (macOS and Windows)
IIRC the layer from where you want to copy the selection needs to be a (Pixel) layer but not an (Image) layer. Rasterise it before copying. -
Hi, in Photo (1.9.2) I have placed a raw file in to an aphoto document and have it linked instead of embedded. In the layers panel it shows up as a pixel layer and I can edit it as usual. Does Photo actually use the raw data for processing adjustments or does it convert it to a different format in the background? Is there any benefit or downside to placing raw files like that? From a workflow perspective I could skip the step of making a tif file before placing it in the document, or not?
-
Univers is indeed one of the beautiful ones. Also Frutiger is a classic. What I discovered a while back are the two similar ones "TT Interphases" and "Inter". Both of them were developed to be good on screens as an average design of good modern fonts iirc. I use Inter for a lot of things including print. It looks similar to Apple's system font San Francisco. But it might need manual letter spacing to look attractive in some situations.
-
That looks good. May I ask how you added those shadows that go over the logo?
-
RAW Datei
user_0815 replied to Alex Sportmaus's topic in Pre-V2 Archive of Affinity on Desktop Questions (macOS and Windows)
Menü "Affinity Photo" > "Einstellungen" Oder cmd + ;
-
You can adjust the image compression for smaller file sizes. In the export settings (for example press ready), click on "More" at the bottom. There is an option to adjust the "JPEG compression". Reduce the "Quality" until you get the file size you need. Rule of thumb it shouldn't go below 70 because the image quality could degrade visibly.
-
RAW Import
user_0815 replied to Marv Sanchez's topic in Pre-V2 Archive of Affinity on Desktop Questions (macOS and Windows)
Every RAW converter interprets RAW files differently. RAW files are not finished images but just raw data. Different apps show more or less different results because they have to interpret the raw data as a preview how they think the image should look until you save it as an image file (tif, jpeg...). How the result looks depends on how the developers of the app (LR, C1, Photo...) programmed the support for your camera's raw files. If Photo shows a result that is drastically different as others, perhaps the files of the Canon RP aren't supported yet or not in a way that looks pleasing. There must be a list of supported cameras somewhere. What you can do now is adjust the exposure, contrast, saturation etc to your liking and save it as a preset. If it looks just dull, it might be sufficient to make a slight s-curve in the "Tones" panel and save just that curve as a preset. You can then apply that preset for every raw file you open. -
eraser tool
user_0815 replied to dizeyner's topic in Pre-V2 Archive of Affinity on Desktop Questions (macOS and Windows)
Draw with the vector brush and set it's blend mode to erase. If you have a lot to erase, make a group and set only the group to erase. That way, every new curve within the group will erase (without having to set each curve indivudally to erase). erase.mov -
I think the PNG needs the whites to be transparency. (Black & transparent instead of black & white)
-
Layer opacity vs. fill
user_0815 replied to mso1977's topic in Feedback for Affinity Photo V1 on Desktop
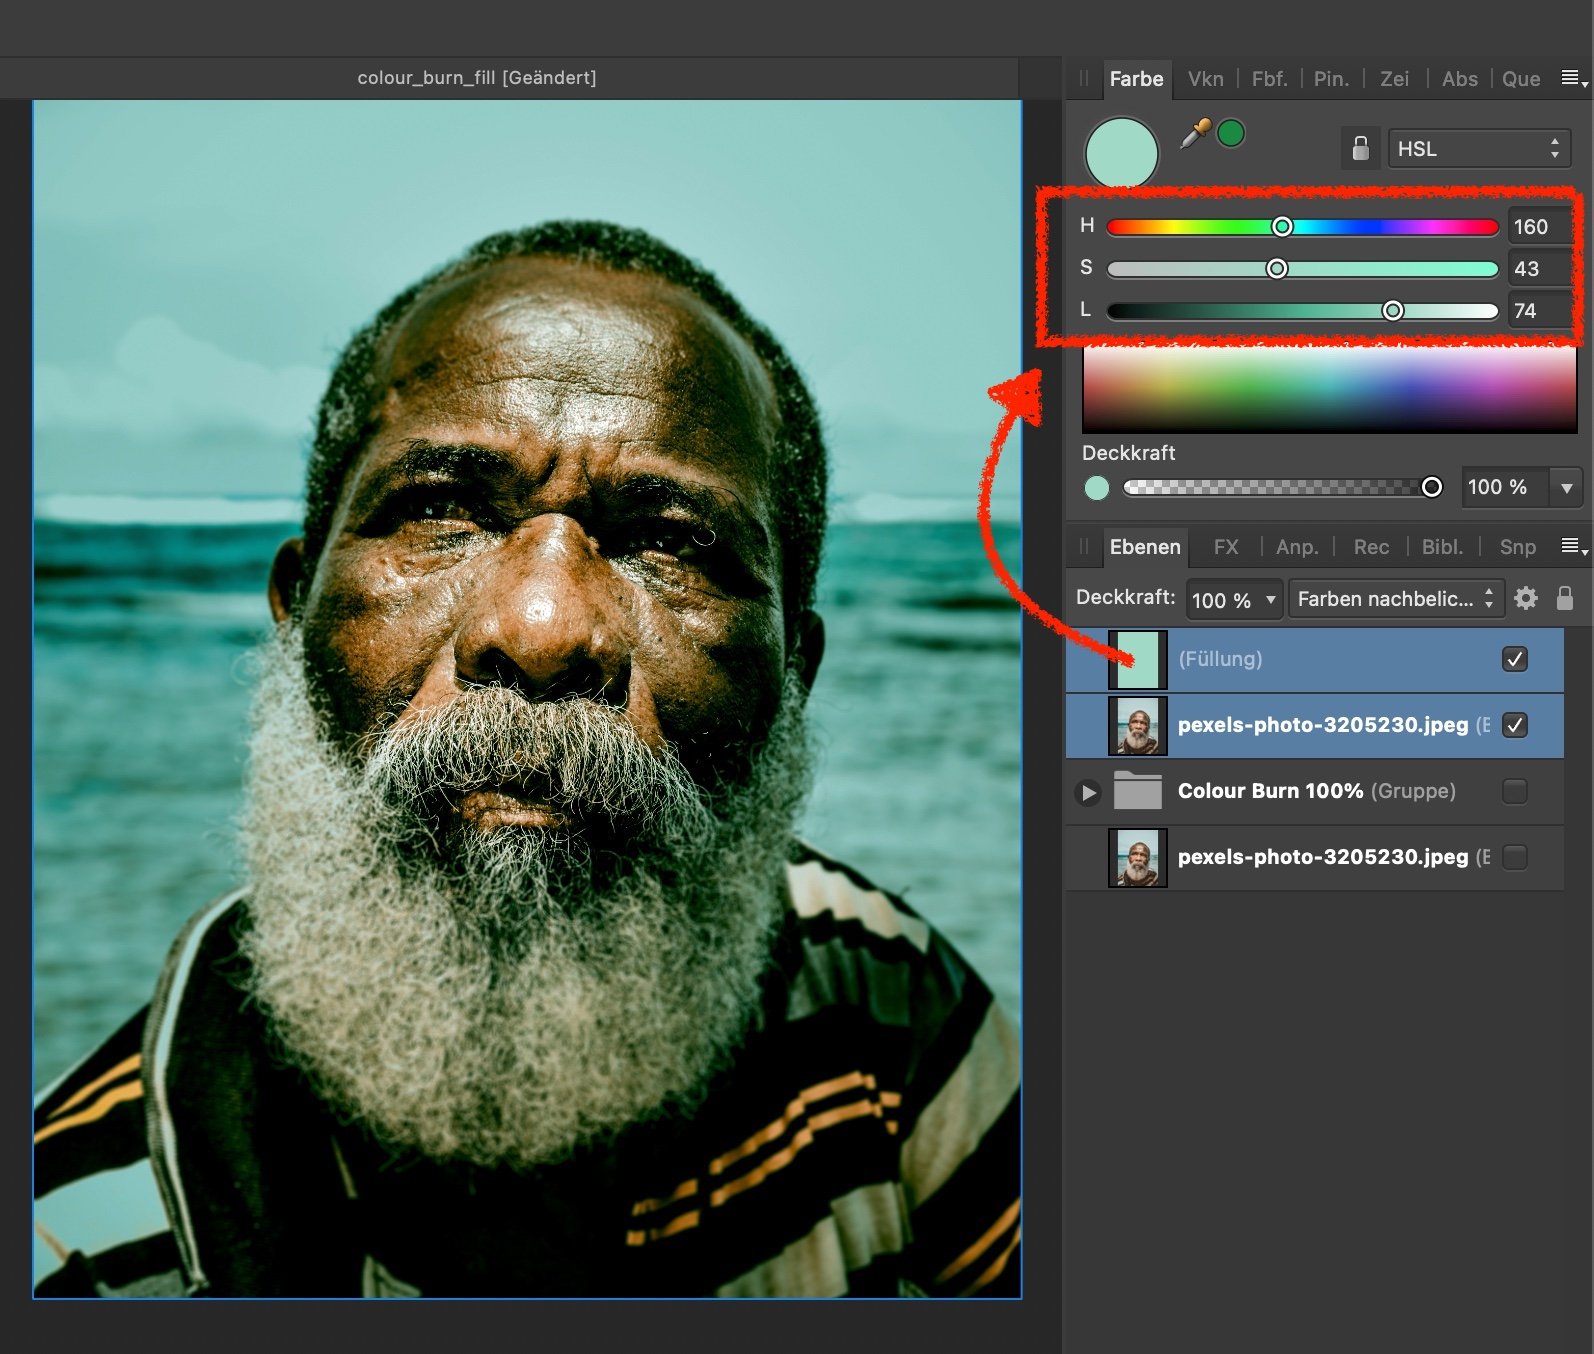
Mixing that colour layer and the white layer can be achieved by using HSL directly at the colour layer. Adjust via the Saturation and Lightness slider. No need of the white layer. Same result (at least as far as I have tested). For the dark ones just move the L slider to the dark side (instead of mixing it with a black layer).
-
You can do both. When you use the crop tool, there will be a default crop-frame that you can adjust. But you can also just click-and-drag anywhere and the crop-frame will be that selected area.
-
JGP Export --> Filesize Limit
user_0815 replied to davengel's topic in Feedback for Affinity Photo V1 on Desktop
Setting a limit isn't possible as far as I know. I adjust the quality slider to get the required file size before exporting. You can also klick in to the numbers field and use the arrow up/down keys for adjusting the quality.
-
Afaik leading can be set both in the Character and the Paragraph panel. Try setting it to "Auto" and "Standard". These settings are able to override each other. Perhaps that is the cause.
-
How do I copy a layer mask easily
user_0815 replied to Jowday's topic in Feedback for Affinity Photo V1 on Desktop
Drag & drop on to the "Links" panel (View > Studio > Links). James has a good tutorial somewhere where he presents the new features. Still a multi-step-process, so no solution for your original question. Unless you keep the "Links" panel open, then it's just one drag. I haven't had the time to try it in detail but I like the concept. Linked_Layers.mov -
How do I copy a layer mask easily
user_0815 replied to Jowday's topic in Feedback for Affinity Photo V1 on Desktop
Ok then. I thought you needed a hand. -
How do I copy a layer mask easily
user_0815 replied to Jowday's topic in Feedback for Affinity Photo V1 on Desktop
Duplicate and drag the mask layer. Alternatively, the way I do it: 1. CMD/CTRL-click on the mask 2. Add a mask layer or adjustment layer while selection is active This will add an exact copy of your mask, no matter whether you use the built-in masks or separate masking layers. Mask Duplicate .mov Mask 1.mov Adjustment with mask.mov -
The quickest and easiest way would be to brush over the edges of the live filter layer with a large soft black brush. This will mask the edges out with a gradient. This is the same logic as GarryP posted but a different way of doing it.
-
When picking the colour, you can see the picked colour in that small circle next to the picker icon (right side). Click on it to apply it.
-
"Global" does not mean globally available in the app and all documents. That would be the Application Palette. Application palette = always available in the app (any document you open) Document palette = Available only in that one document where the palette lives Global colour = If you change that global colour, every element which uses that global colour gets updated with that change. Afaik this is on a per-document level.
-
You can also press ESC or add a new layer to start a new line. Or do anything that de-selects the current curve layer. This will make the app start a new line (on a new layer).